2016 MERCEDES-BENZ B-Class ELECTRIC center console
[x] Cancel search: center consolePage 197 of 342

Settings menu
Introduction
Depending on the equipment installed in the
vehicle, in the Sett.
menu you have the fol-
lowing options:
RChanging the E-CELL settings
RChanging the instrument cluster settings
RChanging the light settings
RChanging the vehicle settings
RRestoring the factory settings
E‑CELL menu
Departure time
In the E-CELL
menu you can choose to cool
down or heat the vehicle interior for a prede- fined departure time.
If you have engaged Pand the charging cable
is connected, the on-board computer dis-
plays:
Rthe expected charge time of the high-volt-
age battery or
Rthe RANGE PLUS condition of charge for
the departure time set
Changing the departure time
XPress the =or; button on the steer-
ing wheel to select the Settings
menu.
XPress9or: on the steering wheel
to select the E‑CELL
menu.
XPress9or: to select Depart.
Time.
XPressato confirm.
You will see the selected setting.
XPress the :or9 button to select A,B
or Change C.
XPress ato confirm.
XPress =or; to select Depart.
Time Hours.
XPress the 9or: button to set the
hour.
XPress =or; to select Depart.
Time Minutes.
XPress9or: to set the minutes.
XPress ato confirm.
After changing from one menu to another,
the departure time setting is stored.
Selecting the departure time
XPress the =or; button on the steer-
ing wheel to select the Settings
menu.
XPress9or: on the steering wheel
to select the E‑CELL
menu.
XPress9or: to select Depart.
Time.
XPressato confirm.
XPress the :or9 button to select
one of the three departure times or Timer
Off(no timer active).
XPressato confirm.
Charging with RANGE PLUS
If you have engaged Pand the charging cable
is connected, the on-board computer dis-
plays:
Rthe expected charge time of the high-volt-
age battery or
Rthe RANGE PLUS condition of charge for
the departure time set
RANGE PLUS charges when:
Ryou have activated RANGE PLUS via the
center console prior to charging and
Rthe high-voltage battery is fully charged
If charging is not complete by departure time,
the maximum range will notbe available.
Menus and submenus195
On-board computer and displays
Z
Page 214 of 342

Display messagesPossible causes/consequences andMSolutions
Front Passenger
Airbag Disabled
SeeOperator'sMan‐
ual
The front-passenger air bag is deactivated during the journey, even
though:
Ran adult
or
Ra person of the corresponding stature is on the front-passenger
seat
If additional forces are applied to the seat, the system may inter-
pret the occupant's weight as lower than it actually is.
GWARNING
The front-passenger air bag does not deploy during an accident.
There is an increased risk of injury.
XPull over and stop the vehicle safely as soon as possible, paying
attention to road and traffic conditions.
XSecur eth e vehicle against rolling away (Ypage 153).
XSwitc hth e ignition off.
XHave the occupant get out of the vehicle.
XKeep the seat unoccupied, close the front-passenger door and
switch on the ignition.
XObserve thePASSENGER AI RBA G indicator lamps in the center
console and th e multifunction display and check the following:
Seat unoccupied and ignition switched on:
Ra self-diagnosis is carried out. The PASSENGER AIR BAG OFF
and PASSENGER AI RBA G ON indicator lamps must light up
simultaneously for approximately six seconds
Rth ePASSENGER AI RBA G OFF indicator lamp must then light
up and remain lit after the self-diagnosis. If the indicator lamp
is on, OCS (Occupant Classification System) has disabled the
front-passenger front air bag (
Ypage 50)
Rth eFront Passenger Air Bag Enabled See Opera‐
tor's Manualor Front Passenger Air Bag Disabled
See Operator's Manualdisplay messages must not be
shown in the multifunction display
XWait fo raperiod of at least 60 seconds until the necessary sys-
te m checks have been completed.
XMake sure that the display messages do not appear in the mul-
tifunction display.
If these conditions are fulfilled, the front-passenger seat can be
occupied again. Whether the PASSENGER AIRBA G OFF or ON
indicator lamp remains lit or goes out depends on how OCS clas-
sifies the occupant.
212Display messages
On-board computer and displays
Page 215 of 342

Display messagesPossible causes/consequences andMSolutions
If the conditions are not fulfilled, the system is not operating cor-
rectly.
XVisit a qualified specialist workshop immediately.
Fo r further information about the Occupant Classification System,
see (
Ypage 50).
Front Passenger
AirbagEnabledSee
Operator's Manual
The front-passenger air bag is enabled during the journey, even
though:
Ra child, a small adult or an object weighing less than the sys-
tem' s weight threshold is located on the front-passenger seat
or
Rth e front-passenger seat is unoccupied
The system may detect objects or forces applying additional
weight on the seat.
GWARNING
The air bag may deploy unintentionally.
There is an increased risk of injury.
XPull over and stop the vehicle safely as soon as possible, paying
attention to road and traffic conditions.
XSecur eth e vehicle against rolling away (Ypage 153).
XSwitc hth e ignition off.
XOpen the front-passenger door.
XRemove th e child and the child restraint system from the front-
passenger seat.
XMake sure that there are no objects on the seat adding to the
weight.
The system may otherwise detect the additional weight and
interpret the seat occupant's weight as greater than it actually
is.
XKeep the seat unoccupied, close the front-passenger door and
switch on the ignition.
XObserve thePASSENGER AI RBA G indicator lamps in the center
console and th e multifunction display and check the following:
Se at unoccupied and ignition switched on:
Ra self-diagnosis is carried out. The PASSENGER AIR BAG OFF
and PASSENGER AI RBA G ON indicator lamps must light up
simultaneously for approximately six seconds
Rth ePASSENGER AI RBA G OFF indicator lamp must then light
up and remain lit after the self-diagnosis. If the indicator lamp
Display messages21 3
On-board computer and displays
Z
Page 245 of 342

RAlways stow objects so that they cannot be
thrown around in such situations.
RAlways make sure that objects do not pro-
trude from stowage spaces, parcel nets or
stowage nets.
RClose the lockable stowage spaces before
starting a journey.
RStow and secure objects that are heavy,
hard, pointed, sharp-edged, fragile or too
large in the cargo compartment.
Observe the loading guidelines (Ypage 242).
Stowage compartments in the front
Glove box
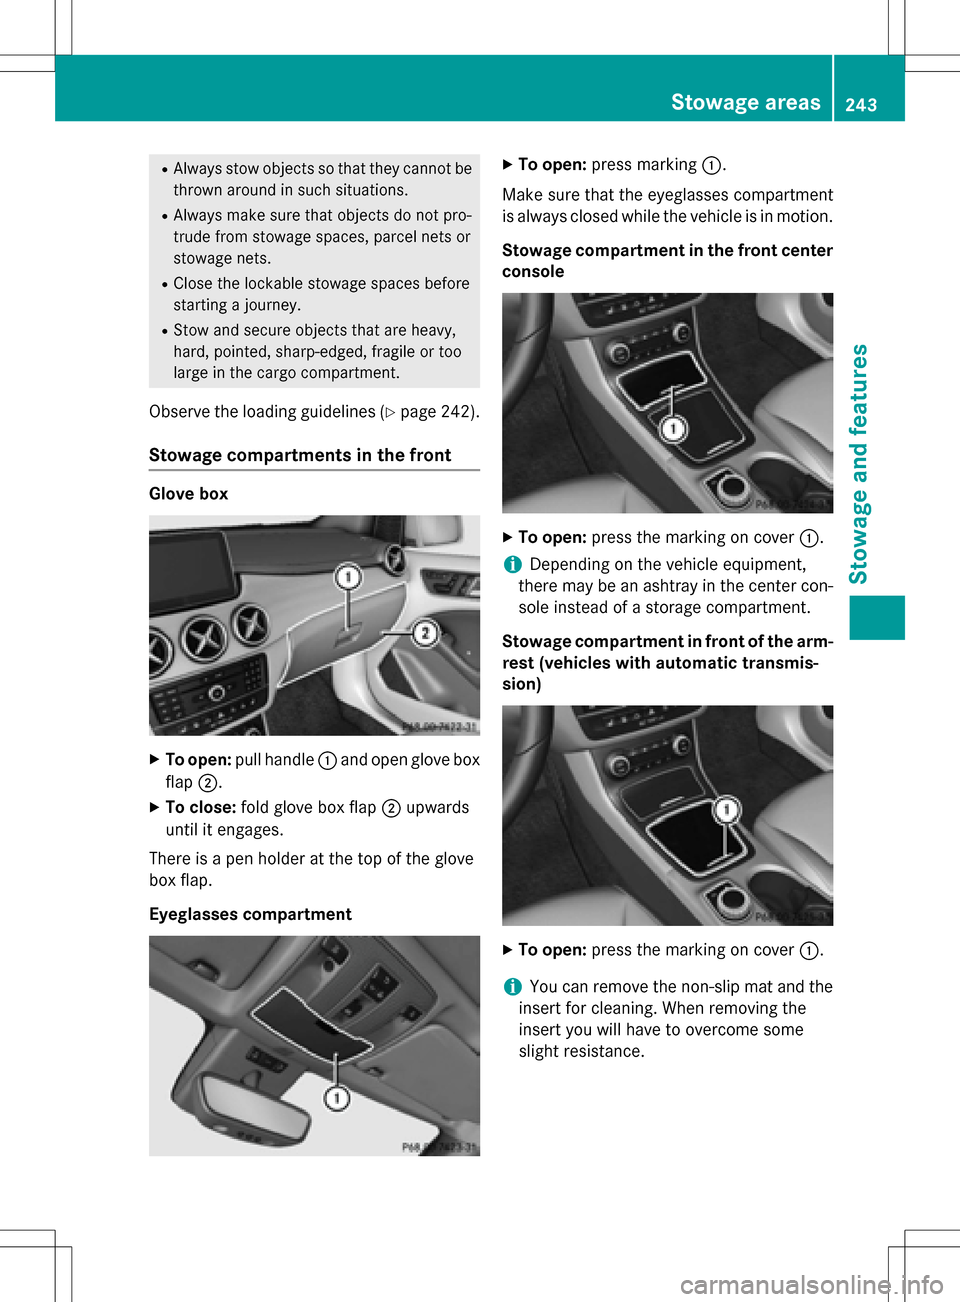
XTo open: pull handle :and open glove box
flap ;.
XTo close: fold glove box flap ;upwards
until it engages.
There is a pen holder at the top of the glove
box flap.
Eyeglasses compartment
XTo open: press marking :.
Make sure that the eyeglasses compartment
is always closed while the vehicle is in motion.
Stowage compartment in the front center
console
XTo open: press the marking on cover :.
iDepending on the vehicle equipment,
there may be an ashtray in the center con-
sole instead of a storage compartment.
Stowage compartment in front of the arm-
rest (vehicles with automatic transmis-
sion)
XTo open: press the marking on cover :.
iYou can remove the non-slip mat and the
insert for cleaning. When removing the
insert you will have to overcome some
slight resistance.
Stowage areas243
Stowage and features
Z
Page 246 of 342

Stowage compartment under the armrest
XTo open:on vehicles with movable armr-
ests, make sure that the armrest is in the
rearmost position.
XPress button :and fold the armrest up.
Depending on the vehicle equipment, the
armrest can be moved backwards or forwards
in a longitudinal direction.
Depending on the vehicle's equipment, the
following may be in the stowage compart-
ment: a multimedia connector unit with an SD
card slot and 2 USB ports, e.g. for use with an
iPod
®, iPhone®or MP3 player; see the sepa-
rate operating instructions.
Stowage compartment under the driver's
seat and front-passenger seat
GWARNING
If you exceed the maximum load for the stow- age compartment, the cover may not be able
to restrain the items. Items may be thrown out
of the stowage compartment and hit vehicle
occupants. There is a risk of injury, particu-
larly in the event of sudden braking or a sud-
den change in direction.
Never exceed the maximum permissible load
for the stowage compartment. Stow and
secure heavy objects in the cargo compart-
ment.
The maximum permissible load of the stow-
age compartment is 2.6 lbs (1.5 kg).
XTo open: pull handle :up and fold
cover ;forwards.
Stowage space in the rear
Stowage compartment in the rear center
console
XTo open: pull down the top of stowage
compartment :by the edge of the handle.
iDepending on the vehicle's equipment,
there may be an open stowage space above the stowage compartment.
Folding table
GWARNING
If the folding table is folded out while the vehi-
cle is in motion, passengers can be thrown
against it, particularly in the event of an acci-
dent, heavy braking or a sudden change of
direction. There is a risk of injury.
Fold the folding table away before each jour-
ney.
244Stowage areas
Stowage and features
Page 254 of 342

There is a risk of injury, particularly in the
event of sudden braking or a sudden change
in direction.
RAlways stow objects so that they cannot be
thrown around in such situations.
RAlways make sure that objects do not pro-
trude from stowage spaces, parcel nets or
stowage nets.
RClose the lockable stowage spaces before
starting a journey.
RStow and secure objects that are heavy,
hard, pointed, sharp-edged, fragile or too
large in the cargo compartment.
!Only use the cup holders for containers of
the right size and which have lids. The
drinks could otherwise spill.
Observe the loading guidelines (
Ypage 242).
The stowage compartments in the doors pro-
vide space for bottles:
Rfront: capacity up to 51 fl. oz. (1.5 l)
Rrear: capacity up to 17 fl. oz. (0.5 l)
Cup holder in the front-compartment
center console
The cup holder and the rubber mat under-
neath can be removed for cleaning. Clean
them with clean, lukewarm water only.
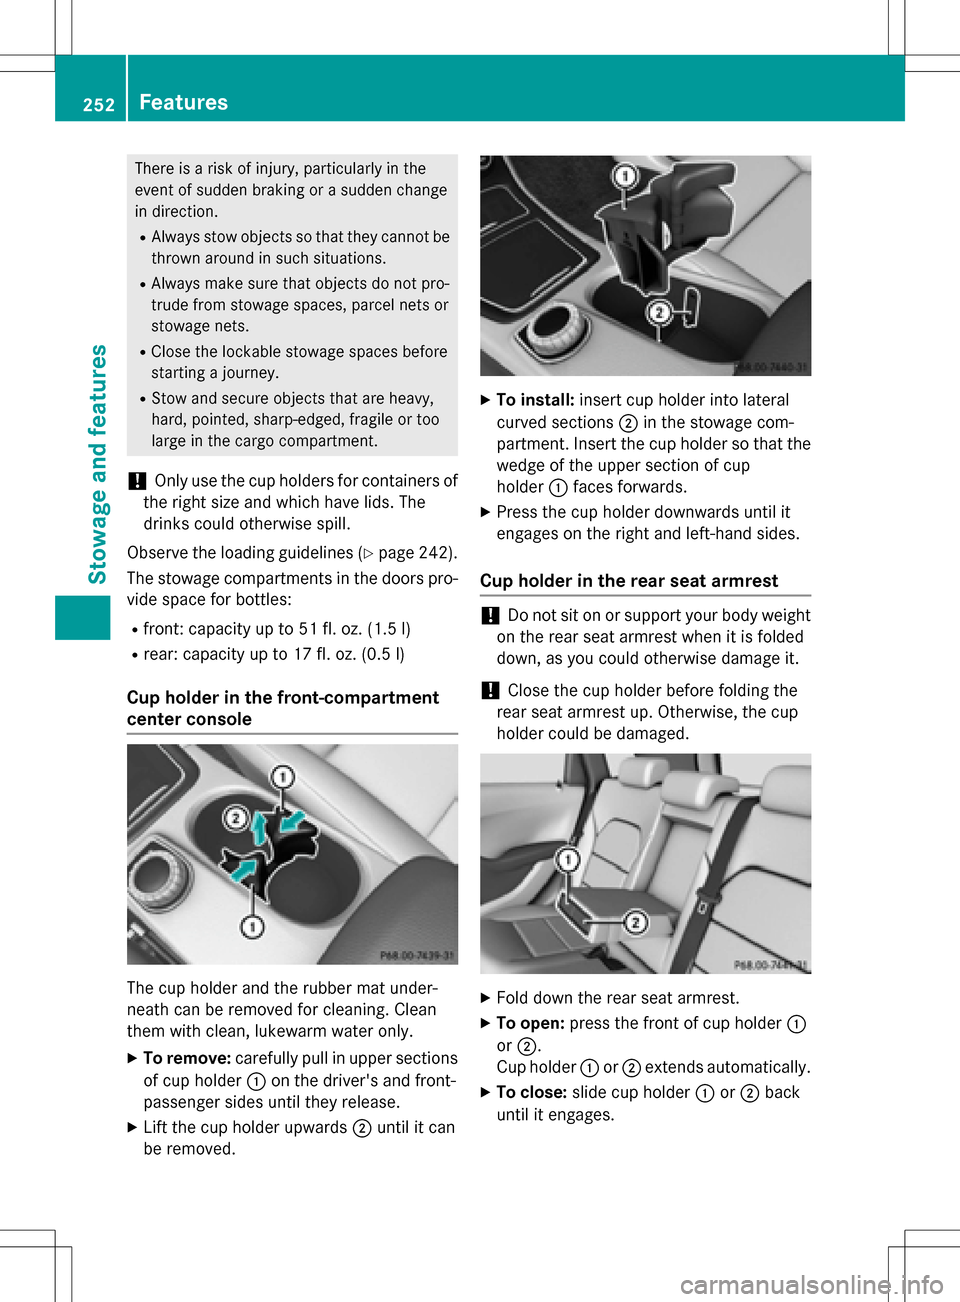
XTo remove:carefully pull in upper sections
of cup holder :on the driver's and front-
passenger sides until they release.
XLift the cup holder upwards ;until it can
be removed.
XTo install: insert cup holder into lateral
curved sections ;in the stowage com-
partment. Insert the cup holder so that the wedge of the upper section of cup
holder :faces forwards.
XPress the cup holder downwards until it
engages on the right and left-hand sides.
Cup holder in the rear seat armrest
!Do not sit on or support your body weight
on the rear seat armrest when it is folded
down, as you could otherwise damage it.
!Close the cup holder before folding the
rear seat armrest up. Otherwise, the cup
holder could be damaged.
XFold down the rear seat armrest.
XTo open: press the front of cup holder :
or ;.
Cup holder :or; extends automatically.
XTo close: slide cup holder :or; back
until it engages.
252Features
Stowage and features
Page 256 of 342

Cigarette lighter
GWARNING
You can burn yourself if you touch the hot
heating element or the socket of the cigarette lighter.
In addition, flammable materials can ignite if:
Rthe hot cigarette lighter falls
Ra child holds the hot cigarette lighter to
objects, for example
There is a risk of fire and injury.
Always hold the cigarette lighter by the knob.
Always make sure that the cigarette lighter is
out of reach of children. Never leave children
unsupervised in the vehicle.
Your attention must always be focused on the
traffic conditions. Only use the cigarette
lighter when road and traffic conditions per-
mit.
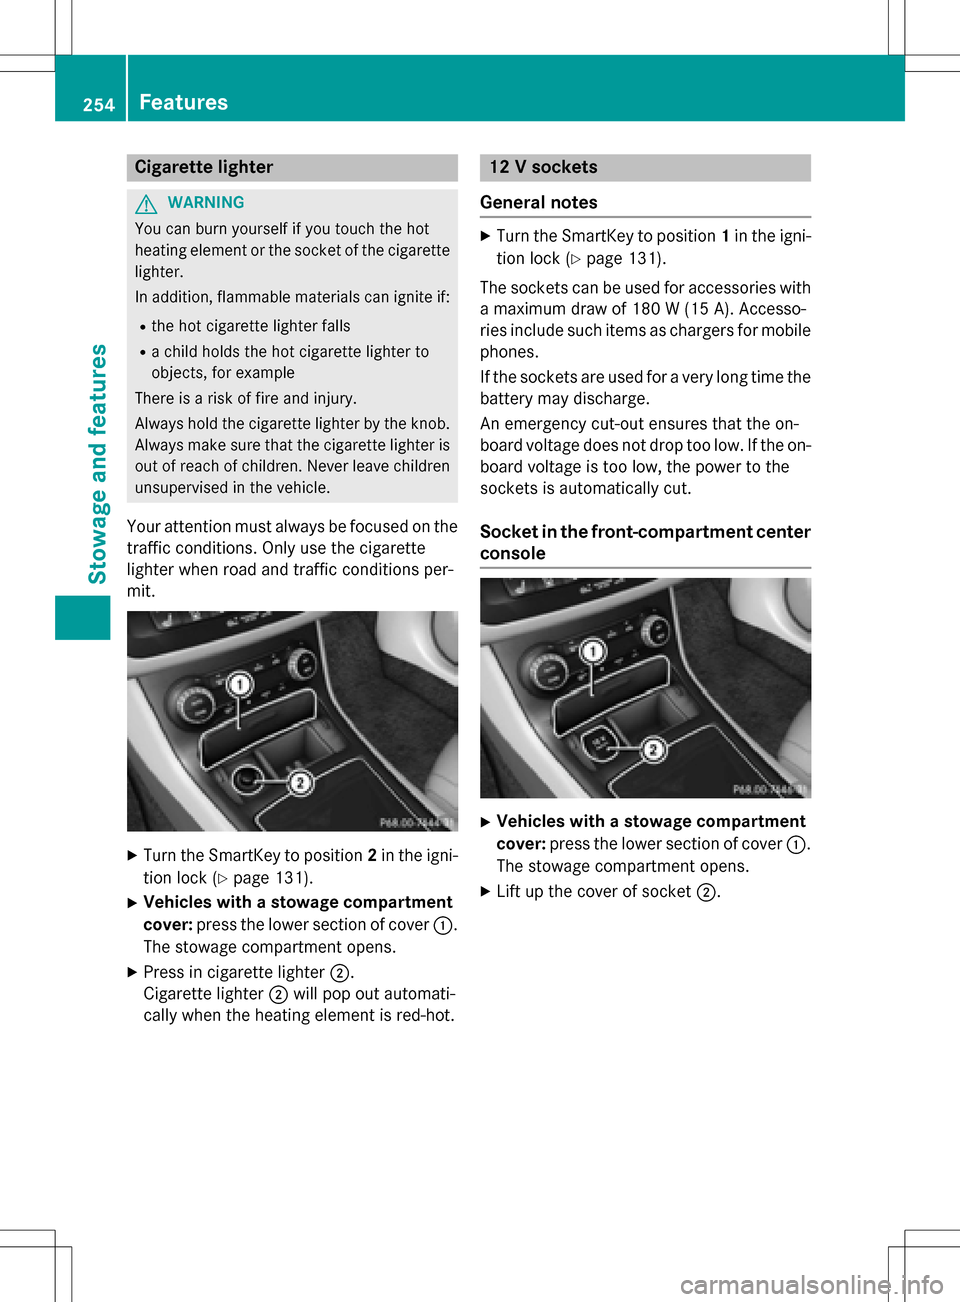
XTurn the SmartKey to position 2in the igni-
tion lock (
Ypage 131).
XVehicles with a stowage compartment
cover: press the lower section of cover :.
The stowage compartment opens.
XPress in cigarette lighter ;.
Cigarette lighter ;will pop out automati-
cally when the heating element is red-hot.
12 V sockets
General notes
XTurn the SmartKey to position 1in the igni-
tion lock (
Ypage 131).
The sockets can be used for accessories with a maximum draw of 180 W (15A). Accesso-
ries include such items as chargers for mobile
phones.
If th e sockets are used foravery long time the
battery may discharge.
An emergency cut-out ensures that the on-
board voltage does not drop too low. If the on-
board voltage is too low, the power to the
sockets is automatically cut.
Socket in the front-compartment center
console
XVehicles with a stowage compartment
cover: press the lower section of cover :.
The stowage compartment opens.
XLift up the cover of socket ;.
254Features
Stowageand features
Page 257 of 342

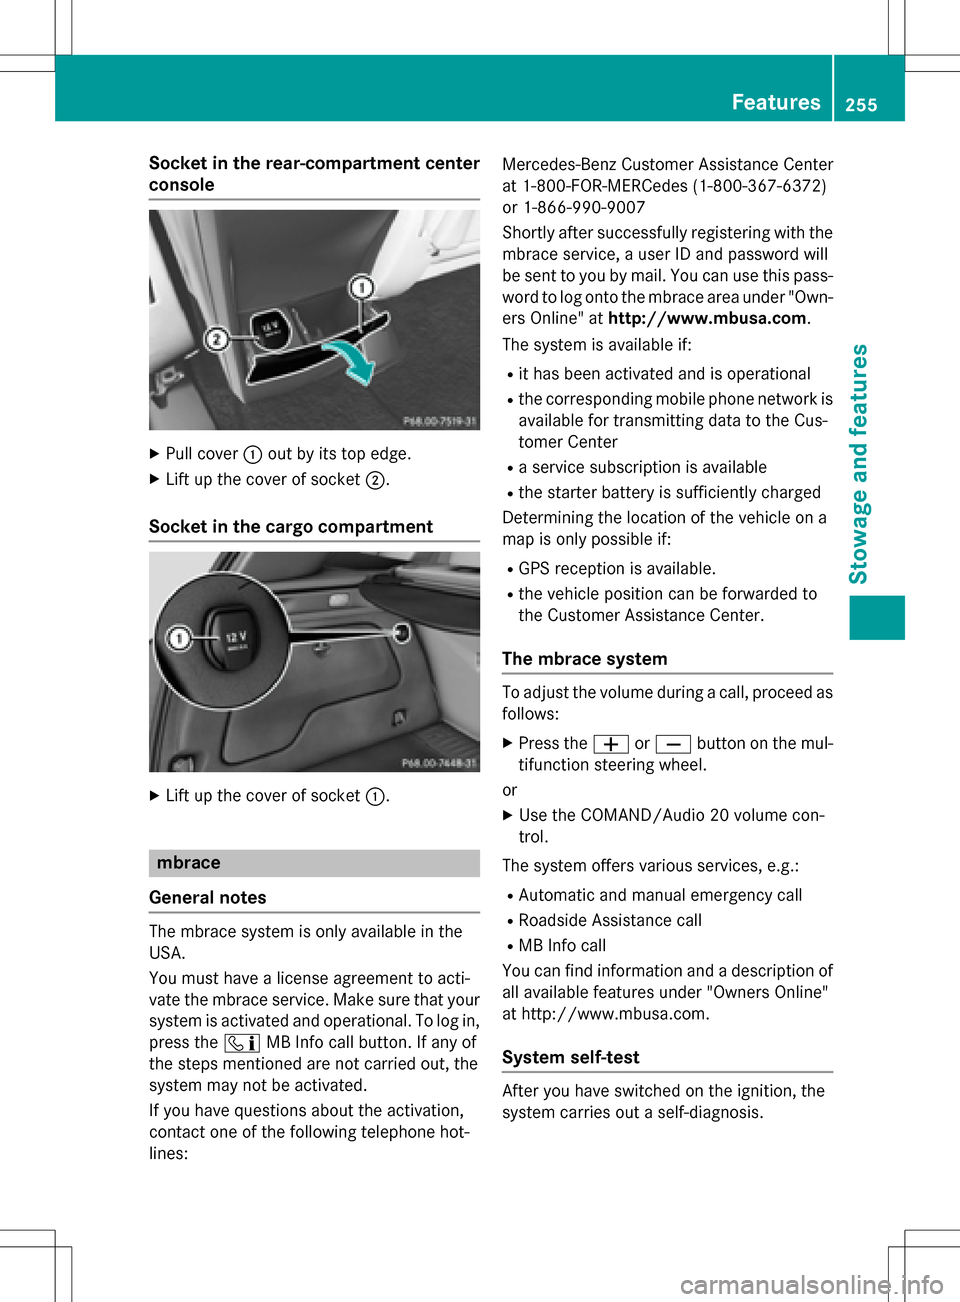
Socket in the rear-compartment center
console
XPull cover:out by its top edge.
XLift up the cover of socket ;.
Socket in the cargo compartment
XLift up the cover of socket :.
mbrace
General notes
The mbrace system is only available in the
USA.
You must have a license agreement to acti-
vate the mbrace service. Make sure that your system is activated and operational. To log in,
press the ïMB Info call button. If any of
the steps mentioned are not carried out, the
system may not be activated.
If you have questions about the activation,
contact one of the following telephone hot-
lines: Mercedes-Benz Customer Assistance Center
at 1-800-FOR-MERCedes (1-800-367-6372)
or 1-866-990-9007
Shortly after successfully registering with the
mbrace service, a user ID and password will
be sent to you by mail. You can use this pass-
word to log onto the mbrace area under "Own-
ers Online" at
http://www.mbusa.com.
The system is available if:
Rit has been activated and is operational
Rthe corresponding mobile phone network is
available for transmitting data to the Cus-
tomer Center
Ra service subscription is available
Rthe starter battery is sufficiently charged
Determining the location of the vehicle on a
map is only possible if:
RGPS reception is available.
Rthe vehicle position can be forwarded to
the Customer Assistance Center.
The mbrace system
To adjust the volume during a call, proceed as
follows:
XPress the WorX button on the mul-
tifunction steering wheel.
or
XUse the COMAND/Audio 20 volume con-
trol.
The system offers various services, e.g.:
RAutomatic and manual emergency call
RRoadside Assistance call
RMB Info call
You can find information and a description of
all available features under "Owners Online"
at http://www.mbusa.com.
System self-test
After you have switched on the ignition, the
system carries out a self-diagnosis.
Features255
Stowage and features
Z