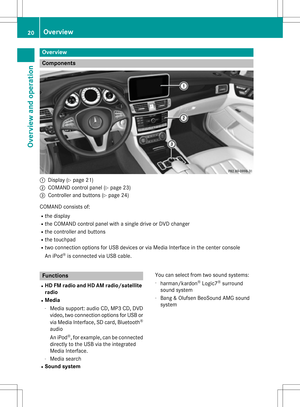
Page 145 of 246

XDisplay the message (Ypage 140).
XTo call up a menu: press the controller.
XTo selectReply: turn and press the con-
troller.
The e-mail input menu appears. The
addressee's details are automatically filled
in using the details in the original message.
When replying to an e-mail, you can also
select Reply
toAllinstead of Reply. In this
case, the reply is sent not just to the sender
but to all those who received the original mes- sage.
Forwarding an e-mail
Observe the requirements for the message
function (
Ypage 138).
XDisplay the message (Ypage 140).
XTo call up a menu: press the controller.
XTo select Forward: turn and press the con-
troller.
The input menu appears. The subject line is automatically filled in with the same details
as those in the original message.
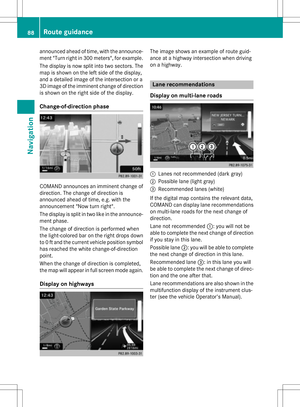
Text templates
Using text templates
:Displays text templates
XSelect the input line for a text message
(
Ypage 141) or e-mail (Ypage 142).
XTo select text templates :in the character
bar: turn and press the controller.
The text templates are displayed.
XTo select and insert a text template: turn
and press the controller.
The text template is inserted into the text
message or e-mail.
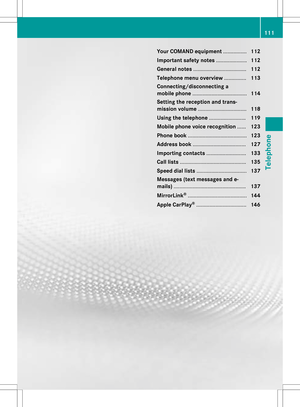
Editing text templates
:Displays text templates
XSelect the input line for a text message
(
Ypage 141) or e-mail (Ypage 142).
XTo select text templates :in the character
bar: turn and press the controller.
The text templates are displayed.
XTo highlight the text template to be edited: turn the controller.
XTo select G: slide 9the controller.
XTo select Edit: turn and press the control-
ler.
The text template is displayed in an input
line.
XEnter characters using the controller
(
Ypage 33) or the number keypad.
XTo adopt changes to the text template,
select ¬: turn and press the controller.
The text template has been changed.
Messages (text messages and e-mails)143
Telephone
Z
Page 146 of 246

Calling a text message sender
XDisplay the message (Ypage 140).
XTo call up a menu: press the controller.
XTo selectCallSender: turn and press the
controller.
The call is made.
Using a phone number in the text
Numbers in text messages that are highligh-
ted can be used.
XTo select a usable telephone number while
the message is displayed: turn the control-
ler.
XTo select Use: press the controller.
XTo selectCall: turn and press the control-
ler.
The call is made.
iIt is possible that a highlighted numerical
sequence may not contain a telephone
number.
iYou can use the "New entry" or "Add no."
functions to save this telephone number or
to add it to an existing entry.
Storing sender as a new contact
Storing the sender of a text message
XTo call up the menu when a text message is displayed: press the controller.
XTo select SaveNumber: turn and press the
controller.
XSelect a number category, e.g. Home.
XSelect a telephone category, e.g. Mobile
Phone.
XSelectContinue.
The input line for the name of the new con-
tact is displayed. The input line for the tele-
phone number is filled in automatically.
XEnter characters using the controller
(
Ypage 33) or the number keypad.
XTo finish the entry: select OK.
The new contact has been created.
Saving the sender of an e-mail
XTo call up the menu when an e-mail is dis-
played: press the controller.
XTo select Save Sender's E-Mail
Address: turn and press the controller.
The input line for the name of the new con-
tact is displayed. The input line for the e-
mail address is filled in automatically.
XEnter characters using the controller
(
Ypage 33) or the number keypad.
XTo finish the entry: select OK.
The new contact has been created.
Deleting messages
XCall up the message folder (Ypage 140).
XTo select the message: turn and press the
controller.
XTo select G: slide 9the controller.
XTo select Delete: turn and press the con-
troller.
XTo select Yes: turn and press the controller.
The message is deleted from the mobile
phone and COMAND.
or
XTo select No: turn and press the controller.
The process is canceled.
iThis delete function is not supported by all
mobile phones. The Delete
failed.mes-
sage then appears.
MirrorLink®
Introduction
MirrorLink®is standard for the connection
between COMAND and your mobile phone.
With MirrorLink
®, the content of the display
144MirrorLink®
Telephone
Page 147 of 246

on your mobile phone can be displayed in
COMAND. Audio content from your mobile
phone can also be played back in COMAND.
The availability of MirrorLink
®and Mirror-
Link®apps may vary depending on the coun-
try. The support of buttons in your vehicle
depends on your mobile phone and the avail- able apps. You can find an overview of the
COMAND control panel with available but-
tons here (
Ypage 20).
Prerequisites
RThe mobile phone must support Mirror-
Link®version 1.1.
RThe mobile phone is switched on
RA MirrorLink®certified app must be instal-
led on the phone.
RThe mobile phone is connected to
COMAND via a suitable USB cable.
RThe mobile phone must be connected to
COMAND via Bluetooth®for the telephone
functions.
COMAND automatically establishes a Blue-
tooth
®connection to the mobile phone. If this
is unsuccessful, an error message will
appear. In this case, you should connect the
mobile phone manually via Bluetooth
®
(Ypage 114).
Setting up a connection
COMAND
XTo call up the telephone menu: press the
% button.
XTo show the main function bar: slide 5
the controller.
XTo select Tel/®: turn and press the con-
troller.
XTo select MirrorLink: turn and press the
controller.
Mobile phone
XConnect a mobile phone with USB cable to
the USB socket in the center console.
XActivate MirrorLink®(see the manufactur-
er's operating instructions).
Apps which have been certified for Mirror-
Link
®are displayed in the COMAND dis-
play.
The availability of individual apps may vary
depending on the country.
Only one mobile phone at a time can be con-
nected via MirrorLink
®to COMAND.
MirrorLink®settings
Activating/deactivating automatic con-
nection
When you connect a mobile phone to
COMAND for the first time, you are asked if
activation should be done automatically or
manually in future.
XTo call up the telephone menu: press the
% button.
XTo show the main function bar: slide 5
the controller.
XTo select Tel/®: turn and press the con-
troller.
XTo select MirrorLink: turn and press the
controller.
XTo switch to the menu bar: slide 6the
controller.
MirrorLink®145
Telephone
Z
Page 148 of 246

XTo selectOptions: turn and press the con-
troller.
XTo select Automatically Connect Mir‐
rorLink: turn and press the controller.
You can allow Oor suppress ªthe auto-
matic connection function.
Activating manually
XTo call up the telephone menu: press the
% button.
XTo show the main function bar: slide 5
the controller.
XTo select Tel/®: turn and press the con-
troller.
XSelect MirrorLink.
XConnect a mobile phone with USB cable to
the USB socket in the center console.
Navigation messages on the mobile
phone can also be played back
You can select whether the navigation mes-
sages should be overlaid on the COMAND
audio playback.
XTo call up the telephone menu: press the
% button.
XTo show the main function bar: slide 5
the controller.
XTo select Tel/®: turn and press the con-
troller.
XTo select MirrorLink: turn and press the
controller.
XTo switch to the menu bar: slide 6the
controller.
XTo select Options: turn and press the con-
troller.
XTo select MirrorLink Ann. Have Pri‐
ority: turn and press the controller.
Mobile phone navigation messages overlay
the COMAND audio playback Oor you can
suppress the function ª.
Sound settings
If a MirrorLink®audio source is active, you
can adjust the sound settings.
XTo call up the telephone menu: press the
% button.
XTo show the main function bar: slide 5
the controller.
XTo select Tel/®: turn and press the con-
troller.
XTo select MirrorLink: turn and press the
controller.
XTo switch to the menu bar: slide 6the
controller.
XTo select à: turn and press the control-
ler.
You can adjust the sound settings.
Apple CarPlay®
Introduction
iPhone functions can be used via COMAND
using Apple CarPlay®. CarPlay®can be oper-
ated using the controller or the Siri voice-
operated control system. The support of but-
tons in your vehicle depends on the iOS ver-
sion of your mobile phone and the available
apps. You can find an overview of the
COMAND control panel with available but-
tons here (
Ypage 20).
To activate voice-operated control, press and
hold the óbutton on the multifunction
steering wheel (
Ypage 123). CarPlay®is only
available for Apple mobile phones (see the
manufacturer's operating instructions). The
availability of CarPlay
®may vary depending
on the country.
146Apple CarPlay®
Telephone
Page 149 of 246

Prerequisites
RCarPlay®can be used from iPhone 5
upwards. CarPlay functions optimally with
the iOS 8 operating system.
RDeactivate the key lock of your mobile
phone.
RApple CarPlay®functions best when the
mobile phone is connected to the Internet.
Activating/deactivating automatic
connection
When you connect a CarPlay-enabled mobile
phone to COMAND for the first time, you are
asked if activation should be done automati-
cally or manually in future.
XTo call up the telephone menu: press the
% button.
XTo show the main function bar: slide 5
the controller.
XTo select Tel/®: turn and press the con-
troller.
XSelect Apple CarPlay.
XTo select Start Apple CarPlay Auto‐
matically: press the controller.
You can allow Oor suppress ªthe auto-
matic connection function.
XConnect the iPhone via the USB port (USB
2).
Apple CarPlay is automatically activated.
Activating manually
XTo call up the telephone menu: press the
% button.
XTo show the main function bar: slide 5
the controller.
XTo select Tel/®: turn and press the con-
troller.
XSelect Apple CarPlay.
XConnect the iPhone via the USB port (USB
2).
TheConfirm to Start Apple CarPlay
message appears.
XTo confirm the message: press the control-
ler.
You will see the Apple Carplay
®menu.
Terminating CarPlay mode
XRemove the USB cable from the USB port
(USB 2).
TheNo
AppleCarPlaydeviceconnec‐
ted. Please ensure that your
deviceisconnectedtothecorrect
USB port (USB 2).message appears.
Apple CarPlay®147
Telephone
Z
Page 150 of 246
Page 151 of 246
Your COMAND equipment................150
Important safet ynotes .................... .150
General notes .................................... 150
Conditions for acces s...................... .150
Setting up an Internet connection
(Canada) ............................................ .151
Establishing/ending th econnec-
tion .................................................... .154
Google™ loca lsearch ...................... .155
Destination/rout edownloa d.......... .157
Further Mercedes-Ben zApp s.......... .160
Web browser .................................... .161
149
Online and Internet functions
Page 152 of 246

Your COMANDequipment
These operatin ginstruction sdescribe all th e
standar dan doptional equipmen tof your
COMAN Dsystem, as available at th etime of
going to print .Country-specifi cdifference s
are possible. Bear in min dthat your vehicle
may no tfeature all function sdescribed here.
Thi salso applies to safety-relevan tsystems
an dfunctions.
Read th einformation on qualified specialis t
workshop sin th evehicle Operator's Manual.
Important safet ynotes
GWARNING
If you operat einformation systems an dcom-
munication equipment integrated in th evehi-
cl e whil edriving, you will be distracted from
traffic conditions. You could also los econtro l
of th evehicle. There is aris kof an accident.
Only operat eth eequipment when th etraffic
situation permits. If you are no tsur ethat this
is possible, par kth evehicle payin gattention
to traffic condition san doperat eth eequip-
men twhen th evehicle is stationary.
You mus tobserv eth elega lrequirements fo r
th ecountry in whic hyou are drivin gwhen
operatin gth esystem.
General notes
Connection difficulties whil eth evehi-
cle is in motion
The connection may be los tif:
Rth emobile phone networ kcoverage is
insufficien t
Rthevehicle has moved into amobile phone
cell wit hno free channels
Rth eSI M car dused is no tcompatible wit h
th enetwor kavailable
Function restrictions (Canada)
You will no tbe able to use th eMercedes-Ben z
Apps an dInternet connection ,or will no lon -
ger be able to use them, or may hav eto wait
befor eusin gthem, in th efollowin gsituations:
Rwhen th emobile phone is switched of f
Rif your mobile phone has notbee nenabled
fo rInternet access
Rif th eBluetoot h®function is switched of fon
COMAN Dan dth edesire dphone is sup-
posed to be connecte dvia Bluetoot h
®
Rif theBluetoot h®function is switched of fon
th emobile phone an dth ephone is sup-
posed to be connecte dvia Bluetoot h
®
Rif neither themobile phone networ kno rth e
mobile phone allow simultaneous use of a
phone an dan Internet connection
Rif th emobile phone has no tbee nenabled
fo rInternet access via Bluetoot h®
The driver is notpermitte dto cal lup websites
whil edrivin gan duse of th eMercedes-Ben z
Apps is restricted.
iIt is possible that you may no tbe able to
receiv ecalls when an Internet connection
is active .Thi sdepend son th emobile phone
an dth emobile phone networ kused .
Conditions for access
USA: to use Mercedes-Ben zApps an dInter-
ne taccess ,mbrace mus tbe activated an d
operational. Furthermore, mbrace mus tbe
activated fo rMercedes-Ben zApps an dInter-
ne taccess .Tak enote of th econnection pri -
orities .An emergency cal lhas th ehighes tpri -
ority. Whe n aservic ecall, e.g. abreakdown
servic ecal lor th eMB Info Call, is active ,an
emergency cal lcan still be initiated. Aservic e
call, on th eother hand, has priorit yover a
curren tInternet connection .Therefore, you
canno testablis han Internet connection dur -
in g a servic ecall.
150Conditions for access
Online and Internet functions