2016 KIA Optima Hybrid power steering
[x] Cancel search: power steeringPage 15 of 466

Your vehicle at a glance
42
INTERIOR OVERVIEW
1. Driver position memory system ........4-35
2. Door lock/unlock button ....................4-14
3. Outside rearview mirror control switch ................................................4-42
4. Power window lock button ................4-24
5. Power window switches ....................4-21
6. Central door lock switch....................4-15
7. Instrument panel illumination control button ....................................4-46
8. ESC OFF button ...............................5-23
9. Steering wheel heater On/Off button .. 4-39
10. BSD On/Off button ..........................5-36
11. Steering wheel tilt lever...................4-38
12. Fuse box .........................................7-57
13. Hood release lever ..........................4-26
14. Parking brake pedal ........................5-19
15. Brake pedal .....................................5-17
16. Accelerator pedal ..............................5-9
17. Fuel filler lid release button.............4-28
18. Trunk lid release button...................4-18
OTFH014001N❈ The actual shape may differ from the illustration.
Page 16 of 466

25
Your vehicle at a glance
INSTRUMENT PANEL OVERVIEW
1. Instrument cluster .............................4-45
2. Light control / Turn signals.......4-87, 4-90
3. Wiper/Washer ...................................4-92
4. Horn ..................................................4-38
5. Steering wheel audio control ..........4-125
6. Auto cruise control ............................5-31
7. Driver’s air bag ..................................3-46
8. Steering wheel ..................................4-37
9. ENGINE START/STOP button ............5-6
10. Hazard ..............................................6-2
11. Audio .............................................4-124
12. Climate control system .................4-100
13. Shift lever ........................................5-12
14. Aux, USB and iPod
®port ..............4-126
15. Power outlet ..................................4-121
16. Seat warmer ...................................3-11
17. Passenger’s air bag ........................3-46
18. Glove box ......................................4-117
OTFH014002C
❈ The actual shape may differ from the illustration.
Page 24 of 466

Safety features of your vehicle
63
Front seat adjustment - power
(if equipped)
The front seat can be adjusted by
using the control switch located on
the outside of the seat cushion.
Before driving, adjust the seat to the
proper position so as to easily con-
trol the steering wheel, pedals and
switches on the instrument panel.
When in operation, the power seat
consumes a large amount of electri-
cal power. To prevent unnecessary
charging system drain, don’t adjust
the power seat longer than neces-
sary while the engine is not running.
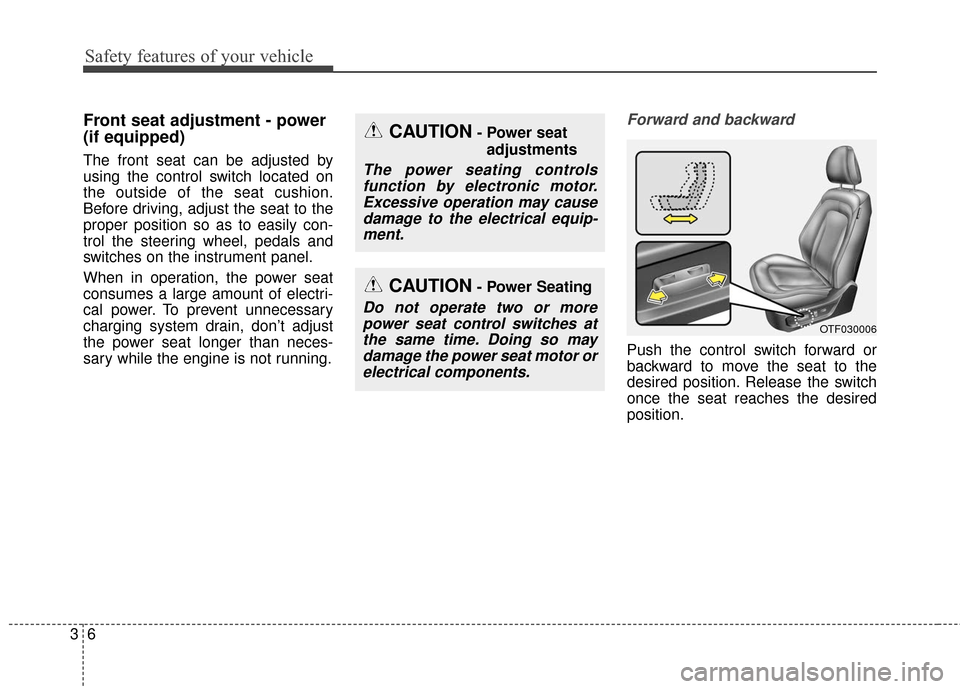
Forward and backward
Push the control switch forward or
backward to move the seat to the
desired position. Release the switch
once the seat reaches the desired
position.
OTF030006
CAUTION- Power seatadjustments
The power seating controlsfunction by electronic motor.Excessive operation may causedamage to the electrical equip-ment.
CAUTION- Power Seating
Do not operate two or morepower seat control switches atthe same time. Doing so maydamage the power seat motor orelectrical components.
Page 112 of 466

437
Features of your vehicle
Electric power steering
Power steering uses the motor to
assist you in steering the vehicle. If
the engine is off or if the power steer-
ing system becomes inoperative, the
vehicle may still be steered, but it will
require increased steering effort.
The motor driven power steering is
controlled by the power steering con-
trol unit which senses the steering
wheel torque and vehicle speed to
command the motor.
The steering wheel becomes heavier
as the vehicle’s speed increases and
becomes lighter as the vehicle’s
speed decreases for better control of
the steering wheel.
Should you notice any change in the
effort required to steer during normal
vehicle operation, have the power
steering checked by an authorized
Kia dealer.
✽ ✽NOTICE
The following symptoms may occur
during normal vehicle operation:
• The steering effort is increased
immediately after turning the igni-
tion switch on. This happens as the
system performs the EPS system
diagnostics. When the diagnostics
are completed, the steering wheel
will return to its normal condition
• A click noise may be heard from the EPS relay after the ignition
switch is turned to the ON or
LOCK position.
• Motor noise may be heard when the vehicle is at a stop or at a low
driving speed.
• The steering effort increases if the steering wheel is rotated continuous-
ly when the vehicle is not in motion.
However, after a few minutes, it will
return to its normal conditions.
• When you operate the steering wheel in low temperature, abnor-
mal noise could occur. If tempera-
ture rises, the noise will disappear.
This is a normal condition.
If the Electric Power Steering System
does not operate normally, the warn-
ing light will illuminate on the instru-
ment cluster. The steering wheel may
become difficult to control or operate
abnormally. Take your vehicle to an
authorized Kia dealer and have the
vehicle checked as soon as possible.
STEERING WHEEL
Page 143 of 466

Features of your vehicle
68
4
✽
✽
NOTICE
• If the vehicle is not on level ground
or the battery power has been
interrupted, the distance to empty
function may not operate correctly.
• The distance to empty may differ from the actual driving distance as
it is an estimate of the available
driving distance.
• The trip computer may not regis- ter additional fuel if less than 1.6
gallons (6 liters) of fuel are added
to the vehicle.
• The fuel economy and distance to empty may vary significantly based
on driving conditions, driving
habits, and condition of the vehicle.
Average Fuel Economy (2)
The average fuel economy is calcu-
lated by the total driving distance
and fuel consumption since the last
average fuel economy reset.
- Fuel economy range: 0.0 ~ 99.9L/100km or MPG
The average fuel economy can be reset both manually and automati-
cally.
Manual reset
To clear the average fuel economy
manually, press the [OK] button
(select/reset) on the steering wheel
for more than 1 second when the
average fuel economy is displayed. Automatic reset
To make the average fuel economy
be reset automatically whenever refu-
eling, select the "Auto Reset" mode in
User Setting menu of the LCD display
(Refer to "LCD Display").
Under "Auto Reset" mode, the aver-
age fuel economy will be cleared to
zero (---) when the vehicle speed
exceeds 1 km/h after refueling more
than 1.6 gallons (6 liters).
✽ ✽
NOTICE
The average fuel economy is not dis-
played for more accurate calculation
if the vehicle does not drive more than
10 seconds or 50 meters (0.03 miles)
since the ignition switch or Engine
Start/Stop button is turned to ON.
Page 149 of 466

Features of your vehicle
74
4
Electronic Power
Steering (EPS) WarningLight (if equipped)
This warning light illuminates:
Once you set the ignition switch or Engine Start/Stop Button to the ON
position.
- It remains on until the engine isstarted.
When there is a malfunction with the EPS.
In this case, have your vehicle
inspected by an authorized Kia
dealer.
Malfunction Indicator
Lamp (MIL)
This warning light illuminates:
Once you set the ignition switch or Engine Start/Stop Button to the ON
position.
- It remains on until the engine isstarted.
When there is a malfunction with the emission control system.
In this case, have your vehicle
inspected by an authorized Kia
dealer.
CAUTION- Malfunction
Indicator
Lamp (MIL)
Driving with the MalfunctionIndicator Lamp (MIL) on maycause damage to the emissioncontrol systems which couldeffect drivability and/or fueleconomy.
CAUTION- Gasoline
Engine
If the Malfunction IndicatorLamp (MIL) illuminates, poten-tial catalytic converter damageis possible which could result inloss of engine power.
In this case, have your vehicleinspected by an authorized Kiadealer as soon as possible.
Page 200 of 466

4125
Features of your vehicle
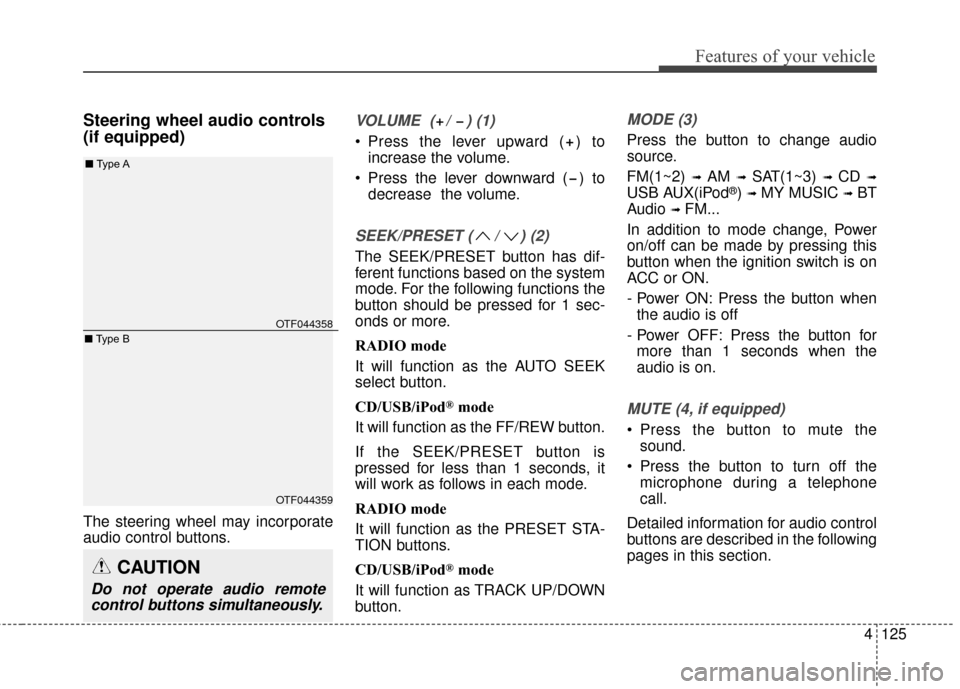
Steering wheel audio controls
(if equipped)
The steering wheel may incorporate
audio control buttons.
VOLUME ( / ) (1)
Press the lever upward ( ) toincrease the volume.
Press the lever downward ( ) to decrease the volume.
SEEK/PRESET ( / ) (2)
The SEEK/PRESET button has dif-
ferent functions based on the system
mode. For the following functions the
button should be pressed for 1 sec-
onds or more.
RADIO mode
It will function as the AUTO SEEK
select button.
CD/USB/iPod
®mode
It will function as the FF/REW button.
If the SEEK/PRESET button is
pressed for less than 1 seconds, it
will work as follows in each mode.
RADIO mode
It will function as the PRESET STA-
TION buttons.
CD/USB/iPod
®mode
It will function as TRACK UP/DOWN
button.
MODE (3)
Press the button to change audio
source.
FM(1~2)
➟ AM ➟ SAT(1~3) ➟ CD ➟
USB AUX(iPod®) ➟ MY MUSIC ➟ BT
Audio
➟ FM...
In addition to mode change, Power
on/off can be made by pressing this
button when the ignition switch is on
ACC or ON.
- Power ON: Press the button when the audio is off
- Power OFF: Press the button for more than 1 seconds when the
audio is on.
MUTE (4, if equipped)
Press the button to mute the sound.
Press the button to turn off the microphone during a telephone
call.
Detailed information for audio control
buttons are described in the following
pages in this section.
CAUTION
Do not operate audio remote control buttons simultaneously.
OTF044358
OTF044359
■ Type A
■ Type B
Page 234 of 466

4159
Features of your vehicle
PHONE
Before using the Bluetooth®Wireless
Technology phone features
Bluetooth®Wireless
Technology phone, you must first
pair and connect the
Bluetooth®
Wireless Technology mobile phone.
connected, it is not possible to
enter Phone mode. Once a phone
is paired or connected, the guid-
ance screen will be displayed.
tion (IGN/ACC ON), the
Bluetooth®
Wireless Technology phone will be
automatically connected. Even if
you are outside, the
Bluetooth®
Wireless Technology phone will be
automatically connected once you
are in the vicinity of the vehicle. If
you do not want automatic
Bluetooth®Wireless Technology
phone connection, set the
Bluetooth®Wireless Technology
power to OFF
Making a call using the
Steering-wheel mounted con-
trols
(1) MUTE button : Mute the micro-
phone during a call.
(2) VOLUME button : Raises or low- ers speaker volume.
(3) b utton : Places and transfers
calls.
(4) b utton : Ends calls or cancels
functions.
(5) button : Activates voice recog- nition.
➀
Briefly press (under 1 seconds)
the key on the steering
remote controller.
\b The call history list will be dis-
played on the screen.
➂ Press the key again to con-
nect a call to the selected number.
number
➀ Press and hold (over 1 seconds)
the key on the steering
remote controller.
\b The most recently called number
is redialed.