Page 13 of 466
Your vehicle at a glance
22
EXTERIOR OVERVIEW
1. Hood .....................................................4-26
2. Head lamp ...................................4-87, 7-70
3. Fog lamp .....................................4-91, 7-75
4. Wheel and tire ......................................7-43
5. Outside rearview mirror ........................4-42
6. Front windshield wiper blades .....4-92, 7-38
7. Windows ...............................................4-21
OTFH014003N
■Front view
❈The actual shape may differ from the illustration.
Page 15 of 466

Your vehicle at a glance
42
INTERIOR OVERVIEW
1. Driver position memory system ........4-35
2. Door lock/unlock button ....................4-14
3. Outside rearview mirror control switch ................................................4-42
4. Power window lock button ................4-24
5. Power window switches ....................4-21
6. Central door lock switch....................4-15
7. Instrument panel illumination control button ....................................4-46
8. ESC OFF button ...............................5-23
9. Steering wheel heater On/Off button .. 4-39
10. BSD On/Off button ..........................5-36
11. Steering wheel tilt lever...................4-38
12. Fuse box .........................................7-57
13. Hood release lever ..........................4-26
14. Parking brake pedal ........................5-19
15. Brake pedal .....................................5-17
16. Accelerator pedal ..............................5-9
17. Fuel filler lid release button.............4-28
18. Trunk lid release button...................4-18
OTFH014001N❈ The actual shape may differ from the illustration.
Page 115 of 466
Features of your vehicle
40
4
Inside rearview mirror
Adjust the rearview mirror so that the
center view through the rear window
is seen. Make this adjustment before
you start driving.
Do not place objects in the rear seat
which would interfere with your vision
through the rear window.
Day/night rearview mirror
(if equipped)
Make this adjustment before you
start driving and while the day/night
lever is in the day position.
Pull the day/night lever toward you to
reduce the glare from the headlights
of the vehicles behind you during
night driving.
Remember that you lose somerearview clarity in the night position.
MIRRORS
WARNING - Mirror
adjustment
Do not adjust the rearview mirror
while the vehicle is moving. This
could result in loss of control.
OTF040040
Day Night
Page 116 of 466

441
Features of your vehicle
Electric chromic mirror (ECM) (if equipped)
The electric rearview mirror automat-
ically controls the glare from the
headlights of the car behind you in
nighttime or low light driving condi-
tions. The sensor mounted in the mir-
ror senses the light level around the
vehicle, and automatically controls
the headlight glare from vehicles
behind you.
When the engine is running, the glare
is automatically controlled by the sen-
sor mounted in the rearview mirror.
Whenever the shift lever is shifted
into reverse (R), the mirror will auto-
matically go to the brightest setting in
order to improve the drivers view
behind the vehicle. To operate the electric rearview mirror:
The mirror defaults to the ON posi-
tion whenever the ignition switch is
turned on.
Press the ON/OFF button (1) to turn the automatic dimming func-
tion off. The mirror indicator light
will turn off.
Press the ON/OFF button (1) to
turn the automatic dimming func-
tion on. The mirror indicator light
will illuminate.
CAUTION
When cleaning the mirror, use apaper towel or similar materialdampened with glass cleaner.Do not spray glass cleanerdirectly on the mirror as thatmay cause the liquid cleaner toenter the mirror housing.
OVG049039
IndicatorSensor
Page 117 of 466

Features of your vehicle
42
4
Outside rearview mirror
Be sure to adjust mirror angles
before driving.
Your vehicle is equipped with both
left-hand and right-hand outside
rearview mirrors. The mirrors can be
adjusted remotely with the remote
switch (if equipped). The mirror heads
can be folded to prevent damage dur-
ing an automatic car wash or when
passing through a narrow street.
The right outside rearview mirror is
convex. Objects seen in the mirror
are closer than they appear.
Use your interior rearview mirror or
direct observation to determine the
actual distance of following vehicles
when changing lanes.
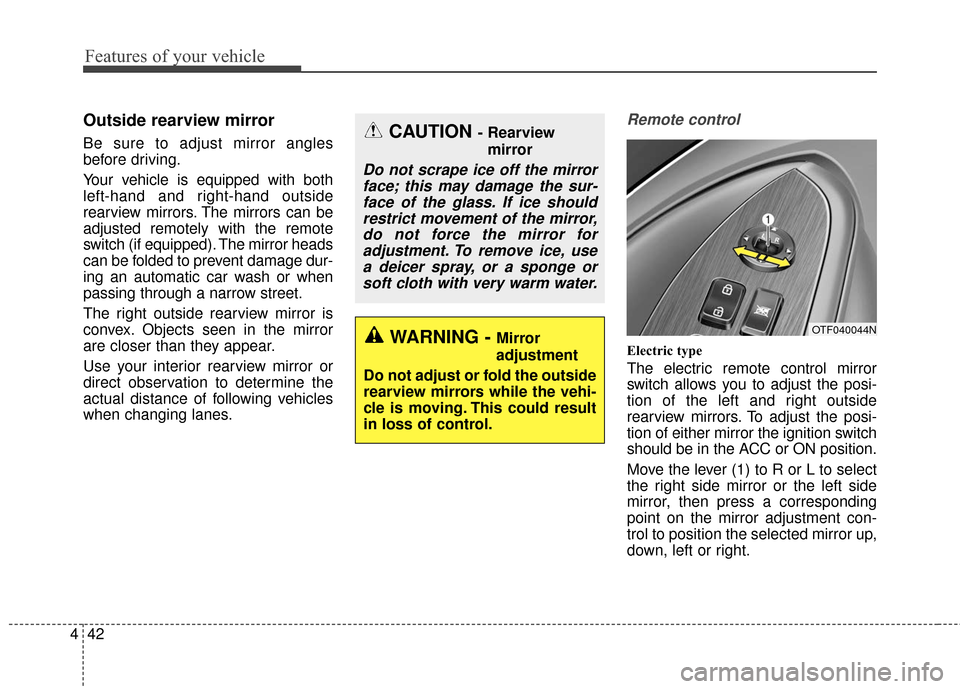
Remote control
Electric type
The electric remote control mirror
switch allows you to adjust the posi-
tion of the left and right outside
rearview mirrors. To adjust the posi-
tion of either mirror the ignition switch
should be in the ACC or ON position.
Move the lever (1) to R or L to select
the right side mirror or the left side
mirror, then press a corresponding
point on the mirror adjustment con-
trol to position the selected mirror up,
down, left or right.
CAUTION - Rearview
mirror
Do not scrape ice off the mirrorface; this may damage the sur-face of the glass. If ice shouldrestrict movement of the mirror,do not force the mirror foradjustment. To remove ice, usea deicer spray, or a sponge orsoft cloth with very warm water.
WARNING - Mirror
adjustment
Do not adjust or fold the outside
rearview mirrors while the vehi-
cle is moving. This could result
in loss of control.OTF040044N
Page 118 of 466

443
Features of your vehicle
After the adjustment, put the lever
into neutral (center) position to pre-
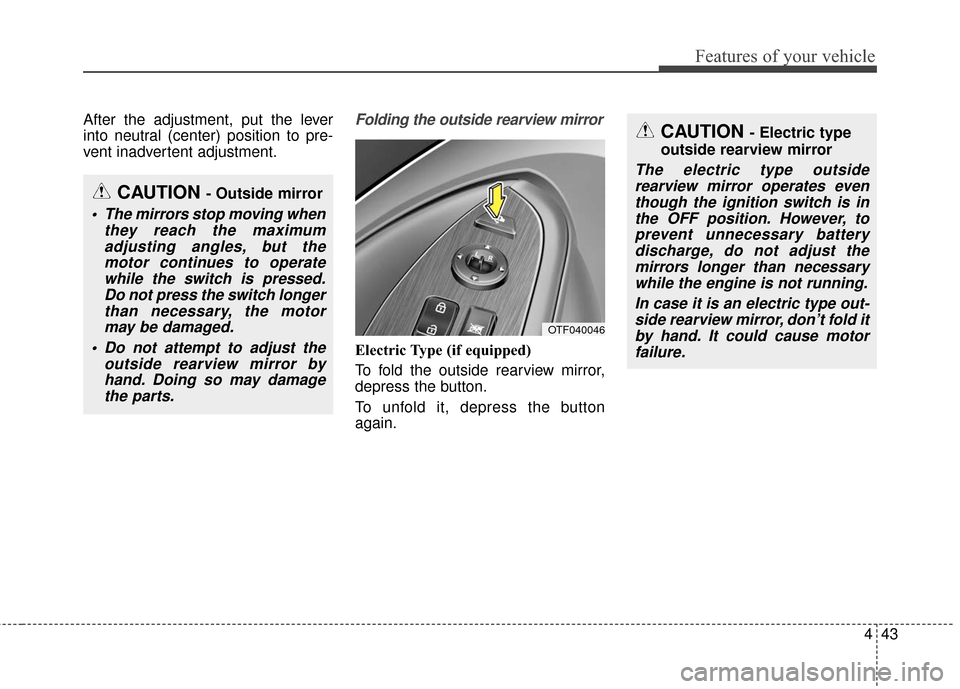
vent inadvertent adjustment.Folding the outside rearview mirror
Electric Type (if equipped)
To fold the outside rearview mirror,
depress the button.
To unfold it, depress the button
again.
CAUTION - Outside mirror
The mirrors stop moving whenthey reach the maximumadjusting angles, but themotor continues to operatewhile the switch is pressed.Do not press the switch longerthan necessary, the motormay be damaged.
Do not attempt to adjust the outside rearview mirror byhand. Doing so may damagethe parts.
CAUTION - Electric type
outside rearview mirror
The electric type outside rearview mirror operates eventhough the ignition switch is inthe OFF position. However, toprevent unnecessary batterydischarge, do not adjust themirrors longer than necessarywhile the engine is not running.
In case it is an electric type out-side rearview mirror, don’t fold itby hand. It could cause motorfailure.
OTF040046
Page 119 of 466
Features of your vehicle
44
4
Manual type
To fold outside rearview mirror, grasp
the housing of mirror and then fold it
toward the rear of the vehicle.
OTF040045
Page 159 of 466

Features of your vehicle
84
4
The Rear Camera Display will acti-
vate when the back-up light is ON
with the ignition switch ON and the
shift lever in the R (Reverse) posi-
tion. Note- during initial start up, system
may not display instantly due to the
audio system booting up.
2 ~ 4 seconds may be required before
displaying during initial reverse selec-
tion. This occurs when starting and
immediately shifting to reverse.
This system is a supplemental sys-
tem that shows behind the vehicle
through the UVO audio or navigation
display backing-up.
Always keep the camera lens clean. If
lens is covered with foreign matter,
the camera may not operate normally.
The Rear Camera Display is not a
safety device. It only serves to assist
the driver in identifying objects direct-
ly behind the middle of the vehicle.
The camera does NOT cover the
complete area behind the vehicle.
Never rely solely on the rear camera
display when backing.
REAR CAMERA DISPLAY (IF EQUIPPED)
OTFH044102
OTFH044103N
WARNING - Backing Up &Using Camera
Never rely solely on the rear
view camera display when
backing up. Prior to entering
your vehicle always do a visual
check of the area behind your
vehicle, and before backing up
be aware of your surroundings
and supplement the rear view
camera by looking over your
shoulders and checking your
rear view mirrors. Due to the dif-
ficulty of ensuring that the area
behind you remains clear,
always back up slowly and stop
immediately if you even suspect
that a person, and especially a
child, might be behind you.