Page 41 of 62

OTHER KEY F E AT U R E S
39*IF EQUIPPED
A LWAYS CHECK THE OWNER’S MANUAL FOR COMPLETE OPERATING INFORMATION AND SAFETY WARNINGS.
Power Tr u n k
The Power Tr unk can be operated from several controls to
either open, close or lock the trunk. The Power Tr unk Lock
button will close the trunk, lock all doors and trunk then arm
the vehicle.
To turn the Power Tr unk features ON, press the Power Tr unk
Lid Control button to ON, located inside the glove box.
Driver’s Panel Power Tr u n k Main Control Lever – Located
to the left of the steering wheel, below the main button panel.
To open, pull the Power Tr unk Main Control lever
A.
To close, press and hold the Power Trunk Main Control lever
A.
Power Tr u n k Close/Lock Buttons – Located underneath
the inside of the trunk lid.
To close trunk – Press the Trunk Close button
B.
To close trunk and lock and arm all doors/trunk, press the
Tr unk Lock button
C.
Exterior Power Tr u n k Open Button – Located underneath
the outside of the trunk lid. To open, press the soft-touch
Power Tr unk Open button.
Quick Tips
- The trunk must be unlocked before it can be
opened by the Trunk Release button
- The trunk unlocks automatically and then can be
opened manually when the Smart Key is within
close proximity to the vehicle
BC
www.KuTechVideos.com/kh13/2016
POWER TRUNK VIDEO
To view a video on your
mobile device, snap
this QR Code or visit the
listed website. Refer
to page 2 for more
information.
A
(Button located under driver’s
panel, left of the steering wheel)
REMINDERS:
- Power Trunk may be damaged if attempting to
open or close manually
- When not in use, keep the Trunk Lid Control
button in the OFF position
- If going through a car wash, remind the attendant
to keep the vehicle in Neutral (N) and keep the
engine running. Also, disable the Power Trunk
lid control using the button inside the glove
compartment, turn off the auto rain-sensing
wipers and fold in the mirrors
- Ensure all obstacles are out of the way of the
trunk lid when operating the Power Trunk
Smart Power Tr u n k \fContinued)
29319_Text.indd 3911/6/15 10:25 AM
Page 42 of 62

OTHER KEY F E AT U R E S
*IF EQUIPPED 40
Smart Key
A Press to lock all doors
B Press to unlock driver’s door. Press twice within 4
seconds to unlock all doors
C Press and hold for more than 1 second to unlock trunk
and open
REMINDERS:
- Trunk lid will partially open. To fully open, lift up manually
- The trunk unlocks when the Smart Key is within close proximity of the vehicle
D Press and hold more than a half a second for panic alarm.
To turn off alarm, press any button
E Press to release mechanical key (button on reverse side)
Smart Key (Card type)*
G
Press and hold the release button to remove the mechanical
key (release button located on reverse side of the side
shown above).
www.KuTechVideos.com/kh13/2016
ENGINE STOP/START
BUTTON & SMART
KEY VIDEO
To view a video on
your mobile device,
snap this QR Code or
visit the listed website.
Refer to page 2 for
more information.
Quic\f Tips
- If the Smart Key battery is weak or not working
properly, hold the Smart Key fob up to the ENGINE
START/STOP button (lock button side closest)
and press to start engine
- The Smart Key’s signal can be blocked by
the normal operation of a cellular phone or
smartphone. To help prevent this, store each
device separately
- When reinserting the mechanical key, make
sure it is pushed all the way in until there is a
click sound
REMINDER:
Remote button con�guration may vary depending on vehicle options.
ABC
D
E
F
G
(Card Type)*
29319_Text.indd 4011/6/15 10:25 AM
Page 43 of 62
OTHER KEY F E AT U R E S
41*IF EQUIPPED
A LWAYS CHECK THE OWNER’S MANUAL FOR COMPLETE OPERATING INFORMATION AND SAFETY WARNINGS.
Mechanical Key F:
§ Use to unlock driver’s door:
1. Remove door handle keyhole cover with mechanical key by pressing up into slot as shown
I
2. Insert mechanical key J and turn right to unlock driver’s door
3. Insert mechanical key
J and turn left to lock driver’s door
§ Use to lock glove box
IJ
H
Smart Key (Contin\fed)
Dri\ber’s Door Lock/Unlock B\ftton H:
To unlock door(s):
§ Press button once to unlock driver’s door
§ Press again within 4 seconds to unlock all doors
To lock all doors:
§ Press again to lock all doors
29319_Text.indd 4111/6/15 10:25 AM
Page 44 of 62

OTHER KEY F E AT U R E S
*IF EQUIPPED 42
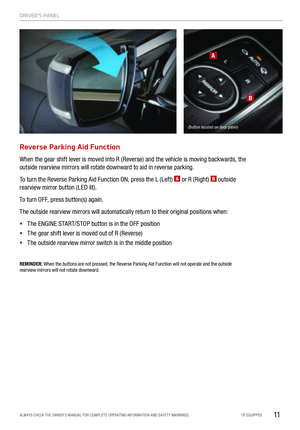
Map/Room Lamps
Automatic Tu r n O\f\f Function
The interior lights automatically turn off approximately 20
seconds after the ENGINE START/STOP button is turned O F F.
Map/Room Lamp Operation
Map Lamps – These lights produce spot beams for
convenient use as map lamps or as personal lamps for the
driver or the front passenger. Press the buttons
A to turn the
map lamps ON/OFF.
ROOM button – Press the button
B to turn the front and
rear lamps ON/OFF.
REAR ROOM button – Press the button
C to turn the rear
lamp ON/OFF.
DOOR button – When the DOOR button
D is pressed (LED
lit) the front and rear lamps will turn ON as follows:
§ When a door is opened or doors are unlocked with the
Smart Key, the lamps will turn ON for approximately
30 seconds
§ If the ENGINE START/STOP button is in the ACC/OFF
position and a door is open, the lamps will stay ON for
approximately 20 minutes
§ If the ENGINE START/STOP button is in the ACC/ON
position and a door is open, the lamps will stay ON
The lamps will turn OFF immediately if the ENGINE STA R T/
STOP button is turned ON or all doors are locked.
PRIVACY button – When button
E is pressed (LED lit) and
a door is opened, that door lamp will turn ON.
REMINDER: When room lamp lens is pressed ON it
will remain ON, even when the map lamp switch is in
the OFF position.
Quic\b
Tips
- When doors are unlocked by the Smart Key, the
lamp turns ON for approximately 30 seconds
- If your vehicle is equipped with the theft alarm
system, the interior lights automatically turn off
approximately 3 seconds after the system is in
armed stage
- Using interior lights for an extended period of time
may cause battery discharge
BC
D
E
AA
29319_Text.indd 4211/6/15 10:25 AM
Page 45 of 62

OTHER KEY F E AT U R E S
43*IF EQUIPPED
A LWAYS CHECK THE OWNER’S MANUAL FOR COMPLETE OPERATING INFORMATION AND SAFETY WARNINGS.
Panoramic Sunroof Operation
The sunroof and sunshade operation is controlled by a multi-
directional switch/lever A. The ignition needs to be in the
ON position to operate the sunroof/sunshade.
Slide the sunshade and sunroof:
Auto Open – Slide lever backward to the farthest position
and release.
Auto Close – Slide the lever forward to the farthest position
and release.
Slide the sunshade:
Auto Open – Slide the lever backward to the �rst detent position.
Auto Close – Slide the lever forward to the farthest position.
Slide the sunroof (with sunshade open):
Auto Open – Slide the lever backward and release.
Auto Close – Slide the lever forward to the �rst detent
position or pull the lever downward.
Tilt the sunroof:
Raise – Press lever upward.
Lower – Pull lever downward.
Auto-close sunroof and sunshade:
Slide the lever forward to the farthest position.
REMINDER: Sunshade must remain OPEN while
sunroof is open and vehicle is moving.
Quick
Tip
To stop the sunroof/sunshade at any position, press
or pull the sunroof control lever in any direction.
A
29319_Text.indd 4311/6/15 10:26 AM
Page 46 of 62

OTHER KEY F E AT U R E S
*IF EQUIPPED 44
ABC
DE
FGH
A eServices Guide button B UVO Luxury Services Voice Local Search button C Roadside Assist button D Auto dimming ON/OFF
E Glare detection sensorF HomeLink® button G HomeLink® button
H HomeLink® button
Auto-Dimming Rearview Mirror with \fomeLink®
The Auto-Dimming Rearview Mirror is designed to help reduce glare from a vehicle’s headlights located in
the rear and also connect up to three electronic transmitters in one location. To turn automatic dimming ON
or O F F, press button
D.
\bVO Luxury Services Rearview Mirror Key Functions
A UVO Luxury Services Guide button: Provides information about UVO Luxury Services features within the
vehicle. Press button A and follow the voice prompts to use the eServices Guide.
B UVO Luxury Services Voice Local Search button: Uses Google® to locate points of interest in the
surrounding area. Press button B and follow the voice prompts to use UVO Luxury Services Voice
Local Search.
C Roadside Assist button: Connects to Roadside Assist and provides services including emergency
assistance and vehicle towing. Press button C to connect to Roadside Assist.
REMINDER: Mirror indicator light will illuminate when automatic dimming is ON.
29319_Text.indd 4411/6/15 10:26 AM
Page 47 of 62

OTHER KEY FEATURES
45*IF EQUIPPED
ALWAYS CHECK THE OWNER’S MANUAL FOR COMPLE TE OPER ATING INFORMATION AND SAFE T Y WARNINGS.
E Glare detection sensorF HomeLink® button G HomeLink® button
H HomeLink® button
How to Sync Transmitter with HomeLink\f
If programming for the �rst time, begin with step 1 (repeating
this step will delete all information).
To program non-rolling and rolling code garage door openers
and other devices:
1. Press and hold the left
F and center G buttons
simultaneously until the indicator light begins to �ash (to
reprogram buttons, skip this step)
2. Press and hold the desired button
F, G or H and hold
the button on the transmitter while it is approximately 1 to
3 inches away from the mirror. The HomeLink
® indicator
light will �ash rapidly once the frequency signal has been
successfully programmed
To �nish programming rolling code garage door openers,
complete these steps:
3. Locate the “learn” or “smart” button on the garage door’s
motor head unit. Press and release the button and complete
step 4 within 30 seconds
4. Firmly press and release the programmed HomeLink
®
button up to three times
Quick Tips
- You can reprogram a single HomeLink® button by
repeating step 2
- Erasing programmed buttons will delete all
trained transmitters
\bperating HomeLink\f:
Press one of the programmed HomeLink
® buttons.
Erasing programmed buttons:
Press and hold the left
F and center H buttons
simultaneously for approximately 20 seconds, and then
release both buttons within 30 seconds.
If your garage door opener was manufactured in 2011
or later, and you are unable to program your vehicle’s
HomeLink
® system, you may need to purchase a
HomeLink® Repeater Kit. For more information, go to
www.HomeLink.com or call (800) 355-3515.
29319_Text.indd 4511/6/15 10:26 AM
Page 48 of 62
OTHER KEY F E AT U R E S
*IF EQUIPPED 46
Hood Release Lever and Latch
Openin\f the Hood:
1. Pull the hood release lever
A to unlatch the hood
2. In the front of the vehicle, lift the hood slightly, push the secondary latch inside of the hood (center)
B to
the left and lift the hood
Closin\f the Hood:
Lower the hood about halfway and then press down to securely lock in place.
A
B
S\bnvisor
Use the sunvisor to shield direct light through the front or
side windows.
Slide the sunvisor out and adjust as needed. REMINDERS:
- Sunvisor may not shield all direct light
- Sunvisor may impair visibility if not adjusted
properly
- Be aware of seating position when adjusting or
swinging sunvisor around to or from the front or
side windows
29319_Text.indd 4611/6/15 10:26 AM