Page 105 of 148
Preparations For Jump-Start
The battery in your vehicle is located in the front of the engine compartment below
the air intake duct. To access the battery remove the air intake duct by turning the
two finger screws, located on the radiator support.
Air Intake Duct/Finger Screws
1 — Air Intake Duct
2 — Finger Screws
Battery Terminals
1 — Negative Terminal
2 — Positive Terminal
WHAT TO DO IN EMERGENCIES
103
Page 106 of 148

WARNING!
• Take care to avoid the radiator cooling fan whenever the hood is raised. It canstart anytime the ignition switch is ON. You can be injured by moving fan
blades.
• Remove any metal jewelry such as rings, watch bands and bracelets that could
make an inadvertent electrical contact. You could be seriously injured.
• Batteries contain sulfuric acid that can burn your skin or eyes and generate
hydrogen gas which is flammable and explosive. Keep open flames or sparks
away from the battery.
1. Set the parking brake, shift the automatic transmission into PARK (manual transmission to NEUTRAL) and turn the ignition to LOCK.
2. Turn off the heater, radio, and all unnecessary electrical accessories.
3. If using another vehicle to jump-start the battery, park the vehicle within the jumper cables reach, set the parking brake and make sure the ignition is OFF.
WARNING!
Do not allow vehicles to touch each other as this could establish a ground
connection and personal injury could result.
Jump-Starting Procedure
WARNING!
Failure to follow this jump-starting procedure could result in personal injury or
property damage due to battery explosion.
CAUTION!
Failure to follow these procedures could result in damage to the charging system
of the booster vehicle or the discharged vehicle.
NOTE:
Remove Air Intake before proceeding with this Jump-Starting procedure.
Connecting The Jumper Cables
1. Connect the positive (+)end of the jumper cable to the positive (+)post of the
discharged vehicle.
2. Connect the opposite end of the positive (+)jumper cable to the positive (+)post
of the booster battery.
3. Connect the negative end (-)of the jumper cable to the negative (-)post of the
booster battery.
WHAT TO DO IN EMERGENCIES
104
Page 107 of 148

4. Connect the opposite end of the negative(-)jumper cable to a good engine ground
(exposed metal part of the discharged vehicle’s engine) away from the battery and
the fuel injection system.
WARNING!
Do not connect the jumper cable to the negative (-)post of the discharged battery.
The resulting electrical spark could cause the battery to explode and could result
in personal injury. Only use the specific ground point, do not use any other exposed
metal parts.
5. Start the engine in the vehicle that has the booster battery, let the engine idle a few minutes, and then start the engine in the vehicle with the discharged battery.
6. Once the engine is started, remove the jumper cables in the reverse sequence:
Disconnecting The Jumper Cables
1. Disconnect the negative (-)end of the jumper cable from the engine ground of the
vehicle with the discharged battery.
2. Disconnect the opposite end of the negative (-)jumper cable from the negative (-)
post of the booster battery.
3. Disconnect the positive (+)end of the jumper cable from the positive (+)post of
the booster battery.
4. Disconnect the opposite end of the positive (+)jumper cable from the positive (+)
post of the vehicle with the discharged battery.
5. Reinstall the air intake duct.
If frequent jump-starting is required to start your vehicle you should have the battery
and charging system inspected at your authorized dealer.
CAUTION!
Accessories plugged into the vehicle power outlets draw power from the vehicle’s
battery, even when not in use (i.e., cellular devices, etc.). Eventually, if plugged in
long enough without engine operation, the vehicle’s battery will discharge suffi-
ciently to degrade battery life and/or prevent the engine from starting.
SHIFT LEVER OVERRIDE
If a malfunction occurs and the shift lever cannot be moved out of the PARK position,
you can use the following procedure to temporarily move the shift lever:
1. Turn the engine OFF.
2. Firmly apply the parking brake.
3. Using a small screwdriver or similar tool, remove the shift lever override access cover (located on the right side of the shift lever housing).
WHAT TO DO IN EMERGENCIES
105
Page 108 of 148

4. Turn the ignition switch to the ACC or ON/RUN position, but do not start theengine.
5. Press and maintain firm pressure on the brake pedal.
6. Insert the screwdriver or similar tool into the access port, and push and hold the override release lever forward.
7. Move the shift lever to the NEUTRAL position.
8. The vehicle may then be started in NEUTRAL.
9. Reinstall the shift lever override access cover.
TOWING A DISABLED VEHICLE
This section describes procedures for towing a disabled vehicle using a commercial
towing service.
Towing
Condition Wheels OFF
the Ground Manual
Transmission 6-Speed
Automatic
(FWD Only) 6-Speed Au-
tomatic 4WD CVT Auto-
matic Trans- mission
Flat Tow NONE • Trans-
mission
in NEU-
TRAL
• Key in
ACC or
ON/RUN
position If transmis-
sion is oper- able:
• Trans- mission
in NEU-
TRAL
• 25 mph
(40 km/h)
max
speed
• 15 miles
(24 km)
max dis-
tance If transmis-
sion is oper- able:
• Trans- mission
in NEU-
TRAL
• 25 mph
(40 km/h)
max
speed
• 15 miles
(24 km)
max dis-
tance NOT AL-
LOWED
Wheel Lift
or Dolly Tow Rear
NOT AL-
LOWED NOT AL-
LOWED NOT AL-
LOWED
Front FWD Models
ONLY OKNOT AL-
LOWED FWD Models
ONLY
Flatbed ALLBEST
METHOD BEST
METHOD BEST
METHOD BEST
METHOD
Refer to” Towing A Disabled Vehicle” in the Owner’s Manual on the DVD for further
information.
WHAT TO DO IN EMERGENCIES
106
Page 109 of 148

FREEING A STUCK VEHICLE
If your vehicle becomes stuck in mud, sand or snow, it can often be moved using a
rocking motion. Turn the steering wheel right and left to clear the area around the
front wheels. Then shift back and forth between DRIVE and REVERSE (with
automatic transmission) or 2nd gear and REVERSE (with manual transmission),
while gently pressing the accelerator. Use the least amount of accelerator pedal
pressure that will maintain the rocking motion, without spinning the wheels, or racing
the engine.
CAUTION!
Racing the engine or spinning the wheels may lead to transmission overheating
and failure. Allow the engine to idle with the transmission in NEUTRAL for at least
one minute after every five rocking-motion cycles. This will minimize overheating
and reduce the risk of clutch or transmission failure during prolonged efforts to
free a stuck vehicle.
NOTE:
Push the "ESC Off" switch, to place the Electronic Stability Control (ESC) system in
"Partial Off" mode, before rocking the vehicle. Refer to “Electronic Brake Control” in
“Starting And Operating” in the Owner’s Manual on the DVD for further information.
Once the vehicle has been freed, push the "ESC Off" switch again to restore "ESC On"
mode.
CAUTION!
• When “rocking” a stuck vehicle by shifting between DRIVE/2nd gear and REVERSE, do not spin the wheels faster than 15 mph (24 km/h), or drivetrain
damage may result.
• Revving the engine or spinning the wheels too fast may lead to transmission
overheating and failure. It can also damage the tires. Do not spin the wheels
above 30 mph (48 km/h) while in gear (no transmission shifting occurring).
WARNING!
Fast spinning tires can be dangerous. Forces generated by excessive wheel speeds
may cause damage, or even failure, of the axle and tires. A tire could explode and
injure someone. Do not spin your vehicle's wheels faster than 30 mph (48 km/h)
or for longer than 30 seconds continuously without stopping when you are stuck
and do not let anyone near a spinning wheel, no matter what the speed.
WHAT TO DO IN EMERGENCIES
107
Page 110 of 148
ENHANCED ACCIDENT RESPONSE SYSTEM (EARS)
This vehicle is equipped with an Enhanced Accident Response System.
Please refer to “Supplemental Restraint System (SRS) — Air Bags” in “Getting
Started” in this guide for further information on the Enhanced Accident Response
System (EARS) function.
EVENT DATA RECORDER (EDR)
This vehicle is equipped with an event data recorder (EDR). The main purpose of an
EDR is to record, in certain crash or near crash-like situations, such as an air bag
deployment or hitting a road obstacle, data that will assist in understanding how a
vehicle’s systems performed.
Please refer to “Supplemental Restraint System (SRS) — Air Bags” in “Getting
Started” in this guide for further information on the Event Data Recorder (EDR).
WHAT TO DO IN EMERGENCIES
108
Page 111 of 148

TO OPEN AND CLOSE THE HOOD
To open the hood, two latches must be released.
1. Pull the hood release lever located on the left kick panel.
2. Move the safety latch, located outsidethe vehicle under the front edge of the
hood, toward the center and raise the
hood.
Lift the hood prop rod, clipped to the
right side (left side facing hood) of the
engine compartment to secure the hood
in the open position. Place the hood prop
at the location stamped into the inner
hood surface.
CAUTION!
To prevent possible damage:
• Before closing hood, make sure the hood prop rod is fully seated into its storage retaining clips.
• Do not slam the hood to close it. Use a firm downward push at the center front
edge of the hood to ensure that both latches engage. Never drive your vehicle
unless the hood is fully closed, with both latches engaged.
WARNING!
Be sure the hood is fully latched before driving your vehicle. If the hood is not fully
latched, it could open when the vehicle is in motion and block your vision. Failure
to follow this warning could result in serious injury or death.
Hood Release Lever
MAINTAINING YOUR VEHICLE
109
Page 112 of 148
ENGINE COMPARTMENT — 2.0L
1. Washer Fluid Reservoir
2. Brake Fluid Reservoir
3. Integrated Power Module (Fuses)
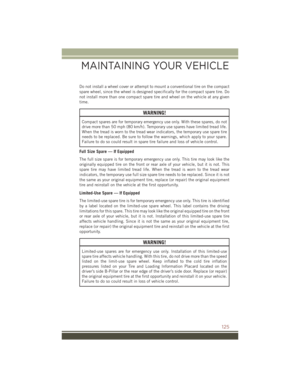
4. Air Cleaner Filter
5. Air Intake (Remove to Access Battery)
MAINTAINING YOUR VEHICLE
110