Page 209 of 236

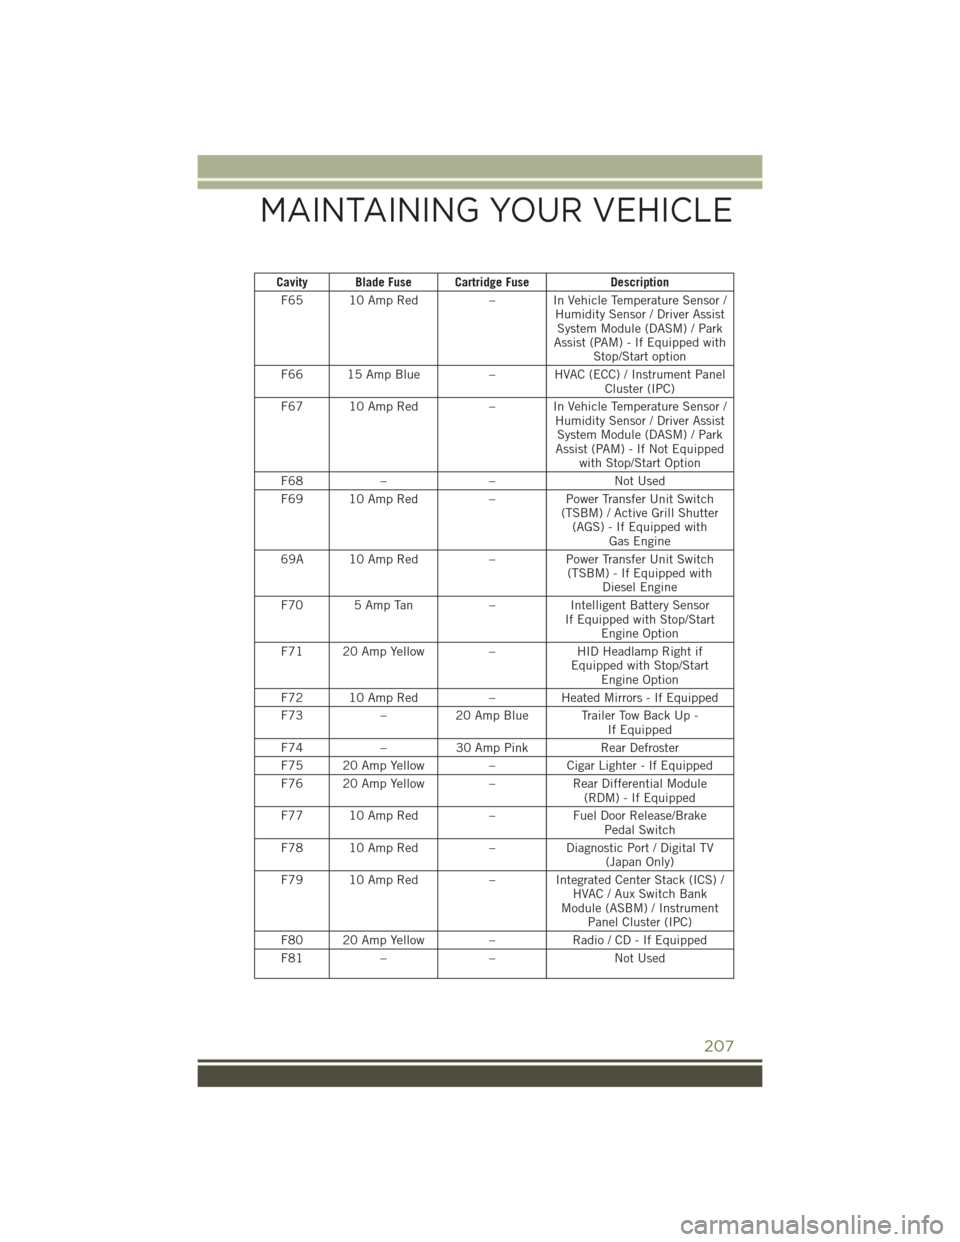
Cavity Blade Fuse Cartridge FuseDescription
F65 10 Amp Red – In Vehicle Temperature Sensor /
Humidity Sensor / Driver AssistSystem Module (DASM) / Park
Assist (PAM) - If Equipped with Stop/Start option
F66 15 Amp Blue – HVAC (ECC) / Instrument Panel
Cluster (IPC)
F67 10 Amp Red – In Vehicle Temperature Sensor /
Humidity Sensor / Driver AssistSystem Module (DASM) / Park
Assist (PAM) - If Not Equipped with Stop/Start Option
F68 – – Not Used
F69 10 Amp Red –Power Transfer Unit Switch
(TSBM) / Active Grill Shutter (AGS) - If Equipped with Gas Engine
69A 10 Amp Red –Power Transfer Unit Switch
(TSBM) - If Equipped with Diesel Engine
F70 5 Amp Tan –Intelligent Battery Sensor
If Equipped with Stop/Start Engine Option
F71 20 Amp Yellow –HID Headlamp Right if
Equipped with Stop/Start Engine Option
F72 10 Amp Red –Heated Mirrors - If Equipped
F73 –20 Amp Blue Trailer Tow Back Up -
If Equipped
F74 –30 Amp Pink Rear Defroster
F75 20 Amp Yellow –Cigar Lighter - If Equipped
F76 20 Amp Yellow –Rear Differential Module
(RDM) - If Equipped
F77 10 Amp Red –Fuel Door Release/Brake
Pedal Switch
F78 10 Amp Red –Diagnostic Port / Digital TV
(Japan Only)
F79 10 Amp Red – Integrated Center Stack (ICS) /
HVAC / Aux Switch Bank
Module (ASBM) / Instrument Panel Cluster (IPC)
F80 20 Amp Yellow –Radio / CD - If Equipped
F81 – – Not Used
MAINTAINING YOUR VEHICLE
207
Page 210 of 236

Cavity Blade Fuse Cartridge FuseDescription
F82 – – Not Used
F83 –20 Amp Blue Engine Controller Module (Gas)
F84 –30 Amp Pink Electric Park Brake (EPB) - Left
F85 – – Not Used
F86 20 Amp Yellow –Horns - If Equipped With
Stop/Start Engine Option
F87A 20 Amp Yellow –HID Headlamp Left -
If Equipped with Stop/Start Engine Option
F88 15 Amp Blue –Collision Mitigation Module
(CMM) / Electrochromatic
Mirror / Smart Camera Module - If Equipped
F89 10 Amp Red –Headlamp Leveling -
If Equipped
F90 – – Not Used
F91 20 Amp Yellow – Power Outlet Rear - If Equipped
- Customer Selectable
F92 – – Not Used
F93 –40 Amp Green Brake System Module (BSM) -
Pump Motor
F94 –30 Amp Pink Electric Park Brake (EPB) -
Right
F95 10 Amp Red – Electrochromatic Mirror / Rain
Sensor / Sunroof - If Equipped /Passenger Window Switch /
Power Outlet Console / Digital TV (Japan Only)
F96 10 Amp Red –Occupant Restraint Controller
(ORC) / (Airbag)
F97 10 Amp Red –Occupant Restraint Controller
(ORC) / (Airbag)
F98 25 Amp Clear –Audio Amplifier - If Equipped
F99 – – Not Used
F100 – – Not Used
MAINTAINING YOUR VEHICLE
208
Page 211 of 236
Interior Fuses
The interior fuse panel is located in the passenger compartment on the left side dash
panel under the instrument panel.
CavityBlade Fuse Description
F13 15 Amp Blue Low Beam Left
F32 10 Amp Red Interior Lighting
F36 10 Amp Red Intrusion Module/Siren – If Equipped
F38 20 Amp Yellow Deadbolt All Unlock
F43 20 Amp Yellow Washer Pump Front
F48 25 Amp Clear Fog Lamp Rear Left/Right – If Equipped
F49 7.5 Amp Brown Lumbar Support
F50 7.5 Amp Brown Wireless Charging Pad – If Equipped
F51 10 Amp Red Driver Window Switch/Power Mirrors –
If Equipped
F53 7.5 Amp Brown UCI Port (USB & AUX)
F89 10 Amp Red Door Locks – Driver Unlock
F91 7.5 Amp Brown Fog Lamp Front Left
F92 7.5 Amp Brown Fog Lamp Front Right
F93 10 Amp Red Low Beam Right
MAINTAINING YOUR VEHICLE
209
Page 212 of 236

ADDING FUEL
The gas cap is located behind the fuel filler door, on the passenger side of the vehicle.
If the gas cap is lost or damaged, be sure the replacement cap has been designed for
use with this vehicle.
NOTE:
When removing the fuel filler cap, lay the cap tether in the hook, located on the fuel
filler door reinforcement.
1. Push the fuel filler door release switch (located on the driver’s side door trim).
2. Open the fuel filler door, and remove the fuel filler cap.
NOTE:
• In certain cold conditions, ice mayprevent the fuel door from opening. If
this occurs, lightly push on the fuel
door to break the ice buildup and re-
release the fuel door using the inside
release button. Do not pry on the door.
• When the fuel nozzle “clicks” or shuts off, the fuel tank is full.
• Tighten the gas cap about one quarter turn until you hear one click. This is an
indication that the cap is properly
tightened.
• If the gas cap is not tightened prop- erly, the MIL will come on. Be sure the gas cap is tightened every time the vehicle
is refueled.
Fuel Filler Door Release Switch
Fuel Filler Cap (Gas Cap)
MAINTAINING YOUR VEHICLE
210
Page 213 of 236

CAUTION!
• Damage to the fuel system or emission control system could result from usingan improper fuel filler cap. A poorly fitting cap could let impurities into the fuel
system. Also, a poorly fitting aftermarket cap can cause the “Malfunction
Indicator Light (MIL)” to illuminate, due to fuel vapors escaping from the
system.
• A poorly fitting fuel filler cap may cause the MIL to turn on.
•
To avoid fuel spillage and overfilling, do not “top off” the fuel tank after filling.
WARNING!
• Never have any smoking materials lit in or near the vehicle when the gas cap is
removed or the tank is being filled.
• Never add fuel when the engine is running. This is in violation of most state and
federal fire regulations and may cause the MIL to turn on.
• A fire may result if gasoline is pumped into a portable container that is inside
of a vehicle. You could be burned. Always place gas containers on the ground
while filling.
Emergency Fuel Filler Door Release
If you are unable to open the fuel filler door, use the fuel filler door emergency
release.
1. Open the liftgate.
2. Remove access door located on right interior trim panel for release cable with the tip of your key.
3. Grab the release cable tether and pull up to release the fuel filler door.
Loose Fuel Filler Cap Message
If the vehicle diagnostic system determines that the fuel filler cap is loose,
improperly installed, or damaged, a “CHECK GASCAP” message will be displayed in
the Electronic Vehicle Information Center (EVIC) or Driver Information Display (DID).
Refer to “Electronic Vehicle Information (EVIC) or "Driver Information Display (DID)”
in “Understanding Your Instrument Panel” for further information. Tighten the fuel
filler cap until a “clicking” sound is heard. This is an indication that the fuel filler cap
is properly tightened. Refer to “Onboard Diagnostic System” in “Maintaining Your
Vehicle” for further information.
MAINTAINING YOUR VEHICLE
211
Page 214 of 236

TIRES — GENERAL INFORMATION
TIRE PRESSURES
Check the inflation pressure of each tire, including the spare tire (if equipped), at
least monthly and inflate to the recommended pressure for your vehicle.
The tire pressures recommended for your vehicle are found on the “Tire and Loading
Information” label located on the driver’s side door opening or B pillar.
NOTE:
Refer to the Owner's Manual on the DVD
or the Tire Information Supplement lo-
cated in your Owners Information kit for
more information regarding tire warnings
and instructions.
WARNING!
• Overloading of your tires is dangerous. Overloading can cause tire failure,affect vehicle handling, and increase your stopping distance. Use tires of the
recommended load capacity for your vehicle. Never overload them.
• Improperly inflated tires are dangerous and can cause collisions. Under-
inflation increases tire flexing and can result in over-heating and tire failure.
Over-inflation reduces a tire’s ability to cushion shock. Objects on the road and
chuck holes can cause damage that results in tire failure. Unequal tire
pressures can cause steering problems. You could lose control of your vehicle.
Over-inflated or under-inflated tires can affect vehicle handling and can fail
suddenly, resulting in loss of vehicle control. Always drive with each tire
inflated to the recommended cold tire inflation pressure.
Tire And Loading Information Location (Example)
MAINTAINING YOUR VEHICLE
212
Page 215 of 236

SPARE TIRES — IF EQUIPPED
NOTE:
For vehicles equipped with Tire Service Kit instead of a spare tire, please refer to “Tire
Service Kit” in “What To Do In Emergencies” on your DVD for further information.
CAUTION!
Because of the reduced ground clearance, do not take your vehicle through an
automatic car wash with a compact or limited-use temporary spare installed.
Damage to the vehicle may result.
Spare Tire Matching Original Equipped Tire And Wheel — If Equipped
Your vehicle may be equipped with a spare tire and wheel equivalent in look and
function to the original equipment tire and wheel found on the front or rear axle of
your vehicle. This spare tire may be used in the tire rotation for your vehicle. If your
vehicle has this option, refer to an authorized tire dealer for the recommended tire
rotation pattern.
Compact Spare Tire — If Equipped
The compact spare is for temporary emergency use only. You can identify if your
vehicle is equipped with a compact spare by looking at the spare tire description on
the Tire and Loading Information Placard located on the driver’s side door opening or
on the sidewall of the tire. Compact spare tire descriptions begin with the letter “T”
or “S” preceding the size designation. Example: T145/80D18 103M.
T,S=Temporary Spare Tire
Since this tire has limited tread life, the original equipment tire should be repaired
(or replaced) and reinstalled on your vehicle at the first opportunity.
Do not install a wheel cover or attempt to mount a conventional tire on the compact
spare wheel, since the wheel is designed specifically for the compact spare tire. Do not
install more than one compact spare tire and wheel on the vehicle at any given time.
WARNING!
Compact spares are for temporary emergency use only. With these spares, do not
drive more than 50 mph (80 km/h). Temporary use spares have limited tread life.
When the tread is worn to the tread wear indicators, the temporary use spare tire
needs to be replaced. Be sure to follow the warnings, which apply to your spare.
Failure to do so could result in spare tire failure and loss of vehicle control.
MAINTAINING YOUR VEHICLE
213
Page 216 of 236

Full Size Spare — If Equipped
The full size spare is for temporary emergency use only. This tire may look like the
originally equipped tire on the front or rear axle of your vehicle, but it is not. This
spare tire may have limited tread life. When the tread is worn to the tread wear
indicators, the temporary use full size spare tire needs to be replaced. Since it is not
the same as your original equipment tire, replace (or repair) the original equipment
tire and reinstall on the vehicle at the first opportunity.
Limited-Use Spare — If Equipped
The limited-use spare tire is for temporary emergency use only. This tire is identified
by a label located on the limited-use spare wheel. This label contains the driving
limitations for this spare. This tire may look like the original equipped tire on the front
or rear axle of your vehicle, but it is not. Installation of this limited-use spare tire
affects vehicle handling. Since it is not the same as your original equipment tire,
replace (or repair) the original equipment tire and reinstall on the vehicle at the first
opportunity.
WARNING!
Limited-use spares are for emergency use only. Installation of this limited-use
spare tire affects vehicle handling. With this tire, do not drive more than the speed
listed on the limit-use spare wheel. Keep inflated to the cold tire inflation
pressures listed on your Tire and Loading Information Placard located on the
driver’s side B-Pillar or the rear edge of the driver’s side door. Replace (or repair)
the original equipment tire at the first opportunity and reinstall it on your vehicle.
Failure to do so could result in loss of vehicle control.
WHEEL AND WHEEL TRIM CARE
All wheels and wheel trim, especially aluminum and chrome plated wheels, should
be cleaned regularly with a mild soap and water to prevent corrosion.
To remove heavy soil and/or excessive brake dust, use MOPAR Wheel Cleaner or
equivalent or select a non-abrasive, non-acidic cleaner.
CAUTION!
Do not use scouring pads, steel wool, a bristle brush, or metal polishes. Do not use
oven cleaner. These products may damage the wheel's protective finish. Avoid
automatic car washes that use acidic solutions or harsh brushes that may damage
the wheel's protective finish. Only MOPAR Wheel Cleaner or equivalent is
recommended.
MAINTAINING YOUR VEHICLE
214