Page 1 of 16
CONTENTS
Driver controls 2
Vehicle access 3
Comfort adjustments 4
Starting and driving 5
Driving aids 8
Heating and ventilation 10
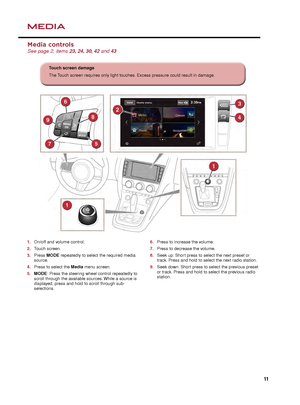
Media 11
Navigation 14
Phone 15
Gas station information 16
JJM189635161.indd 104/11/2014 13:31:24
Some of the features described may not be �tted to your vehicle.
QUICK START GUIDE
F�TYPE
Page 2 of 16

2
DRIVER CONTROLSVEHICLE ACCESS
1. Central locking/unlocking.
2. Seat adjustment.
3. Driving position memory.
4. Trip computer.
5. Turn signals and headlamp control.
6. Gearshift down.
7. Phone.
8. Instrument panel, Message center and warning lamps.
9. Heated steering wheel.
10. Gearshift up.
11. Wiper/washers.
12. Climate control AUTO mode.
13. Air conditioning on/off.
14. Climate control recirculation.
15. Hazard warning lamps on/off.
16. Windshield maximum defrost.
17. Heated windshield.
18. Heated rear screen.
19. Home menu.
20. Climate menu.
21. Touch screen Setup or Parking aid.
22. Touch screen on/off or Rear camera.
23. Audio/video mode selection.
24. Audio/video menu.
25. Phone menu.
26. Navigation menu.
27. Climate control.
28. Power socket.
29. Auto gearbox selector.
30. Audio/video system on/off and volume control.
31. Active exhaust.
32. Convertible roof switch.
33. Deployable rear spoiler switch.
34. Intelligent stop/start.
35. Electric parking brake.
36. Stability control.
37. Driving modes.
38. START/STOP.
39. Cruise control or Automatic speed limiter.
40. Horn.
41. Steering wheel adjuster.
42. Audio/video mode selection.
43. Audio/video and phone controls.
44. Instrument illumination.
45. Fog lamps on/off.
46. Trunk/tailgate release.
47. Exterior mirror controls.
48. Window controls.
49. Dynamic driving mode.
50. Rain/Ice/Snow driving mode.
51. Manual gearbox selector.
Smart key
Press once to lock the vehicle and arm the alarm.
Multi-point entry - press once to disarm the
alarm, and unlock all of the doors and the trunk.
Single-point entry - press once to disarm
the alarm and unlock the driver’s door. A second press
unlocks the passenger door and the trunk.
Press and hold to also open the windows (Global
opening).
With either method, the door handles are presented for
opening. Pull to open the door.
To change between entry modes, with the vehicle
unlocked, press the lock and unlock buttons
simultaneously for 3 seconds. The hazard warning lamps
flash twice to confirm the change .
Press once to switch the headlamps on for up to
120 seconds. Press again to switch off.
Press to open only the trunk/powered tailgate.
The rest of the security system remains active.
Press and hold for 3 seconds to activate/cancel the panic alarm.
Powered tailgate See page 2, item 46
To open:
1. With transmission P selected, press the external tailgate release, or
2. press the internal tailgate release.
Alternatively, use the Smart key.
The powered tailgate will continue to open to the set
height, unless an obstruction is detected.
To close:
3. Press and release.
If an obstruction is detected during closing, the tailgate
will stop and then reverse to the fully open position. An
audible warning will indicate a mislock.
Note: Steering wheel design may
differ depending on specification.
Smart key detection
The Smart key may not be detected if it is placed in
a metal container, or if it is shielded by a device with
a back-lit LCD screen, (e.g., laptop, smartphone,
etc.).
Loose coins in the same pocket as the Smart key
can also act as a shield. Keep the Smart key clear
of possible shielding when attempting Keyless entry
or Keyless starting.
JJM189635161.indd 204/11/2014 13:31:25
Page 3 of 16

3
DRIVER CONTROLSVEHICLE ACCESS
26. Navigation menu.
27. Climate control.
28. Power socket.
29. Auto gearbox selector.
30. Audio/video system on/off and volume control.
31. Active exhaust.
32. Convertible roof switch.
33. Deployable rear spoiler switch.
34. Intelligent stop/start.
35. Electric parking brake.
36. Stability control.
37. Driving modes.
38. START/STOP.
39. Cruise control or Automatic speed limiter.
40. Horn.
41. Steering wheel adjuster.
42. Audio/video mode selection.
43. Audio/video and phone controls.
44. Instrument illumination.
45. Fog lamps on/off.
46. Trunk/tailgate release.
47. Exterior mirror controls.
48. Window controls.
49. Dynamic driving mode.
50. Rain/Ice/Snow driving mode.
51. Manual gearbox selector.
Smart key
Press once to lock the vehicle and arm the alarm.
Multi-point entry - press once to disarm the
alarm, and unlock all of the doors and the trunk.
Single-point entry - press once to disarm
the alarm and unlock the driver’s door. A second press
unlocks the passenger door and the trunk.
Press and hold to also open the windows (Global
opening).
With either method, the door handles are presented for
opening. Pull to open the door.
To change between entry modes, with the vehicle
unlocked, press the lock and unlock buttons
simultaneously for 3 seconds. The hazard warning lamps
flash twice to confirm the change .
Press once to switch the headlamps on for up to
120 seconds. Press again to switch off.
Press to open only the trunk/powered tailgate.
The rest of the security system remains active.
Press and hold for 3 seconds to activate/cancel the panic alarm.
Powered tailgate See page 2, item 46
To open:
1. With transmission P selected, press the external tailgate release , or
2. press the internal tailgate release.
Alternatively, use the Smart key.
The powered tailgate will continue to open to the set
height, unless an obstruction is detected.
To close:
3. Press and release.
If an obstruction is detected during closing, the tailgate
will stop and then reverse to the fully open position. An
audible warning will indicate a mislock.
Smart key not found
If the Smart key is
not detected and
the message Smart
Key Not Found is
displayed, hold it in the
indicated position. Start
the engine as normal.
The Smart key can now
be removed.
Smart key detection
DO NOT leave your Smart key inside the trunk.
If it becomes shielded, the vehicle WILL NOT
automatically unlock.
Passive entry and locking
The door handles operate only while the Smart key is
within 3 ft (1m) of the vehicle.
To unlock the vehicle and disarm the alarm, press a
door handle recess or the trunk release button. The door
handle is presented for opening. Pull to open the door.
To lock, press the rear of the door handle until it is flush
with the door. The doors and trunk lock, and the alarm is
activated. The doors can still be unlocked from inside the
vehicle.
When locking, the convertible roof should be up.
Smart key detection
The Smart key may not be detected if it is placed in
a metal container, or if it is shielded by a device with
a back-lit LCD screen, (e.g., laptop, smartphone,
etc.).
Loose coins in the same pocket as the Smart key
can also act as a shield. Keep the Smart key clear
of possible shielding when attempting Keyless entry
or Keyless starting.
JJM189635161.indd 304/11/2014 13:31:26
Page 4 of 16

COMFORT ADJUSTMENTS
4
STARTING AND DRIVING
Setting the driving position See page 2, items 2, 3, 41 and 47
Driver’s seat
Set the seat position using the following controls:
1. Seatback angle.
2. Lumbar support.
3. Memory preset buttons 1, 2 and 3.
4. Memory set button.
5. Seat forwards and backwards, cushion height and cushion angle .
6. Side bolsters inflate and deflate.
7. With the vehicle stationary, adjust tilt and reach of the steering wheel to your ideal driving position.
8. Press the left or right mirror selector. Use the mirror adjuster to set the mirror positions .
Storing the driving position to memory
When the driver’s seat, steering wheel and door mirrors
are adjusted to the required position, the settings can be
stored.
Press the memory set button 4 to activate the memory
store function. The button illuminates to indicate that the
memory store function is active.
Within 5 seconds, press memory button 1, 2 or 3 to store
the current driving position.
A stored memory position can now be recalled with
a press of the appropriate button. The driver’s seat,
steering wheel and mirrors move to their preset positions.
Time limit
Memory buttons must be pressed within 5 seconds
of pressing the memory set button, otherwise, the
memory store function cancels.
Engine start/stop See page 2, item 38
Ignition on
• With the Smart key inside the vehicle, press the START/STOP button to switch on the ignition.
Engine start
1. The transmission must be in the P or N position.
2. Automatic transmission: Press the brake pedal firmly. Manual transmission: Press the clutch pedal firmly.
3. Press and release the START/STOP button to start the engine.
Engine stop
• With transmission P or N selected and the Electric parking brake applied, press to stop the engine and switch off the ignition.
Automatic transmission See page 2, item 29
1. Press the brake pedal before and while the selector is moved from the P position.
2. The selector release button must be pressed when moving from P or N.
3. Move the selector backwards to D or forwards to N, or forwards again to R. An LED on top of the selector will illuminate to indicate the current gear selection. The Message center also indicates the current gear selection.
4. To select S (Sport mode) when in D, move the selector to the left. Pull the selector backwards for up-shifts and push it forwards for down-shifts. To return to fully automatic mode, move the selector back to D.
5. To select Park, simply press the P switch on top of the selector. This can be done while in any gear selection. The vehicle must be stationary when P is selected.
If the engine is switched off with any other gear still
selected, the transmission returns to the P position.
Automatic return to the P position
If the engine is switched off with N selected, automatic
return to the P position is delayed for 10 minutes. This
allows enough time for the vehicle to be conveyed
through an automatic car wash.
DO NOT use this feature to enable towing of the vehicle. Refer to
Vehicle recovery in the Owner’s Handbook.
Convertible roof See page 2, item 32
To operate the convertible roof, the ignition must be
switched on and the vehicle’s speed must be below 30
mph (50 km/h).
1. To open the roof, press and hold down the front of the switch.
2. An audible warning sounds, the windows open and the roof starts to move. When the roof is fully open, the warning sounds again and a message is displayed in the Message center.
3. Release the switch.
Closing is the reverse of this procedure. Pull up the front
of the switch until the roof is fully closed and latched.
JJM189635161.indd 404/11/2014 13:31:26
Page 5 of 16

COMFORT ADJUSTMENTSSTARTING AND DRIVING
5
Smart key use
The engine will continue to run, even if the Smart key
is removed from the vehicle. However, if the engine is
stopped, it cannot be restarted until the Smart key is
returned to the vehicle.
Engine start/stop See page 2, item 38
Ignition on
• With the Smart key inside the vehicle, press the START/STOP button to switch on the ignition.
Engine start
1. The transmission must be in the P or N position.
2. Automatic transmission: Press the brake pedal firmly. Manual transmission: Press the clutch pedal firmly.
3. Press and release the START/STOP button to start the engine .
Engine stop
• With transmission P or N selected and the Electric parking brake applied, press to stop the engine and switch off the ignition.
Rolling start
If the engine is switched off while the vehicle is moving,
it can be restarted after 2 seconds have elapsed. Select
transmission N and then press the START/STOP button.
Automatic transmission See page 2, item 29
1. Press the brake pedal before and while the selector is moved from the P position.
2. The selector release button must be pressed when moving from P or N.
3. Move the selector backwards to D or forwards to N, or forwards again to R. An LED on top of the selector will illuminate to indicate the current gear selection. The Message center also indicates the current gear selection.
4. To select S (Sport mode) when in D, move the selector to the left. Pull the selector backwards for up-shifts and push it forwards for down-shifts. To return to fully automatic mode, move the selector back to D.
5. To select Park, simply press the P switch on top of the selector. This can be done while in any gear selection. The vehicle must be stationary when P is selected.
If the engine is switched off with any other gear still
selected, the transmission returns to the P position.
Automatic return to the P position
If the engine is switched off with N selected, automatic
return to the P position is delayed for 10 minutes. This
allows enough time for the vehicle to be conveyed
through an automatic car wash.
DO NOT use this feature to enable towing of the vehicle. Refer to
Vehicle recovery in the Owner’s Handbook.
JJM189635161.indd 504/11/2014 13:31:26
Page 6 of 16

STARTING AND DRIVING
6
STARTING AND DRIVING
Releasing
• With the ignition on, apply the brake pedal and press down on the EPB switch.
• If the vehicle is stationary with the EPB applied and with either transmission D or R selected, pressing the accelerator automatically releases the EPB.
Electric parking brake (EPB) See page 2, item 35
Applying
• With the vehicle stationary, lift up the EPB switch and then release it. A red warning lamp in the Instrument panel illuminates.
Auto headlamps and
High beam assist
See page 2, item 5
1. When the lighting control’s AUTO position is selected, the side lamps and headlamps s witch on automatically as ambient light falls below a preset level. With the lighting control in the low beam position, High beam assist activates automatically in the absence of other vehicle lights ahead. The vehicle’s speed must be above 25 mph (40 km/h). To over-ride High beam assist and select low beam, pull the lighting control backwards to the flash position, and release. To reinstate High beam assist, push the lighting control forwards to the high beam position, then back to the low beam position. High beam assist can be enab led/disabled via the Vehicle Settings option in the Instrument panel menu.
Exit delay
2. 3. 4. The headlamps can temporarily illuminate the way ahead when exiting the vehicle at night. Rotate the control for delay periods of 30, 60, or 120 seconds.
Cruise control and Automatic speed limiter (ASL) See page 2, item 39
Setting the Cruise control speed
1. Accelerate to the desired speed, then press to set and maintain the speed. Can also be used to increase speed while Cruise control is operating.
2. Resumes the set speed after Cruise control has been suspended.
3. Press to decrease the set speed.
4. Suspends Cruise control but retains the current set speed in the memory.
5. Press to switch between Cruise control and ASL.
Intelligent stop/start See page 2, item 34
Intelligent stop/start automatically activates when the
ignition is switched on. If the vehicle is stopped and the
brake pedal is applied, the engine switches off (unless it
is required to support other vehicle systems).
Note: The engine will not stop automatically if a gear shift
paddle has been used to select a gear.
When the brake pedal is released and a drive gear is
selected, the engine restarts. A green stop/start lamp
illuminates in the Instrument panel while the engine is
switched off by Intelligent stop/start.
Gear shift paddles See page 2, items 6 and 10The gear shift paddles can be used while in transmission
D or S.
1. To shift down a gear, briefly pull the left paddle.
2. To shift up a gear, briefly pull the right paddle.
3. To exit manual mode and return to the previously selected automatic mode , pull and hold the right paddle for 1 second.
While transmission D is selected, if use of the paddles
is not maintained, gear selection will revert to fully
automatic mode. With transmission S selected,
permanent manual mode is initiated if the paddles are
used. To return to fully automatic mode, move the gear
selector back to transmission D.
When Dynamic mode is selected while in transmission
S, up-shifts are fully controlled by the driver. The
transmission will not automatically change up to the next
gear, even if the engine’s rev limit is reached.
A gear position indicator, in the Message center, glows
amber when an up-shift is required.
Deployable rear spoiler (DRS) See page 2, item 33
The DRS will raise automatically when the vehicle
reaches a predetermined speed:
Convertible - 60 mph (96 km/h) and will retract when the
speed drops below 40 mph (64 km/h).
Coupe - 70 mph (113 km/h) and will retract when the
speed drops below 50 mph (80 km/h).
Manual operation
1. Press to raise the DRS at vehicle speeds of below 60 mph (96 km/h) for the Convertible and 70 mph (113 km/h) for the Coupe.
2. Press again to return to automatic mode.
JJM189635161.indd 604/11/2014 13:31:27
Page 7 of 16

STARTING AND DRIVINGSTARTING AND DRIVING
7
Releasing
• With the ignition on, apply the brake pedal and press down on the EPB switch.
• If the vehicle is stationary with the EPB applied and with either transmission D or R selected, pressing the accelerator automatically releases the EPB.
Cruise control over-ride
Cruise control disengages when the brakes are
applied or when the vehicle’s speed is below 18 mph
(30 km/h). Cruise control will cancel if the accelerator
is used for more than 5 minutes.
Cruise control and Automatic
speed limiter (ASL)
See page 2, item 39
Setting the Cruise control speed
1. Accelerate to the desired speed, then press to set and maintain the speed. Can also be used to increase speed while Cruise control is operating.
2. Resumes the set speed after Cruise control has been suspended.
3. Press to decrease the set speed.
4. Suspends Cruise control but retains the current set speed in the memory.
5. Press to switch between Cruise control and ASL.
Intelligent stop/start See page 2, item 34
Intelligent stop/start automatically activates when the
ignition is switched on. If the vehicle is stopped and the
brake pedal is applied, the engine switches off (unless it
is required to support other vehicle systems).
Note: The engine will not stop automatically if a gear shift
paddle has been used to select a gear.
When the brake pedal is released and a drive gear is
selected, the engine restarts. A green stop/start lamp
illuminates in the Instrument panel while the engine is
switched off by Intelligent stop/start. Press the Intelligent stop/start switch to deactivate the
system. The message center will briefly display the
message, AUTO STOP-START OFF.
Note: The engine restarts automatically if the switch is
pressed while an automatic engine stop is in progress.
When the ignition is switched off and on again, Intelligent
stop/start is reinstated.
The gear shift paddles can be used while in transmission D or S.
1. To shift down a gear, briefly pull the left paddle.
2. To shift up a gear, briefly pull the right paddle.
3. To exit manual mode and return to the previously selected automatic mode, pull and hold the right paddle for 1 second.
While transmission D is selected, if use of the paddles
is not maintained, gear selection will revert to fully
automatic mode. With transmission S selected,
permanent manual mode is initiated if the paddles are
used. To return to fully automatic mode, move the gear
selector back to transmission D.
When Dynamic mode is selected while in transmission
S, up-shifts are fully controlled by the driver. The
transmission will not automatically change up to the next
gear, even if the engine’s rev limit is reached.
A gear position indicator, in the Message center, glows
amber when an up-shift is required.
Setting an ASL speed limit
With ASL selected, a maximum speed can be set while
the vehicle is stationary or on the move. The engine
responds normally up to the set speed, but further
accelerator pressure will not allow the ASL setting to
be exceeded. Accelerator kickdown use will over-ride
the ASL setting, allowing a higher speed to be reached.
When kickdown is used, ASL is suspended.
1. With ASL selected, press to set a maximum speed. A higher maxim um speed can be set at any time. The set speed is displa yed in the Message center.
2. Resumes ASL assistance after a suspension, if the vehicle’s speed is less than the set speed. Vehicle speed must be above 18 mph (30 km/h).
3. Press to decrease the speed limit.
4. Suspends ASL assistance.
5. Press to switch between ASL and Cruise control.
Deployable rear spoiler (DRS) See page 2, item 33
The DRS will raise automatically when the vehicle
reaches a predetermined speed:
Convertible - 60 mph (96 km/h) and will retract when the
speed drops below 40 mph (64 km/h).
Coupe - 70 mph (113 km/h) and will retract when the
speed drops below 50 mph (80 km/h).
Manual operation
1. Press to raise the DRS at vehicle speeds of below 60 mph (96 km/h) f or the Convertible and 70 mph (113 km/h) for the Coupe.
2. Press again to return to automatic mode.
Note: Coupe
switch graphic
is similar.
JJM189635161.indd 704/11/2014 13:31:27
Page 8 of 16

DRIVING AIDS
8
DRIVING AIDS
Driving modes See page 2, items 37, 49 and 50
Manual and automatic transmission
Rain/Ice/Snow mode and Dynamic mode, allow the driver
to more finely tune the vehicle’s driving characteristics to
suit the prevailing conditions. While a mode is selected,
the relevant switch lamp is illuminated.
1. Dynamic mode: Coordinates the vehicle’s systems to deliver a high performance driving experience. If transmission S is now used with paddle gear selection, there is no automatic gear change, even if the rev limit is reached.
NOTE: This mode remains selected for 6 hours after the
engine is switched off.
Blind spot monitor
BSM switches on automatically at vehicle speeds of
above 6 mph (10 km/h) while in a forward gear. It
monitors an area that extends approximately 20 ft (6 m)
behind the rear wheels and 8.2 ft (2.5 m) to the sides.
1. Each mirror displays amber icons to warn of overtaking vehicles in adjacent lanes.
2. The amber dot remains illuminated until the vehicle’s speed exceeds 6 mph (10 km/h).
Door mirror dip and Blind spot
monitor (BSM)
See page 2, item 47
Passenger side mirror dip when reversing
This feature can be used to improve the passenger side
lower view, while reversing. Mirror dip can be selected
or deselected from the Instrument panel menu. Select
from the Vehicle Settings menu, then select the desired
option from the list.
To set a dip position
1. With the Electric parking brake applied, select transmission position R.
2. Adjust the mirror position with the joystick control to show a view of the lower rear curb and vehicle.
Subsequently, each time transmission R is selected, the
set dip position will be automatically selected. The mirrors
will return to their normal position when a forward gear is
selected.
Parking aids See page 2, item 21
When transmission R is selected, Parking aids sensors at
the rear and front of the vehicle activate. When a forward
gear is selected and the front Parking aids are required,
press the Parking aids switch to the left of the Touch
screen. Forward speed must be kept below 10 mph (16
km/h).
1. When a Rear camera is not fitted, the Touch screen displays a vehicle graphic and indicates the approximate distance to any object detected.
Note: Sensors may activate when water, snow, or ice are
detected on their surfaces. Make sure that the sensors
are cleaned regularly.
An audible alert increases in frequency as the object is
approached.
The audible alert volume can be adjusted via the Touch
screen. Select the Home menu, then Setup followed by
System. Now select Volume presets. Use the + or - soft
keys, alongside Parking aid, to adjust the volume.
Valet mode
The glovebox, trunk, and the Touch screen can be
security locked to deny access to a parking attendant.
Selecting Valet mode
1. From the Touch screen, select the Home menu.
2. Now select Valet.
3. Enter a 4 digit PIN (personally chosen) and touch OK. You will be requested to confirm the PIN number.
4. Valet mode activated is displayed.
Folding mirrors
Press both buttons simultaneously to fold the mirrors
inwards. Press again to unfold.
2. Rain/ice/snow mode: Use in slippery road conditions . Moderates engine response and modifies the gear change strategy, to achieve the maximum possible traction.
NOTE: This mode remains in use until switched off.
Dynamic launch
Enhances vehicle acceleration and automatic gear
changes during a launch from standstill.
1. With Dynamic mode selected, press and hold the brake pedal with the left foot.
2. Select transmission D or S and lightly press the accelerator until the Message center displays DYNAMIC LAUNCH READY.
3. Release the brake pedal and then fully press the accelerator pedal. DYNAMIC LAUNCH ACTIVE is displayed in the Message center and rapid acceleration commences.
JJM189635161.indd 804/11/2014 13:31:27