Page 17 of 32
15
Headlight Control
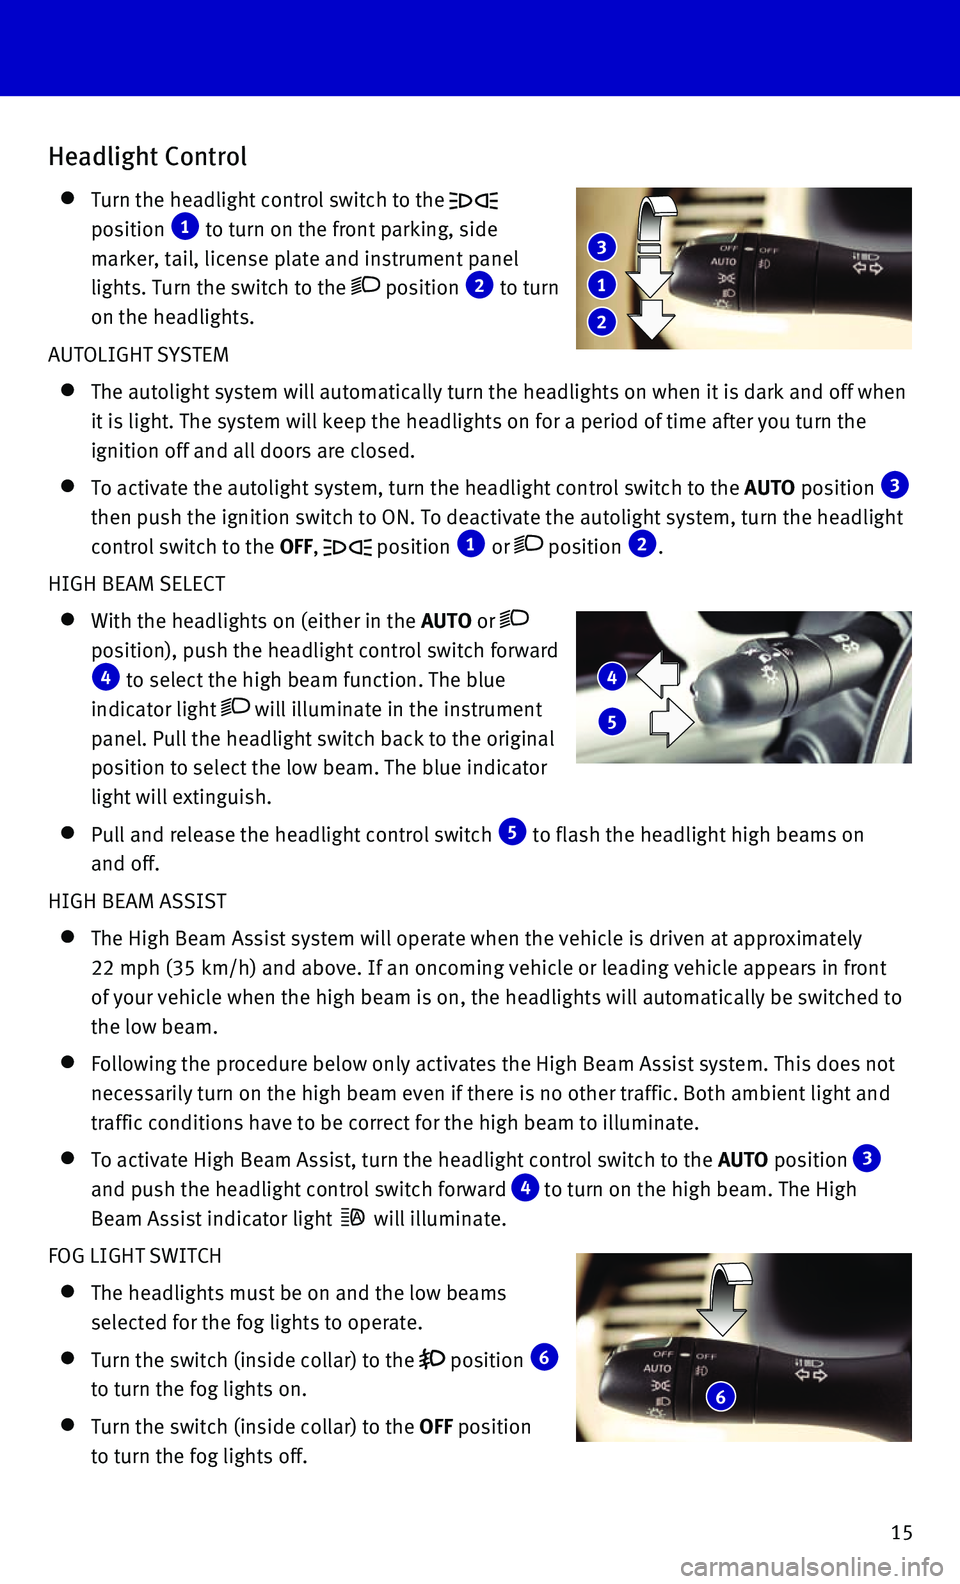
Turn the headlight control switch to the
position 1 to turn on the front parking, side
marker, tail, license plate and instrument panel
lights. Turn the switch to the
position 2 to turn
on the headlights.
AUTOLIGHT SYSTEM
The autolight system will automatically turn the headlights on when it i\
s da rk and off when
it is light. The system will keep the headlights on for a period of time\
after you turn the
ignition off and all doors are closed.
To activate the autolight system, turn the headlight control switch to t\
he AUTO position 3
then push the ignition switch to ON. To deactivate the autolight system,\
turn the headlight
control switch to the OFF,
position 1 or position 2.
HIGH BEAM SELECT
With the headlights on (either in the AUTO or
position), push the headlight control switch forward 4 to select the high beam function. The blue
indicator light
will illuminate in the instrument
panel. Pull the headlight switch back to the original
position to select the low beam. The blue indicator
light will extinguish.
Pull and release the headlight control switch 5 to flash the headlight high beams on
and off.
HIGH BEAM ASSIST
The High Beam Assist system will operate when the vehicle is driven at a\
pp roximately
22 mph (35 km/h) and above. If an oncoming vehicle or leading vehicle \
appears in front
of your vehicle when the high beam is on, the headlights will automatica\
lly be switched to
the low beam.
Following the procedure below only activates the High Beam Assist system\
. This does not
necessarily turn on the high beam even if there is no other traffic. Bot\
h ambient light and
traffic conditions have to be correct for the high beam to illuminate.
To activate High Beam Assist, turn the headlight control switch to the AUTO position 3
and push the headlight control switch forward
4 to turn on the high beam. The High
Beam Assist indicator light
will illuminate.
FOG LIGHT SWITCH
The headlights must be on and the low beams
selected for the fog lights to operate.
Turn the switch (inside collar) to the position 6
to turn the fog lights on.
Turn the switch (inside collar) to the OFF position
to turn the fog lights off.
1
2
3
4
5
6
Page 18 of 32
16
first drive features
Wiper and Washer Switch
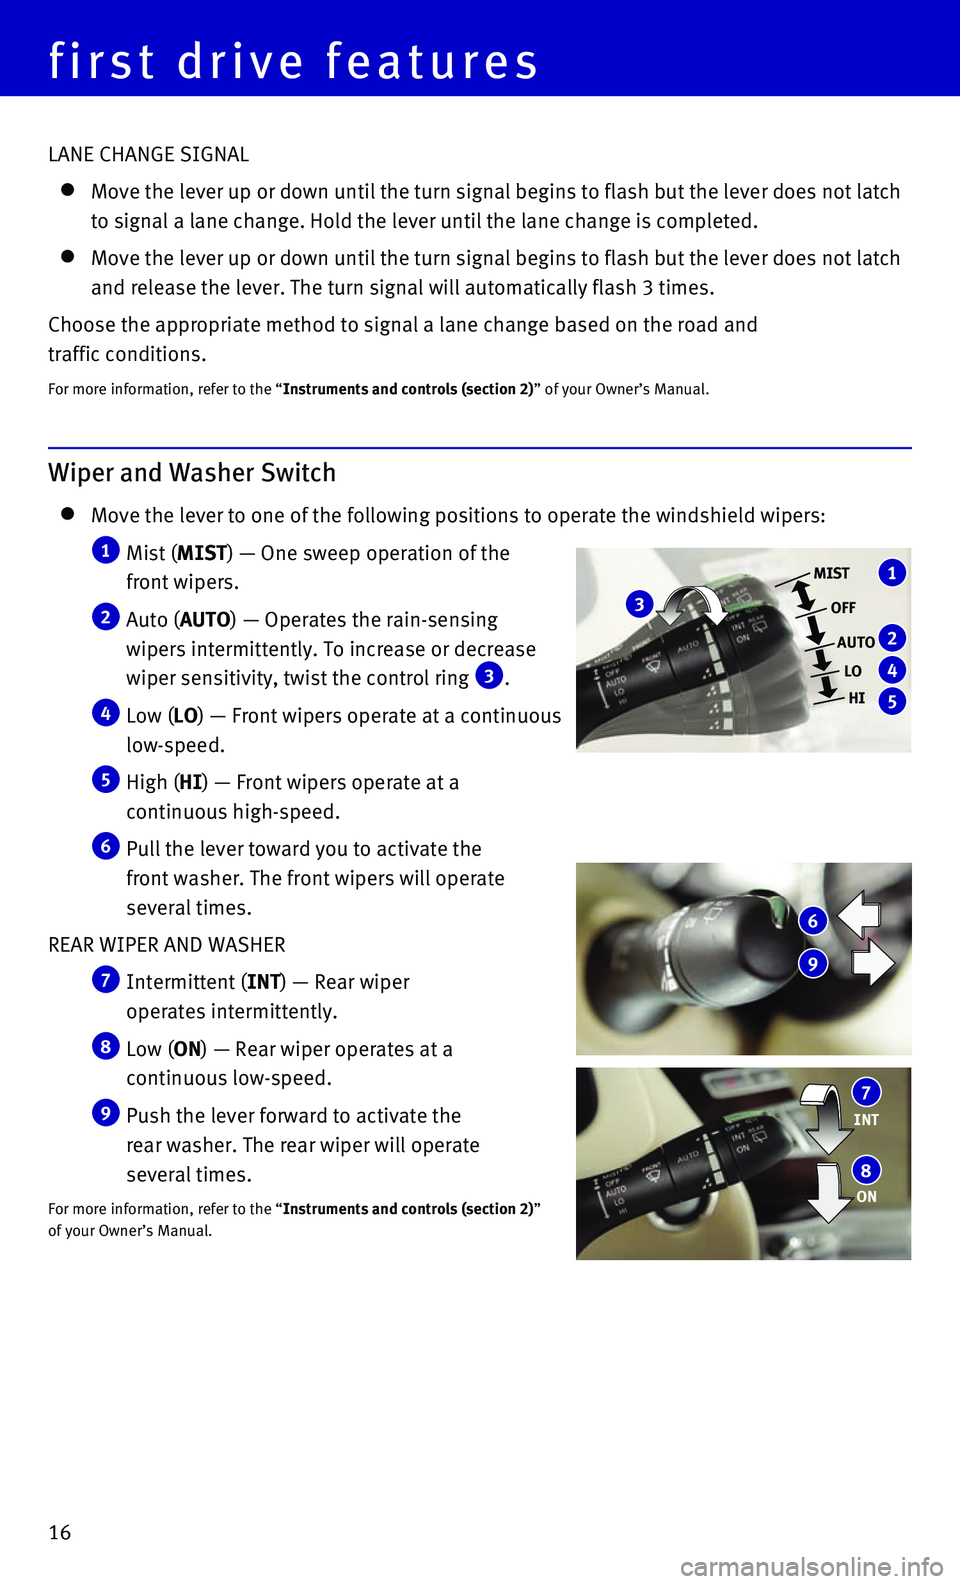
Move the lever to one of the following positions to operate the windshie\
ld wipers:
1 Mist (MIST) — One sweep operation of the
front wipers.
2 Auto (AUTO) — Operates the rain-sensing
wipers intermittently. To increase or decrease
wiper sensitivity, twist the control ring
3.
4 Low (LO) — Front wipers operate at a continuous
low-speed.
5 High (HI) — Front wipers operate at a
continuous high-speed.
6 Pull the lever toward you to activate the
front washer. The front wipers will operate
several times.
REAR WIPER AND WASHER
7 Intermittent (INT) — Rear wiper
operates intermittently.
8 Low (ON) — Rear wiper operates at a
continuous low-speed.
9 Push the lever forward to activate the
rear washer. The rear wiper will operate
several times.
For more information, refer to the “Instruments and controls (section 2)”
of your Owner’s Manual.
INT 7
ON 8
3
1
2
4
5
MIST
OFF
AUTO LOHI
6
9
LANE CHANGE SIGNAL
Move the lever up or down until the turn signal begins to flash but the \
leve r does not latch
to signal a lane change. Hold the lever until the lane change is complet\
ed.
Move the lever up or down until the turn signal begins to flash but the \
lever does not latch
and release the lever. The turn signal will automatically flash 3 times.\
Choose the appropriate method to signal a lane change based on the road \
and
traffic conditions.
For more information, refer to the “Instruments and controls (section 2)” of your Owner’s Manual.
Page 19 of 32
17
Heater and Air Conditioner (automatic)
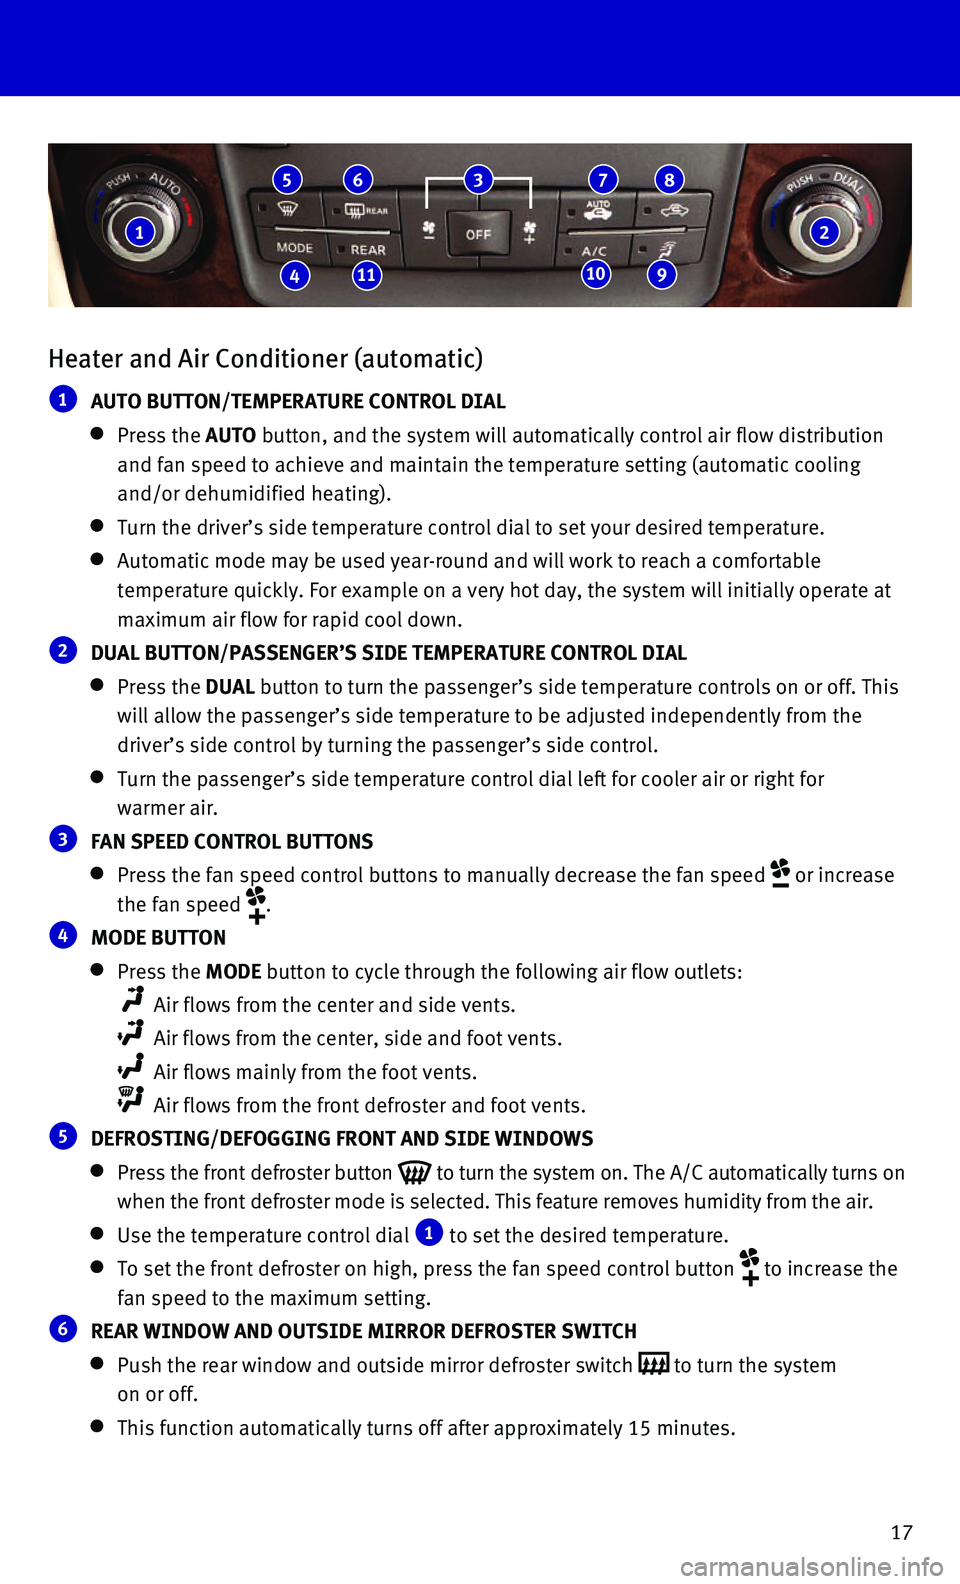
1 AUTO BUTTON/TEMPERATURE CONTROL DIAL
Press the AUTO button, and the system will automatically control air flow distribution\
and fan speed to achieve and maintain the temperature setting (automati\
c cooling
and/or dehumidified heating).
Turn the driver’s side temperature control dial to set your desired t\
emperat ure.
Automatic mode may be used year-round and will work to reach a comfortab\
le
temperature quickly. For example on a very hot day, the system will init\
ially operate at
maximum air flow for rapid cool down.
2 DUAL BUTTON/PASSENGER’S SIDE TEMPERATURE CONTROL DIAL
Press the DUAL button to turn the passenger’s side temperature controls on or off. \
This
will allow the passenger’s side temperature to be adjusted independen\
tly from the
driver’s side control by turning the passenger’s side control.
Turn the passenger’s side temperature control dial left for cooler ai\
r or righ t for
warmer air.
3 FAN SPEED CONTROL BUTTONS
Press the fan speed control buttons to manually decrease the fan speed or increase
the fan speed
.
4 MODE BUTTON
Press the MODE button to cycle through the following air flow outlets:
Air flows from the center and side vents.
Air flows from the center, side and foot vents.
Air flows mainly from the foot vents.
Air flows from the front defroster and foot vents.
5 DEFROSTING/DEFOGGING FRONT AND SIDE WINDOWS
Press the front defroster button to turn the system on. The A/C automatically turns on
when the front defroster mode is selected. This feature removes humidity\
from the air.
Use the temperature control dial 1 to set the desired temperature.
To set the front defroster on high, press the fan speed control button to increase the
fan speed to the maximum setting.
6 REAR WINDOW AND OUTSIDE MIRROR DEFROSTER SWITCH
Push the rear window and outside mirror defroster switch to turn the system
on or off.
This function automatically turns off after approximately 15 minutes.
1
41110 9
5 6 3 7 8
2
Page 20 of 32
18
first drive features
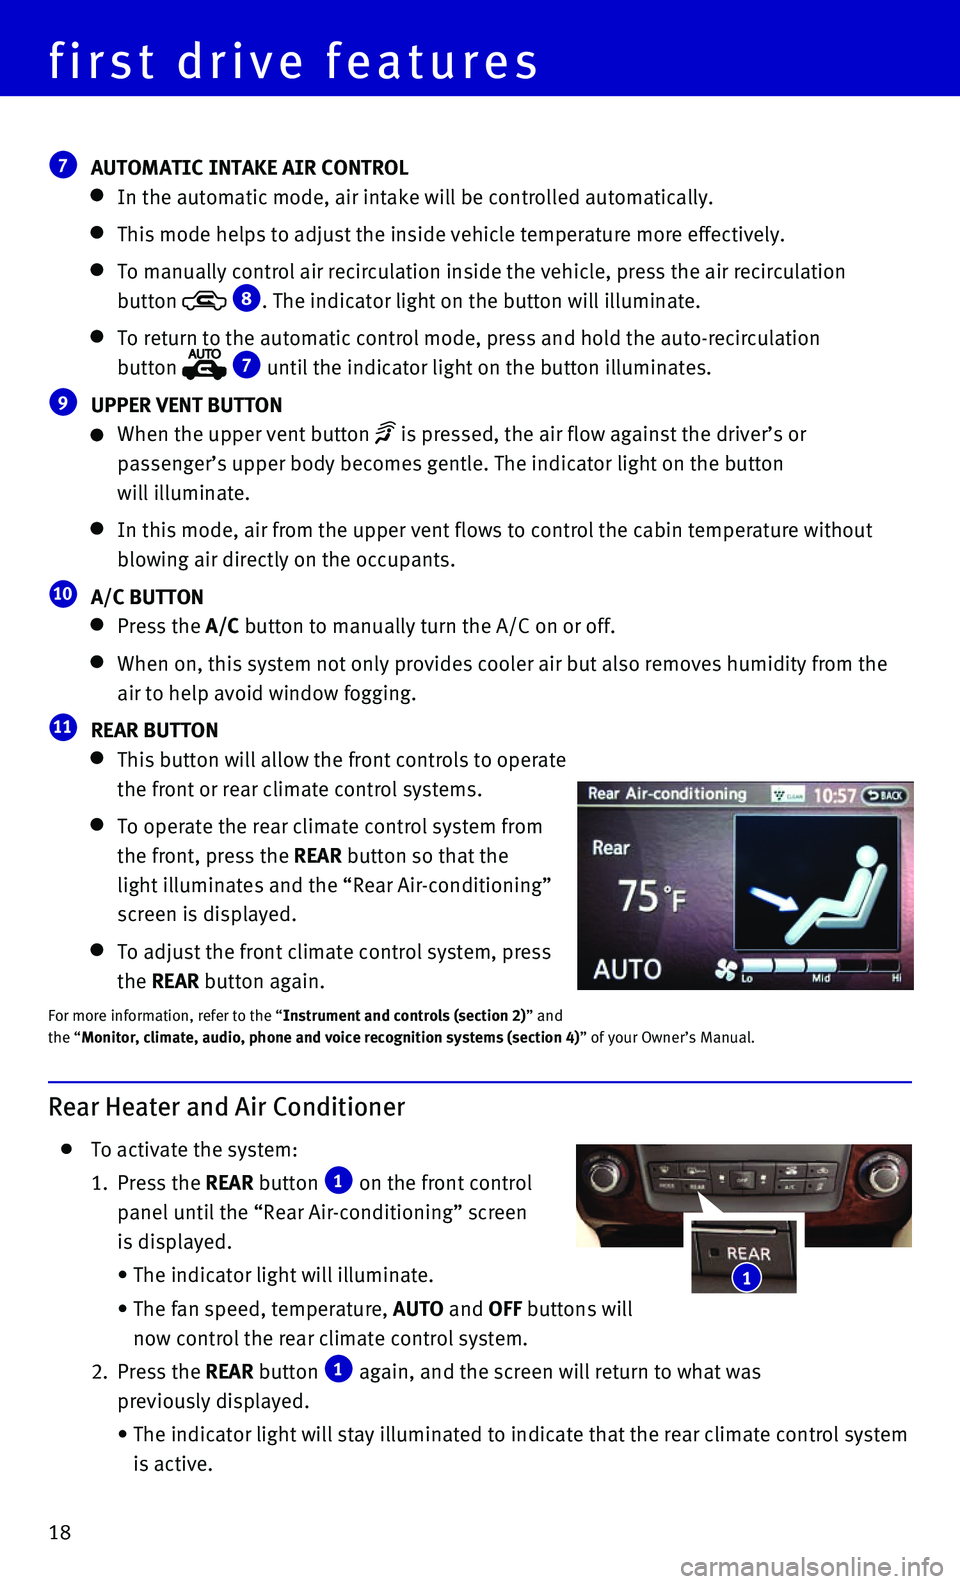
7 AUTOMATIC INTAKE AIR CONTROL
In the automatic mode, air intake will be controlled automatically.
This mode helps to adjust the inside vehicle temperature more effectivel\
y.
To manually control air recirculation inside the vehicle, press the air \
recirculation
button
8. The indicator light on the button will illuminate.
To return to the automatic control mode, press and hold the auto-recircu\
lat ion
button
7 until the indicator light on the button illuminates.
9 UPPER VENT BUTTON
When the upper vent button is pressed, the air flow against the driver’s or
passenger’s upper body becomes gentle. The indicator light on the but\
ton
will illuminate.
In this mode, air from the upper vent flows to control the cabin tempera\
ture without
blowing air directly on the occupants.
10 A/C BUTTON
Press the A/C button to manually turn the A/C on or off.
When on, this system not only provides cooler air but also removes humid\
i ty from the
air to help avoid window fogging.
11 REAR BUTTON
This button will allow the front controls to operate
the front or rear climate control systems.
To operate the rear climate control system from
the front, press the REAR button so that the
light illuminates and the “Rear Air-conditioning”
screen is displayed.
To adjust the front climate control system, press
the REAR button again.
For more information, refer to the “Instrument and controls (section 2)” and
the “Monitor, climate, audio, phone and voice recognition systems (section 4\
) ” of your Owner’s Manual.
Rear Heater and Air Conditioner
To activate the system:
1. Press the REAR button 1 on the front control
panel until the “Rear Air-conditioning” screen
is displayed.
• The indicator light will illuminate.
• The fan speed, temperature, AUTO and OFF buttons will
now control the rear climate control system.
2. Press the REAR button 1 again, and the screen will return to what was
previously displayed.
• The indicator light will stay illuminated to indicate that the rear clim\
ate control system
is active.
1
Page 21 of 32
19
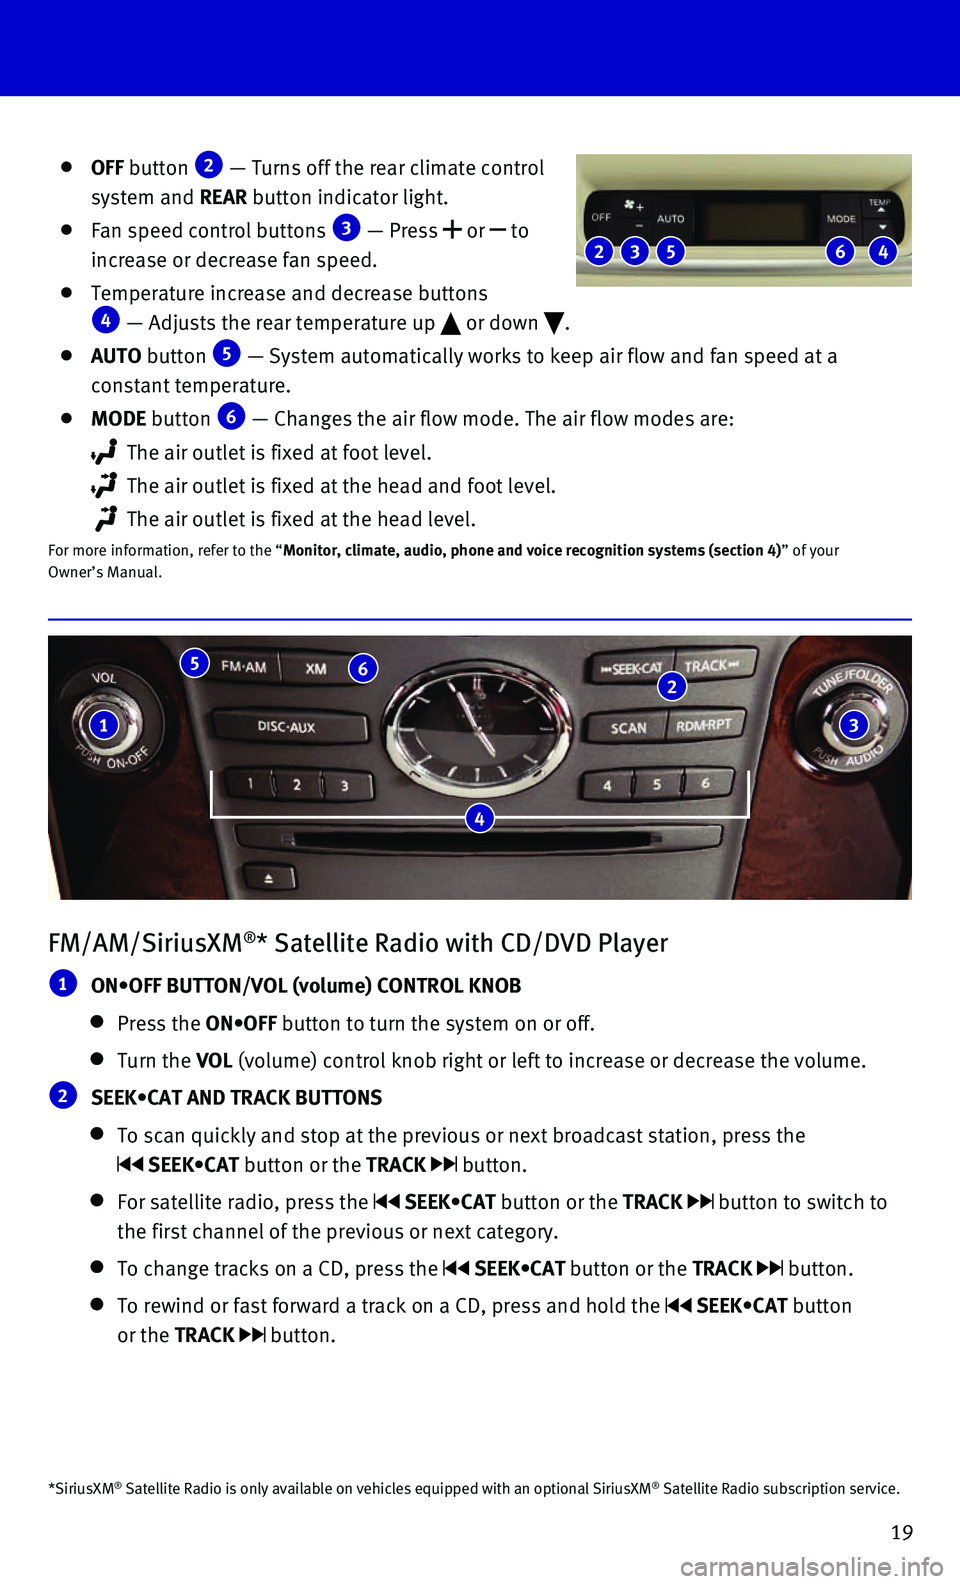
FM/AM/SiriusXM®* Satellite Radio with CD/DVD Player
1 ON•OFF BUTTON/VOL (volume) CONTROL KNOB
Press the ON•OFF button to turn the system on or off.
Turn the VOL (volume) control knob right or left to increase or decrease the volum\
e.
2 SEEK•CAT AND TRACK BUTTONS
To scan quickly and stop at the previous or next broadcast station, pres\
s the
SEEK•CAT button or the TRACK button.
For satellite radio, press the SEEK•CAT button or the TRACK button to switch to
the first channel of the previous or next category.
To change tracks on a CD, press the SEEK•CAT button or the TRACK button.
To rewind or fast forward a track on a CD, press and hold the SEEK•CAT button
or the TRACK
button.
4
1
5 6 2
3
OFF button 2 — Turns off the rear climate control
system and REAR button indicator light.
Fan speed control buttons 3 — Press or to
increase or decrease fan speed.
Temperature increase and decrease buttons 4 — Adjusts the rear temperature up or down .
AUTO button 5 — System automatically works to keep air flow and fan speed at a
constant temperature.
MODE button 6 — Changes the air flow mode. The air flow modes are:
The air outlet is fixed at foot level.
The air outlet is fixed at the head and foot level.
The air outlet is fixed at the head level.
For more information, refer to the “Monitor, climate, audio, phone and voice recognition systems (section 4\
) ” of your
Owner’s Manual.
2 5 3 4 6
*SiriusXM® Satellite Radio is only available on vehicles equipped with an optional\
SiriusXM® Satellite Radio subscription service.
Page 22 of 32
20
first drive features
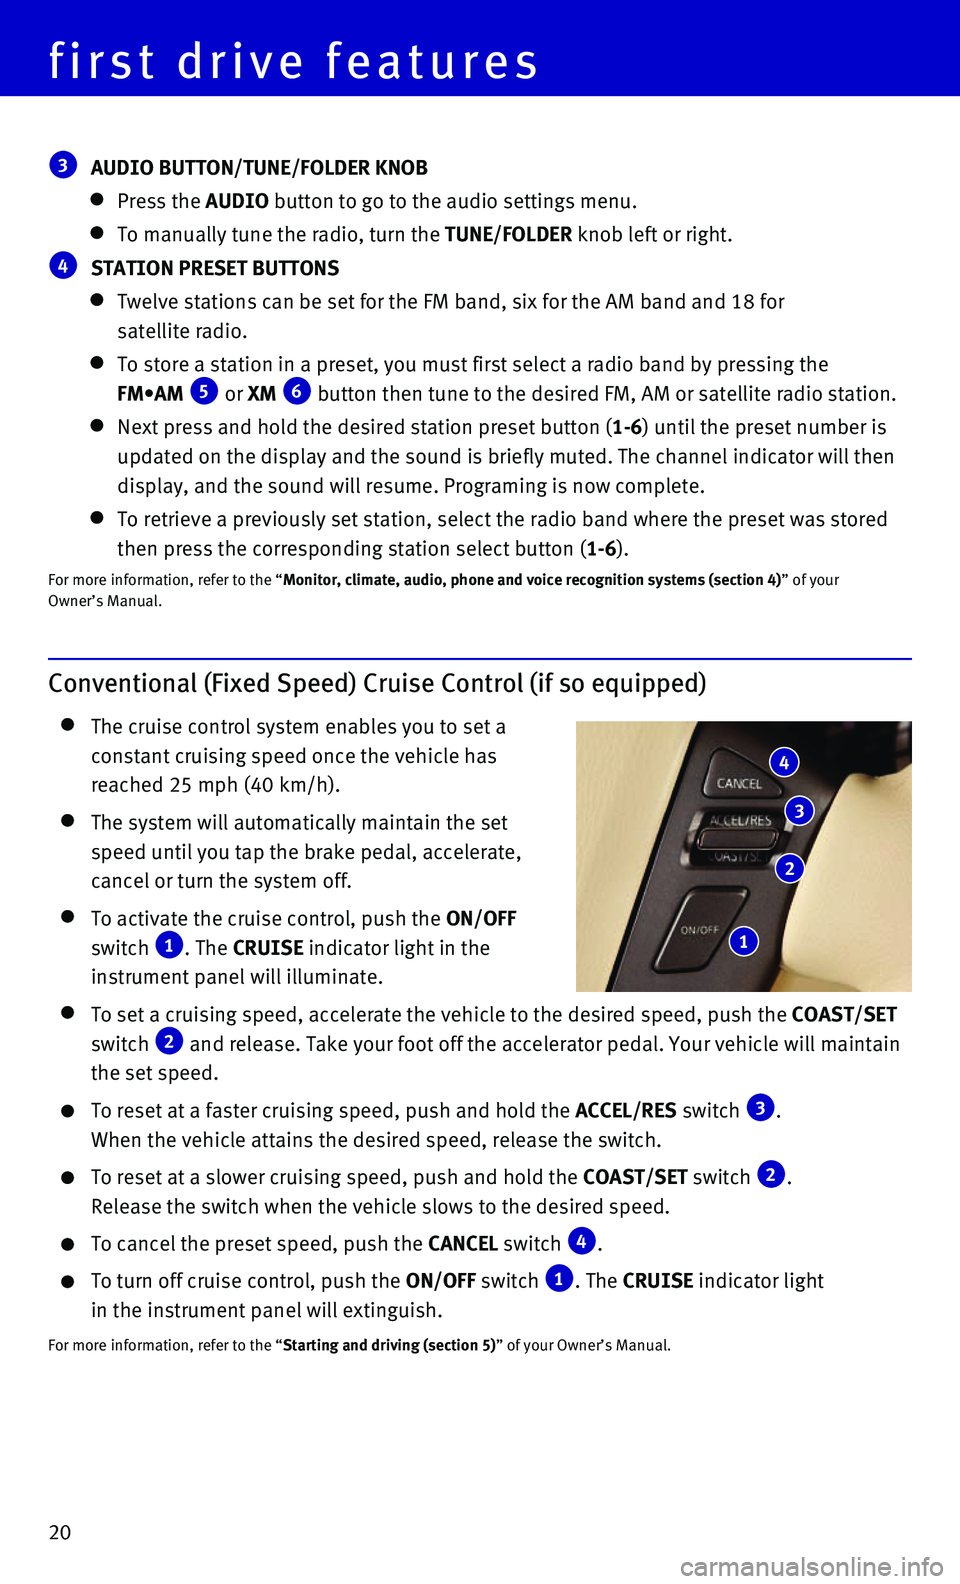
Conventional (Fixed Speed) Cruise Control (if so equipped)
The cruise control system enables you to set a
constant cruising speed once the vehicle has
reached 25 mph (40 km/h).
The system will automatically maintain the set
speed until you tap the brake pedal, accelerate,
cancel or turn the system off.
To activate the cruise control, push the ON/OFF
switch 1. The CRUISE indicator light in the
instrument panel will illuminate.
To set a cruising speed, accelerate the vehicle to the desired speed, pu\
sh the COAST/SET
switch 2 and release. Take your foot off the accelerator pedal. Your vehicle wil\
l maintain
the set speed.
To reset at a faster cruising speed, push and hold the ACCEL/RES switch 3.
When the vehicle attains the desired speed, release the switch.
To reset at a slower cruising speed, push and hold the COAST/SET switch 2.
Release the switch when the vehicle slows to the desired speed.
To cancel the preset speed, push the CANCEL switch 4.
To turn off cruise control, push the ON/OFF switch 1. The CRUISE indicator light
in the instrument panel will extinguish.
For more information, refer to the “Starting and driving (section 5)” of your Owner’s Manual.
4
3
2
1
3 AUDIO BUTTON/TUNE/FOLDER KNOB
Press the AUDIO button to go to the audio settings menu.
To manually tune the radio, turn the TUNE/FOLDER knob left or right.
4 STATION PRESET BUTTONS
Twelve stations can be set for the FM band, six for the AM band and 18 f\
or
satellite radio.
To store a station in a preset, you must first select a radio band by pr\
essing the
FM•AM 5 or XM 6 button then tune to the desired FM, AM or satellite radio station.
Next press and hold the desired station preset button (1-6) until the preset number is
updated on the display and the sound is briefly muted. The channel indic\
ator will then
display, and the sound will resume. Programing is now complete.
To retrieve a previously set station, select the radio band where the pr\
eset was stored
then press the corresponding station select button (1-6).
For more information, refer to the “Monitor, climate, audio, phone and voice recognition systems (section 4\
) ” of your
Owner’s Manual.
Page 23 of 32
21
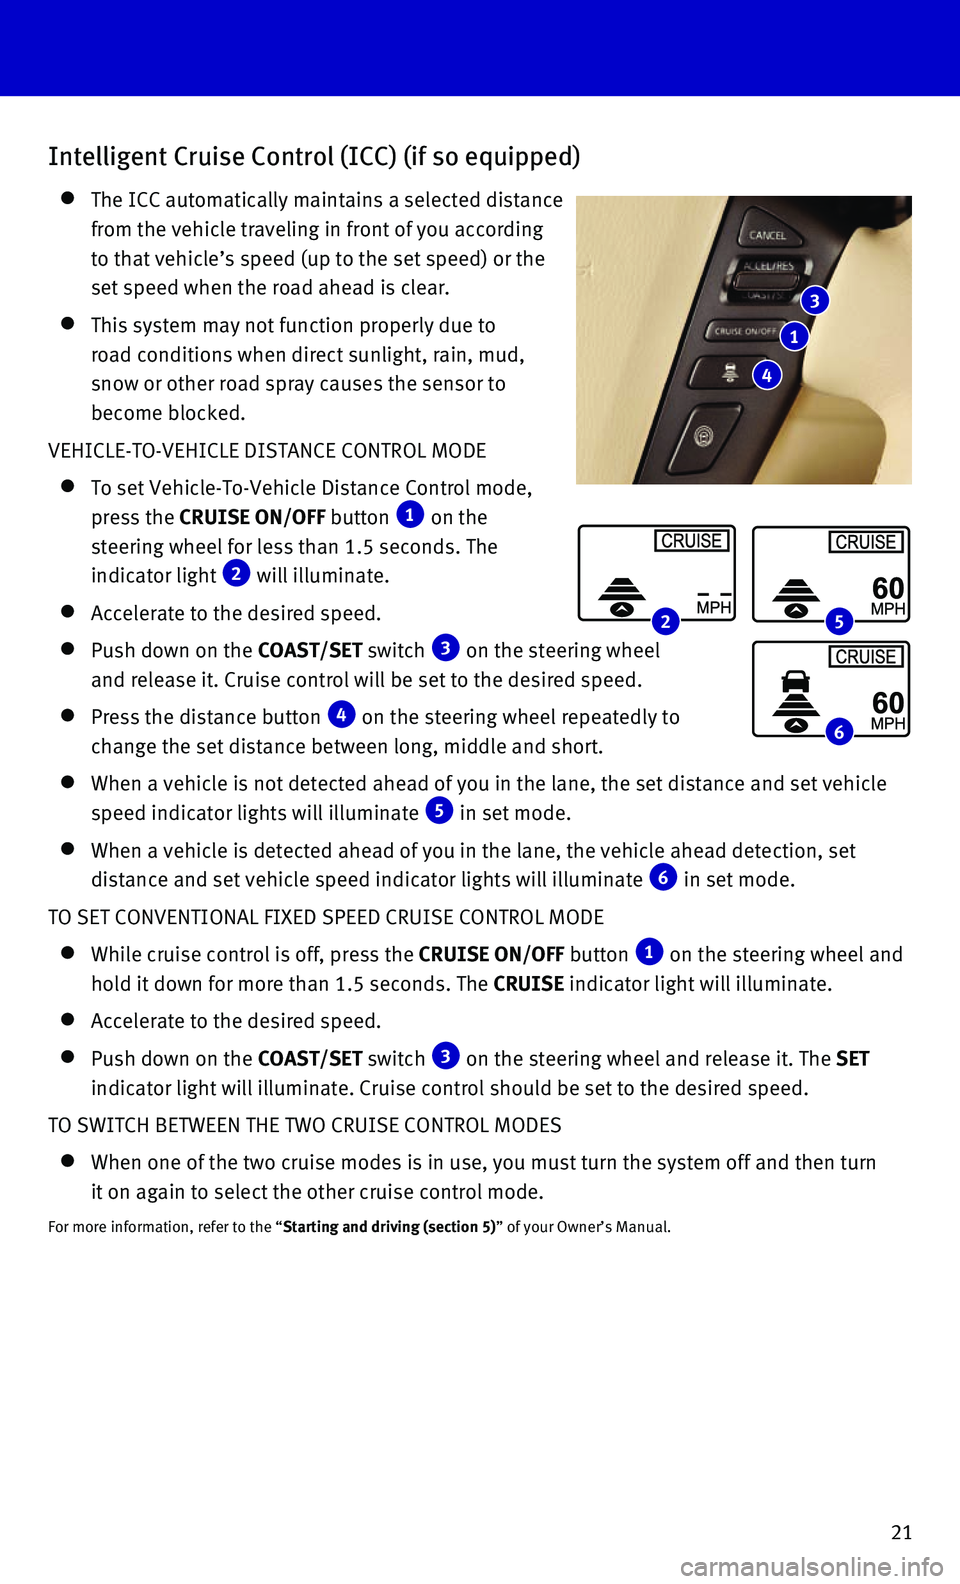
Intelligent Cruise Control (ICC) (if so equipped)
The ICC automatically maintains a selected distance
from the vehicle traveling in front of you according
to that vehicle’s speed (up to the set speed) or the
set speed when the road ahead is clear.
This system may not function properly due to
road conditions when direct sunlight, rain, mud,
snow or other road spray causes the sensor to
become blocked.
VEHICLE-TO-VEHICLE DISTANCE CONTROL MODE
To set Vehicle-To-Vehicle Distance Control mode,
press the CRUISE ON/OFF button 1 on the
steering wheel for less than 1.5 seconds. The
indicator light 2 will illuminate.
Accelerate to the desired speed.
Push down on the COAST/SET switch 3 on the steering wheel
and release it. Cruise control will be set to the desired speed.
Press the distance button 4 on the steering wheel repeatedly to
change the set distance between long, middle and short.
When a vehicle is not detected ahead of you in the lane, the set distanc\
e a nd set vehicle
speed indicator lights will illuminate 5 in set mode.
When a vehicle is detected ahead of you in the lane, the vehicle ahead d\
etection, set
distance and set vehicle speed indicator lights will illuminate 6 in set mode.
TO SET CONVENTIONAL FIXED SPEED CRUISE CONTROL MODE
While cruise control is off, press the CRUISE ON/OFF button 1 on the steering wheel and
hold it down for more than 1.5 seconds. The CRUISE indicator light will illuminate.
Accelerate to the desired speed.
Push down on the COAST/SET switch 3 on the steering wheel and release it. The SET
indicator light will illuminate. Cruise control should be set to the des\
ired speed.
TO SWITCH BETWEEN THE TWO CRUISE CONTROL MODES
When one of the two cruise modes is in use, you must turn the system off\
a nd then turn
it on again to select the other cruise control mode.
For more information, refer to the “Starting and driving (section 5)” of your Owner’s Manual.
3
1
4
2 5
6
Page 24 of 32
22
system guide
Bluetooth® Hands-free Phone System
A cellular telephone should not be used while driving so full attention \
may be given to
vehicle operation.*
SYSTEM OPERATING TIPS
If the Voice Recognition system does not recognize
your voice commands:
1. Be sure to wait for the tone/beep before speaking
a command.
2. Reduce background noise as much as possible by
closing the windows and moonroof.
3. Make sure there are no other conversations on
going in the car at the same time.
4. Lower HVAC blower fan speed and point vents
away from the ceiling microphone.
5. Speak naturally. Speaking too fast, too slow,
too soft, or too loud makes voice recognition
more difficult.
6. Confirm the correct voice commands are being
used. Glance at the screen to see the currently
available commands.
7. Train the system using the Speaker Adaptation Mode. See your Owner’s \
Manual for
detailed information.
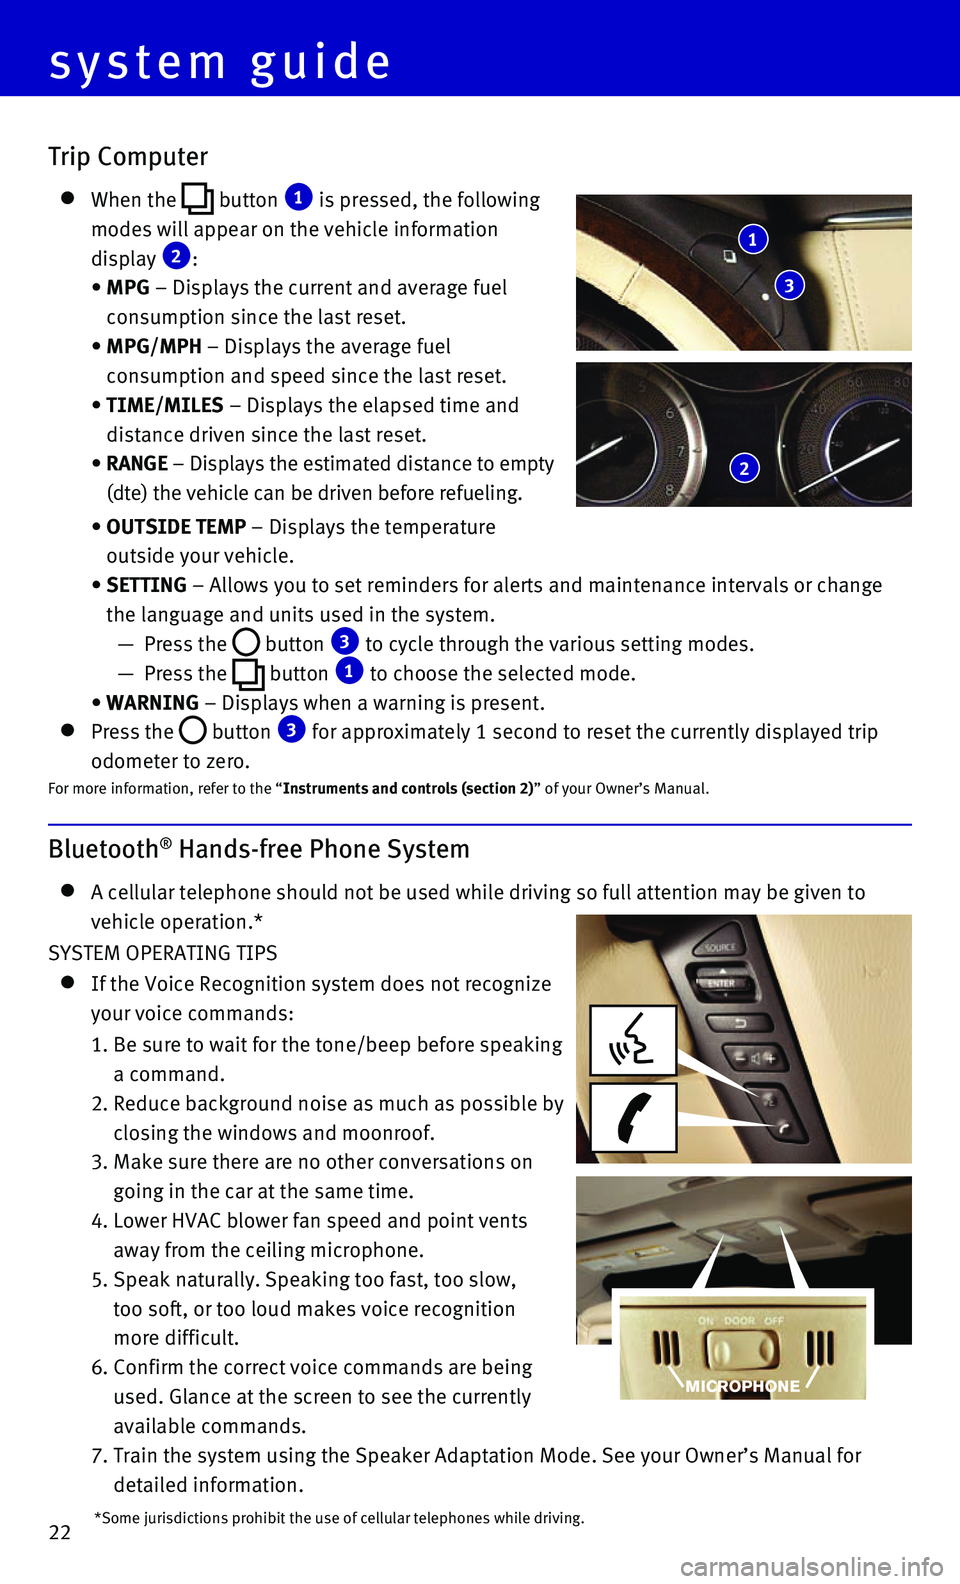
Trip Computer
When the button 1 is pressed, the following
modes will appear on the vehicle information
display 2:
• MPG – Displays the current and average fuel
consumption since the last reset.
• MPG/MPH – Displays the average fuel
consumption and speed since the last reset.
• TIME/MILES – Displays the elapsed time and
distance driven since the last reset.
• RANGE – Displays the estimated distance to empty
(dte) the vehicle can be driven before refueling.
• OUTSIDE TEMP – Displays the temperature
outside your vehicle.
• SETTING – Allows you to set reminders for alerts and maintenance intervals o\
r change
the language and units used in the system.
— Press the button 3 to cycle through the various setting modes.
— Press the button 1 to choose the selected mode.
• WARNING – Displays when a warning is present.
Press the button 3 for approximately 1 second to reset the currently displayed trip
odometer to zero.For more information, refer to the “Instruments and controls (section 2)” of your Owner’s Manual.
1
3
2
*Some jurisdictions prohibit the use of cellular telephones while drivin\
g.