2016 INFINITI QX80 ignition
[x] Cancel search: ignitionPage 4 of 32

2
Around View® Monitor with Moving Object Detection (MOD)
MOD operates only with the Around View®
Monitor activated.
• To temporarily turn the system on or off, select
the “MOD” key on the bottom of the control
panel display.
When the CAMERA button is pressed and the vehicle
speed is less than 6 mph (10 km/h) or the shift lever
is moved to the R (REVERSE) position, the display
screen will automatically change to view the area surrounding the vehicl\
e.
With the Around View® Monitor displayed, the corner sonar system can detect objects
near the vehicle and warn the driver by sounding a tone and showing an i\
ndicator on
the display screen.
For more information, refer to the “Monitor, climate, audio, phone and voice recognition systems (secti\
on 4)” of your
Owner’s Manual.
Blind Spot Warning (BSW) and Blind Spot Intervention® (BSI)
(if so equipped)
The BSW system alerts the driver when another
vehicle moves into the vehicle’s detection zone.
An indicator light located near the outside mirrors 1
will illuminate if the radar sensors detect a vehicle in
the detection zone.
Push the warning systems switch 2 to temporarily
turn the system off. When the system is off, the
indicator light
3 on the switch is off.
The indicator light 3 will also be off if all of the
warning systems are deactivated using the
Settings menu.
The indicator light 3 will illuminate after the
ignition switch is placed in the ON position and the BSW system is enabl\
ed.
For more information, refer to the “Starting and driving (section 5)” of your Owner’s Manual.
1
2
3
new system features
Page 5 of 32

3
essential information
Tire Pressure Monitoring System (TPMS) with Tire Inflation Indicator
A CHECK TIRE PRESSURE warning message will appear in the vehicle information display 1 and the low tire pressure warning light 2 will illuminate when one or more tires are
low in pressure and air is needed.
• The tire pressures should be checked
when the tires are cold. The tires are
considered cold after the vehicle has
been parked for 3 hours or more or
driven less than 1 mi (1.6 km) at
moderate speeds.
When adding air to an under-inflated tire, the TPMS with Tire Inflation \
Indicator provides visual and audible signals to help you inflate the ti\
re
to the recommended COLD tire pressure.
To use the Tire Inflation Indicator:
1. Move the shift lever to the P (PARK) position and apply the parking brake.
2. Place the ignition switch in the ON position. Do not start the engine.
3. Add air to the under-inflated tire, and within a few seconds, the hazard\
warning lights
will start flashing.
4. When the designated tire pressure is reached, the horn will beep once an\
d the hazard
warning flashers will stop.
5. Repeat this procedure for any additional under-inflated tires.
After tire pressures are adjusted, drive the vehicle at speeds above 16 \
mph (25 km/h).
The CHECK TIRE PRESSURE warning message and low tire pressure warning light 2
will extinguish.
When the low tire pressure warning light 2 flashes for approximately 1 minute and then
remains on, the TPMS is not functioning properly. Have the system checke\
d by an
INFINITI retailer.
Tire pressure rises and falls depending on the heat caused by the vehicl\
e’s operation and
the outside temperature. Low outside temperature can lower the temperatu\
re of the air
inside the tire, which can cause a lower tire inflation pressure. This m\
ay cause the low tire
pressure warning light
2 to illuminate. If the warning light illuminates, check the tire
pressure in your tires.
• Check the tire pressure (including the spare tire) often and always pr\
ior to long
distance trips.
The Tire and Loading Information label contains valuable information. Pl\
ea se refer to the
“Technical and consumer information (section 9)” of your Owner’\
s Manual for the location
of the Tire and Loading Information label.
For more information, refer to the “Instruments and controls (section 2)”, the “Starting and driving (section 5)” and the
“Maintenance and do-it-yourself (section 8)” of your Owner’s Manual.
1
2
Page 11 of 32

9
INFINITI Intelligent Key System
The INFINITI Intelligent Key system allows you to lock
or unlock your vehicle, open your liftgate and start the
engine. It is important to make sure the Intelligent Key
is with you (that is, in your pocket or purse).
LOCKING AND UNLOCKING YOUR VEHICLE
The operating range of the Intelligent Key is within
31.5 in (80 cm) from each request switch.
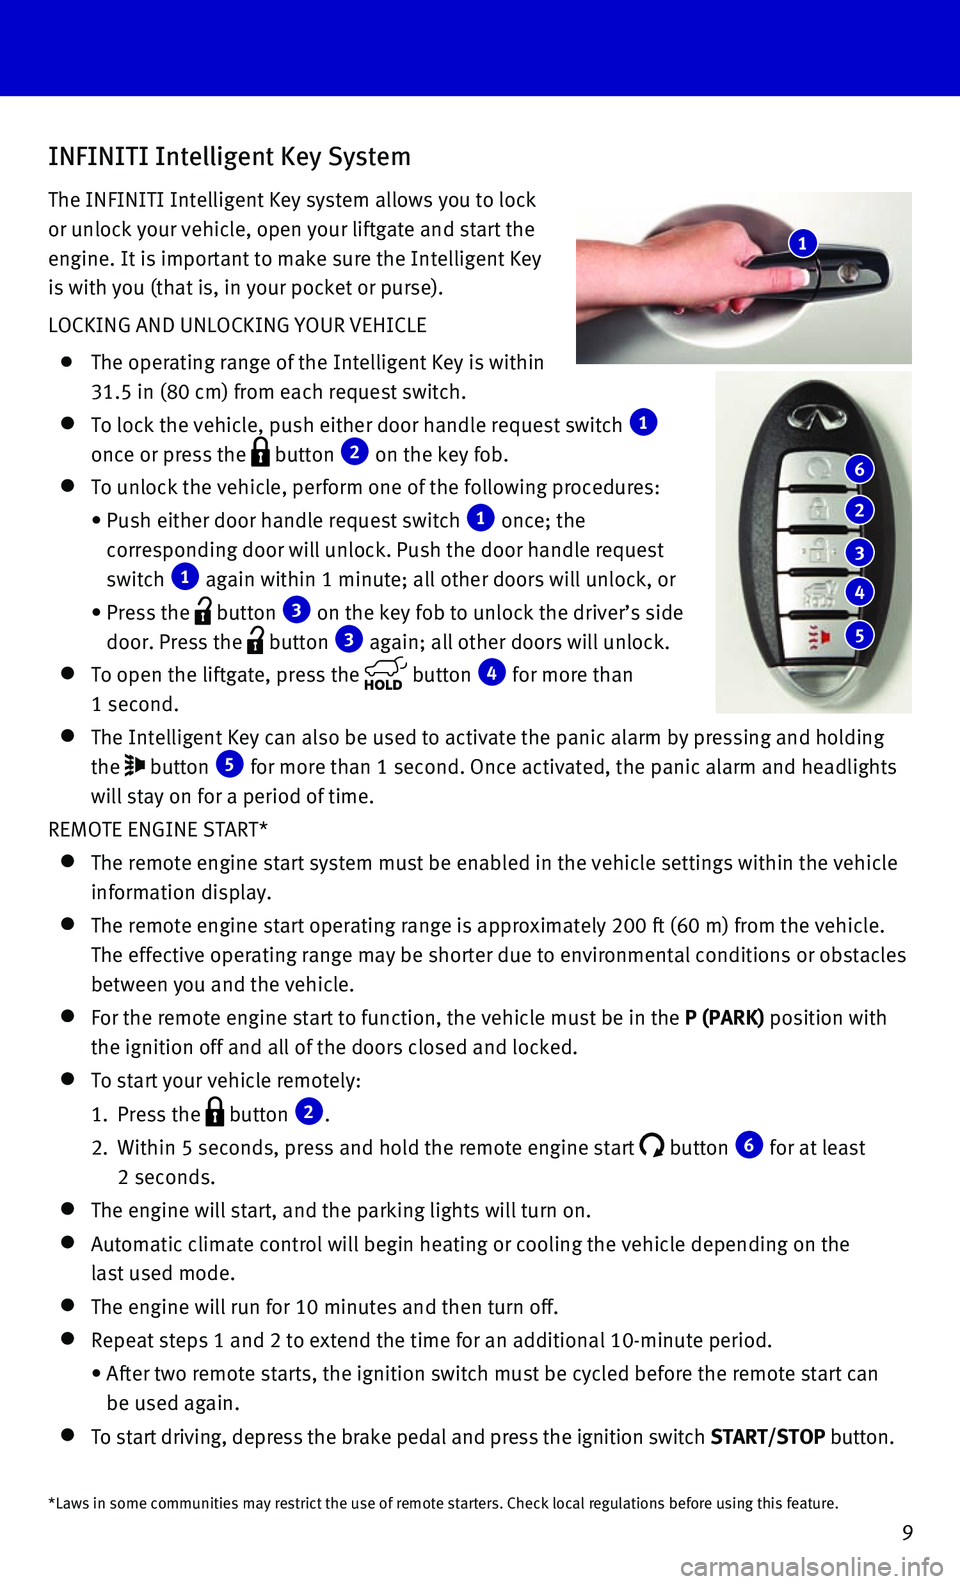
To lock the vehicle, push either door handle request switch 1
once or press the button 2 on the key fob.
To unlock the vehicle, perform one of the following procedures:
• Push either door handle request switch 1 once; the
corresponding door will unlock. Push the door handle request
switch 1 again within 1 minute; all other doors will unlock, or
• Press the button 3 on the key fob to unlock the driver’s side
door. Press the button 3 again; all other doors will unlock.
To open the liftgate, press the button 4 for more than
1 second.
The Intelligent Key can also be used to activate the panic alarm by pres\
sing and holding
the button 5 for more than 1 second. Once activated, the panic alarm and headlights \
will stay on for a period of time.
REMOTE ENGINE START*
The remote engine start system must be enabled in the vehicle settings w\
i thin the vehicle
information display.
The remote engine start operating range is approximately 200 ft (60 m)\
fro m the vehicle.
The effective operating range may be shorter due to environmental condit\
ions or obstacles
between you and the vehicle.
For the remote engine start to function, the vehicle must be in the P (PARK) position with
the ignition off and all of the doors closed and locked.
To start your vehicle remotely:
1. Press the button 2.
2. Within 5 seconds, press and hold the remote engine start button 6 for at least
2 seconds.
The engine will start, and the parking lights will turn on.
Automatic climate control will begin heating or cooling the vehicle depe\
nd ing on the
last used mode.
The engine will run for 10 minutes and then turn off.
Repeat steps 1 and 2 to extend the time for an additional 10-minute peri\
od .
• After two remote starts, the ignition switch must be cycled before the r\
emote start can
be used again.
To start driving, depress the brake pedal and press the ignition switch \
START/STOP button.
1
6
2
3
4
5
*Laws in some communities may restrict the use of remote starters. Check\
local regulations before using this feature.
Page 12 of 32

10
Power Liftgate
When the liftgate is closed and locked, the liftgate
will open automatically by:
• Pushing the power liftgate switch 1 on the
instrument panel.
• Pushing the liftgate opener switch 2; the
liftgate must be unlocked, or you must have the
Intelligent Key with you (that is, in your pocket
or purse).
• Pressing the button 3 on the INFINITI
Intelligent Key for more than 1 second.
The power liftgate operation can be turned
on or off by the power liftgate
main switch
4 on the
instrument panel.
• When the power liftgate
main switch 4 is pushed to
the OFF position, power operation is not available
using the power liftgate switch located on the lower part of the liftgat\
e
or the liftgate opener switch
2.
For more information, refer to the “Pre-driving checks and adjustments (section 3)” of
your Owner’s Manual.
1
4
2
3
INTELLIGENT KEY BATTERY DISCHARGE
If the battery of the Intelligent Key is discharged
or environmental conditions interfere with the
Intelligent Key operation, start the engine according
to the following procedure:
1. Move the shift lever to the P (PARK) position.
2. Firmly apply the foot brake.
3. Touch the ignition switch with the Intelligent Key,
and a chime will sound.
4. Within 10 seconds after the chime sounds, push the ignition switch while\
depressing
the brake pedal and the engine will start.
For more information, refer to the “Pre-driving checks and adjustments (section 3)”, the “Starting and driving (section 5)” and
the “Maintenance and do-it-yourself (section 8)” of your Owner’s Manual.
first drive features
Page 13 of 32

11
Front Seat Adjustments
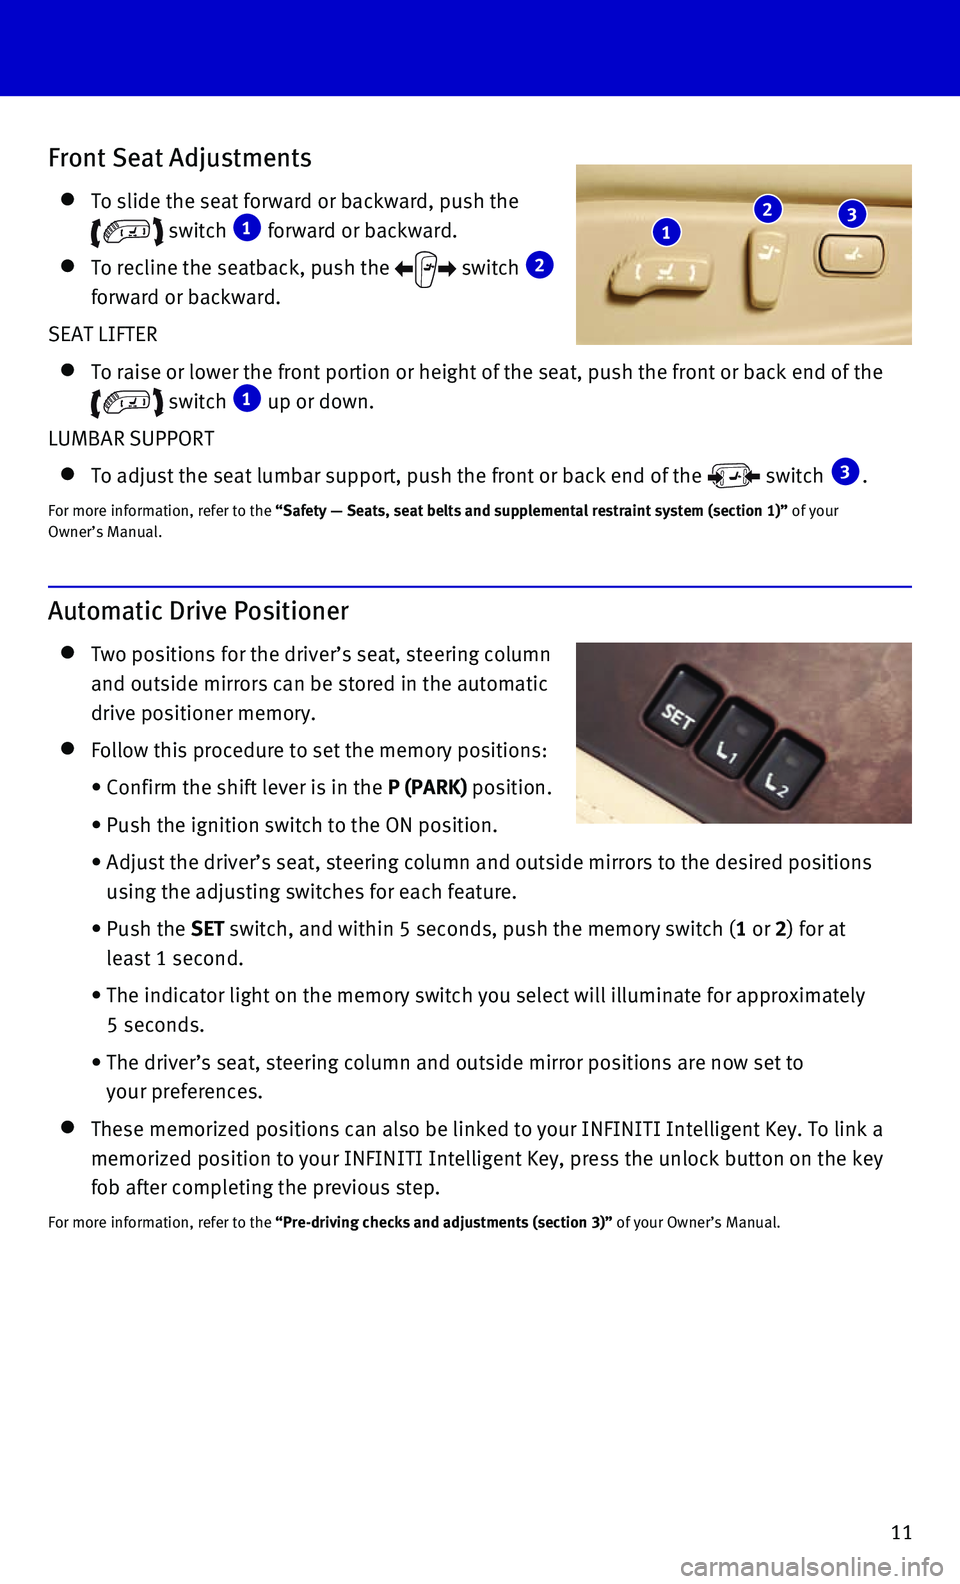
To slide the seat forward or backward, push the
switch 1 forward or backward.
To recline the seatback, push the switch 2
forward or backward.
SEAT LIFTER
To raise or lower the front portion or height of the seat, push the fron\
t or ba ck end of the
switch 1 up or down.
LUMBAR SUPPORT
To adjust the seat lumbar support, push the front or back end of the switch 3.
For more information, refer to the “Safety — Seats, seat belts and supplemental restraint system (s\
ection 1)” of your
Owner’s Manual.
1 2 3
Automatic Drive Positioner
Two positions for the driver’s seat, steering column
and outside mirrors can be stored in the automatic
drive positioner memory.
Follow this procedure to set the memory positions:
• Confirm the shift lever is in the P (PARK) position.
• Push the ignition switch to the ON position.
• Adjust the driver’s seat, steering column and outside mirrors to the \
desired positions
using the adjusting switches for each feature.
• Push the SET switch, and within 5 seconds, push the memory switch (1 or 2) for at
least 1 second.
• The indicator light on the memory switch you select will illuminate for \
approximately
5 seconds.
• The driver’s seat, steering column and outside mirror positions are n\
ow set to
your preferences.
These memorized positions can also be linked to your INFINITI Intelligen\
t Key. To link a
memorized position to your INFINITI Intelligent Key, press the unlock bu\
tton on the key
fob after completing the previous step.
For more information, refer to the “Pre-driving checks and adjustments (section 3)” of your Owner’s Manual.
Page 16 of 32

14
first drive features
Outside Mirror Control Switch
Move the control switch 1 right or left to select the
right or left side mirror.
Adjust each mirror to the desired position using the
switch 2.
Move the switch 1 to the center (neutral) position
to prevent accidentally moving the mirror.
POWER FOLDING OUTSIDE MIRRORS
To fold the outside rearview mirrors, push the switch 3 to the position. To unfold
the outside rearview mirrors, push the switch
3 to the position.
If the mirrors are manually operated or bumped, the mirror body can beco\
m e loose at the
pivot point.
To correct the electronic mirror operation, cycle mirrors by pushing the\
out side rearview
mirror folding switch 3 to the position until it is completely closed, then push the
switch 3 to the position until the mirror is completely open.
REVERSE TILT-DOWN FEATURE
When backing up the vehicle, the right or left outside mirror will turn \
down ward
automatically to provide better rear visibility.
1. Push the ignition switch to the ON position.
2. Move the shift lever to the R (REVERSE) position.
3. Choose the right or left outside mirror by operating the outside mirror \
control switch 1.
4. The outside mirror surface will move downward.
When one of the following conditions has occurred, the outside mirror su\
rf ace will return
to its original position:
• The shift lever is moved to any position other than R (REVERSE).
• The outside mirror control switch 1 is set to the center (neutral) position.
• The ignition switch is pushed to the OFF position.
For more information, refer to the “Pre-driving checks and adjustments (section 3)” of your Owner’s Manual.
Starting/Stopping the Engine
It is important to make sure the INFINITI Intelligent
Key is with you (that is, in your pocket or purse).
Depress the brake pedal.
Press the ignition switch START/STOP button to
start the engine.
TURNING THE ENGINE OFF
Move the shift lever to the P (PARK) position and apply the parking brake.
Press the ignition switch START/STOP button to turn the engine off.
For more information, refer to the “Starting and driving (section 5)” of your Owner’s Manual.
1
2
3
Page 17 of 32

15
Headlight Control
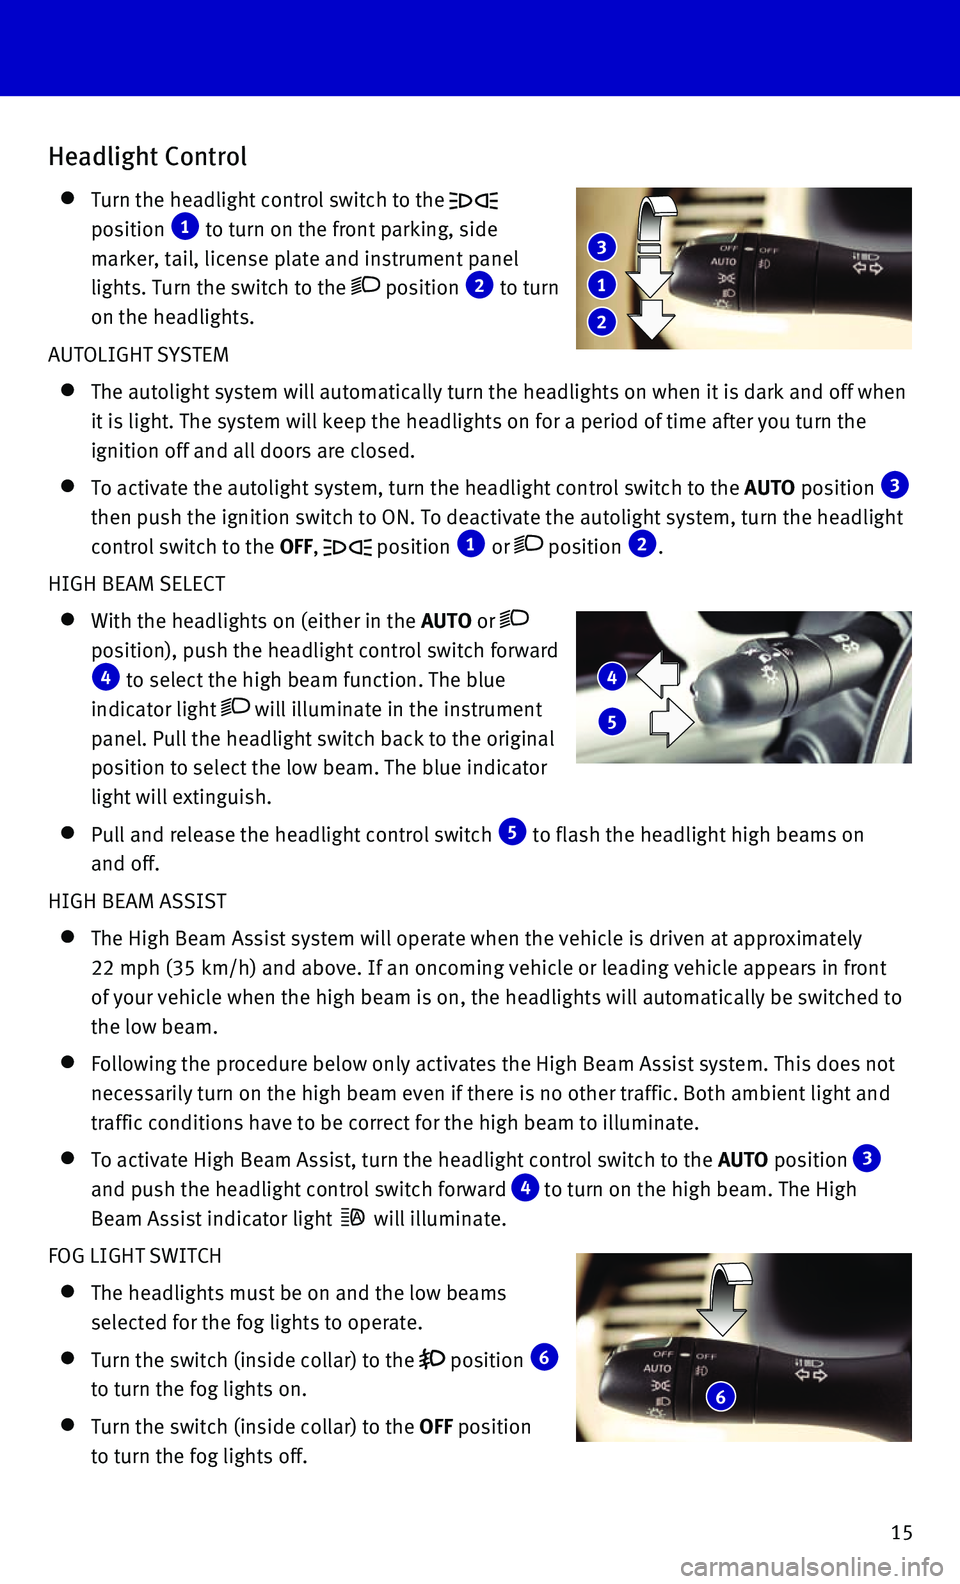
Turn the headlight control switch to the
position 1 to turn on the front parking, side
marker, tail, license plate and instrument panel
lights. Turn the switch to the
position 2 to turn
on the headlights.
AUTOLIGHT SYSTEM
The autolight system will automatically turn the headlights on when it i\
s da rk and off when
it is light. The system will keep the headlights on for a period of time\
after you turn the
ignition off and all doors are closed.
To activate the autolight system, turn the headlight control switch to t\
he AUTO position 3
then push the ignition switch to ON. To deactivate the autolight system,\
turn the headlight
control switch to the OFF,
position 1 or position 2.
HIGH BEAM SELECT
With the headlights on (either in the AUTO or
position), push the headlight control switch forward 4 to select the high beam function. The blue
indicator light
will illuminate in the instrument
panel. Pull the headlight switch back to the original
position to select the low beam. The blue indicator
light will extinguish.
Pull and release the headlight control switch 5 to flash the headlight high beams on
and off.
HIGH BEAM ASSIST
The High Beam Assist system will operate when the vehicle is driven at a\
pp roximately
22 mph (35 km/h) and above. If an oncoming vehicle or leading vehicle \
appears in front
of your vehicle when the high beam is on, the headlights will automatica\
lly be switched to
the low beam.
Following the procedure below only activates the High Beam Assist system\
. This does not
necessarily turn on the high beam even if there is no other traffic. Bot\
h ambient light and
traffic conditions have to be correct for the high beam to illuminate.
To activate High Beam Assist, turn the headlight control switch to the AUTO position 3
and push the headlight control switch forward
4 to turn on the high beam. The High
Beam Assist indicator light
will illuminate.
FOG LIGHT SWITCH
The headlights must be on and the low beams
selected for the fog lights to operate.
Turn the switch (inside collar) to the position 6
to turn the fog lights on.
Turn the switch (inside collar) to the OFF position
to turn the fog lights off.
1
2
3
4
5
6