Page 9 of 32

7
Report Stolen Vehicle – A Response Specialist will attempt to obtain \
location
information from a reported stolen vehicle and provide that information \
to a local law
enforcement agency.
Remote Door Lock/Unlock – Remotely access your vehicle via an Infinit\
i Connection
Response Specialist or the designated website to remotely lock or unlock\
your vehicle.
Alarm Notification – This system will notify you when the factory-ins\
talled vehicle alarm
system has been activated.
Scheduled Maintenance Notification – Receive scheduled maintenance no\
tifications
based on mileage data provided by your vehicle.
Maintenance Alert – Receive notification of a vehicle system malfunct\
ion that triggers
instrument panel warning lights.
Destination Assistance – Receive point-of-interest assistance via a g\
uided IVR (Interactive
Voice Response) or a Response Specialist by pressing the key 3 on the map screen or
the Infiniti Connection™ web portal.
Destination Send-to-Vehicle – Find and download point-of interest inf\
ormation from
Google Maps™ mapping service.
Connected Search – Select “Connected Search” from the Destinati\
on menu on the
vehicle’s Navigation System to conduct a point-of-interest search wit\
hin a certain distance
of the vehicle’s location.
Drive Zone – Monitor the movement of your vehicle within a specified \
region. Set up
boundaries in the Monitoring section of the Infiniti Connection™ web \
portal.
Max Speed Alert – Set a maximum speed on the Infiniti Connection™ \
web portal. You will
receive notifications if your vehicle exceeds the maximum speed setting.\
Mobile Information Service – Receive the latest news headlines, stock\
quotes and sports
scores by setting up preferences on the Mobile Information Service page \
in the Infiniti
Connection™ web portal.
Valet Alert – Use to set up a 0.2-mile radius around your vehicle.
• Activate alerts by pressing the “Connect to Voice Menu” key on the\
Infiniti Connection
screen or by pressing the key 3 on the map screen.
• At the prompt, say “Valet Alert” and then “Activate” or “\
Deactivate”.
For more information, refer to the “Viewing technical information (section 7)” of your Navigation System Owner’s Manual.
Page 10 of 32

With this entertainment system, you can play video
files via a DVD or CD, providing images and sound
both from the front and rear display")
8
first drive features
Theater Package (if so equipped)
With this entertainment system, you can play video
files via a DVD or CD, providing images and sound
both from the front and rear display screens.
WATCHING A DVD
1. Insert a DVD into the DVD slot 1.
2. The DVD will play automatically.
• To watch or control videos on the front display,
make sure the vehicle is in the P (PARK) position
and the parking brake is applied.
REAR DISPLAYS
To turn the rear displays on or off from the
front seats:
1. Press the SETTING button 2 on the
control panel.
2. Select the “Rear Display” key on the display.
3. Toggle the “L” (Left) or “R” (Right) Display 3 on or off.
To access standard DVD controls on the front
display while playing a DVD on the rear display, press the DISC•AUX
button on the control panel while the vehicle is in the P (PARK)
position and the parking brake is applied.
To turn the rear displays on or off from the rear seats:
1. Select the desired seat by sliding the DISPLAY SELECT switch
4 on the remote control to the L (Left) or R (Right) position.
2. Press the POWER button 5 on the remote control.
To control the DVD from the rear seats, use the
remote control.
OPERATING TIPS
You can also connect auxiliary devices, such as
video games, camcorders or portable video players,
to the auxiliary jacks. (Your device will be controlled
through its own control panel.)
Rear Auxiliary Mode allows rear seat passengers
to independently display different sources on
each screen.
Use the headphones, also provided with the system,
to listen to audio wirelessly and independently.
For the best audio sound quality, please make sure
you are facing the monitor directly in front of you.
To reduce driver distraction, movies will not be
shown on the front display while the vehicle is in
any drive position.
For more information, refer to the “Monitor, climate, audio, phone and voice recognition systems (secti\
on 4)” of your
Owner’s Manual.
5 4
1
2
3
Page 11 of 32

9
INFINITI Intelligent Key System
The INFINITI Intelligent Key system allows you to lock
or unlock your vehicle, open your liftgate and start the
engine. It is important to make sure the Intelligent Key
is with you (that is, in your pocket or purse).
LOCKING AND UNLOCKING YOUR VEHICLE
The operating range of the Intelligent Key is within
31.5 in (80 cm) from each request switch.
To lock the vehicle, push either door handle request switch 1
once or press the button 2 on the key fob.
To unlock the vehicle, perform one of the following procedures:
• Push either door handle request switch 1 once; the
corresponding door will unlock. Push the door handle request
switch 1 again within 1 minute; all other doors will unlock, or
• Press the button 3 on the key fob to unlock the driver’s side
door. Press the button 3 again; all other doors will unlock.
To open the liftgate, press the button 4 for more than
1 second.
The Intelligent Key can also be used to activate the panic alarm by pres\
sing and holding
the button 5 for more than 1 second. Once activated, the panic alarm and headlights \
will stay on for a period of time.
REMOTE ENGINE START*
The remote engine start system must be enabled in the vehicle settings w\
i thin the vehicle
information display.
The remote engine start operating range is approximately 200 ft (60 m)\
fro m the vehicle.
The effective operating range may be shorter due to environmental condit\
ions or obstacles
between you and the vehicle.
For the remote engine start to function, the vehicle must be in the P (PARK) position with
the ignition off and all of the doors closed and locked.
To start your vehicle remotely:
1. Press the button 2.
2. Within 5 seconds, press and hold the remote engine start button 6 for at least
2 seconds.
The engine will start, and the parking lights will turn on.
Automatic climate control will begin heating or cooling the vehicle depe\
nd ing on the
last used mode.
The engine will run for 10 minutes and then turn off.
Repeat steps 1 and 2 to extend the time for an additional 10-minute peri\
od .
• After two remote starts, the ignition switch must be cycled before the r\
emote start can
be used again.
To start driving, depress the brake pedal and press the ignition switch \
START/STOP button.
1
6
2
3
4
5
*Laws in some communities may restrict the use of remote starters. Check\
local regulations before using this feature.
Page 12 of 32

10
Power Liftgate
When the liftgate is closed and locked, the liftgate
will open automatically by:
• Pushing the power liftgate switch 1 on the
instrument panel.
• Pushing the liftgate opener switch 2; the
liftgate must be unlocked, or you must have the
Intelligent Key with you (that is, in your pocket
or purse).
• Pressing the button 3 on the INFINITI
Intelligent Key for more than 1 second.
The power liftgate operation can be turned
on or off by the power liftgate
main switch
4 on the
instrument panel.
• When the power liftgate
main switch 4 is pushed to
the OFF position, power operation is not available
using the power liftgate switch located on the lower part of the liftgat\
e
or the liftgate opener switch
2.
For more information, refer to the “Pre-driving checks and adjustments (section 3)” of
your Owner’s Manual.
1
4
2
3
INTELLIGENT KEY BATTERY DISCHARGE
If the battery of the Intelligent Key is discharged
or environmental conditions interfere with the
Intelligent Key operation, start the engine according
to the following procedure:
1. Move the shift lever to the P (PARK) position.
2. Firmly apply the foot brake.
3. Touch the ignition switch with the Intelligent Key,
and a chime will sound.
4. Within 10 seconds after the chime sounds, push the ignition switch while\
depressing
the brake pedal and the engine will start.
For more information, refer to the “Pre-driving checks and adjustments (section 3)”, the “Starting and driving (section 5)” and
the “Maintenance and do-it-yourself (section 8)” of your Owner’s Manual.
first drive features
Page 13 of 32

11
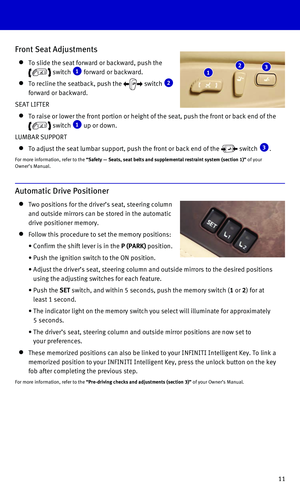
Front Seat Adjustments
To slide the seat forward or backward, push the
switch 1 forward or backward.
To recline the seatback, push the switch 2
forward or backward.
SEAT LIFTER
To raise or lower the front portion or height of the seat, push the fron\
t or ba ck end of the
switch 1 up or down.
LUMBAR SUPPORT
To adjust the seat lumbar support, push the front or back end of the switch 3.
For more information, refer to the “Safety — Seats, seat belts and supplemental restraint system (s\
ection 1)” of your
Owner’s Manual.
1 2 3
Automatic Drive Positioner
Two positions for the driver’s seat, steering column
and outside mirrors can be stored in the automatic
drive positioner memory.
Follow this procedure to set the memory positions:
• Confirm the shift lever is in the P (PARK) position.
• Push the ignition switch to the ON position.
• Adjust the driver’s seat, steering column and outside mirrors to the \
desired positions
using the adjusting switches for each feature.
• Push the SET switch, and within 5 seconds, push the memory switch (1 or 2) for at
least 1 second.
• The indicator light on the memory switch you select will illuminate for \
approximately
5 seconds.
• The driver’s seat, steering column and outside mirror positions are n\
ow set to
your preferences.
These memorized positions can also be linked to your INFINITI Intelligen\
t Key. To link a
memorized position to your INFINITI Intelligent Key, press the unlock bu\
tton on the key
fob after completing the previous step.
For more information, refer to the “Pre-driving checks and adjustments (section 3)” of your Owner’s Manual.
Page 14 of 32

12
first drive features
2nd Row Seats
The 2nd row seat can be tipped forward for easy entry to or exit from the 3rd row seat and
can be folded flat for maximum cargo hauling/extra storage space.
TIPPING THE 2
ND ROW SEATS FORWARD FOR ENTRY TO THE 3RD ROW
MANUAL CONTROLS
1. Lift up on the seatback release latch 1 or the
reclining lever 2. The seatback will tip forward.
2. Lift up on the lower rear corner of the seat bottom
and tip the seat forward.
To return the 2
nd row seat to the standard position:
1. Push back on the seat to return it to its original
position and lock it in place.
2. Pull up and push
back on the seatback
to lock it in place.
3. Use the seat reclining
lever 2 to adjust the seat to the desired position.
POWER REMOTE CONTROLS (if so equipped)
To fold down and tip forward the 2nd row seatback,
push and hold the remote tip-up 2nd row seat
switch 3 located on the instrument panel.
The lower corner of the seat base will lift and the
2nd row seat will tip forward.
For more information, refer to the “Safety — Seats, seat belts and supplemental restraint system (se\
ction 1)” of your
Owner’s Manual.
1
2
STEP 1
3 3
STEP 2
STEP 1 STEP 2
Page 15 of 32

13
3rd Row Power Folding Seats
The 3rd row seats can be folded flat for maximum
cargo hauling or extra storage space.
Before folding down the 3rd row seats:
• Apply the parking brake.
• The shift lever must be in the P (PARK)
or N (NEUTRAL) position.
• Place the seat belt buckles in the storage of the
seat cushion 1 to avoid dropping them under
the seat cushion or causing damage to your
leather seats.
• Disconnect and secure the center seat belt and
tongues into the retractor base 2.
1. To release the seat belt connector tongue, insert
a suitable tool (a key, for example) into the
opening on the side of the connector buckle.
2. Retract the seat belt up to the retractor base
located in the rear ceiling storage area.
3. Insert the seat belt tongue into the fabric
sleeve so that it will lay flat.
4. Secure the connector tongue into the
retractor base.
5. Always reconnect the center seat belt when the
seat is returned to the upright position.
• Make sure that there are no objects on the
seat cushion.
• Lower the 3rd row head restraints.
To lower the seat, push and hold the front portion 3 of the right or left 3rd row power
folding seat switch.
To return the seat to an upright position, push the back portion 4 of the right or left 3rd
row power folding seat switch.
For more information, refer to the “Safety — Seats, seat belts and supplemental restraint system (sectio\
n 1) ” of
your Owner’s Manual.
1
2
3 4
Page 16 of 32

14
first drive features
Outside Mirror Control Switch
Move the control switch 1 right or left to select the
right or left side mirror.
Adjust each mirror to the desired position using the
switch 2.
Move the switch 1 to the center (neutral) position
to prevent accidentally moving the mirror.
POWER FOLDING OUTSIDE MIRRORS
To fold the outside rearview mirrors, push the switch 3 to the position. To unfold
the outside rearview mirrors, push the switch
3 to the position.
If the mirrors are manually operated or bumped, the mirror body can beco\
m e loose at the
pivot point.
To correct the electronic mirror operation, cycle mirrors by pushing the\
out side rearview
mirror folding switch 3 to the position until it is completely closed, then push the
switch 3 to the position until the mirror is completely open.
REVERSE TILT-DOWN FEATURE
When backing up the vehicle, the right or left outside mirror will turn \
down ward
automatically to provide better rear visibility.
1. Push the ignition switch to the ON position.
2. Move the shift lever to the R (REVERSE) position.
3. Choose the right or left outside mirror by operating the outside mirror \
control switch 1.
4. The outside mirror surface will move downward.
When one of the following conditions has occurred, the outside mirror su\
rf ace will return
to its original position:
• The shift lever is moved to any position other than R (REVERSE).
• The outside mirror control switch 1 is set to the center (neutral) position.
• The ignition switch is pushed to the OFF position.
For more information, refer to the “Pre-driving checks and adjustments (section 3)” of your Owner’s Manual.
Starting/Stopping the Engine
It is important to make sure the INFINITI Intelligent
Key is with you (that is, in your pocket or purse).
Depress the brake pedal.
Press the ignition switch START/STOP button to
start the engine.
TURNING THE ENGINE OFF
Move the shift lever to the P (PARK) position and apply the parking brake.
Press the ignition switch START/STOP button to turn the engine off.
For more information, refer to the “Starting and driving (section 5)” of your Owner’s Manual.
1
2
3