Page 358 of 504

5-45
Driving your vehicle
5
DRIVE MODE INTEGRATED CONTROL SYSTEM (IF EQUIPPED)
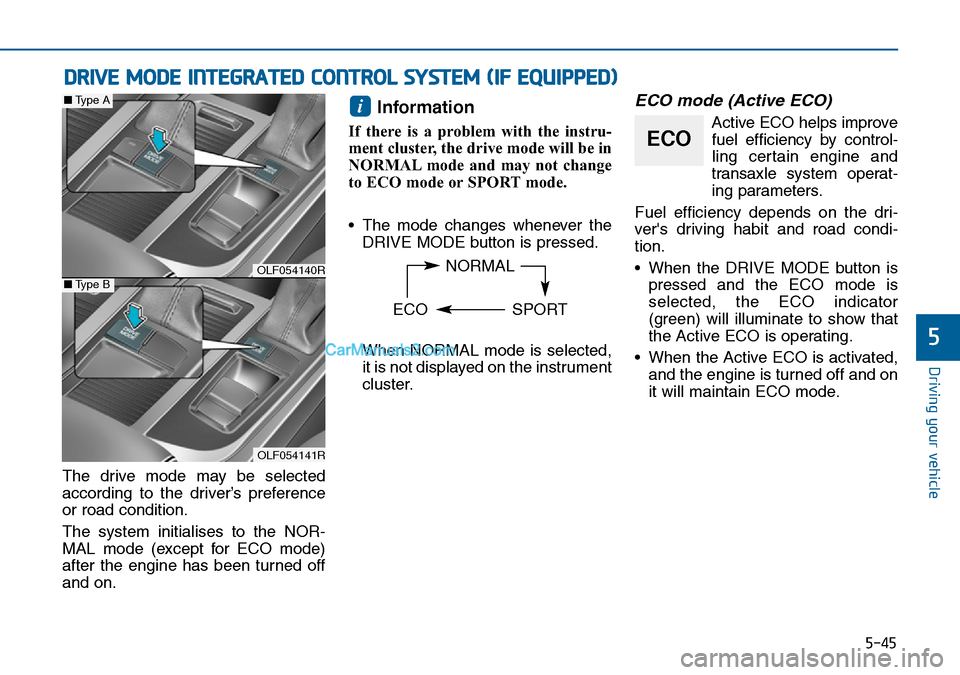
The drive mode may be selected
according to the driver’s preference
or road condition.
The system initialises to the NOR-
MAL mode (except for ECO mode)
after the engine has been turned off
and on.
Information
If there is a problem with the instru-
ment cluster, the drive mode will be in
NORMAL mode and may not change
to ECO mode or SPORT mode.
• The mode changes whenever the
DRIVE MODE button is pressed.
When NORMAL mode is selected,
it is not displayed on the instrument
cluster.
ECO mode (Active ECO)
Active ECO helps improve
fuel efficiency by control-
ling certain engine and
transaxle system operat-
ing parameters.
Fuel efficiency depends on the dri-
ver's driving habit and road condi-
tion.
• When the DRIVE MODE button is
pressed and the ECO mode is
selected, the ECO indicator
(green) will illuminate to show that
the Active ECO is operating.
• When the Active ECO is activated,
and the engine is turned off and on
it will maintain ECO mode.i
NORMAL
ECO SPORT
ECO
OLF054140R
OLF054141R
■Type A
■Type B
Page 359 of 504

5-46
Driving your vehicle
When Active ECO is activated:
• The acceleration response may be
slightly reduced as the accelerator
pedal is depressed moderately.
• The air conditioner performance
may be limited.
• The shift pattern of the automatic
transaxle may change.
• The engine noise may get louder.
The above situations are normal
conditions when the Active ECO sys-
tem is activated to improve fuel effi-
ciency.Limitation of Active ECO opera-
tion:
If the following conditions occur
whilst Active ECO is operating, the
system operation is limited even
though there is no change in the
ECO indicator.
• When the coolant temperature is
low:
The system will be limited until
engine performance becomes nor-
mal.
• When driving up a hill:
The system will be limited to gain
power when driving uphill because
engine torque is restricted.
• When using the automatic
transaxle Sports mode:
The system will be limited accord-
ing to the shift location.
• When the accelerator pedal is
deeply depressed for a few sec-
onds: The system will be limited,
judging that the driver wants to
speed up.
SPORT mode
SPORT mode focuses on
dynamic driving by auto-
matically controlling the
steering wheel, engine
and transaxle system.
• When the DRIVE MODE button is
pressed and the SPORT mode is
selected, the SPORT indicator
(yellow) will illuminate.
• When the SPORT mode is activat-
ed, and the engine is turned off
and on it will change to NORMAL
mode. To turn on the SPORT
mode, press the DRIVE MODE
button again.
• If the system is activated:
- After accelerating and releasing
the accelerator pedal, the gear
and engine speed RPM may not
drop as soon as in NORMAL
mode.
- Up-shifting is delayed.
Information
In SPORT mode, the fuel efficiency
may decrease.
i
SPORT
Page 360 of 504
5-47
Driving your vehicle
5
Cruise Control operation
1. CRUISE indicator
2. SET indicator
The Cruise Control system allows
you to drive at speeds above 40
km/h without depressing the acceler-
ator pedal.During cruise-speed driving of a
manual transaxle vehicle, do not
shift into neutral without depress-
ing the clutch pedal, since the
engine will be overrevved. If this
happens, depress the clutch pedal
or release the cruise control ON-
OFF switch.NOTICE
CRUISE CONTROL (IF EQUIPPED)
Take the following precautions:
Page 361 of 504
5-48
Driving your vehicle
Information
• During normal cruise control opera-
tion, when the SET switch is activat-
ed or reactivated after applying the
brakes, the cruise control will ener-
gize after approximately 3 seconds.
This delay is normal.
• To activate cruise control, depress
the brake pedal at least once after
turning the ignition switch to the
ON position or starting the engine.
This is to check if the brake switch
which is important to cancel cruise
control is in normal condition.
To set Cruise Control speed
1. Push the CRUISE button on the
steering wheel to turn the system
on. The CRUISE indicator will illu-
minate.
2. Accelerate to the desired speed,
which must be more than 40 km/h.3. Push the lever (1) down (SET-) ,
and release it. The SET indicator
light will illuminate.
4. Release the accelerator pedal.
Information
The vehicle may slow down or speed
up slightly whilst going uphill or
downhill.
i
i
OLF054041
OLF054042/Q
Page 364 of 504
5-51
Driving your vehicle
5
Information
Each of the above actions will cancel
Cruise Control operation (the SET
indicator light in the instrument clus-
ter will go off), but only pressing the
CRUISE button will turn the system
off. If you wish to resume Cruise
Control operation, push the lever up
(RES+) located on your steering
wheel. You will return to your previ-
ously preset speed, unless the system
was turned off using the CRUISE but-
ton.
To resume preset Cruising
speed
Push the lever (1) up (RES+). If the
vehicle speed is over 40 km/h, the
vehicle will resume the preset speed.
To turn Cruise Control off
• Push the CRUISE button (the
CRUISE indicator light will go off).
• Turn the engine OFF.
i
OLF054042
OLF054041
Page 366 of 504
5-53
Driving your vehicle
5
BSD (Blind Spot Detection) /
LCA (Lane Change Assist)
Operating conditions
To operate:
Press the BSD switch with the
Ignition switch in the ON position.
The indicator illuminates on the
switch. If vehicle speed exceeds 30
km/h the system will activate.To cancel:
Press the BSD switch again. The
indicator on the switch will go off.
When the system is not used, turn the
system off by turning off the switch.
Information
• If the engine is turned off and on,
the system returns to the previous
state.
• When the system is turned on, the
warning light will illuminate for 3
seconds on the outside rearview
mirror.
Warning type
The system will activate when:
1.The system is on.
2.Vehicle speed is above about 30
km/h.
3.Other vehicles are detected in the
rear side.
i
OLF054037R
Page 373 of 504

5-60
Driving your vehicle
Hazardous driving conditions
When hazardous driving conditions
are encountered such as water,
snow, ice, mud or sand:
Drive cautiously and allow extra dis-
tance for braking.
Avoid sudden movements in braking
or steering.
If stuck in snow, mud, or sand, use
second gear. Accelerate slowly to
avoid spinning the drive wheels.
Use sand, rock salt, or other non-slip
material under the drive wheels to
provide traction when stuck in ice,
snow, or mud.
Rocking the vehicle
If it is necessary to rock the vehicle
to free it from snow, sand, or mud,
first turn the steering wheel right and
left to clear the area around your
front wheels. Then, shift back and
forth between R (Reverse) and a for-
ward gear.
Try to avoid spinning the wheels, and
do not race the engine.
To prevent transaxle wear, wait until
the wheels stop spinning before
shifting gears. Release the accelera-
tor pedal whilst shifting, and press
lightly on the accelerator pedal whilst
the transaxle is in gear. Slowly spin-
ning the wheels in forward and
reverse directions causes a rocking
motion that may free the vehicle.
SPECIAL DRIVING CONDITIONS
Downshifting with an automatic
transaxle whilst driving on slip-
pery surfaces can cause an
accident. The sudden change in
tyre speed could cause the
tyres to skid. Be careful when
downshifting on slippery sur-
faces.
WARNING
If the tyres spin at high speed
the tyres can explode, and you
or others may be injured. Do not
attempt this procedure if people
or objects are anywhere near
the vehicle.
The vehicle can overheat caus-
ing an engine compartment fire
or other damage. Spin the
wheels as little as possible and
avoid spinning the wheels at
speeds over 56 km/h as indicat-
ed on the speedometer.
WARNING
Page 374 of 504

5-61
Driving your vehicle
5
If you are still stuck after rocking
the vehicle a few times, have the
vehicle pulled out by a tow vehicle
to avoid engine overheating, pos-
sible damage to the transaxle, and
tyre damage. See “Towing” in
chapter 6.
To prevent damage to the
transaxle, turn OFF the ESC prior
to rocking the vehicle.
Smooth cornering
Avoid braking or gear changing
around corners, especially when
roads are wet. Ideally, corners
should always be taken under gentle
acceleration.
Driving at night
Night driving presents more hazards
than driving in the daylight. Here are
some important tips to remember:
• Slow down and keep more dis-
tance between you and other vehi-
cles, as it may be more difficult to
see at night, especially in areas
where there may not be any street
lights.
• Adjust your mirrors to reduce the
glare from other driver's head-
lamps.
• Keep your headlamps clean and
properly aimed. Dirty or improperly
aimed headlamps will make it
much more difficult to see at night.
• Avoid staring directly at the head-
lamps of oncoming vehicles. You
could be temporarily blinded, and it
will take several seconds for your
eyes to readjust to the darkness.
NOTICE