2016 Hyundai Sonata wheel torque
[x] Cancel search: wheel torquePage 353 of 504
5-40
Driving your vehicle
ESC OFF usage
When Driving
The ESC OFF mode should only be
used briefly to help free the vehicle if
stuck in snow or mud, by temporarily
stopping operation of the ESC to
maintain wheel torque.
To turn ESC off whilst driving, press
the ESC OFF button whilst driving on
a flat road surface.To prevent damage to the
transaxle:
• Do not allow wheel(s) of one
axle to spin excessively whilst
the ESC, ABS, and brake warn-
ing lights are displayed. The
repairs would not be covered by
the vehicle warranty. Reduce
engine power and do not spin
the wheel(s) excessively whilst
these lights are displayed.
• When operating the vehicle on a
dynamometer, ensure the ESC is
turned off (ESC OFF light illumi-
nated).
Information
Turning the ESC off does not affect
ABS or standard brake system opera-
tion.
Vehicle Stability Management
(if equipped)
Vehicle Stability Management (VSM)
helps ensure the vehicle stays stable
when accelerating or braking sud-
denly on wet, slippery and rough
roads where traction over the four
tyres can suddenly become uneven.
i
NOTICE
Take the following precautions
when using the Vehicle Stability
Management (VSM):
•ALWAYS check the speed and
the distance to the vehicle
ahead. The VSM is not a sub-
stitute for safe driving prac-
tices.
•Never drive too fast for the
road conditions. The VSM sys-
tem will not prevent acci-
dents. Excessive speed in bad
weather, slippery and uneven
roads can result in severe
accidents.
WARNING
Page 359 of 504
5-46
Driving your vehicle
When Active ECO is activated:
• The acceleration response may be
slightly reduced as the accelerator
pedal is depressed moderately.
• The air conditioner performance
may be limited.
• The shift pattern of the automatic
transaxle may change.
• The engine noise may get louder.
The above situations are normal
conditions when the Active ECO sys-
tem is activated to improve fuel effi-
ciency.Limitation of Active ECO opera-
tion:
If the following conditions occur
whilst Active ECO is operating, the
system operation is limited even
though there is no change in the
ECO indicator.
• When the coolant temperature is
low:
The system will be limited until
engine performance becomes nor-
mal.
• When driving up a hill:
The system will be limited to gain
power when driving uphill because
engine torque is restricted.
• When using the automatic
transaxle Sports mode:
The system will be limited accord-
ing to the shift location.
• When the accelerator pedal is
deeply depressed for a few sec-
onds: The system will be limited,
judging that the driver wants to
speed up.
SPORT mode
SPORT mode focuses on
dynamic driving by auto-
matically controlling the
steering wheel, engine
and transaxle system.
• When the DRIVE MODE button is
pressed and the SPORT mode is
selected, the SPORT indicator
(yellow) will illuminate.
• When the SPORT mode is activat-
ed, and the engine is turned off
and on it will change to NORMAL
mode. To turn on the SPORT
mode, press the DRIVE MODE
button again.
• If the system is activated:
- After accelerating and releasing
the accelerator pedal, the gear
and engine speed RPM may not
drop as soon as in NORMAL
mode.
- Up-shifting is delayed.
Information
In SPORT mode, the fuel efficiency
may decrease.
i
SPORT
Page 405 of 504
6-14
What to do in an emergency
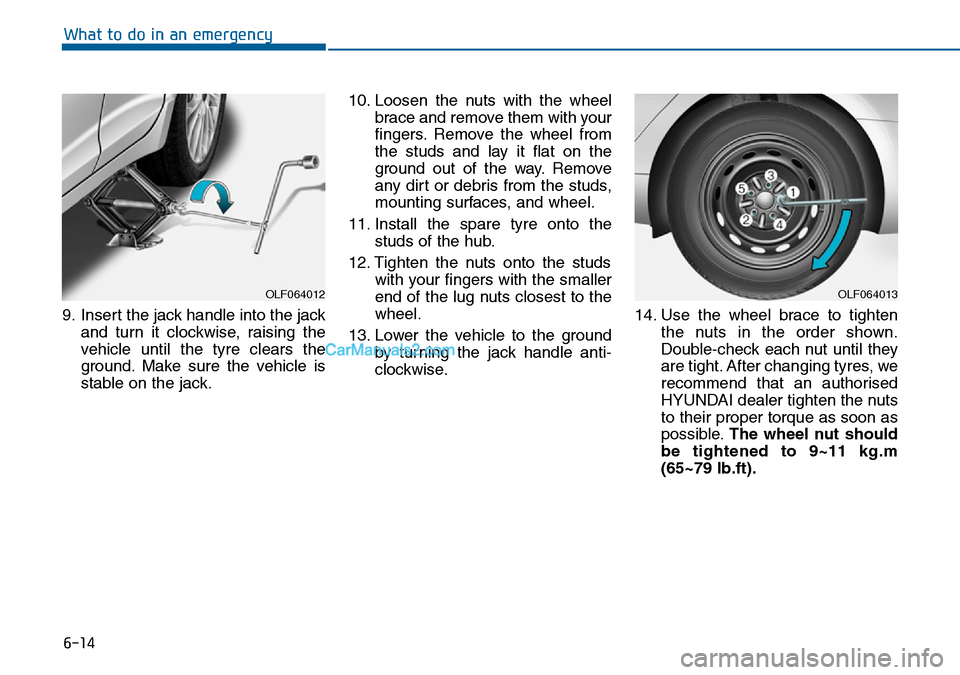
9. Insert the jack handle into the jack
and turn it clockwise, raising the
vehicle until the tyre clears the
ground. Make sure the vehicle is
stable on the jack.10. Loosen the nuts with the wheel
brace and remove them with your
fingers. Remove the wheel from
the studs and lay it flat on the
ground out of the way. Remove
any dirt or debris from the studs,
mounting surfaces, and wheel.
11. Install the spare tyre onto the
studs of the hub.
12. Tighten the nuts onto the studs
with your fingers with the smaller
end of the lug nuts closest to the
wheel.
13. Lower the vehicle to the ground
by turning the jack handle anti-
clockwise.14. Use the wheel brace to tighten
the nuts in the order shown.
Double-check each nut until they
are tight. After changing tyres, we
recommend that an authorised
HYUNDAI dealer tighten the nuts
to their proper torque as soon as
possible.The wheel nut should
be tightened to 9~11 kg.m
(65~79 lb.ft).
OLF064013OLF064012
Page 407 of 504
6-16
What to do in an emergency
When driving with the compact spare
tyre mounted to your vehicle:
• Check the tyre pressure after
installing the compact spare tyre.
The compact spare tyre should be
inflated to 420 kPa (60 psi).
• Do not take this vehicle through an
automatic car wash whilst the com-
pact spare tyre is installed.
• Do not use the compact spare tyre
on any other vehicle because this
tyre has been designed especially
for your vehicle.
• The compact spare tyre’s tread life
is shorter than a regular tyre.
Inspect your compact spare tyre
regularly and replace worn com-
pact spare tyres with the same size
and design, mounted on the same
wheel.
• Do not use more than one compact
spare tyre at a time.
• Do not tow a trailer whilst the com-
pact spare tyre is installed.When the original tyre and wheel
are repaired and reinstalled on the
vehicle, the nut torque must be set
correctly. The correct nut tighten-
ing torque is 9-11 kg.m (65-79
lb.ft).
NOTICE
To prevent damaging the com-
pact spare tyre and your vehi-
cle:
•Drive slowly enough for the
road conditions to avoid all
hazards, such as a potholes
or debris.
•Avoid driving over obstacles.
The compact spare tyre diam-
eter is smaller than the diame-
ter of a conventional tyre and
reduces the ground clearance
approximately 25 mm (1 inch).
•Do not use tyre chains on the
compact spare tyre. Because
of the smaller size, a tyre
chain will not fit properly.
•Do not use the compact spare
tyre on any other wheels, nor
should standard tyres, snow
tyres, wheel covers or trim
rings be used with the com-
pact spare wheel.
CAUTION
Page 430 of 504
7-19
7
Maintenance
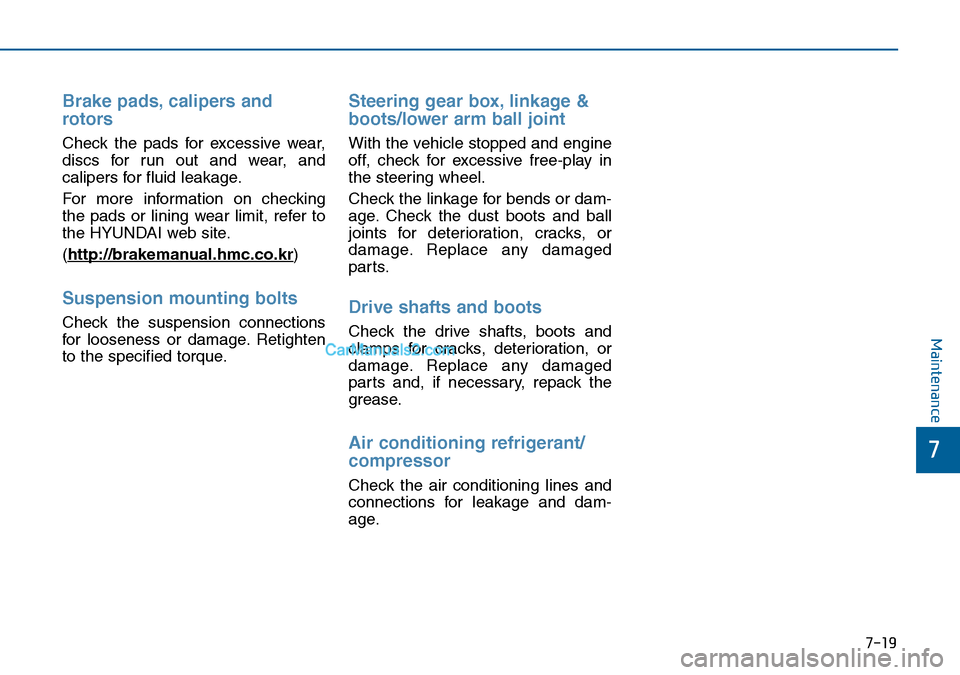
Brake pads, calipers and
rotors
Check the pads for excessive wear,
discs for run out and wear, and
calipers for fluid leakage.
For more information on checking
the pads or lining wear limit, refer to
the HYUNDAI web site.
(http://brakeman
ual.hmc.co.kr)
Suspension mounting bolts
Check the suspension connections
for looseness or damage. Retighten
to the specified torque.
Steering gear box, linkage &
boots/lower arm ball joint
With the vehicle stopped and engine
off, check for excessive free-play in
the steering wheel.
Check the linkage for bends or dam-
age. Check the dust boots and ball
joints for deterioration, cracks, or
damage. Replace any damaged
parts.
Drive shafts and boots
Check the drive shafts, boots and
clamps for cracks, deterioration, or
damage. Replace any damaged
parts and, if necessary, repack the
grease.
Air conditioning refrigerant/
compressor
Check the air conditioning lines and
connections for leakage and dam-
age.
Page 499 of 504
8-4
Specifications & Consumer information
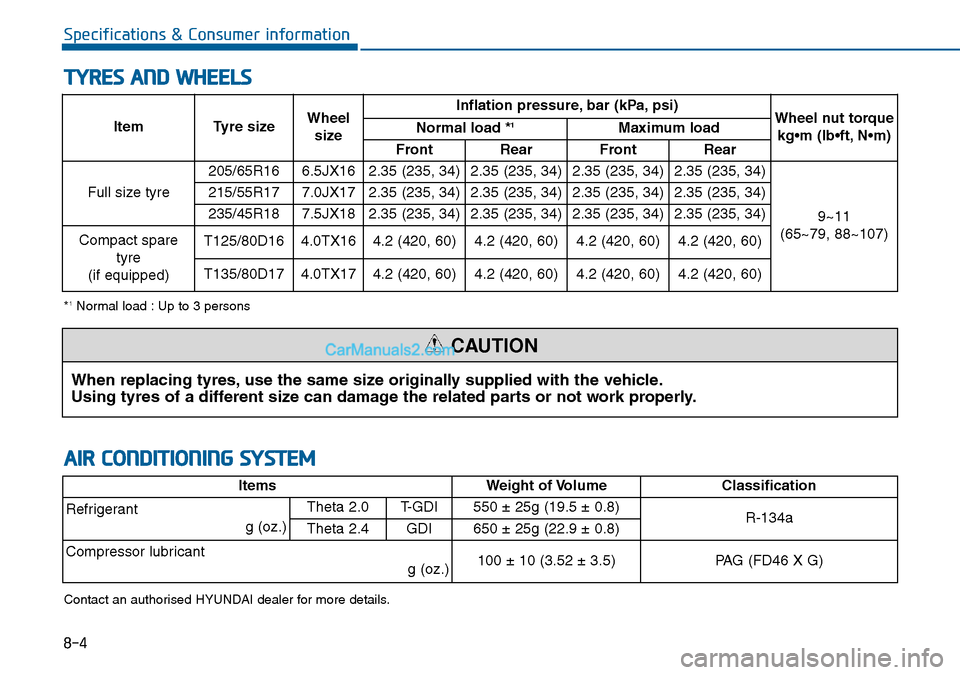
TYRES AND WHEELS
Item Tyre sizeWheel
sizeInflation pressure, bar (kPa, psi)
Wheel nut torque
kg•m (lb•ft, N•m) Normal load *1Maximum load
Front Rear Front Rear
Full size tyre205/65R16 6.5JX16 2.35 (235, 34) 2.35 (235, 34) 2.35 (235, 34) 2.35 (235, 34)
9~11
(65~79, 88~107) 215/55R17 7.0JX17 2.35 (235, 34) 2.35 (235, 34) 2.35 (235, 34) 2.35 (235, 34)
235/45R18 7.5JX18 2.35 (235, 34) 2.35 (235, 34) 2.35 (235, 34) 2.35 (235, 34)
Compact spare
tyre
(if equipped)T125/80D164.0TX164.2 (420, 60)4.2 (420, 60)4.2 (420, 60)4.2 (420, 60)
T135/80D174.0TX174.2 (420, 60)4.2 (420, 60)4.2 (420, 60)4.2 (420, 60)
When replacing tyres, use the same size originally supplied with the vehicle.
Using tyres of a different size can damage the related parts or not work properly.
CAUTION
*1Normal load : Up to 3 persons
AIR CONDITIONING SYSTEM
ItemsWeight of Volume Classification
Refrigerant
g (oz.) Theta 2.0T-GDI550 ± 25g (19.5 ± 0.8)R-134aTheta 2.4GDI650 ± 25g (22.9 ± 0.8)
Compressor lubricant
g (oz.) 100 ± 10 (3.52 ± 3.5)PAG (FD46 X G)
Contact an authorised HYUNDAI dealer for more details.