Page 274 of 759

4177
Features of your vehicle
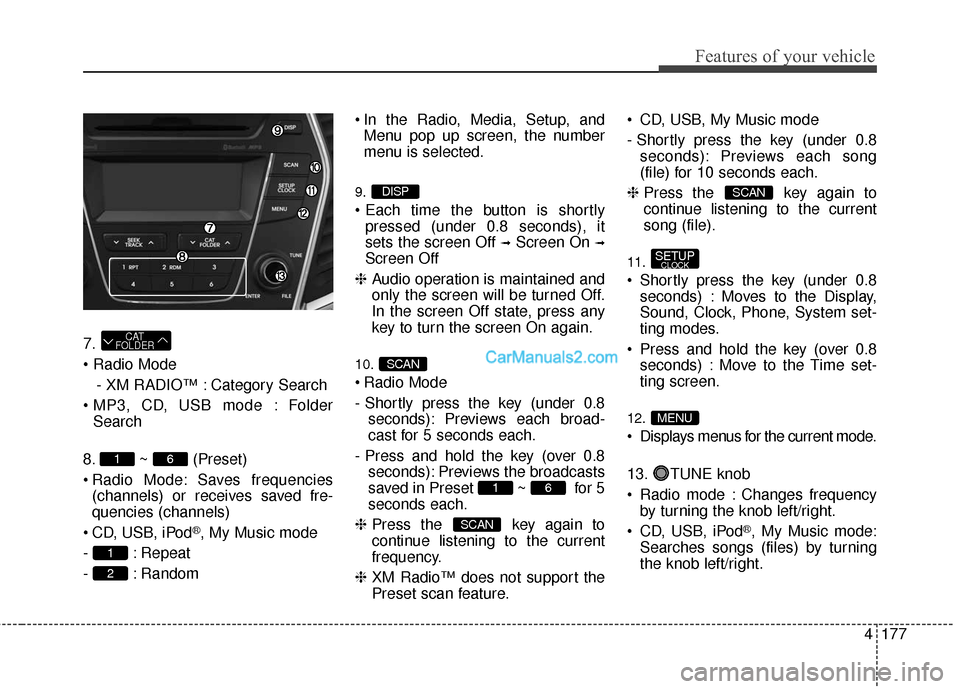
7.
- XM RADIO™ : Category Search
Folder Search
8. ~ (Preset)
Radio Mode: Saves frequencies (channels) or receives saved fre-
quencies (channels)
CD, USB, iPod
®, My Music mode
- : Repeat
- : Random In the Radio, Media, Setup, and
Menu pop up screen, the number
menu is selected.
9.
pressed (under 0.8 seconds), it
sets the screen Off
➟Screen On ➟
Screen Off
❈ Audio operation is maintained and
only the screen will be turned Off.
In the screen Off state, press any
key to turn the screen On again.
10.
Radio Mode
- Shortly press the key (under 0.8
seconds): Previews each broad-
cast for 5 seconds each.
- Press and hold the key (over 0.8 seconds): Previews the broadcasts
saved in Preset ~ for 5
seconds each.
❈ Press the key again to
continue listening to the current
frequency.
❈ XM Radio™ does not support the
Preset scan feature. CD, USB, My Music mode
- Shortly press the key (under 0.8
seconds): Previews each song
(file) for 10 seconds each.
❈ Press the key again to
continue listening to the current
song (file).
11.
Shortly press the key (under 0.8
seconds) : Moves to the Display,
Sound, Clock, Phone, System set-
ting modes.
Press and hold the key (over 0.8 seconds) : Move to the Time set-
ting screen.
12.
Displays menus for the current mode.
13. TUNE knob
Radio mode : Changes frequencyby turning the knob left/right.
CD, USB, iPod
®, My Music mode:
Searches songs (files) by turning
the knob left/right.
MENU
SETUPCLOCK
SCAN
SCAN
61
SCAN
DISP
2
1
61
CAT
FOLDER
Page 322 of 759
4225
Features of your vehicle
8.
9.
Displays the time/date/day.
10.
previews all receiv-able broadcasts for 5 seconds each
: previews each song (file) for 10seconds each. 11.
Converts to Setup mode.
12. TUNE knob
turn to change broad-
cast frequencies.
(CD/USB/iPod
®/My Music)
modes : turn to search tracks/chan-
nels/files.
13. DISC-IN LED
LED that indicates whether a disc is inserted.
14. RESET
Forced system termination and system restart.
Audio Head Unit
15.
Category Search
CD, USB/MP3 mode : SearchFolderCAT
FOLDER
SETUP
SCAN
CLOCK
DISP
Page 381 of 759
Features of your vehicle
284
4
SETUP
Starting Mode
Press the key to display the
Setup screen.
You can select and control options
related to [Display], [Sound],
[Clock/Calendar], [Phone] and
[System].
Display Settings
Adjusting the Brightness
Press the key Select
[Display] Select [Brightness]
Use the , buttons to adjust the
screen brightness or set the
Brightness on Automatic, Daylight, or
Night mode.
Press the button to reset.
1) Automatic : Adjusts the brightness
automatically
2) Daylight : Always maintains the brightness on high
3) Night : Always maintains the
brightness on low
Mode Pop-up
Press the key Select
[Display] Select [Mode Pop up]
This feature is used to display the
Mode Pop-up screen when entering
radio and media modes.
When this feature is turned on,
pressing the or key
will display the Mode Pop-up screen.
✽ ✽ NOTICE
The media Mode Pop-up screen can
be displayed only when two or more
media modes have been connected.
MEDIA RADIO
SETUP
Default
SETUP SETUP
Page 405 of 759

Features of your vehicle
308
4
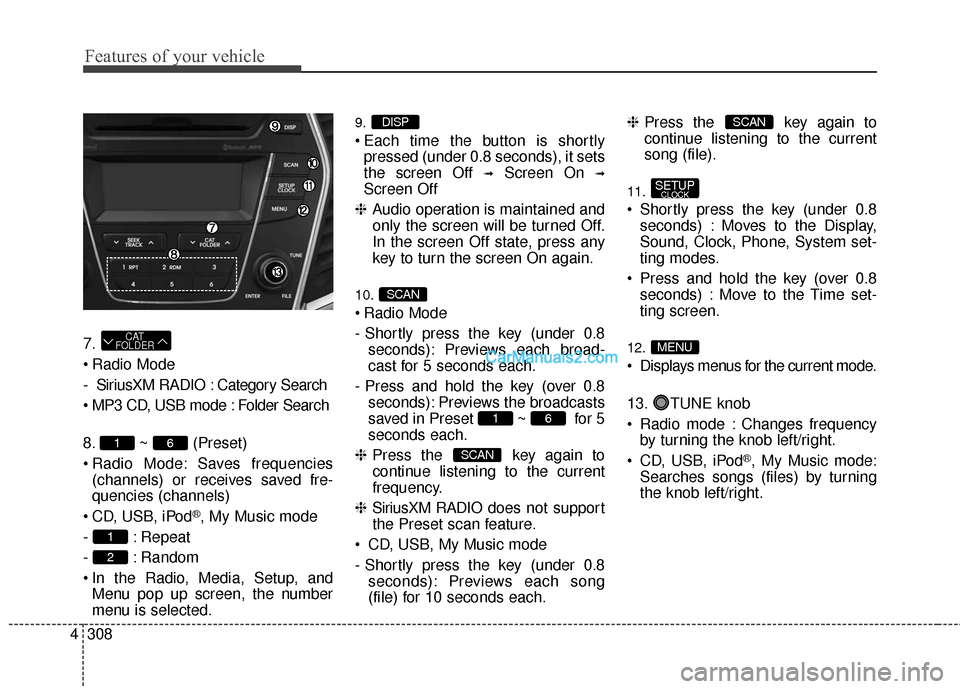
7.
Radio Mode
- SiriusXM RADIO : Category Search
MP3 CD, USB mode : Folder Search
8. ~ (Preset)
Radio Mode: Saves frequencies
(channels) or receives saved fre-
quencies (channels)
CD, USB, iPod
®, My Music mode
- : Repeat
- : Random
In the Radio, Media, Setup, and Menu pop up screen, the number
menu is selected.
9.
Each time the button is shortlypressed (under 0.8 seconds), it sets
the screen Off
➟Screen On ➟
Screen Off
❈ Audio operation is maintained and
only the screen will be turned Off.
In the screen Off state, press any
key to turn the screen On again.
10.
Radio Mode
- Shortly press the key (under 0.8 seconds): Previews each broad-
cast for 5 seconds each.
- Press and hold the key (over 0.8 seconds): Previews the broadcasts
saved in Preset ~ for 5
seconds each.
❈ Press the key again to
continue listening to the current
frequency.
❈ SiriusXM RADIO does not support
the Preset scan feature.
CD, USB, My Music mode
- Shortly press the key (under 0.8 seconds): Previews each song
(file) for 10 seconds each. ❈
Press the key again to
continue listening to the current
song (file).
11.
Shortly press the key (under 0.8 seconds) : Moves to the Display,
Sound, Clock, Phone, System set-
ting modes.
Press and hold the key (over 0.8 seconds) : Move to the Time set-
ting screen.
12.
Displays menus for the current mode.
13. TUNE knob
Radio mode : Changes frequencyby turning the knob left/right.
CD, USB, iPod
®, My Music mode:
Searches songs (files) by turning
the knob left/right.
MENU
SETUPCLOCK
SCAN
SCAN
61
SCAN
DISP
2
1
61
CAT
FOLDER
Page 429 of 759

Features of your vehicle
332
4
(Continued)
• Bluetooth related operations are
possible only with devices that
support Handsfree or audio fea-
tures, such as a Bluetooth
®
Wireless Technology mobile phone
or a Bluetooth audio device.
• If a connected Bluetooth
®Wireless
Technology device becomes dis-
connected due to being out of com-
munication range, turning the
device OFF, or a Bluetooth
®
Wireless Technology communica-
tion error, corresponding
Bluetooth
®Wireless Technology
devices are automatically searched
and reconnected.
• If the system becomes unstable due to communication errors
between the car Handsfree and the
Bluetooth
®Wireless Technology
device, reset the device by turning
off and back on again. Upon reset-
ting Bluetooth
®Wireless
Technology device, the system will
be restored. (Continued)(Continued)
• After pairing is complete, a con-
tacts download request is sent
once to the mobile phone. Some
mobile phones may require confir-
mation upon receiving a download
request, ensure your mobile phone
accepts the connection. Refer to
your phones user’s manual for
additional information regarding
phone pairing and connections.
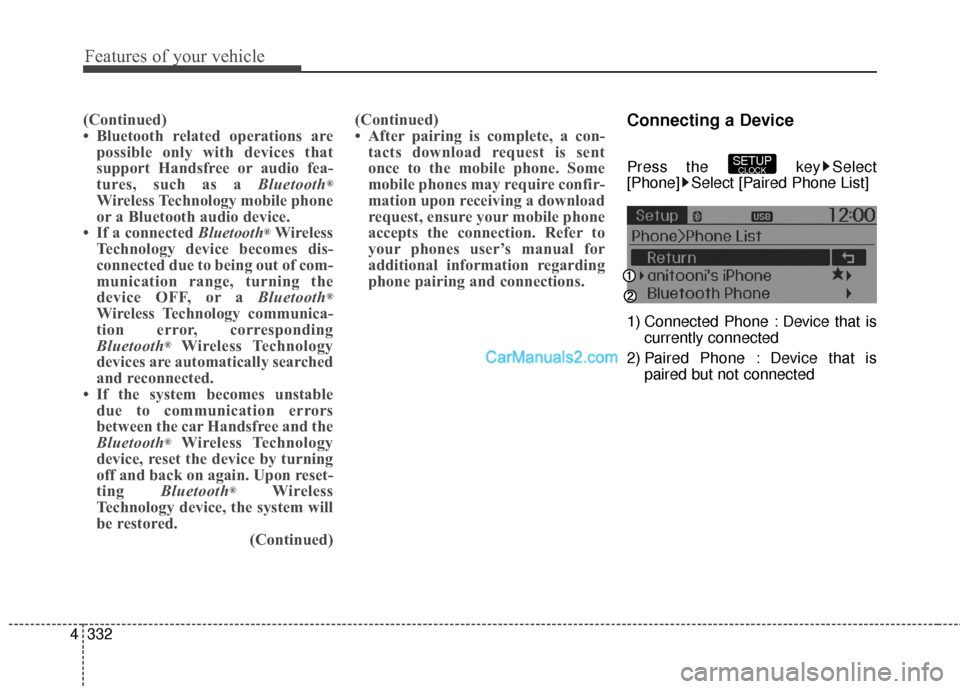
Connecting a Device
Press the key Select
[Phone] Select [Paired Phone List]
1) Connected Phone : Device that is
currently connected
2) Paired Phone : Device that is paired but not connectedSETUPCLOCK
Page 454 of 759
4357
Features of your vehicle
8.
Turns the monitor display on/off.
9.
Displays the time/date/day.
10.
Radio Mode : previews all receiv-able broadcasts for 5 seconds
each
Media (CD/USB/My Music) modes : previews each song (file) for 10seconds each. 11.
Converts to Setup mode.
12. TUNE knob
Radio mode : turn to change
broadcast frequencies.
Media (CD/USB/iPod
®/My Music)
modes : turn to search
tracks/channels/files.
13. DISC-IN LED
LED that indicates whether a disc is inserted.
14. RESET
Forced system termination and system restart.
Audio Head Unit
15.
SiriusXM RADIO : CategorySearch
MP3 CD/USB mode : Search FolderCAT
FOLDER
SETUP
SCAN
CLOCK
DISP
Page 515 of 759
Features of your vehicle
418
4
SETUP
Starting Mode
Press the key to display the
Setup screen.
You can select and control options
related to [Display], [Sound],
[Clock/Calendar], [Phone] and
[System].
Display Settings
Adjusting the Brightness
Press the key Select
[Display] Select [Brightness]
Use the , buttons to adjust the
screen brightness or set the
Brightness on Automatic, Daylight, or
Night mode.
Press the button to reset.
1) Automatic : Adjusts the brightness
automatically
2) Daylight : Always maintains the brightness on high
3) Night : Always maintains the
brightness on low
Mode Pop-up
Press the key Select
[Display] Select [Mode Pop up]
This feature is used to display the
Mode Pop-up screen when entering
radio and media modes.
When this feature is turned on,
pressing the or key
will display the Mode Pop-up screen.
✽ ✽ NOTICE
The media Mode Pop-up screen can
be displayed only when two or more
media modes have been connected.
MEDIA RADIO
SETUP
Default
SETUP SETUP
Page 689 of 759

747
Maintenance
Reset items
Items should be reset after the bat-
tery has been discharged or the bat-
tery has been disconnected.
Auto up/down window (See section 4)
Sunroof (See section 4)
Trip computer (See section 4)
Climate control system (See section 4)
Clock (See section 4)
Audio (See section 4)(Continued)
Disconnect the battery charg- er in the following order.
1. Turn off the battery charger main switch.
2. Unhook the negative clamp from the negative battery
terminal.
3. Unhook the positive clamp from the positive battery
terminal.
Before performing mainte- nance or recharging the bat-
tery, turn off all accessories
and stop the engine.
The negative battery cable must be removed first and
installed last when the battery
is disconnected.WARNING- Rechargingbattery
When recharging the battery,
observe the following precau-
tions:
The battery must be removed
from the vehicle and placed in
an area with good ventilation.
Do not allow cigarettes, sparks, or flame near the battery.
Watch the battery during charging, and stop or reduce
the charging rate if the battery
cells begin gassing (boiling)
violently or if the temperature
of the electrolyte of any cell
exceeds 120°F (49°C).
Wear eye protection when checking the battery during
charging.
(Continued)