Page 140 of 759

443
Features of your vehicle
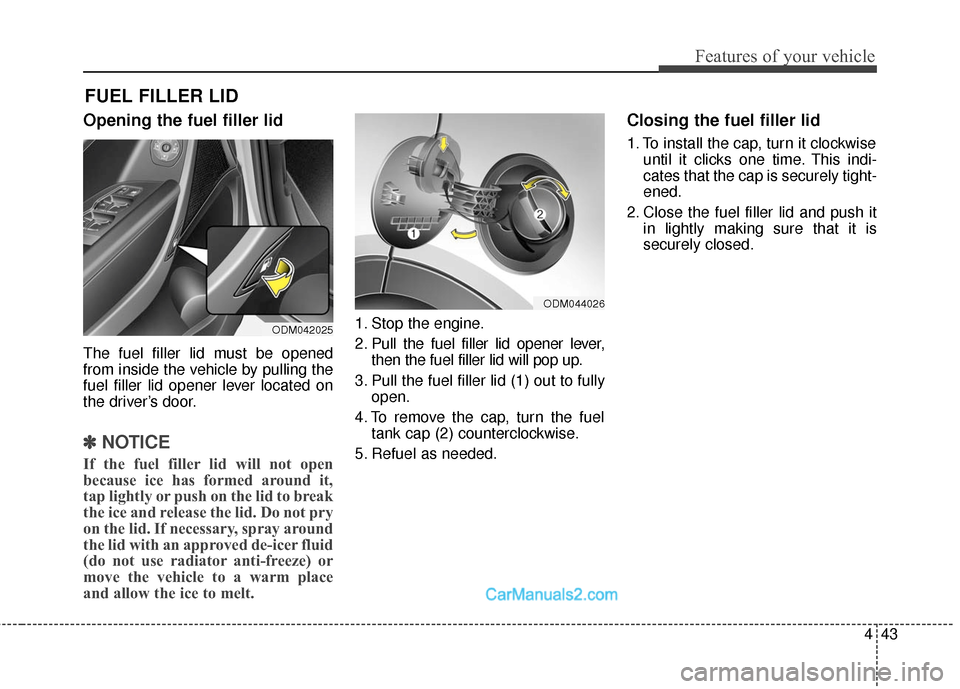
Opening the fuel filler lid
The fuel filler lid must be opened
from inside the vehicle by pulling the
fuel filler lid opener lever located on
the driver’s door.
✽ ✽NOTICE
If the fuel filler lid will not open
because ice has formed around it,
tap lightly or push on the lid to break
the ice and release the lid. Do not pry
on the lid. If necessary, spray around
the lid with an approved de-icer fluid
(do not use radiator anti-freeze) or
move the vehicle to a warm place
and allow the ice to melt.
1. Stop the engine.
2. Pull the fuel filler lid opener lever,
then the fuel filler lid will pop up.
3. Pull the fuel filler lid (1) out to fully open.
4. To remove the cap, turn the fuel tank cap (2) counterclockwise.
5. Refuel as needed.
Closing the fuel filler lid
1. To install the cap, turn it clockwise until it clicks one time. This indi-
cates that the cap is securely tight-
ened.
2. Close the fuel filler lid and push it in lightly making sure that it is
securely closed.
FUEL FILLER LID
ODM042025
ODM044026
Page 274 of 759

4177
Features of your vehicle
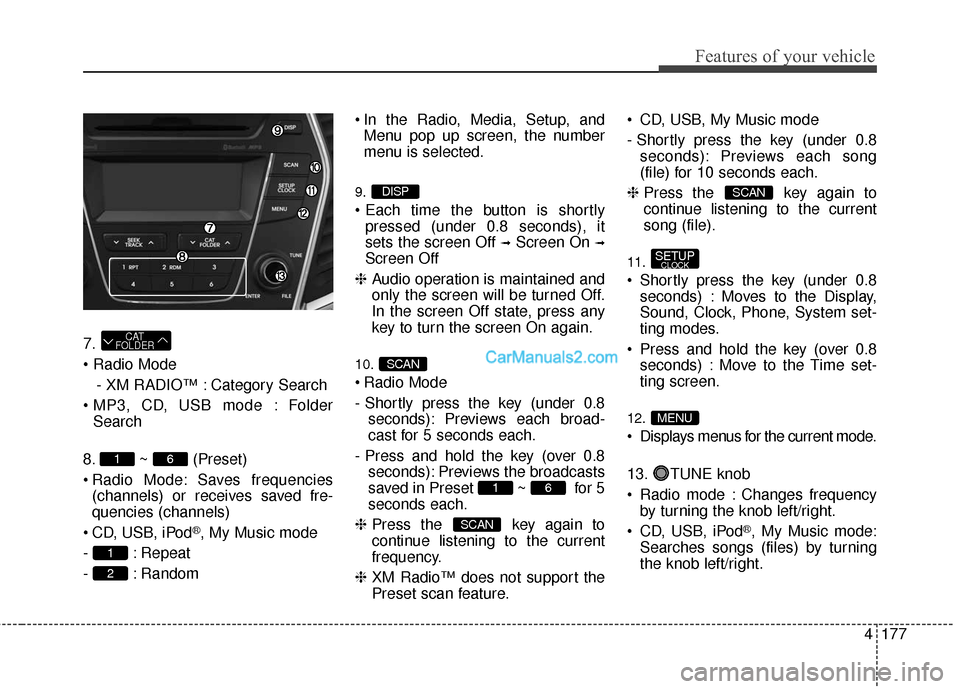
7.
- XM RADIO™ : Category Search
Folder Search
8. ~ (Preset)
Radio Mode: Saves frequencies (channels) or receives saved fre-
quencies (channels)
CD, USB, iPod
®, My Music mode
- : Repeat
- : Random In the Radio, Media, Setup, and
Menu pop up screen, the number
menu is selected.
9.
pressed (under 0.8 seconds), it
sets the screen Off
➟Screen On ➟
Screen Off
❈ Audio operation is maintained and
only the screen will be turned Off.
In the screen Off state, press any
key to turn the screen On again.
10.
Radio Mode
- Shortly press the key (under 0.8
seconds): Previews each broad-
cast for 5 seconds each.
- Press and hold the key (over 0.8 seconds): Previews the broadcasts
saved in Preset ~ for 5
seconds each.
❈ Press the key again to
continue listening to the current
frequency.
❈ XM Radio™ does not support the
Preset scan feature. CD, USB, My Music mode
- Shortly press the key (under 0.8
seconds): Previews each song
(file) for 10 seconds each.
❈ Press the key again to
continue listening to the current
song (file).
11.
Shortly press the key (under 0.8
seconds) : Moves to the Display,
Sound, Clock, Phone, System set-
ting modes.
Press and hold the key (over 0.8 seconds) : Move to the Time set-
ting screen.
12.
Displays menus for the current mode.
13. TUNE knob
Radio mode : Changes frequencyby turning the knob left/right.
CD, USB, iPod
®, My Music mode:
Searches songs (files) by turning
the knob left/right.
MENU
SETUPCLOCK
SCAN
SCAN
61
SCAN
DISP
2
1
61
CAT
FOLDER
Page 278 of 759
4181
Features of your vehicle
Blue Link®Voice Volume
(for Blue Link®equipped model)
Sets the Blue Link
®voice recognition
volume.
❈ While using Blue Link
®voice
recognition, turning the tune knob
will display the volume control
popup screen.
❈ May differ depending on the
selected audio.
Clock Settings
Press the key Select [Clock]
through TUNE knob or key
Select menu through TUNE knob
Clock Settings
This menu is used to set the time.
Select [Clock Settings] Set through
TUNEknob Press TUNEknob
❈ Adjust the number currently in
focus to set the [hour] and press
the tune knob to set the [minute]
and [AM/PM].3
SETUPCLOCK
Page 279 of 759
Features of your vehicle
182
4
Calendar Settings
This menu is used to set the date
(MM/DD/YYYY).
Select [Calendar Settings]] Set
through
TUNE knob Press
TUNE knob
❈ Adjust the number currently in
focus to make the settings and
press the tune knob to move to the
next setting. (Set in order of
Year/Month/Day)
Time Format
This function is used to set the 12/24
hour time format of the audio system.
Select [Time Format] Set 12Hr /
24Hr through
TUNEknob
Clock Display when Power is
OFF
Select [Clock Disp.(Pwr Off)]Set
/ through TUNE knob
: Displays time/date on screen
Turn off.
Off
On
OffOn
Page 322 of 759
4225
Features of your vehicle
8.
9.
Displays the time/date/day.
10.
previews all receiv-able broadcasts for 5 seconds each
: previews each song (file) for 10seconds each. 11.
Converts to Setup mode.
12. TUNE knob
turn to change broad-
cast frequencies.
(CD/USB/iPod
®/My Music)
modes : turn to search tracks/chan-
nels/files.
13. DISC-IN LED
LED that indicates whether a disc is inserted.
14. RESET
Forced system termination and system restart.
Audio Head Unit
15.
Category Search
CD, USB/MP3 mode : SearchFolderCAT
FOLDER
SETUP
SCAN
CLOCK
DISP
Page 381 of 759
Features of your vehicle
284
4
SETUP
Starting Mode
Press the key to display the
Setup screen.
You can select and control options
related to [Display], [Sound],
[Clock/Calendar], [Phone] and
[System].
Display Settings
Adjusting the Brightness
Press the key Select
[Display] Select [Brightness]
Use the , buttons to adjust the
screen brightness or set the
Brightness on Automatic, Daylight, or
Night mode.
Press the button to reset.
1) Automatic : Adjusts the brightness
automatically
2) Daylight : Always maintains the brightness on high
3) Night : Always maintains the
brightness on low
Mode Pop-up
Press the key Select
[Display] Select [Mode Pop up]
This feature is used to display the
Mode Pop-up screen when entering
radio and media modes.
When this feature is turned on,
pressing the or key
will display the Mode Pop-up screen.
✽ ✽ NOTICE
The media Mode Pop-up screen can
be displayed only when two or more
media modes have been connected.
MEDIA RADIO
SETUP
Default
SETUP SETUP
Page 384 of 759
4287
Features of your vehicle
Touch Screen Beep
Press the key Select
[Sound] Select [Touch Screen
Beep]
This feature is used to turn the touch
screen beep on/off.
Blue Link Voice Volume
Press the key Select
[Sound] Select [Blue Link Voice
Vol.]
Turn the TUNE knob to adjust the
Blue Link Voice Volume.
❈Blue Link
®may differ depending
on the selected audio.
Clock/Calendar Setting
Clock Setting
Press the key Select
[Clock/Calendar] Select [Clock
Settings]
Use the , buttons to set the
Hour, Minutes setting and select
AM/PM.
✽ ✽ NOTICE
Press and hold the key (over
0.8 seconds) to set the
Clock/Calendar screen.CLOCK
SETUP
SETUP SETUP
Page 385 of 759
Features of your vehicle
288
4
Calendar Setting
Press the key Select
[Clock/Calendar] Select [Calendar
Settings]
Use the , buttons to set the
Month, Day and Year setting.
Time Format
Press the key Select
[Clock/Calendar] Select [Time Format]
This feature is used to change the
clock format between 12hr or 24hr.
Clock Display
Press the key Select
[Clock/Calendar] Select [Clock
Display (Power off)]
This feature is used to display a clock
on the screen when the audio sys-
tem is turned off.SETUP SETUP SETUP