2016 Hyundai Genesis battery
[x] Cancel search: batteryPage 25 of 502

2-7
Safety system of your vehicle
2
To prevent injury:
•Do not adjust your seat whilst
wearing your seat belt.
Moving the seat cushion for-
ward may cause strong pres-
sure on your abdomen.
•Do not allow your hands or
fingers to get caught in the
seat mechanisms whilst the
seat is moving.
WARNING (Continued)
•Do not allow anything to inter-
fere with the normal position
and proper locking of the seat-
back.
•Do not place a cigarette lighter
on the floor or seat. When you
operate the seat, gas may exit
out of the lighter causing a fire.
•Use extreme caution when
picking small objects trapped
under the seats or between the
seat and the centre console.
Your hands might be cut or
injured by the sharp edges of
the seat mechanism.
•If there are occupants in the
rear seats, be careful whilst
adjusting the front seat posi-
tion.
To prevent damage to the seats:
•Always stop adjusting the
seats when the seat has been
adjusted as far forward or
rearward as possible.
•Do not adjust the seats longer
than necessary when the
engine is turned off. This may
result in unnecessary battery
drain.
•Do not operate two or more
seats at the same time. This
may result in an electrical mal-
function.
CAUTION
NEVER allow children in the
vehicle unattended. The power
seats are operable when the
engine is turned off.
WARNING
Page 30 of 502

2-12
Safety system of your vehicle
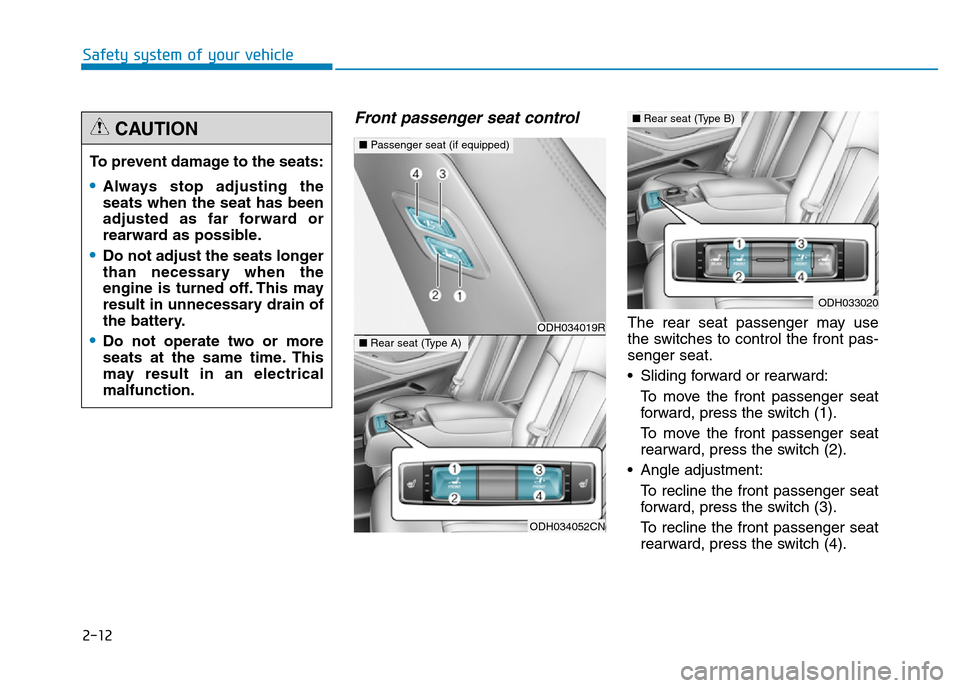
Front passenger seat control
The rear seat passenger may use
the switches to control the front pas-
senger seat.
• Sliding forward or rearward:
To move the front passenger seat
forward, press the switch (1).
To move the front passenger seat
rearward, press the switch (2).
• Angle adjustment:
To recline the front passenger seat
forward, press the switch (3).
To recline the front passenger seat
rearward, press the switch (4).
ODH033020
ODH034019R
ODH034052CN
■Passenger seat (if equipped)
■Rear seat (Type A)
■Rear seat (Type B)■Rear seat (Type B)
To prevent damage to the seats:
•Always stop adjusting the
seats when the seat has been
adjusted as far forward or
rearward as possible.
•Do not adjust the seats longer
than necessary when the
engine is turned off. This may
result in unnecessary drain of
the battery.
•Do not operate two or more
seats at the same time. This
may result in an electrical
malfunction.
CAUTION
Page 100 of 502

3-9
Convenient features of your vehicle
Battery replacement
If the Smart Key is not working prop-
erly, try replacing the battery with a
new one.
Conventional smart key
Battery Type: CR2032
To replace the battery:
1. Pry open the rear cover of the
smart key.
2. Remove the old battery and insert
the new battery. Make sure the
battery position is correct.
3. Reinstall the rear cover of the
smart key.
Card type smart key
Battery Type: CR2412
To replace the battery:
1. Pull out the battery and battery
cover.
2. Remove the old battery and insert
the new battery. Make sure the
battery position is correct.
3. Reinstall the battery cover and
battery.If you suspect your smart key might
have sustained some damage, or
you feel your smart key is not work-
ing correctly, it is recommended that
you contact a HYUNDAI authorised
repairer.
✽NOTICE
An inappropriately disposed
battery can be harmful to
the environment and human
health. Dispose the battery
according to your local
law(s) and regulations.
3
ODH043004
ODH043005
Page 107 of 502

3-16
The Driver Position Memory System
is provided to store and recall the fol-
lowing memory settings with a sim-
ple button operation.
- Driver's seat position
- Outside rearview mirror position
- Steering wheel position
- Instrument panel illumination intensity
- Head Up Display (HUD) position
and brightness✽NOTICE
• If the battery is disconnected, the
memory settings will be erased.
• If the Driver Position Memory
System does not operate normally,
we recommend that you have the
system checked by a HYUNDAI
authorised repairer.
Storing memory positions
1. Move the shift lever into P (Park)
whilst the Engine Start/Stop but-
ton is in the ON position.
2. Adjust the driver's seat position,
outside rearview mirror position,
steering wheel position, instrument
panel illumination intensity and
Head Up Display height/brightness
to the desired position.
3. Press the SET button. The system
will beep once and notify you
"Press button to save settings"on
the LCD display.
4. Press one of the memory buttons
(1 or 2) within 5 seconds. The sys-
tem will beep twice when the mem-
ory has been successfully stored.
5.
"Driver 1 (or 2) settings saved" will
appear on the LCD display.
DRIVER POSITION MEMORY SYSTEM (IF EQUIPPED)
Convenient features of your vehicle
Never attempt to operate the driv-
er position memory system
whilst the vehicle is moving.
This could result in loss of con-
trol, and an accident causing
death, serious injury, or property
damage.
WARNING
ODH043156L/ODH043157L
ODH044041R
Page 110 of 502

3-19
Convenient features of your vehicle
3
Tilt steering / Telescope steering
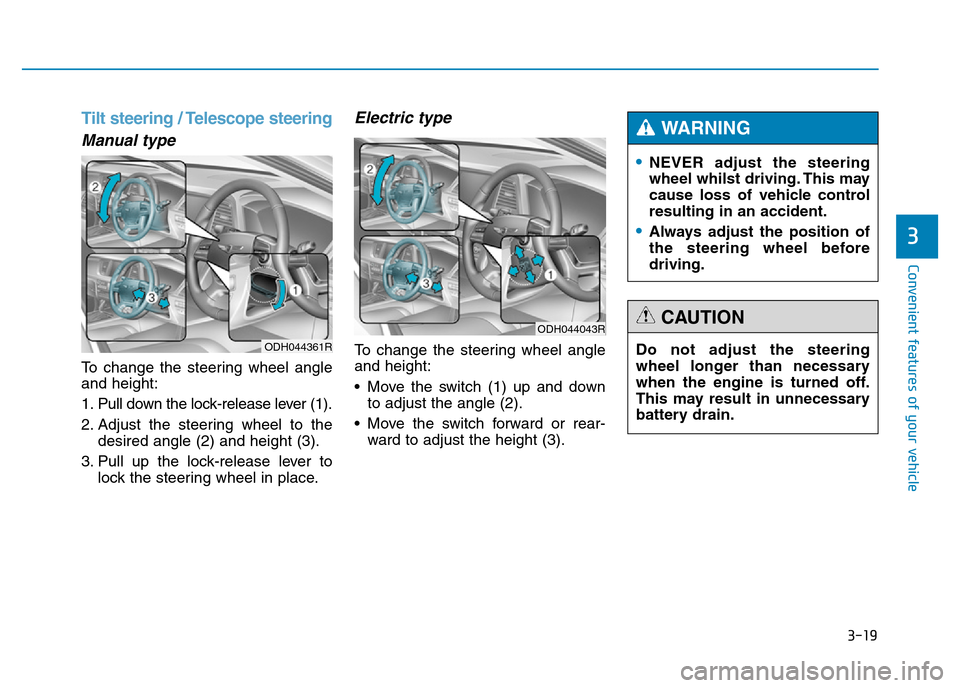
Manual type
To change the steering wheel angle
and height:
1. Pull down the lock-release lever (1).
2. Adjust the steering wheel to the
desired angle (2) and height (3).
3. Pull up the lock-release lever to
lock the steering wheel in place.
Electric type
To change the steering wheel angle
and height:
• Move the switch (1) up and down
to adjust the angle (2).
• Move the switch forward or rear-
ward to adjust the height (3).
•NEVER adjust the steering
wheel whilst driving. This may
cause loss of vehicle control
resulting in an accident.
•Always adjust the position of
the steering wheel before
driving.
WARNING
Do not adjust the steering
wheel longer than necessary
when the engine is turned off.
This may result in unnecessary
battery drain.
CAUTIONODH044043R
ODH044361R
Page 116 of 502

3-25
Convenient features of your vehicle
3
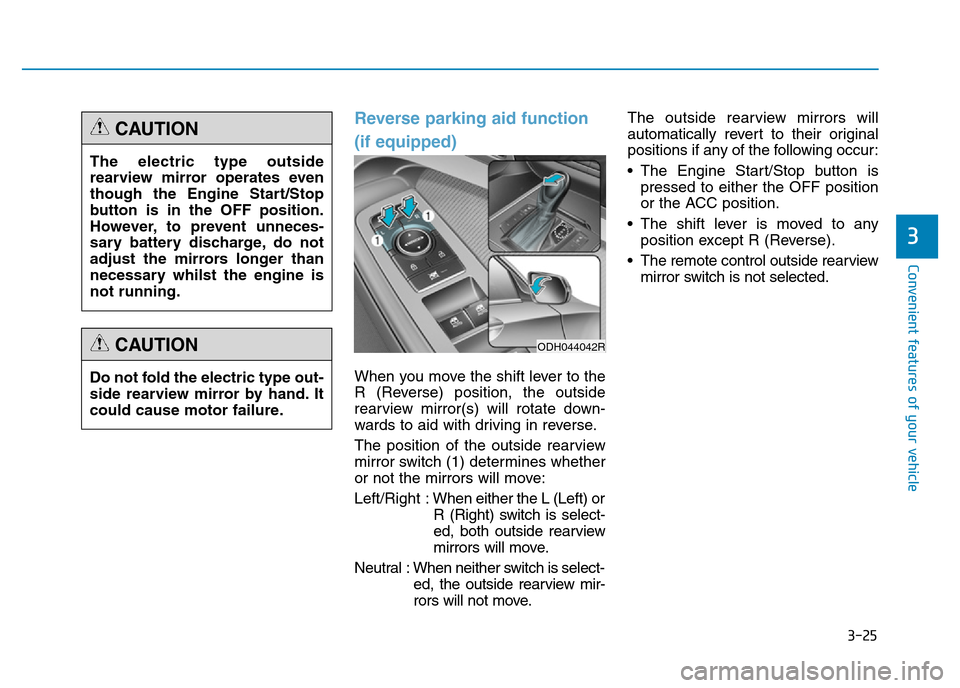
Reverse parking aid function
(if equipped)
When you move the shift lever to the
R (Reverse) position, the outside
rearview mirror(s) will rotate down-
wards to aid with driving in reverse.
The position of the outside rearview
mirror switch (1) determines whether
or not the mirrors will move:
Left/Right :When either the L (Left) or
R (Right) switch is select-
ed, both outside rearview
mirrors will move.
Neutral : When neither switch is select-
ed, the outside rearview mir-
rors will not move.The outside rearview mirrors will
automatically revert to their original
positions if any of the following occur:
• The Engine Start/Stop button is
pressed to either the OFF position
or the ACC position.
• The shift lever is moved to any
position except R (Reverse).
• The remote control outside rearview
mirror switch is not selected. The electric type outside
rearview mirror operates even
though the Engine Start/Stop
button is in the OFF position.
However, to prevent unneces-
sary battery discharge, do not
adjust the mirrors longer than
necessary whilst the engine is
not running.
CAUTION
Do not fold the electric type out-
side rearview mirror by hand. It
could cause motor failure.
CAUTIONODH044042R
Page 124 of 502

3-33
Convenient features of your vehicle
3
✽NOTICE
After washing the vehicle or after a
rain, be sure to wipe off the water on
the sunroof before operating the
sunroof.
Resetting the sunroof
Sunroof needs to be reset if (in the
followings)
- Battery is discharged or discon-
nected or the related fuse has been
replaced or disconnected.
- The one-touch sliding function of
the sunroof does not normally oper-
ate.
1. Turn the engine on and close the
panorama sunroof glass and sun-
shade completely.
2. Release the panorama sunroof
control lever.3. Push the panorama sunroof con-
trol lever forward in the direction of
close for more than 10 seconds
until the panorama sunroof oper-
ates as follows:
Sunshade open→ Glass tilt up
4. Release the panorama sunroof
control lever.
5. Push the panorama sunroof con-
trol lever forward once again within
5 seconds until the panorama sun-
roof operates as follows:
Glass Tilt Close → Glass Slide
Open → Glass Slide Close
Then, release the control lever.
When this is complete, the panora-
ma sunroof system is reset.
For more details, we recommend
that you contact a HYUNDAI autho-
rised repairer.
✽NOTICE
If you do not reset the panorama
sunroof, it may not work properly.
•Periodically remove any dirt
that may accumulate on the
sunroof guide rail or between
the sunroof and roof panel,
which can make a noise.
•Do not try to open the sunroof
when the temperature is
below freezing or when the
sunroof is covered with snow
or ice, the motor could be
damaged. In cold and wet cli-
mates, the sunroof may not
work properly.
CAUTION
ODH043040
Page 130 of 502

3-39
Convenient features of your vehicle
3
✽NOTICE
In cold and wet climates, boot lock
and boot mechanisms may not work
properly due to freezing conditions.
Power Boot Non-Opening or
Closing Conditions:
• The Power Boot will not open or
close automatically, when the vehi-
cle is moving more than 1.8 mph
(3 km/h).
• The Power Boot can be operated
when the engine is not running.
However, the Power Boot operation
consumes large amounts of vehicle
electric power. To prevent the bat-
tery from draining, do not operate it
excessively (e.g., more than
approximately 10 times repeatedly.)
• Do not modify or repair any part of
the Power Boot by yourself. This
must be done by a HYUNDAI
authorised repairer.
• Before jacking up the vehicle to
change a tyre or repair the vehicle,
open the Power Boot. Do not oper-
ate the Power Boot when the vehi-
cle is raised or this could cause the
Power Boot to operate improperly.
• If there are obstacles such as snow
on the Power Boot, it may not open
automatically. After removing the
obstacle, try to open it again.
Automatic stop and reverse
If, during power opening or closing,
the boot is blocked by an object or
part of someone’s body, the power
boot will detect the resistance and it
will stop movement or move to the
full open position to allow the object
to be cleared.
However, if the resistance is weak
such as from an object that is thin or
soft, or the boot is near the latched
position, the automatic stop and
reversal may not detect the resist-
ance and the closing operation will
continue. Also, if the Power Boot is
forced by a strong impact, the auto-
matic stop and reversal may operate.
•Do not close or open the Power
Boot manually. This may cause
damage to the Power Boot. If it
is necessary to close or open
the Power Boot manually when
the battery is drained or dis-
connected, do not apply exces-
sive force.
•Do not leave the Power Boot
open for a long period of time.
This may drain the battery.
•To prevent damage to the
boot lift cylinders and the
attached hardware, always
close the boot before driving.
CAUTION
ODH043019