2016 Hyundai Genesis wiper blades
[x] Cancel search: wiper bladesPage 13 of 502

1-2
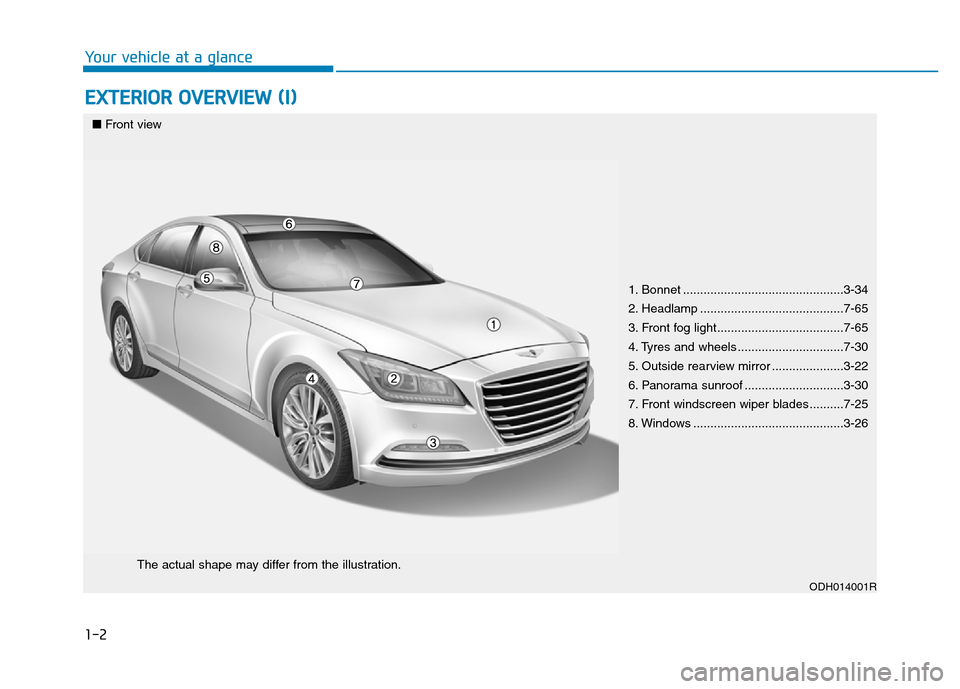
EXTERIOR OVERVIEW (I)
Your vehicle at a glance
1. Bonnet ...............................................3-34
2. Headlamp ..........................................7-65
3. Front fog light.....................................7-65
4. Tyres and wheels ...............................7-30
5. Outside rearview mirror .....................3-22
6. Panorama sunroof .............................3-30
7. Front windscreen wiper blades ..........7-25
8. Windows ............................................3-26
ODH014001R
■Front view
The actual shape may differ from the illustration.
Page 366 of 502

5-93
Driving your vehicle
5
Driving in the rain
Rain and wet roads can make driving
dangerous. Here are a few things to
consider when driving in the rain or
on slick pavement:
• Slow down and allow extra follow-
ing distance. A heavy rainfall
makes it harder to see and increas-
es the distance needed to stop
your vehicle.
• Turn OFF your Cruise Control (if
equipped).
• Replace your windscreen wiper
blades when they show signs of
streaking or missing areas on the
windscreen.
• Be sure your tyres have enough
tread. If your tyres do not have
enough tread, making a quick stop
on wet pavement can cause a skid
and possibly lead to an accident.
See “Tyre Tread”in chapter 7.
• Turn on your headlamps to make it
easier for others to see you.
• Driving too fast through large pud-
dles can affect your brakes. If you
must go through puddles, try to
drive through them slowly.• If you believe your brakes may be
wet, apply them lightly whilst driv-
ing until normal braking operation
returns.
Hydroplaning
If the road is wet enough and you are
going fast enough, your vehicle may
have little or no contact with the road
surface and actually ride on the
water. The best advice is SLOW
DOWN when the road is wet. The
risk of hydroplaning increases as the
depth of tyre tread decreases, refer
to “Tyre Tread” in chapter 7.
Driving in flooded areas
Avoid driving through flooded areas
unless you are sure the water is no
higher than the bottom of the wheel
hub. Drive through any water slowly.
Allow adequate stopping distance
because brake performance may be
reduced.
After driving through water, dry the
brakes by gently applying them sev-
eral times whilst the vehicle is mov-
ing slowly.
Page 407 of 502

7
Maintenance
7
Maintenance
Engine compartment .............................................7-3
Maintenance services ...........................................7-5
Owner's responsibility ......................................................7-5
Owner maintenance precautions ..................................7-5
Owner maintenance ...............................................7-7
Owner maintenance schedule ........................................7-7
Scheduled maintenance service ..........................7-9
Explanation of scheduled maintenance items..7-10
Engine oil ..............................................................7-14
Checking the engine oil level .......................................7-14
Changing the engine oil and filter ..............................7-15
Engine coolant......................................................7-16
Checking the coolant level ...........................................7-16
Changing the coolant .....................................................7-18
Brake fluid ............................................................7-19
Checking the brake fluid level .....................................7-19
Washer fluid .........................................................7-21
Checking the washer fluid level ..................................7-21
Parking brake .......................................................7-21
Checking the parking brake .........................................7-21
Air cleaner ............................................................7-22
Filter replacement ...........................................................7-22
Climate control air filter .....................................7-23
Filter inspection ...............................................................7-23
Filter replacement ...........................................................7-23
Wiper blades .........................................................7-24
Blade inspection ..............................................................7-24
Blade replacement ..........................................................7-24
Battery...................................................................7-26
For best battery service................................................7-26
Battery capacity label ....................................................7-28
Battery recharging .........................................................7-28
Reset items .......................................................................7-29
Tyres and wheels .................................................7-30
Tyre care ...........................................................................7-30
Recommended cold tyre inflation pressures ...........7-30
Checking tyre inflation pressure.................................7-32
Tyre rotation ....................................................................7-33
Wheel alignment and tyre balance.............................7-34
Tyre replacement ............................................................7-34
Wheel replacement ........................................................7-36
Tyre traction ....................................................................7-36
Tyre maintenance ..........................................................7-36
Tyre sidewall labelling....................................................7-36
Low aspect ratio tyre.....................................................7-41
7
Page 414 of 502

7-8
Maintenance
At least monthly:
• Check coolant level in the engine
coolant reservoir.
• Check the operation of all exterior
lights, including the stop lamps,
turn signals and hazard warning
flashers.
• Check the inflation pressures of all
tyres including the spare.
At least twice a year
(i.e., every Spring and Fall):
• Check radiator, heater and air con-
ditioning hoses for leaks or dam-
age.
• Check windscreen washer spray
and wiper operation. Clean wiper
blades with a clean cloth damp-
ened with washer fluid.
• Check headlamp alignment.
• Check muffler, exhaust pipes,
shields and clamps.
• Check the lap/shoulder belts for
wear and function.
• Check for worn tyres and loose
wheel lug nuts.
At least once a year:
• Clean body and door drain holes.
• Lubricate door hinges and checks,
and bonnet hinges.
• Lubricate door and bonnet locks
and latches.
• Lubricate door rubber weather-
strips.
• Check the air conditioning system.
• Inspect and lubricate automatic
transmission linkage and controls.
• Clean battery and terminals.
• Check the brake fluid level.
Page 430 of 502

7-24
Maintenance
WIPER BLADES
Blade inspection
✽NOTICE
Commercial hot waxes applied by
automatic car washes have been
known to make the windscreen diffi-
cult to clean.
Contamination of either the wind-
screen or the wiper blades with for-
eign matter can reduce the effective-
ness of the windscreen wipers.
Common sources of contamination
are insects, tree sap, and hot wax
treatments used by some commer-
cial car washes. If the blades are not
wiping properly, clean both the win-
dow and the blades with a good
cleaner or mild detergent, and rinse
thoroughly with clean water.Blade replacement
When the wipers no longer clean
adequately, the blades may be worn
or cracked, and require replacement.
OLMB073019/H
To prevent damage to the wiper
blades, do not use petrol,
kerosene, paint thinner, or other
solvents on or near them.
CAUTION
To prevent damage to the wiper
arms or other components, do
not attempt to move the wipers
manually.
CAUTION
The use of a non-specified
wiper blade could result in
wiper malfunction and failure.
CAUTION
Page 431 of 502

7-25
7
Maintenance
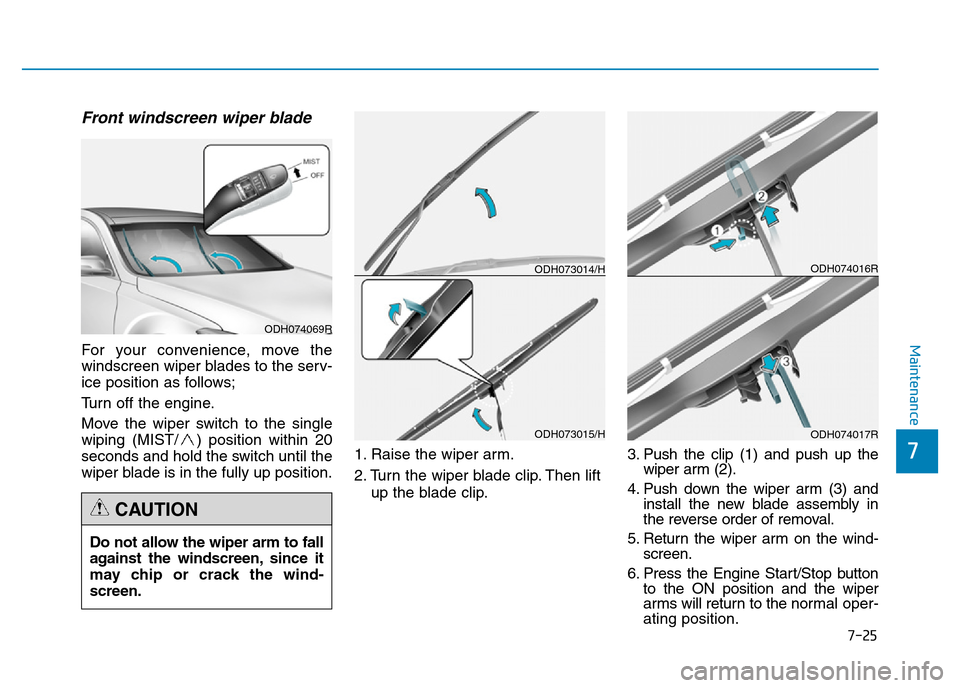
Front windscreen wiper blade
For your convenience, move the
windscreen wiper blades to the serv-
ice position as follows;
Turn off the engine.
Move the wiper switch to the single
wiping (MIST/ ) position within 20
seconds and hold the switch until the
wiper blade is in the fully up position.1. Raise the wiper arm.
2. Turn the wiper blade clip. Then lift
up the blade clip.3. Push the clip (1) and push up the
wiper arm (2).
4. Push down the wiper arm (3) and
install the new blade assembly in
the reverse order of removal.
5. Return the wiper arm on the wind-
screen.
6. Press the Engine Start/Stop button
to the ON position and the wiper
arms will return to the normal oper-
ating position.
Do not allow the wiper arm to fall
against the windscreen, since it
may chip or crack the wind-
screen.
CAUTION
ODH074069R
ODH073015/H
ODH074016R
ODH074017R
ODH073014/H