Page 118 of 498
Features of your vehicle
38 4
To turn the heated steering wheel off,
press the button again. The indicator
on the button will turn off and notify
you on the LCD display (if equipped).
✽NOTICE
The heated steering wheel will turn
off automatically approximately 30
minutes after the heated steering
wheel is turned on.
Flex steering wheel
(if equipped)
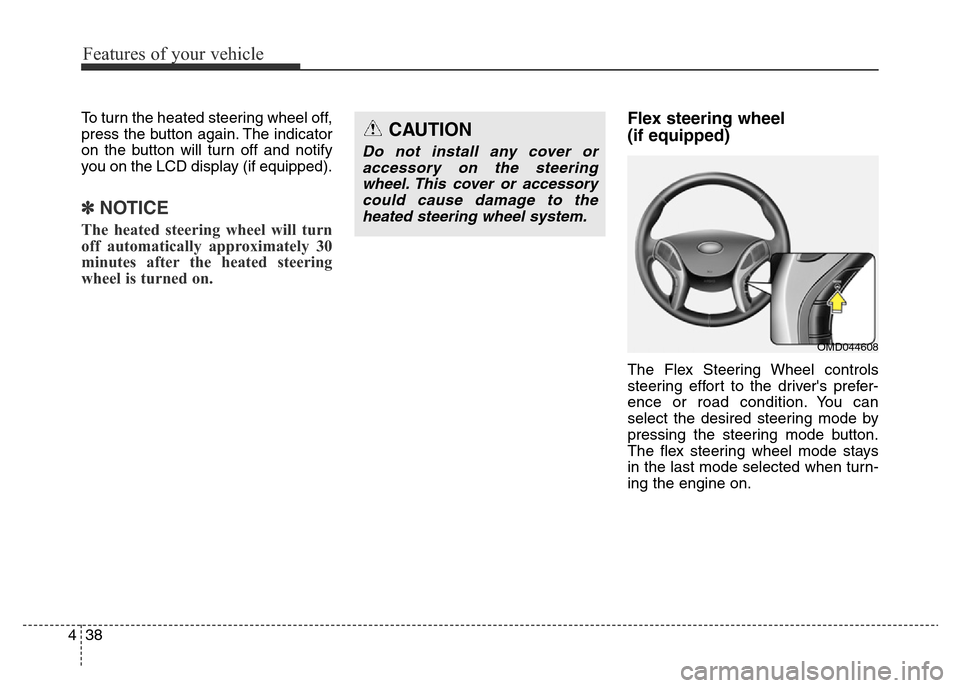
The Flex Steering Wheel controls
steering effort to the driver's prefer-
ence or road condition. You can
select the desired steering mode by
pressing the steering mode button.
The flex steering wheel mode stays
in the last mode selected when turn-
ing the engine on.
CAUTION
Do not install any cover or
accessory on the steering
wheel. This cover or accessory
could cause damage to the
heated steering wheel system.
OMD044608
Page 340 of 498
Driving your vehicle
36 5
ESC operation
ESC ON condition
When the ignition switch is in the ON
position, the ESC and the ESC OFF
indicator lights illuminate for approxi-
mately three seconds and goes off,
then the ESC is turned on.
If this light stays on, your vehicle may
have a malfunction with the ESC
system. We recommend that the
vehicle be checked by an authorised
HYUNDAI dealer as soon as possi-
ble.When operating
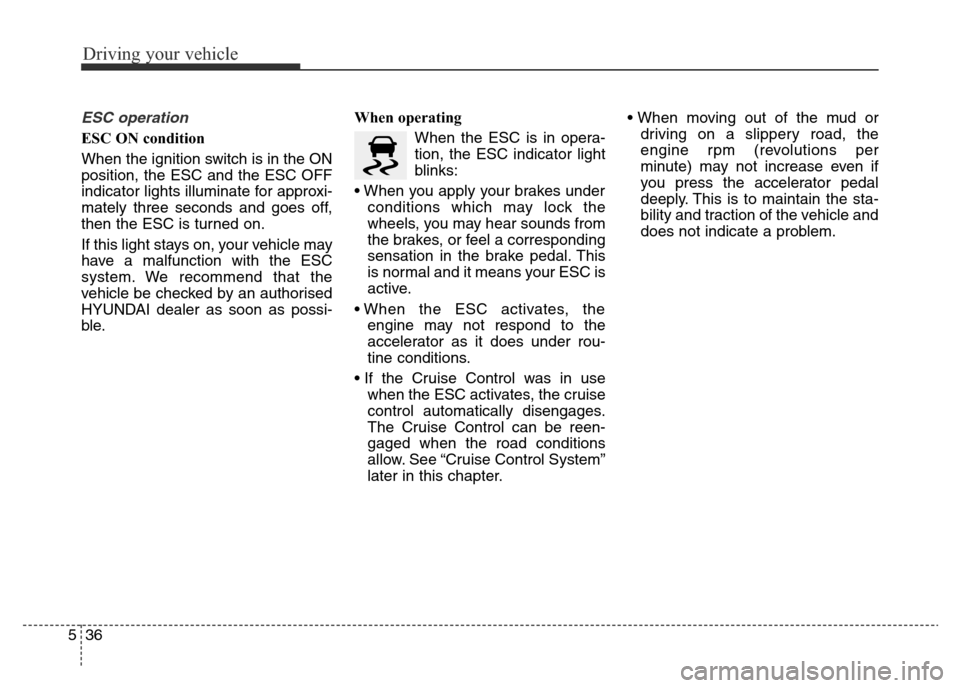
When the ESC is in opera-
tion, the ESC indicator light
blinks:
• When you apply your brakes under
conditions which may lock the
wheels, you may hear sounds from
the brakes, or feel a corresponding
sensation in the brake pedal. This
is normal and it means your ESC is
active.
• When the ESC activates, the
engine may not respond to the
accelerator as it does under rou-
tine conditions.
• If the Cruise Control was in use
when the ESC activates, the cruise
control automatically disengages.
The Cruise Control can be reen-
gaged when the road conditions
allow. See “Cruise Control System”
later in this chapter.• When moving out of the mud or
driving on a slippery road, the
engine rpm (revolutions per
minute) may not increase even if
you press the accelerator pedal
deeply. This is to maintain the sta-
bility and traction of the vehicle and
does not indicate a problem.
Page 388 of 498
What to do in an emergency
12 6
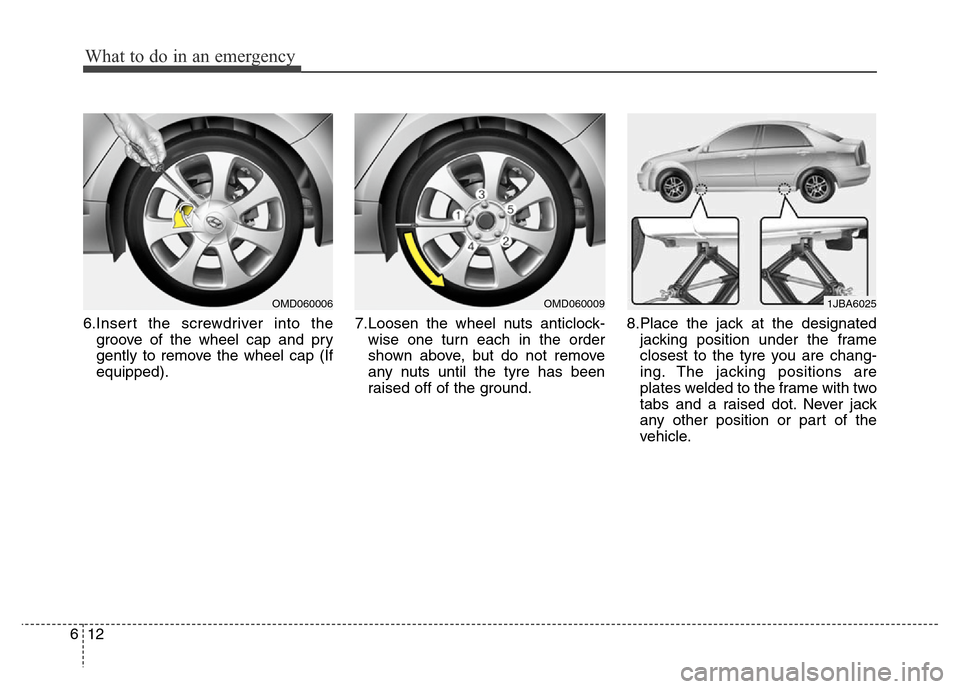
6.Insert the screwdriver into the
groove of the wheel cap and pry
gently to remove the wheel cap (If
equipped).7.Loosen the wheel nuts anticlock-
wise one turn each in the order
shown above, but do not remove
any nuts until the tyre has been
raised off of the ground.8.Place the jack at the designated
jacking position under the frame
closest to the tyre you are chang-
ing. The jacking positions are
plates welded to the frame with two
tabs and a raised dot. Never jack
any other position or part of the
vehicle.
OMD0600061JBA6025OMD060009
Page 389 of 498
613
What to do in an emergency
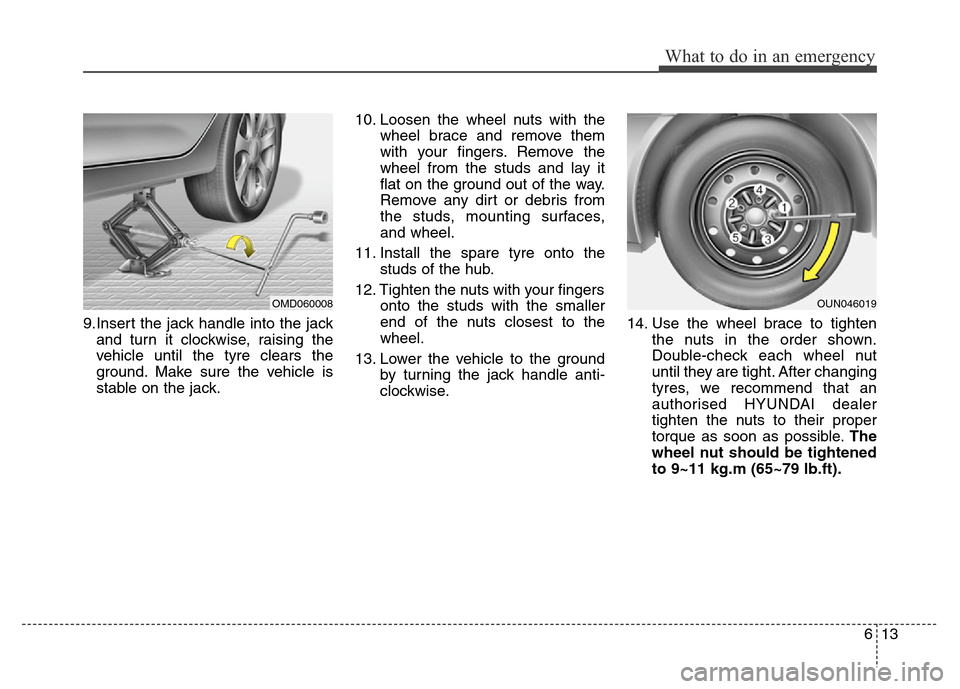
9.Insert the jack handle into the jack
and turn it clockwise, raising the
vehicle until the tyre clears the
ground. Make sure the vehicle is
stable on the jack.10. Loosen the wheel nuts with the
wheel brace and remove them
with your fingers. Remove the
wheel from the studs and lay it
flat on the ground out of the way.
Remove any dirt or debris from
the studs, mounting surfaces,
and wheel.
11. Install the spare tyre onto the
studs of the hub.
12. Tighten the nuts with your fingers
onto the studs with the smaller
end of the nuts closest to the
wheel.
13. Lower the vehicle to the ground
by turning the jack handle anti-
clockwise.14. Use the wheel brace to tighten
the nuts in the order shown.
Double-check each wheel nut
until they are tight. After changing
tyres, we recommend that an
authorised HYUNDAI dealer
tighten the nuts to their proper
torque as soon as possible.The
wheel nut should be tightened
to 9~11 kg.m (65~79 lb.ft).
OMD060008OUN046019
Page 390 of 498
What to do in an emergency
14 6
If you have a tyre gauge, check the
tyre pressure (see “Tyres and
Wheels” in chapter 8 for tyre pres-
sure instructions.). If the pressure is
lower or higher than recommended,
drive slowly to the nearest service
station and adjust it to the recom-
mended pressure. Always reinstall
the valve cap after checking or
adjusting tyre pressure. If the cap is
not replaced, air may leak from the
tyre. If you lose a valve cap, buy
another and install it as soon as pos-
sible. After changing tyres, secure
the flat tyre and return the jack and
tools to their correct storage loca-
tions.
✽NOTICE
Check the tyre pressure as soon as
possible after installing a spare tyre.
Adjust it to the recommended pres-
sure.
If any of the equipment such as the
jack, wheel nuts, studs, or other
equipment is damaged or in poor
condition, do not attempt to change
the tyre and call for assistance.
Use of compact spare tyres
(if equipped)
Compact spare tyres are designed
for emergency use only. Drive care-
fully on the compact spare tyre and
always follow the safety precautions.
CAUTION
Your vehicle has metric threads
on the studs and wheel nuts.
Make certain during tyre chang-
ing that the same nuts that were
removed are reinstalled. If you
have to replace your wheel nuts
make sure they have metric
threads to avoid damaging the
studs and ensure the wheel is
properly secured to the hub. We
recommend that you consult an
authorised HYUNDAI dealer for
assistance.
WARNING
To prevent compact spare tyre
failure and loss of control pos-
sibly resulting in an accident:
• Use the compact spare tyre
only in an emergency.
• NEVER operate your vehicle
over 80 km/h.
• Do not exceed the vehicle’s
maximum load rating or the
load carrying capacity shown
on the sidewall of the com-
pact spare tyre.
• Do not use the compact spare
tyre continuously. Repair or
replace the original tyre as
soon as possible to avoid fail-
ure of the compact spare tyre.
Page 391 of 498
615
What to do in an emergency
When driving with the compact spare
tyre mounted to your vehicle:
• Check the tyre pressure after
installing the compact spare tyre.
The compact spare tyre should be
inflated to 420 kPa (60 psi).
• Do not take this vehicle through an
automatic car wash whilst the com-
pact spare tyre is installed.
• Do not use the compact spare tyre
on any other vehicle because this
tyre has been designed especially
for your vehicle.
• The compact spare tyre’s tread life
is shorter than a regular tyre.
Inspect your compact spare tyre
regularly and replace worn com-
pact spare tyres with the same size
and design, mounted on the same
wheel.
• Do not use more than one compact
spare tyre at a time.
• Do not tow a trailer whilst the com-
pact spare tyre is installed.✽NOTICE
When the original tyre and wheel
are repaired and reinstalled on the
vehicle, the wheel nut torque must
be set correctly to prevent wheel
vibration. The correct wheel nut
tightening torque is 9-11 kg.m (65-79
lb.ft).CAUTION
To prevent damaging the com-
pact spare tyre and your vehi-
cle:
• Drive slowly enough for the
road conditions to avoid all
hazards, such as a potholes or
debris.
• Avoid driving over obstacles.
The compact spare tyre diam-
eter is smaller than the diame-
ter of a conventional tyre and
reduces the ground clearance
approximately 25 mm.
• Do not use tyre chains on the
compact spare tyre. Because
of the smaller size, a tyre
chain will not fit properly.
• Do not use the compact spare
tyre on any other wheels, nor
should standard tyres, snow
tyres, wheel covers or trim
rings be used with the com-
pact spare wheel.
Page 403 of 498
Maintenance
8 7
At least monthly:
• Check the coolant level in the
engine coolant reservoir.
• Check the operation of all exterior
lights, including the stoplights, turn
signals and hazard warning flash-
ers.
• Check the inflation pressures of all
tyres including the spare.
At least twice a year
(i.e., every Spring and Autumn):
• Check the radiator, heater and air
conditioning hoses for leaks or
damage.
• Check the windscreen washer
spray and wiper operation. Clean
wiper blades with clean cloth
dampened with washer fluid.
• Check the headlight alignment.
• Check the muffler, exhaust pipes,
shields and clamps.
• Check the lap/shoulder belts for
wear and function.
• Check for worn tyres and loose
wheel nuts.
At least once a year:
• Clean the body and door drain
holes.
• Lubricate the door hinges and
checks, and bonnet hinges.
• Lubricate the door and bonnet
locks and latches.
• Lubricate the door rubber weather-
strips.
• Check the air conditioning system.
• Inspect and lubricate automatic
transaxle linkage and controls.
• Clean the battery and terminals.
• Check the brake/clutch fluid level.
Page 439 of 498
Maintenance
44 7
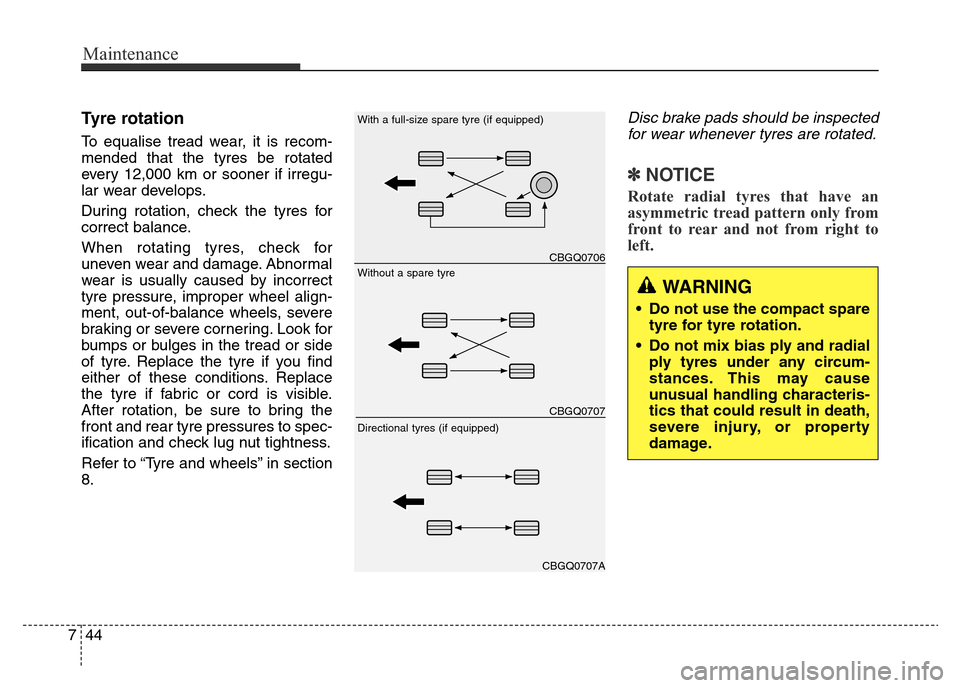
Tyre rotation
To equalise tread wear, it is recom-
mended that the tyres be rotated
every 12,000 km or sooner if irregu-
lar wear develops.
During rotation, check the tyres for
correct balance.
When rotating tyres, check for
uneven wear and damage. Abnormal
wear is usually caused by incorrect
tyre pressure, improper wheel align-
ment, out-of-balance wheels, severe
braking or severe cornering. Look for
bumps or bulges in the tread or side
of tyre. Replace the tyre if you find
either of these conditions. Replace
the tyre if fabric or cord is visible.
After rotation, be sure to bring the
front and rear tyre pressures to spec-
ification and check lug nut tightness.
Refer to “Tyre and wheels” in section
8.
Disc brake pads should be inspected
for wear whenever tyres are rotated.
✽NOTICE
Rotate radial tyres that have an
asymmetric tread pattern only from
front to rear and not from right to
left.
WARNING
• Do not use the compact spare
tyre for tyre rotation.
• Do not mix bias ply and radial
ply tyres under any circum-
stances. This may cause
unusual handling characteris-
tics that could result in death,
severe injury, or property
damage.
CBGQ0706
CBGQ0707
CBGQ0707A
Without a spare tyre With a full-size spare tyre (if equipped)
Directional tyres (if equipped)