2016 Hyundai Elantra battery replacement
[x] Cancel search: battery replacementPage 86 of 498

Features of your vehicle
6 4
✽NOTICE
Changes or modifications not
expressly approved by the party
responsible for compliance could void
the user’s authority to operate the
equipment. If the keyless entry sys-
tem is inoperative due to changes or
modifications not expressly approved
by the party responsible for compli-
ance, it will not be covered by your
manufacturer’s vehicle warranty.
Battery replacement
If the remote key is not working prop-
erly, try replacing the battery with a
new one.
Battery Type: CR2032
To replace the battery:
1. Insert a slim tool into the slot and
gently pry open the cover.
2. Remove the old battery and insert
the new battery. Make sure the
battery position is correct.
3. Reinstall the rear cover of the
remote key.If you suspect your remote key might
have sustained some damage, or
you feel your remote key is not work-
ing correctly, it is recommanded that
you contact an authorised HYUNDAI
dealer.
✽NOTICE
An inappropriately disposed
battery can be harmful to
the environment and human
health. Dispose the battery
according to your local
law(s) and regulation.
OVF041213
CAUTION
Keep the remote key away from
electromagnetic materials that
blocks electromagnetic waves
to the key surface.
Page 91 of 498

411
Features of your vehicle
✽NOTICE
Changes or modifications not
expressly approved by the party
responsible for compliance could void
the user’s authority to operate the
equipment. If the keyless entry sys-
tem is inoperative due to changes or
modifications not expressly approved
by the party responsible for compli-
ance, it will not be covered by your
manufacturer’s vehicle warranty.
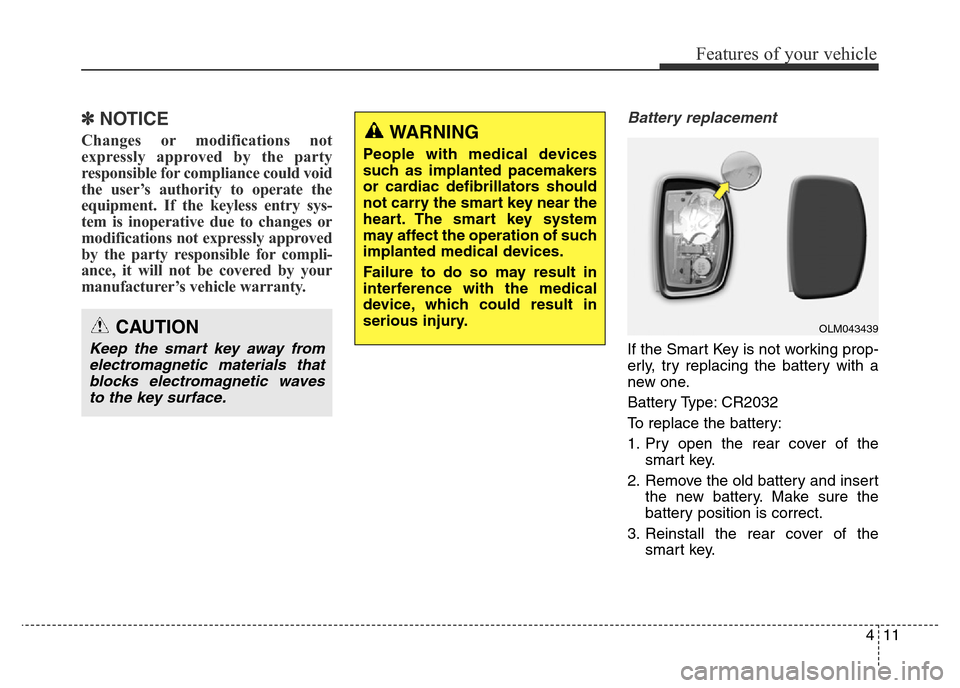
Battery replacement
If the Smart Key is not working prop-
erly, try replacing the battery with a
new one.
Battery Type: CR2032
To replace the battery:
1. Pry open the rear cover of the
smart key.
2. Remove the old battery and insert
the new battery. Make sure the
battery position is correct.
3. Reinstall the rear cover of the
smart key.
OLM043439CAUTION
Keep the smart key away from
electromagnetic materials that
blocks electromagnetic waves
to the key surface.
WARNING
People with medical devices
such as implanted pacemakers
or cardiac defibrillators should
not carry the smart key near the
heart. The smart key system
may affect the operation of such
implanted medical devices.
Failure to do so may result in
interference with the medical
device, which could result in
serious injury.
Page 396 of 498

Maintenance
Engine compartment . . . . . . . . . . . . . . . . . . . . . . . . 7-3
Maintenance services . . . . . . . . . . . . . . . . . . . . . . . . 7-4
• Owner’s responsibility . . . . . . . . . . . . . . . . . . . . . . . . . 7-4
• Owner maintenance precautions . . . . . . . . . . . . . . . . 7-4
Owner maintenance . . . . . . . . . . . . . . . . . . . . . . . . 7-7
• Owner maintenance schedule . . . . . . . . . . . . . . . . . . . 7-7
Scheduled maintenance service . . . . . . . . . . . . . . 7-9
Explanation of scheduled maintenance items . . . 7-19
Engine oil. . . . . . . . . . . . . . . . . . . . . . . . . . . . . . . . . 7-23
• Checking the engine oil level . . . . . . . . . . . . . . . . . . 7-23
• Changing the engine oil and filter . . . . . . . . . . . . . . . 7-24
Engine coolant . . . . . . . . . . . . . . . . . . . . . . . . . . . . 7-26
• Checking the coolant level . . . . . . . . . . . . . . . . . . . . . 7-26
• Changing the coolant . . . . . . . . . . . . . . . . . . . . . . . . . 7-28
Brake/clutch fluid . . . . . . . . . . . . . . . . . . . . . . . . . . 7-29
• Checking the brake/clutch fluid level . . . . . . . . . . . 7-29
Washer fluid . . . . . . . . . . . . . . . . . . . . . . . . . . . . . . 7-30
• Checking the washer fluid level . . . . . . . . . . . . . . . . 7-30
Parking brake . . . . . . . . . . . . . . . . . . . . . . . . . . . . . 7-30
• Checking the parking brake . . . . . . . . . . . . . . . . . . 7-30
Air cleaner. . . . . . . . . . . . . . . . . . . . . . . . . . . . . . . . 7-31
• Filter replacement . . . . . . . . . . . . . . . . . . . . . . . . . . . 7-31
Climate control air filter . . . . . . . . . . . . . . . . . . . . 7-32
• Filter inspection . . . . . . . . . . . . . . . . . . . . . . . . . . . . . . 7-32• Filter replacement . . . . . . . . . . . . . . . . . . . . . . . . . . . . 7-32
Wiper blades . . . . . . . . . . . . . . . . . . . . . . . . . . . . . . 7-34
• Blade inspection . . . . . . . . . . . . . . . . . . . . . . . . . . . . . . 7-34
• Blade replacement . . . . . . . . . . . . . . . . . . . . . . . . . . . . 7-34
Battery . . . . . . . . . . . . . . . . . . . . . . . . . . . . . . . . . . . 7-37
• For best battery service . . . . . . . . . . . . . . . . . . . . . . . 7-37
• Battery capacity label . . . . . . . . . . . . . . . . . . . . . . . . . 7-38
• Battery recharging . . . . . . . . . . . . . . . . . . . . . . . . . . . 7-39
• Reset items . . . . . . . . . . . . . . . . . . . . . . . . . . . . . . . . . . 7-40
Tyres and wheels . . . . . . . . . . . . . . . . . . . . . . . . . . 7-41
• Tyre care. . . . . . . . . . . . . . . . . . . . . . . . . . . . . . . . . . . . 7-41
• Recommended cold tyre inflation pressures . . . . . . . 7-41
• Checking tyre inflation pressure . . . . . . . . . . . . . . . . 7-43
• Tyre rotation . . . . . . . . . . . . . . . . . . . . . . . . . . . . . . . . 7-44
• Wheel alignment and tyre balance . . . . . . . . . . . . . . 7-45
• Tyre replacement . . . . . . . . . . . . . . . . . . . . . . . . . . . . . 7-45
• Wheel replacement . . . . . . . . . . . . . . . . . . . . . . . . . . . 7-47
• Tyre traction . . . . . . . . . . . . . . . . . . . . . . . . . . . . . . . . 7-47
• Tyre maintenance . . . . . . . . . . . . . . . . . . . . . . . . . . . . 7-47
• Tyre sidewall labeling . . . . . . . . . . . . . . . . . . . . . . . . . 7-47
• Low aspect ratio tyre . . . . . . . . . . . . . . . . . . . . . . . . . 7-52
Fuses . . . . . . . . . . . . . . . . . . . . . . . . . . . . . . . . . . . . 7-53
• Instrument panel fuse replacement . . . . . . . . . . . . . . 7-54
• Engine compartment panel fuse replacement . . . . . 7-55
7
Page 448 of 498

753
Maintenance
FUSES
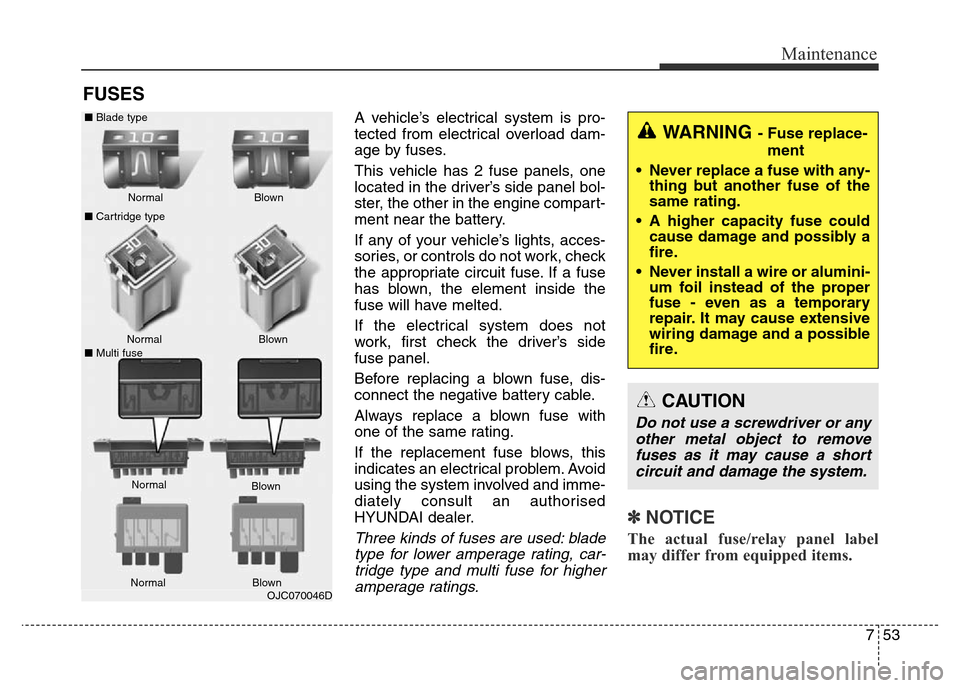
A vehicle’s electrical system is pro-
tected from electrical overload dam-
age by fuses.
This vehicle has 2 fuse panels, one
located in the driver’s side panel bol-
ster, the other in the engine compart-
ment near the battery.
If any of your vehicle’s lights, acces-
sories, or controls do not work, check
the appropriate circuit fuse. If a fuse
has blown, the element inside the
fuse will have melted.
If the electrical system does not
work, first check the driver’s side
fuse panel.
Before replacing a blown fuse, dis-
connect the negative battery cable.
Always replace a blown fuse with
one of the same rating.
If the replacement fuse blows, this
indicates an electrical problem. Avoid
using the system involved and imme-
diately consult an authorised
HYUNDAI dealer.
Three kinds of fuses are used: blade
type for lower amperage rating, car-
tridge type and multi fuse for higher
amperage ratings.
✽NOTICE
The actual fuse/relay panel label
may differ from equipped items.
WARNING - Fuse replace-
ment
• Never replace a fuse with any-
thing but another fuse of the
same rating.
• A higher capacity fuse could
cause damage and possibly a
fire.
• Never install a wire or alumini-
um foil instead of the proper
fuse - even as a temporary
repair. It may cause extensive
wiring damage and a possible
fire.
CAUTION
Do not use a screwdriver or any
other metal object to remove
fuses as it may cause a short
circuit and damage the system.
OJC070046D NormalNormal
■Cartridge type
■Multi fuseBlown
Blown
Normal
Blown ■Blade type
NormalBlown
Page 464 of 498

769
Maintenance
✽NOTICE
HID lamps have superior perform-
ance vs. halogen bulbs. HID lamps
are estimated by the manufacturer
to last twice as long or longer than
halogen bulbs depending on their
frequency of use. They will probably
require replacement at some point
in the life of the vehicle. Cycling the
headlights on and off more than typ-
ical use will shorten HID lamps life.
HID lamps do not fail in the same
manner as halogen incandescent
lamps. If a headlight goes out after a
period of operation, but will imme-
diately relight when the headlight
switch is cycled, it is likely the HID
lamp needs to be replaced. HID
lighting components are more com-
plex than conventional halogen
bulbs, and so have higher replace-
ment cost.
✽NOTICE
We recommend that the headlight
aiming be adjusted after an accident
or after the headlight assembly is rein-
stalled, at an authorised HYUNDAI
dealer.
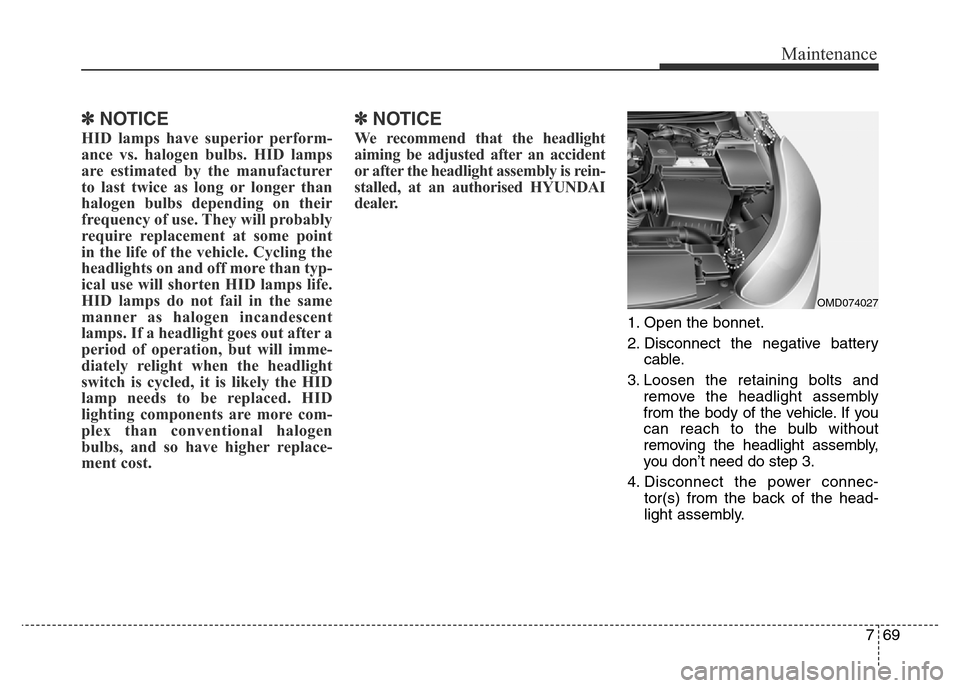
1. Open the bonnet.
2. Disconnect the negative battery
cable.
3. Loosen the retaining bolts and
remove the headlight assembly
from the body of the vehicle. If you
can reach to the bulb without
removing the headlight assembly,
you don’t need do step 3.
4. Disconnect the power connec-
tor(s) from the back of the head-
light assembly.
OMD074027