2016 Hyundai Elantra clock
[x] Cancel search: clockPage 17 of 498
25
Your vehicle at a glance
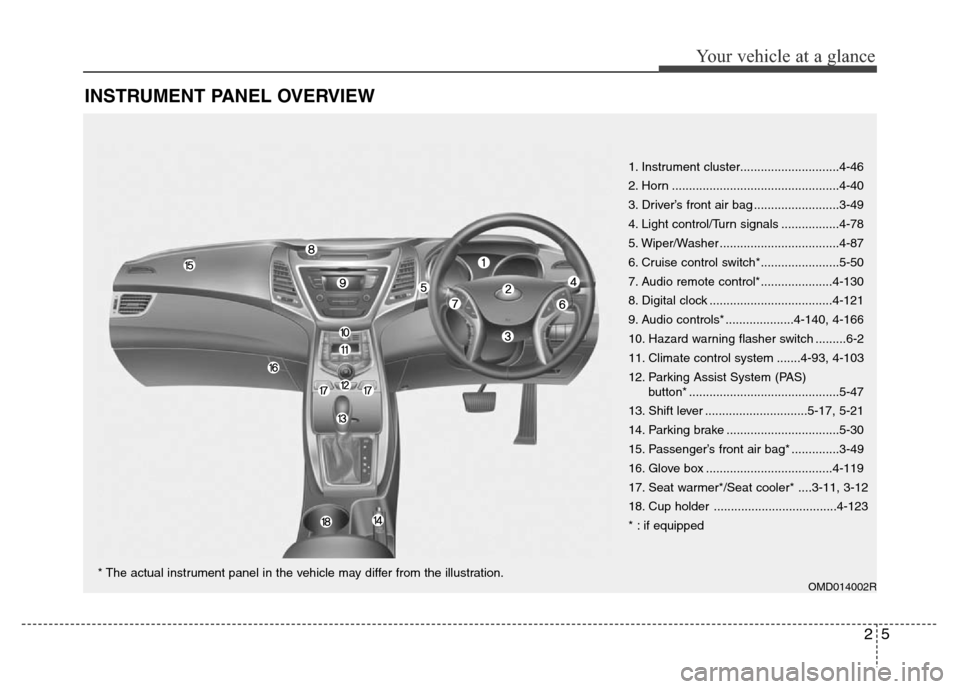
INSTRUMENT PANEL OVERVIEW
OMD014002R
1. Instrument cluster.............................4-46
2. Horn .................................................4-40
3. Driver’s front air bag .........................3-49
4. Light control/Turn signals .................4-78
5. Wiper/Washer ...................................4-87
6. Cruise control switch*.......................5-50
7. Audio remote control*.....................4-130
8. Digital clock ....................................4-121
9. Audio controls* ....................4-140, 4-166
10. Hazard warning flasher switch .........6-2
11. Climate control system .......4-93, 4-103
12. Parking Assist System (PAS)
button* ............................................5-47
13. Shift lever ..............................5-17, 5-21
14. Parking brake .................................5-30
15. Passenger’s front air bag* ..............3-49
16. Glove box .....................................4-119
17. Seat warmer*/Seat cooler* ....3-11, 3-12
18. Cup holder ....................................4-123
* : if equipped
* The actual instrument panel in the vehicle may differ from the illustration.
Page 82 of 498
• System operation . . . . . . . . . . . . . . . . . . . . . . . . . . . . . 4-99
• Climate control air filter . . . . . . . . . . . . . . . . . . . . . . 4-101
• Checking the amount of air conditioner refrigerant
and compressor lubricant. . . . . . . . . . . . . . . . . . . . 4-102
Automatic climate control system. . . . . . . . . . . . 4-103
• Automatic heating and air conditioning . . . . . . . . . 4-104
• Manual heating and air conditioning . . . . . . . . . . . 4-105
• Climate control air filter . . . . . . . . . . . . . . . . . . . . . . 4-110
• Checking the amount of air conditioner refrigerant
and compressor lubricant. . . . . . . . . . . . . . . . . . . . 4-111
Windscreen defrosting and defogging . . . . . . . . . 4-112
• Manual climate control system . . . . . . . . . . . . . . . . 4-112
• Automatic climate control system . . . . . . . . . . . . . . 4-113
• Defogging logic. . . . . . . . . . . . . . . . . . . . . . . . . . . . . . 4-114
Clean air . . . . . . . . . . . . . . . . . . . . . . . . . . . . . . . . 4-117
Storage compartment. . . . . . . . . . . . . . . . . . . . . . 4-118
• Centre console storage . . . . . . . . . . . . . . . . . . . . . . . 4-118
• Sliding armrest . . . . . . . . . . . . . . . . . . . . . . . . . . . . . 4-119
• Glove box . . . . . . . . . . . . . . . . . . . . . . . . . . . . . . . . . . 4-119
• Sunglass holder . . . . . . . . . . . . . . . . . . . . . . . . . . . . . 4-120
Interior features . . . . . . . . . . . . . . . . . . . . . . . . . . 4-121
• Clock and outside temperature . . . . . . . . . . . . . . . . 4-121
• Cigarette lighter. . . . . . . . . . . . . . . . . . . . . . . . . . . . . 4-122
• Ashtray . . . . . . . . . . . . . . . . . . . . . . . . . . . . . . . . . . . . 4-123
• Cup holder . . . . . . . . . . . . . . . . . . . . . . . . . . . . . . . . . 4-123• Sunvisor . . . . . . . . . . . . . . . . . . . . . . . . . . . . . . . . . . . 4-124
• Power outlet . . . . . . . . . . . . . . . . . . . . . . . . . . . . . . . . 4-125
• Aux, USB and iPod
®port . . . . . . . . . . . . . . . . . . . . . 4-126
• Clothes hanger . . . . . . . . . . . . . . . . . . . . . . . . . . . . . . 4-126
• Floor mat anchor(s). . . . . . . . . . . . . . . . . . . . . . . . . . 4-127
• Luggage net holder . . . . . . . . . . . . . . . . . . . . . . . . . . 4-127
Audio system . . . . . . . . . . . . . . . . . . . . . . . . . . . . . 4-129
• Antenna . . . . . . . . . . . . . . . . . . . . . . . . . . . . . . . . . . . 4-129
• Steering wheel audio control . . . . . . . . . . . . . . . . . . 4-130
• How vehicle audio works . . . . . . . . . . . . . . . . . . . . . 4-131
• Caring for disc . . . . . . . . . . . . . . . . . . . . . . . . . . . . . . 4-133
• CD Player . . . . . . . . . . . . . . . . . . . . . . . . . . . . 4-140, 4-166
4
Page 106 of 498
Features of your vehicle
26 4
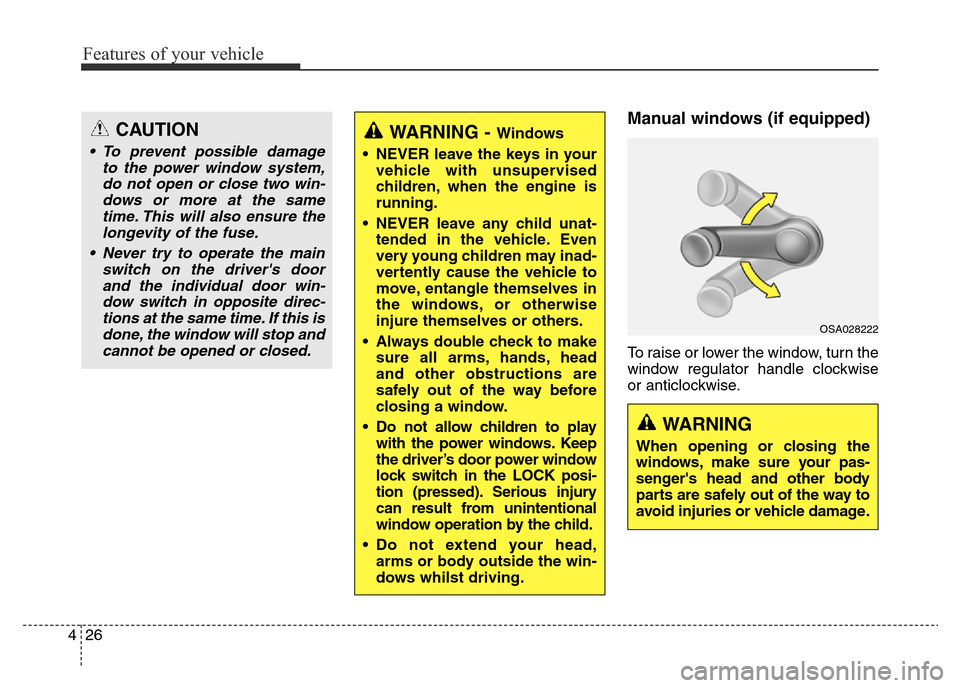
Manual windows (if equipped)
To raise or lower the window, turn the
window regulator handle clockwise
or anticlockwise.
WARNING - Windows
• NEVER leave the keys in your
vehicle with unsupervised
children, when the engine is
running.
• NEVER leave any child unat-
tended in the vehicle. Even
very young children may inad-
vertently cause the vehicle to
move, entangle themselves in
the windows, or otherwise
injure themselves or others.
• Always double check to make
sure all arms, hands, head
and other obstructions are
safely out of the way before
closing a window.
• Do not allow children to play
with the power windows. Keep
the driver’s door power window
lock switch in the LOCK posi-
tion (pressed). Serious injury
can result from unintentional
window operation by the child.
• Do not extend your head,
arms or body outside the win-
dows whilst driving.CAUTION
• To prevent possible damage
to the power window system,
do not open or close two win-
dows or more at the same
time. This will also ensure the
longevity of the fuse.
• Never try to operate the main
switch on the driver's door
and the individual door win-
dow switch in opposite direc-
tions at the same time. If this is
done, the window will stop and
cannot be opened or closed.
WARNING
When opening or closing the
windows, make sure your pas-
senger's head and other body
parts are safely out of the way to
avoid injuries or vehicle damage.
OSA028222
Page 109 of 498
429
Features of your vehicle
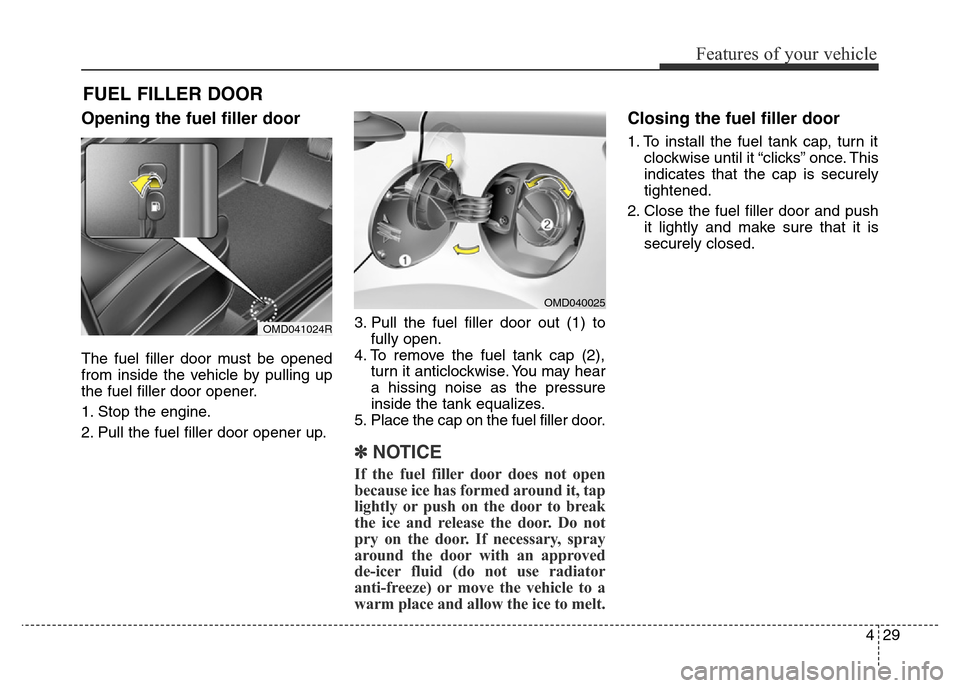
Opening the fuel filler door
The fuel filler door must be opened
from inside the vehicle by pulling up
the fuel filler door opener.
1. Stop the engine.
2. Pull the fuel filler door opener up.3. Pull the fuel filler door out (1) to
fully open.
4. To remove the fuel tank cap (2),
turn it anticlockwise. You may hear
a hissing noise as the pressure
inside the tank equalizes.
5. Place the cap on the fuel filler door.
✽NOTICE
If the fuel filler door does not open
because ice has formed around it, tap
lightly or push on the door to break
the ice and release the door. Do not
pry on the door. If necessary, spray
around the door with an approved
de-icer fluid (do not use radiator
anti-freeze) or move the vehicle to a
warm place and allow the ice to melt.
Closing the fuel filler door
1. To install the fuel tank cap, turn it
clockwise until it “clicks” once. This
indicates that the cap is securely
tightened.
2. Close the fuel filler door and push
it lightly and make sure that it is
securely closed.
FUEL FILLER DOOR
OMD040025
OMD041024R
Page 201 of 498
4121
Features of your vehicle
INTERIOR FEATURES
LCD monitor (Clock and out-
side temperature) (if equipped)
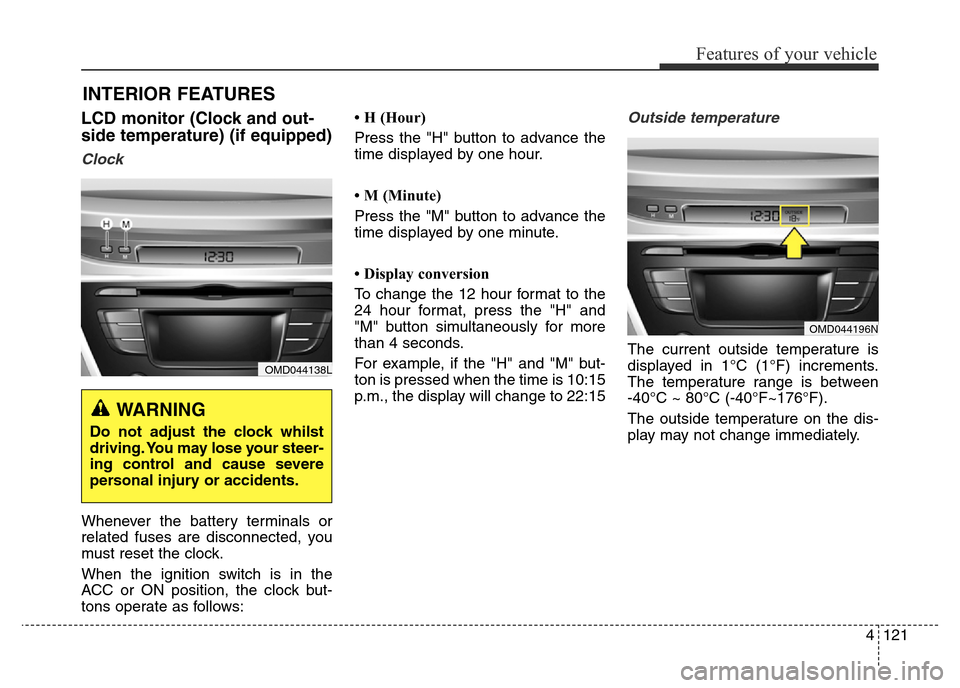
Clock
Whenever the battery terminals or
related fuses are disconnected, you
must reset the clock.
When the ignition switch is in the
ACC or ON position, the clock but-
tons operate as follows:• H (Hour)
Press the "H" button to advance the
time displayed by one hour.
• M (Minute)
Press the "M" button to advance the
time displayed by one minute.
• Display conversion
To change the 12 hour format to the
24 hour format, press the "H" and
"M" button simultaneously for more
than 4 seconds.
For example, if the "H" and "M" but-
ton is pressed when the time is 10:15
p.m., the display will change to 22:15
Outside temperature
The current outside temperature is
displayed in 1°C (1°F) increments.
The temperature range is between
-40°C ~ 80°C (-40°F~176°F).
The outside temperature on the dis-
play may not change immediately.
OMD044138L
WARNING
Do not adjust the clock whilst
driving. You may lose your steer-
ing control and cause severe
personal injury or accidents.
OMD044196N
Page 384 of 498
If your temperature gauge indicates
overheating, you experience a loss
of power, or hear loud pinging or
knocking, the engine may be over-
heating. If this happens, you should:
1.Pull off the road and stop as soon
as it is safe to do so.
2.Place the shift lever in P (Park, for
automatic transaxle vehicle) or
neutral (for manual transaxle vehi-
cle) and set the parking brake. If
the air conditioning is ON, turn it
OFF.
3.If engine coolant is running out
under the vehicle or steam is com-
ing out from the bonnet, stop the
engine. Do not open the bonnet
until the coolant has stopped run-
ning or the steaming has stopped.
If there is no visible loss of engine
coolant and no steam, leave the
engine running and check to be
sure the engine cooling fan is oper-
ating. If the fan is not running, turn
the engine off.4.Check for coolant leaking from the
radiator, hoses or under the vehi-
cle. (If the air conditioning had
been in use, it is normal for cold
water to be draining from it when
you stop.)
5.If engine coolant is leaking out,
stop the engine immediately and
we recommend that you call an
authorised HYUNDAI dealer for
assistance.
IF THE ENGINE OVERHEATS
What to do in an emergency
8 6
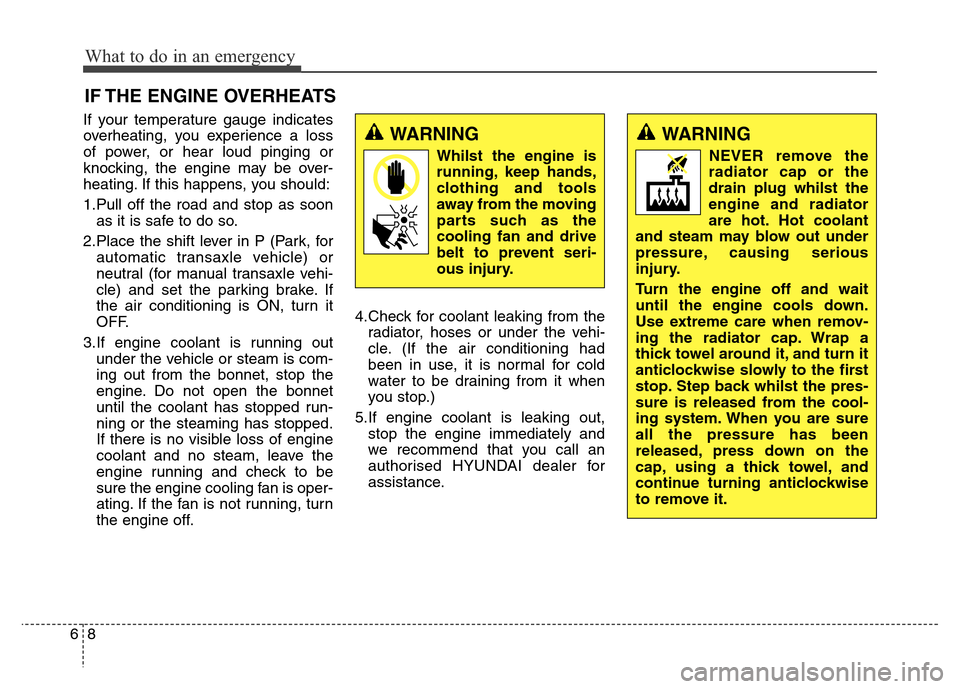
WARNING
Whilst the engine is
running, keep hands,
clothing and tools
away from the moving
parts such as the
cooling fan and drive
belt to prevent seri-
ous injury.
WARNING
NEVER remove the
radiator cap or the
drain plug whilst the
engine and radiator
are hot. Hot coolant
and steam may blow out under
pressure, causing serious
injury.
Turn the engine off and wait
until the engine cools down.
Use extreme care when remov-
ing the radiator cap. Wrap a
thick towel around it, and turn it
anticlockwise slowly to the first
stop. Step back whilst the pres-
sure is released from the cool-
ing system. When you are sure
all the pressure has been
released, press down on the
cap, using a thick towel, and
continue turning anticlockwise
to remove it.
Page 386 of 498
What to do in an emergency
10 6
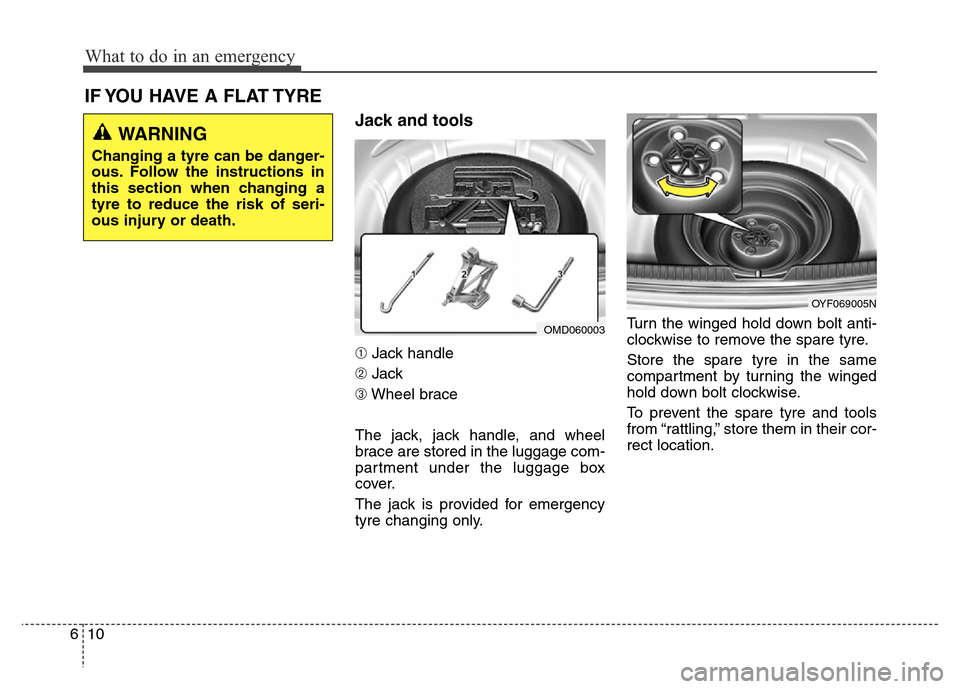
Jack and tools
➀Jack handle
➁Jack
➂Wheel brace
The jack, jack handle, and wheel
brace are stored in the luggage com-
partment under the luggage box
cover.
The jack is provided for emergency
tyre changing only.Turn the winged hold down bolt anti-
clockwise to remove the spare tyre.
Store the spare tyre in the same
compartment by turning the winged
hold down bolt clockwise.
To prevent the spare tyre and tools
from “rattling,” store them in their cor-
rect location.
IF YOU HAVE A FLAT TYRE
OMD060003
OYF069005N
WARNING
Changing a tyre can be danger-
ous. Follow the instructions in
this section when changing a
tyre to reduce the risk of seri-
ous injury or death.
Page 388 of 498
What to do in an emergency
12 6
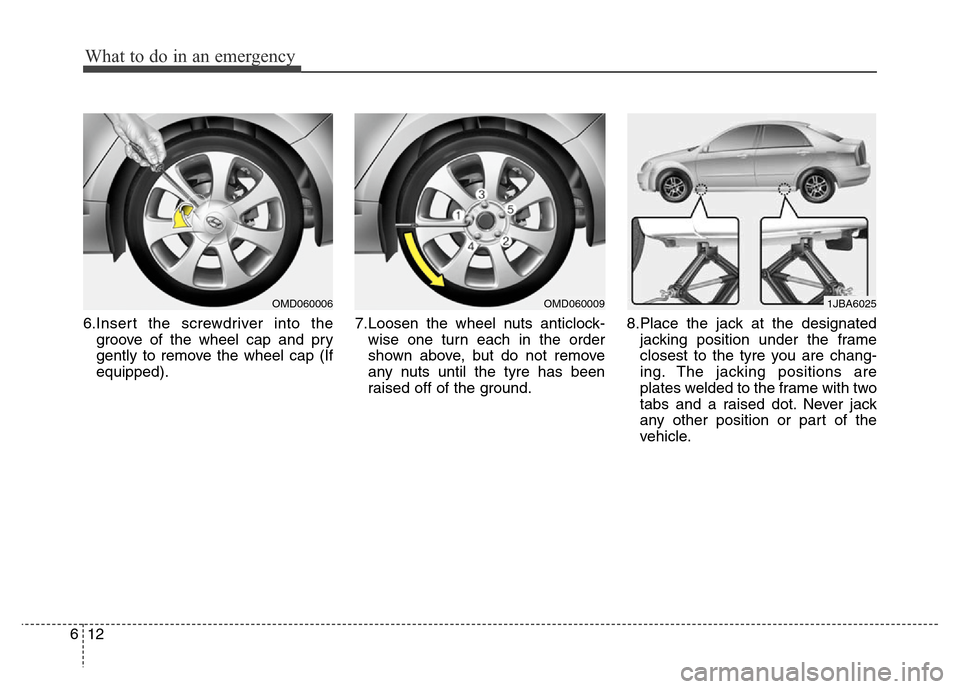
6.Insert the screwdriver into the
groove of the wheel cap and pry
gently to remove the wheel cap (If
equipped).7.Loosen the wheel nuts anticlock-
wise one turn each in the order
shown above, but do not remove
any nuts until the tyre has been
raised off of the ground.8.Place the jack at the designated
jacking position under the frame
closest to the tyre you are chang-
ing. The jacking positions are
plates welded to the frame with two
tabs and a raised dot. Never jack
any other position or part of the
vehicle.
OMD0600061JBA6025OMD060009