Page 389 of 498

613
What to do in an emergency
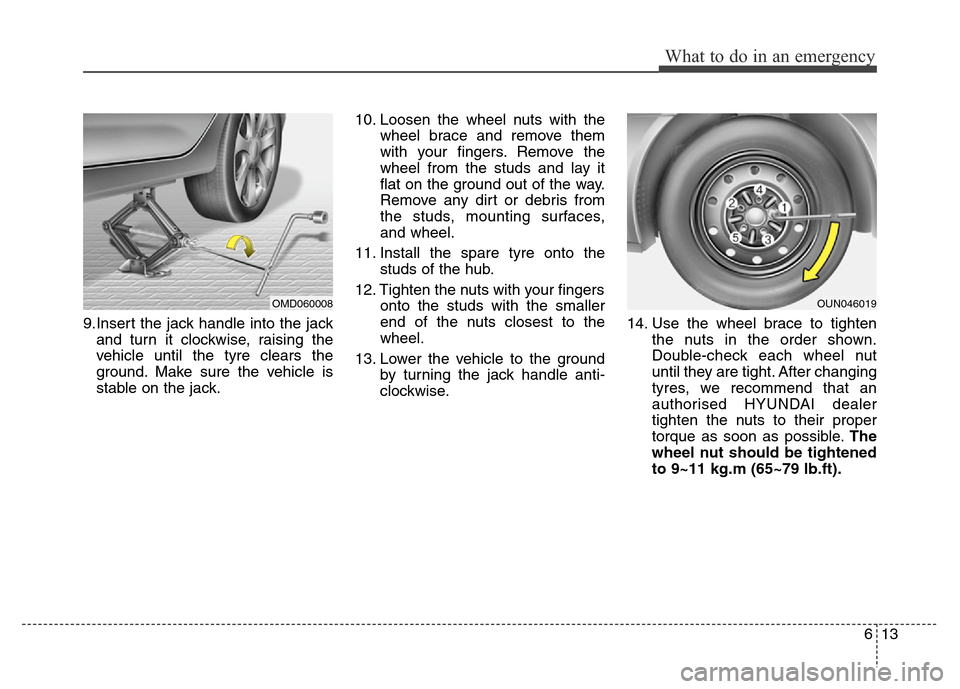
9.Insert the jack handle into the jack
and turn it clockwise, raising the
vehicle until the tyre clears the
ground. Make sure the vehicle is
stable on the jack.10. Loosen the wheel nuts with the
wheel brace and remove them
with your fingers. Remove the
wheel from the studs and lay it
flat on the ground out of the way.
Remove any dirt or debris from
the studs, mounting surfaces,
and wheel.
11. Install the spare tyre onto the
studs of the hub.
12. Tighten the nuts with your fingers
onto the studs with the smaller
end of the nuts closest to the
wheel.
13. Lower the vehicle to the ground
by turning the jack handle anti-
clockwise.14. Use the wheel brace to tighten
the nuts in the order shown.
Double-check each wheel nut
until they are tight. After changing
tyres, we recommend that an
authorised HYUNDAI dealer
tighten the nuts to their proper
torque as soon as possible.The
wheel nut should be tightened
to 9~11 kg.m (65~79 lb.ft).
OMD060008OUN046019
Page 393 of 498
617
What to do in an emergency
When towing your vehicle in an
emergency without wheel dollies:
1.Place the ignition switch in the
ACC position.
2.Place the shift lever in N (Neutral).
3.Release the parking brake.Removable towing hook
1.Open the boot, and remove the
towing hook from the tool case.
2.Remove the hole cover pressing
the lower part of the cover on the
front bumper.
3.Install the towing hook by turning it
clockwise into the hole until it is
fully secured.
4.Remove the towing hook and
install the cover after use.
Emergency towing
If towing is necessary, we recom-
mend you have it done by an autho-
rised HYUNDAI dealer or a commer-
cial tow truck service.
CAUTION
Failure to place the shift lever in
N (Neutral) when being towed
with the front wheels on the
ground can cause internal dam-
age to the transaxle.
OMD060010
OMD060011
OMD060007
■Front
■ Rear
Page 421 of 498

Maintenance
26 7
ENGINE COOLANT
The high-pressure cooling system
has a reservoir filled with year-round
antifreeze coolant. The reservoir is
filled at the factory.
Check the antifreeze protection and
coolant level at least once a year, at
the beginning of the winter season,
and before travelling to a colder cli-
mate.Checking the coolant level(Continued)
• Turn the engine off and wait
until it cools down. Use
extreme care when removing
the radiator cap. Wrap a thick
towel around it, and turn it
anticlockwise slowly to the
first stop. Step back whilst the
pressure is released from the
cooling system. When you are
sure all the pressure has been
released, press down on the
cap, using a thick towel, and
continue turning anticlock-
wise to remove it.
• Even if the engine is not oper-
ating, do not remove the radi-
ator cap or the drain plug
whilst the engine and radiator
are hot. Hot coolant and
steam may still blow out
under pressure, causing seri-
ous injuries.
WARNING
Removing radiator
cap
• Never attempt to remove the
radiator cap whilst the engine
is operating or hot. Doing so
might lead to cooling system
and engine damage and could
result in serious personal
injury from escaping hot
coolant or steam.
(Continued)
CAUTION
• Do not drive with no engine
coolant. It may cause water
pump failure and engine
seizure, etc.
• When the engine overheats
from low engine coolant, sud-
denly adding engine coolant
may cause cracks in the
engine. To prevent damage,
add engine coolant slowly in
small quantities.
Page 427 of 498
Maintenance
32 7
CLIMATE CONTROL AIR FILTER (IF EQUIPPED)
Filter inspection
If the vehicle is operated in severely
air-polluted cities or on dusty rough
roads for a long period, it should be
inspected more frequently and
replaced earlier. When you, the
owner, replace the climate control air
filter, replace it performing the follow-
ing procedure, and be careful to
avoid damaging other components.
Replace the filter according to the
maintenance schedule.
Filter replacement
1. Open the glove box.2. Remove the stoppers by turning
them anticlockwise on both sides.
OMD070013/H
OMD040129/H
Page 435 of 498
Maintenance
40 7
Reset items
Items should be reset after the bat-
tery has been discharged or the bat-
tery has been disconnected.
• Auto up/down window (See sec-
tion 4)
• Sunroof (See section 4)
• Trip computer (See section 4)
• Climate control system
(See section 4)
• Clock (See section 4)
• Audio (See section 4)WARNING
• Before performing mainte-
nance or recharging the bat-
tery, turn off all accessories
and stop the engine.
• The negative battery cable
must be removed first and
installed last when the battery
is disconnected.
Page 450 of 498

755
Maintenance
5. Push in a new fuse of the same
rating, and make sure it fits tightly
in the clips.
If it fits loosely, we recommend that
you consult an authorised HYUNDAI
dealer.
If you do not have a spare, use a
fuse of the same rating from a circuit
you may not need for operating the
vehicle, such as the cigarette lighter
fuse.
If the electrical components do not
work and the fuses are OK, check
the fuse panel in the engine com-
partment. If a fuse is blown, it must
be replaced.
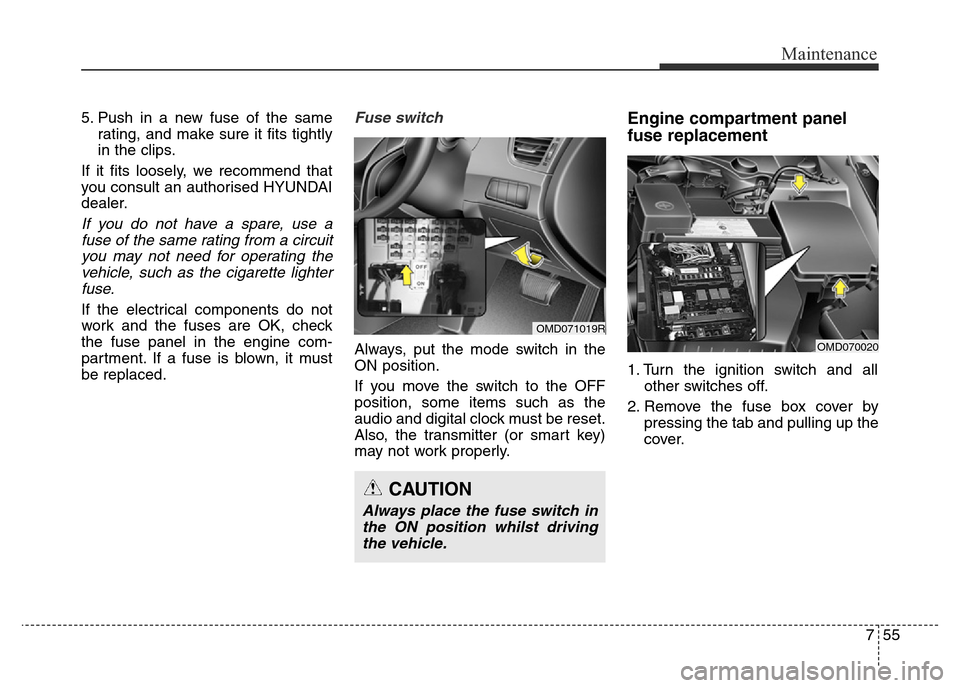
Fuse switch
Always, put the mode switch in the
ON position.
If you move the switch to the OFF
position, some items such as the
audio and digital clock must be reset.
Also, the transmitter (or smart key)
may not work properly.
Engine compartment panel
fuse replacement
1. Turn the ignition switch and all
other switches off.
2. Remove the fuse box cover by
pressing the tab and pulling up the
cover.
CAUTION
Always place the fuse switch in
the ON position whilst driving
the vehicle.
OMD070020
OMD071019R
Page 454 of 498
759
Maintenance
Inner fuse panel
Fuse NameSymbolFuse ratingProtected Component
START7.5AW/O Smart Key : ICM Relay Box (Theft Alarm Relay)
With Smart Key : A/T - Transaxle Range Switch,
M/T - ECM, E/R Fuse & Relay Box (RLY.5), Smart Key Control Module
A/BAG15ASRS Control Module
A/BAG IND7.5AInstrument Cluster
CLUSTERCLUSTER7.5ACLUSTER
C/LIGHTER15ACIGARETTE LIGHTER
BCM7.5ASmart Key Control Module, BCM
A/CON SWITCH7.5AA/C Control Module
MODULE 27.5AElectro Chromic Mirror, ESC OFF Switch
MDPSEPS CONTROL MODULE
MODULE 47.5ARear Parking Assist Sensor LH/RH (IN), Rear Parking Assist, Sensor LH/RH (OUT),
Headlight Levelling Device Switch, Headlight Levelling Device Actuator LH/RH,
A/C Control Module(Auto A/C)
IG120AE/R Fuse & Relay Box(FUSE - F9, F10, F11, F12, F13)
PDM 37.5ASmart Key Control Module
POWER OUTLET FRT20APOWER OUTLET
MODULE 610APower Outside Mirror Switch, Audio, Digital Clock
Page 455 of 498
Maintenance
60 7
Fuse NameSymbolFuse ratingProtected Component
HTD MIRR10ADriver/Passenger Power Outside Mirror, ECM (G4FC), A/C Control Module
MODULE 37.5AAudio, Digital Clock, BCM, Instrument Cluster, Driver/Passenger Seat Heater Module
BRAKE SWITCH10ASMK_UNIT, Stop Lamp sw, Stop Lamp Relay, ESC (ABS), ECM
STEERING WHEEL
HEATER15ASTEERING WHEEL HEATER
SUNROOF15ASunroof
SPARE15A-
SPARE15A-
BLOWER10AA/C Control Module, Blower Resistor, ECM/PCM (G4NB)
INTERIOR LAMP10ALuggage Lamp, Vanity Lamp LH/RH, Passenger Compartment Lamp, Overhead Console
Lamp, Ignition Key ILL. & Door Warning Switch
BOOT10ABoot Relay
MODULE 17.5ASport Mode Switch (A/T), Key Solenoid (W/O Smart Key)
SPARE 15A-
S/HEATER RR15ARear Seat Heater Switch
MODULE 77.5ASmart Key Control Module, BCM
SPARE10A-
MULTIMEDIA15AMULTIMEDIA