Page 109 of 498
429
Features of your vehicle
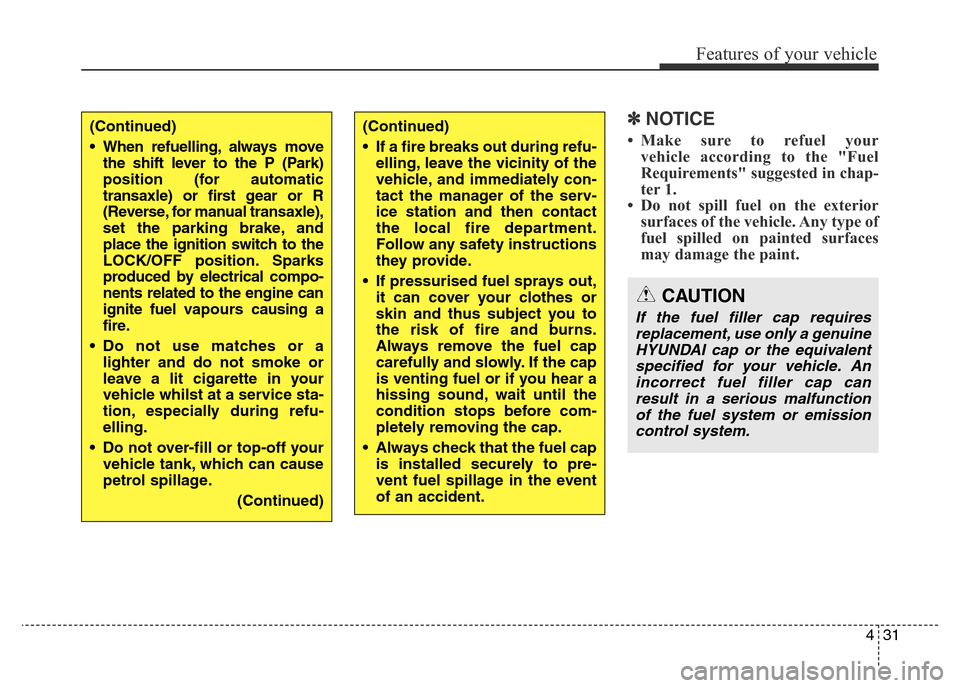
Opening the fuel filler door
The fuel filler door must be opened
from inside the vehicle by pulling up
the fuel filler door opener.
1. Stop the engine.
2. Pull the fuel filler door opener up.3. Pull the fuel filler door out (1) to
fully open.
4. To remove the fuel tank cap (2),
turn it anticlockwise. You may hear
a hissing noise as the pressure
inside the tank equalizes.
5. Place the cap on the fuel filler door.
✽NOTICE
If the fuel filler door does not open
because ice has formed around it, tap
lightly or push on the door to break
the ice and release the door. Do not
pry on the door. If necessary, spray
around the door with an approved
de-icer fluid (do not use radiator
anti-freeze) or move the vehicle to a
warm place and allow the ice to melt.
Closing the fuel filler door
1. To install the fuel tank cap, turn it
clockwise until it “clicks” once. This
indicates that the cap is securely
tightened.
2. Close the fuel filler door and push
it lightly and make sure that it is
securely closed.
FUEL FILLER DOOR
OMD040025
OMD041024R
Page 111 of 498
431
Features of your vehicle
✽NOTICE
• Make sure to refuel your
vehicle according to the "Fuel
Requirements" suggested in chap-
ter 1.
• Do not spill fuel on the exterior
surfaces of the vehicle. Any type of
fuel spilled on painted surfaces
may damage the paint.(Continued)
• When refuelling, always move
the shift lever to the P (Park)
position (for automatic
transaxle) or first gear or R
(Reverse, for manual transaxle),
set the parking brake, and
place the ignition switch to the
LOCK/OFF position. Sparks
produced by electrical compo-
nents related to the engine can
ignite fuel vapourscausing a
fire.
• Do not use matches or a
lighter and do not smoke or
leave a lit cigarette in your
vehicle whilst at a service sta-
tion, especially during refu-
elling.
• Do not over-fill or top-off your
vehicle tank, which can cause
petrol spillage.
(Continued)(Continued)
• If a fire breaks out during refu-
elling, leave the vicinity of the
vehicle, and immediately con-
tact the manager of the serv-
ice station and then contact
the local fire department.
Follow any safety instructions
they provide.
• If pressurised fuel sprays out,
it can cover your clothes or
skin and thus subject you to
the risk of fire and burns.
Always remove the fuel cap
carefully and slowly. If the cap
is venting fuel or if you hear a
hissing sound, wait until the
condition stops before com-
pletely removing the cap.
• Always check that the fuel cap
is installed securely to pre-
vent fuel spillage in the event
of an accident.
CAUTION
If the fuel filler cap requires
replacement, use only a genuine
HYUNDAI cap or the equivalent
specified for your vehicle. An
incorrect fuel filler cap can
result in a serious malfunction
of the fuel system or emission
control system.
Page 112 of 498
Features of your vehicle
32 4
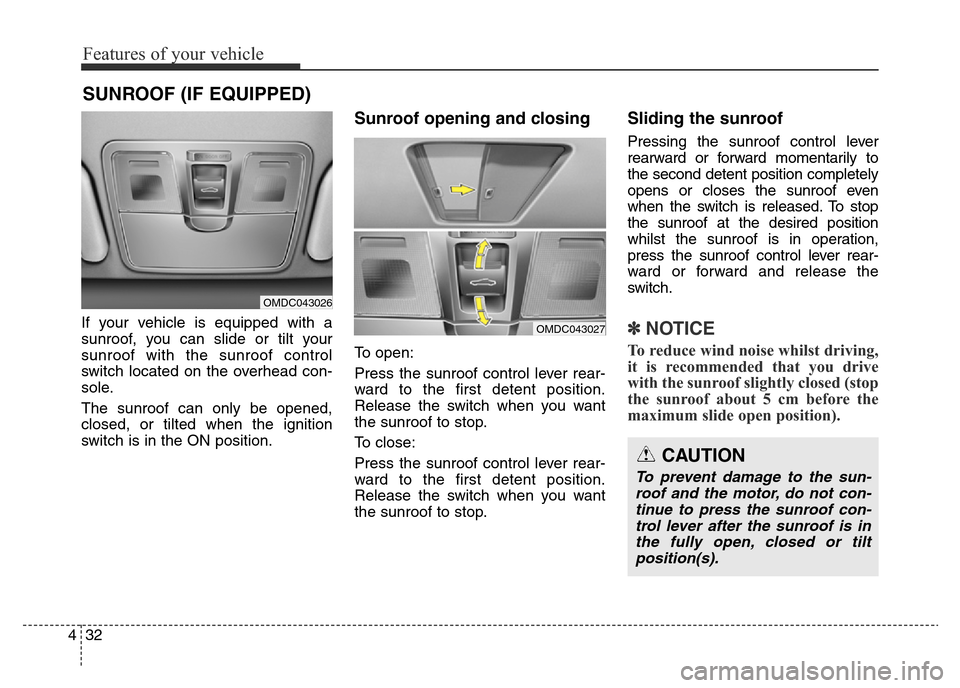
If your vehicle is equipped with a
sunroof, you can slide or tilt your
sunroof with the sunroof control
switch located on the overhead con-
sole.
The sunroof can only be opened,
closed, or tilted when the ignition
switch is in the ON position.
Sunroof opening and closing
To open:
Press the sunroof control lever rear-
ward to the first detent position.
Release the switch when you want
the sunroof to stop.
To close:
Press the sunroof control lever rear-
ward to the first detent position.
Release the switch when you want
the sunroof to stop.
Sliding the sunroof
Pressing the sunroof control lever
rearward or forward momentarily to
the second detent position completely
opens or closes the sunroof even
when the switch is released. To stop
the sunroof at the desired position
whilst the sunroof is in operation,
press the sunroof control lever rear-
ward or forward and release the
switch.
✽NOTICE
To reduce wind noise whilst driving,
it is recommended that you drive
with the sunroof slightly closed (stop
the sunroof about 5 cm before the
maximum slide open position).
SUNROOF (IF EQUIPPED)
OMDC043026
OMDC043027
CAUTION
To prevent damage to the sun-
roof and the motor, do not con-
tinue to press the sunroof con-
trol lever after the sunroof is in
the fully open, closed or tilt
position(s).
Page 115 of 498
435
Features of your vehicle
4. Push the control lever forward
about 10 seconds.
- When the sunroof is in the closed
position :
The glass will tilt and slightly
move up and down.
- When the sunroof is in the tilt
position:
The glass will slightly move up
and down.
Do not release the lever until the
operation is completed.
If you release the lever during opera-
tion, try again from step 2.5. Within 3 seconds, push the control
lever forward until the sunroof
operates as follows:
Tilt down →Slide Open →Slide
Close.
Do not release the lever until the
operation is completed.
If you release the lever during opera-
tion, try again from step 2.
6. Release the sunroof control lever
after all operation has completed.
(The sunroof system has been
reset.)✽NOTICE
• If the sunroof does not reset when
the vehicle battery is disconnected
or discharged, or related fuse is
blown, the sunroof may not oper-
ate normally.
• For more detailed information, we
recommend that you contact an
authorised HYUNDAI dealer.
Page 116 of 498
Features of your vehicle
36 4
Electric power steering (EPS)
The system assists you with steering
the vehicle. If the engine is off or if
the power steering system becomes
inoperative, the vehicle may still be
steered, but it will require increased
steering effort.
Also, the steering effort becomes
heavier as the vehicle’s speed
increases and becomes lighter as
the vehicle’s speed decreases for
better control of the steering wheel.
Should you notice any change in the
effort required to steer during normal
vehicle operation, we recommend
that the system be checked by an
authorised HYUNDAI dealer.
✽NOTICE
The following may occur during
normal vehicle operation:
• The steering effort may be high
immediately after placing the igni-
tion switch in the ON position.
This happens as the system per-
forms the EPS system diagnostics.
When the diagnostics is complet-
ed, the steering wheel will return
to its normal condition.
• A click noise may be heard from
the EPS relay after the ignition
switch is placed in the ON or
LOCK/OFF position.
• Motor noise may be heard when
the vehicle is at stop or at a low
driving speed.
• When you operate the steering
wheel in low temperatures, abnor-
mal noise may occur. If the tem-
perature rises, the noise will disap-
pear. This is a normal condition.
STEERING WHEEL
CAUTION
If the Electric Power Steering
System does not operate nor-
mally, the warning light ( ) will
illuminate on the instrument
cluster. The steering wheel may
become difficult to control or
operate. Take your vehicle to an
authorised HYUNDAI dealer and
have the system checked as
soon as possible.
Page 117 of 498
437
Features of your vehicle
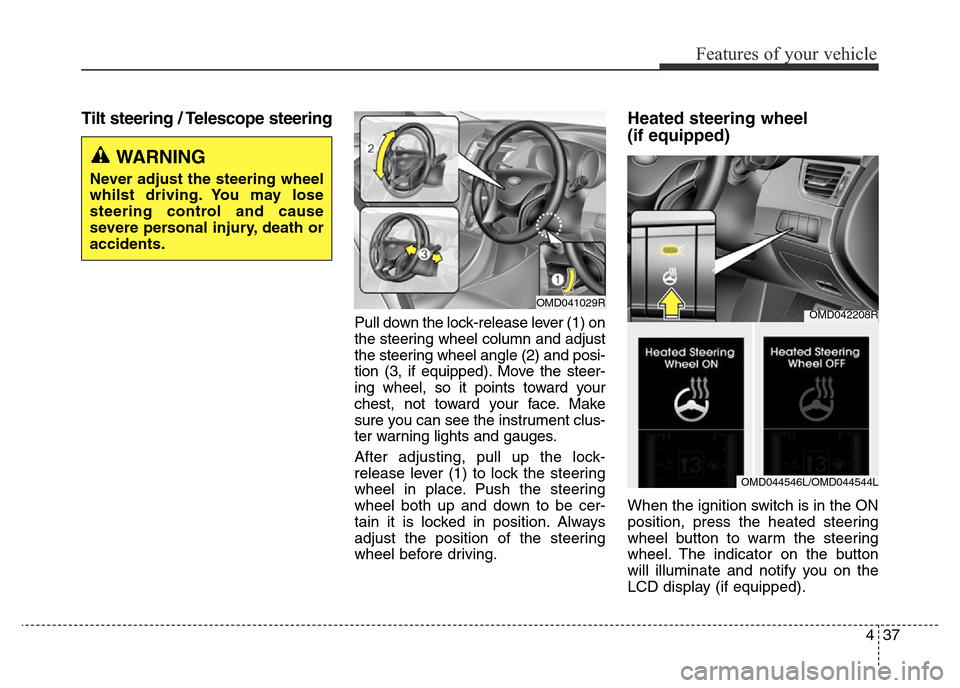
Tilt steering / Telescope steering
Pull down the lock-release lever (1) on
the steering wheel column and adjust
the steering wheel angle (2) and posi-
tion (3, if equipped). Move the steer-
ing wheel, so it points toward your
chest, not toward your face. Make
sure you can see the instrument clus-
ter warning lights and gauges.
After adjusting, pull up the lock-
release lever (1) to lock the steering
wheel in place. Push the steering
wheel both up and down to be cer-
tain it is locked in position. Always
adjust the position of the steering
wheel before driving.
Heated steering wheel
(if equipped)
When the ignition switch is in the ON
position, press the heated steering
wheel button to warm the steering
wheel. The indicator on the button
will illuminate and notify you on the
LCD display (if equipped).
WARNING
Never adjust the steering wheel
whilst driving. You may lose
steering control and cause
severe personal injury, death or
accidents.
OMD041029ROMD042208R
OMD044546L/OMD044544L
Page 120 of 498
Features of your vehicle
40 4
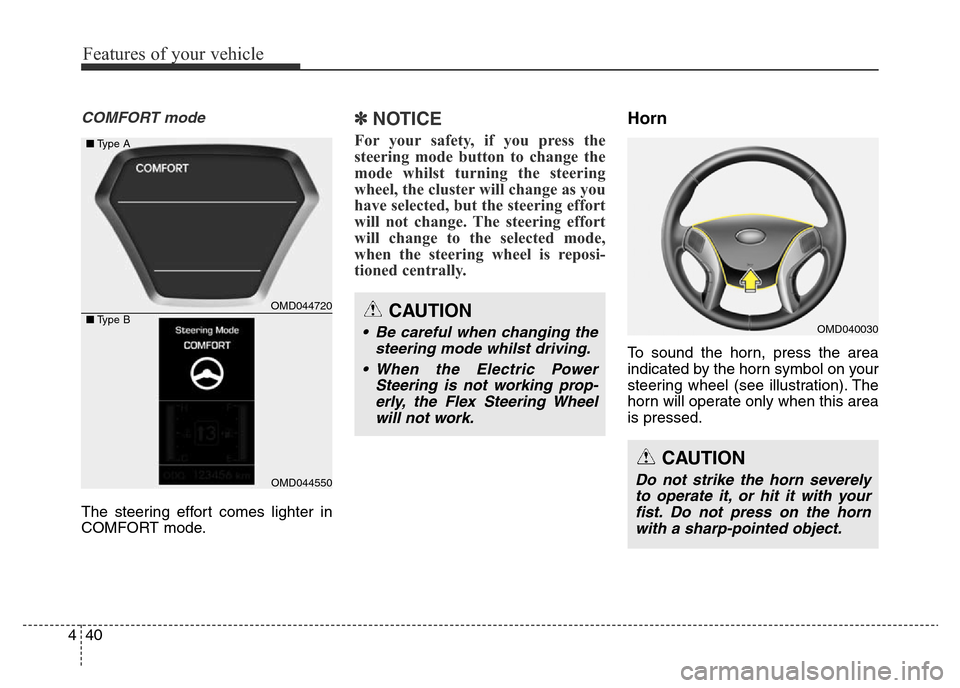
COMFORT mode
The steering effort comes lighter in
COMFORT mode.
✽NOTICE
For your safety, if you press the
steering mode button to change the
mode whilst turning the steering
wheel, the cluster will change as you
have selected, but the steering effort
will not change. The steering effort
will change to the selected mode,
when the steering wheel is reposi-
tioned centrally.
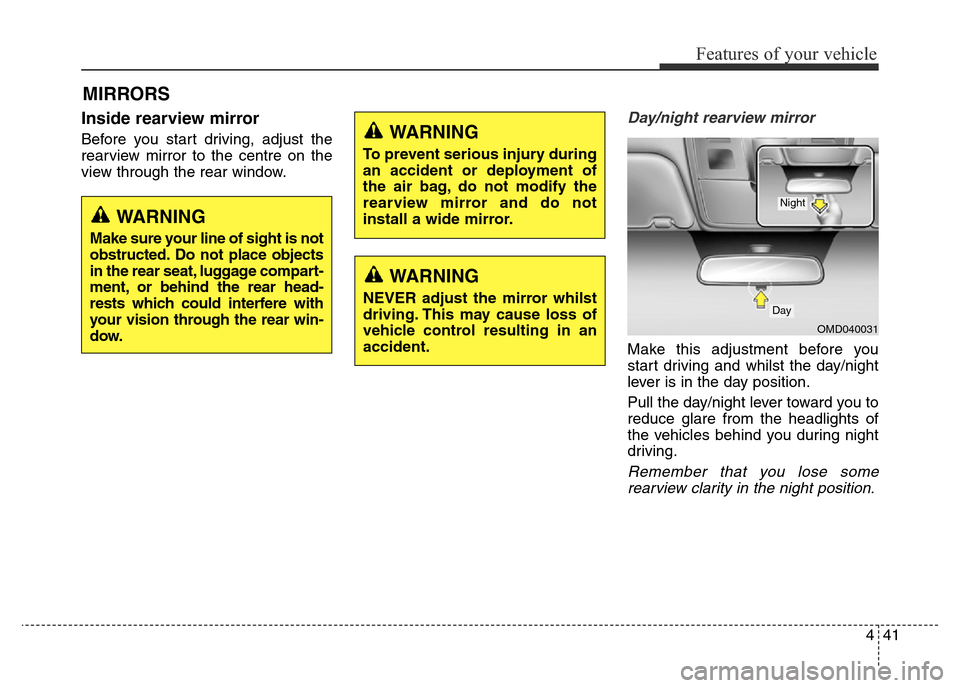
Horn
To sound the horn, press the area
indicated by the horn symbol on your
steering wheel (see illustration). The
horn will operate only when this area
is pressed.
CAUTION
• Be careful when changing the
steering mode whilst driving.
• When the Electric Power
Steering is not working prop-
erly, the Flex Steering Wheel
will not work.OMD040030
CAUTION
Do not strike the horn severely
to operate it, or hit it with your
fist. Do not press on the horn
with a sharp-pointed object.
OMD044720
OMD044550 ■Type A
■Type B
Page 121 of 498
441
Features of your vehicle
Inside rearview mirror
Before you start driving, adjust the
rearview mirror to the centre on the
view through the rear window.
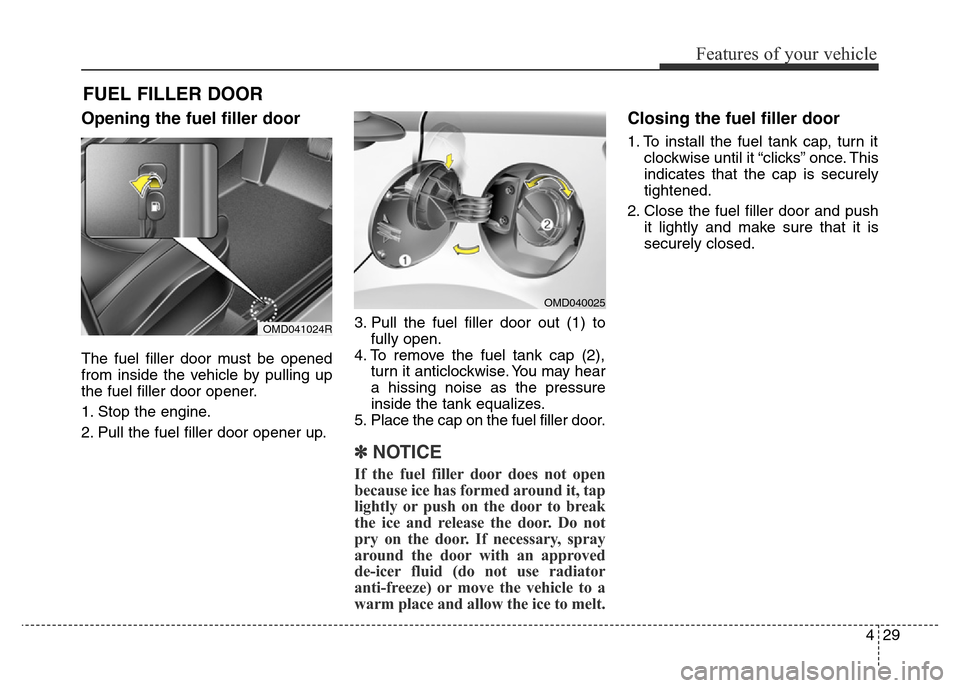
Day/night rearview mirror
Make this adjustment before you
start driving and whilst the day/night
lever is in the day position.
Pull the day/night lever toward you to
reduce glare from the headlights of
the vehicles behind you during night
driving.
Remember that you lose some
rearview clarity in the night position.
MIRRORS
WARNING
Make sure your line of sight is not
obstructed. Do not place objects
in the rear seat, luggage compart-
ment, or behind the rear head-
rests which could interfere with
your vision through the rear win-
dow.
WARNING
To prevent serious injury during
an accident or deployment of
the air bag, do not modify the
rearview mirror and do not
install a wide mirror.
WARNING
NEVER adjust the mirror whilst
driving. This may cause loss of
vehicle control resulting in an
accident.
OMD040031
Day
Night