Page 57 of 89

106 || 107
DRIVING
DRIVING
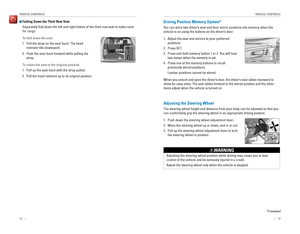
Remote Engine Start*
Start your vehicle’s engine using the remote transmitter before you enter the vehicle.
Make sure the vehicle is in a safe location when using remote engine start (i.e., a
well ventilated area, away from any flammable materials).
Starting the Engine
Press the Lock button, then press and hold the Engine button within 5 se\
conds to
remotely start the engine.
The engine runs for up to 10 minutes. To extend the run time for another 10
minutes, repeat the procedure during the initial 10 minutes.
While the engine is running, the climate control system adjusts the cabi\
n
temperature, the security system remains on, and lights and accessories remain
off.
Stopping the EnginePress and hold the Engine button.
The engine will also stop if it has been running for more than 10 minute\
s, or if any
door is opened without using the remote or smart entry.
Engine exhaust contains toxic carbon monoxide gas.
Breathing carbon monoxide can kill you or cause unconsciousness.
Never use the remote engine starter when the vehicle is parked in a gara\
ge or
other area with limited ventilation.
WARNING
Lock button
Engine button
Starting to Drive
Turn on the vehicle and start the engine to begin driving.
Before Starting the EngineCheck that the transmission is in Park (P), then
press the brake pedal. Keep your foot firmly on the
brake pedal when starting the engine.
Release the parking brake, if necessary (see page
111).
Brake pedal
The engine is harder to start in cold weather and in thinner air found a\
t altitudes
above 8,000 feet (2,400 m). When starting the engine in cold weather, turn off
all electrical accessories such as the lights, climate control system, a\
nd rear
defogger in order to reduce battery drain.
Changing the Power ModeUse the ENGINE START/STOP button to cycle through power modes or start the
engine.
Accessory or On mode: Press the ENGINE START/
STOP button once without pressing the brake pedal
for Accessory mode. Press it again for On mode.
Starting the engine: Press and hold the brake pedal,
then press the ENGINE START/STOP button. Keep
your foot firmly on the brake pedal when starting the
engine.
Turning the vehicle off: Shift to Park (P), then press the ENGINE START/STOP
button.
Page 58 of 89
: Used for parking or starting/stopping
the engine. Press the brake pedal")
108 || 109
DRIVING
DRIVING
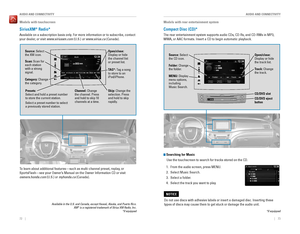
Shifting
Change the shift position based on your driving needs.
Shift Lever*
Park (P): Used for parking or starting/stopping
the engine. Press the brake pedal, then press the
release button to shift.
Reverse (R): Used for reversing.
Neutral (N): Used for idling.
Drive (D): Used for normal driving.
Low (L): Used for stronger engine power and
braking when driving in hilly terrain.
D4: Press the D4 button when the shift lever is in
Drive. Used for going up or down hills or towing a
trailer in hilly terrain.
When you change the shift lever from D to R and vice versa, come to a co\
mplete
stop and keep the brake pedal pressed. Operating the shift lever before \
the vehicle
has come to a complete stop or while pressing the accelerator pedal can \
damage
the transmission.
NOTICE
Release button
D4 button
*if equipped
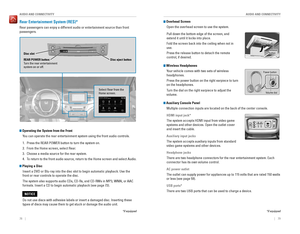
Electronic Gear Selector* Park (P): Used for parking or starting or turning off
the vehicle. Press P with the brake pedal pressed. A
red indicator appears.
Reverse (R): Used for reversing. Pull back R. A green
indicator appears.
Neutral (N): Used for idling. Press N. A red indicator
appears.
Drive (D/S): Used for normal driving (D) or driving in sequential mode (S) (see \
page
110). Press D/S once for normal driving. Press D/S twice for sequential\
mode
driving. A green indicator appears. Make sure the parking brake is relea\
sed (see
page 111).
The vehicle can roll away if left unattended without confirming that P\
ark is
engaged. Always keep your foot on the brake pedal until you have confi\
rmed that
P is shown on the gear position indicator.
WARNING
*if equipped
When you change from D to R and vice versa, press the brake pedal and co\
me to
a complete stop, then select the intended gear position while maintainin\
g brake
pressure.
NOTICE
Auto park mode
For your convenience, Park (P) is automatically selected when all of t\
he following
conditions are met:
• The vehicle is stopped.
• The driver’s seatbelt is unbuckled.
• The driver’s door is opened.
Car wash mode
If you are driving through a conveyor-style car wash where you or the attendant
do not remain in the vehicle, follow these steps while the engine is on:\
1. Press and hold the brake pedal.
2. Press and release N (Neutral).
3. Press and hold N again for two seconds. The engine remains on, and
the transmission remains in Neutral. To turn off the engine but keep the
transmission in Neutral, press the ENGINE START/STOP button.
The transmission remains in Neutral for 15 minutes. After 15 minutes, th\
e gear
position changes to Park and the vehicle turns off.
Page 59 of 89

110 || 111
DRIVING
DRIVING
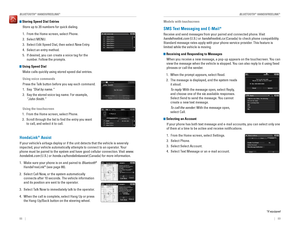
Sequential Mode*
Use the paddle shifters to change gears without removing your hands from\
the
steering wheel.
When the transmission is in D: Press D/S once. The vehicle goes into sequential
shift mode momentarily, and the gear selection indicator comes on. When
you start traveling at a constant speed, sequential mode and the gear po\
sition
indicator automatically go off.
When the transmission is in S: Press D/S twice. The vehicle goes into sequential
mode, and the M (sequential mode) indicator and gear selection indicat\
or come
on. Use the paddle shifters to change gears.
To cancel this mode, hold the + paddle shifter for two seconds or press D\
/S again.
The M indicator and gear selection indicator go off.
(-) Paddle shifter:
Pull to shift down to
a lower gear. (+) Paddle shifter:
Pull to shift up to a
higher gear.
Recommended shift points
M indicator/gear position indicator
Shift up
Normal acceleration1st to 2n d15 mph (24 km/h)
2nd to 3r d2 5 mph (40 km/h)
3rd to 4th40 mph (64 km/h)
4th to 5t h4 7 mph (76 km/h)
5th to 6th52 mph (84 km/h)
6th to 7t h5 7 mph (92 km/h)
7th to 8th62 mph (100 km/h)
8th to 9th 67 mph (108 km/h)
Braking
Slow down or stop your vehicle, and keep it from moving when parked.
Foot Brake
Press the brake pedal to slow down or stop your
vehicle from moving.
Parking BrakeKeep the vehicle from moving when it is parked.
To apply: Press the parking brake with your foot.
To release: Press the brake pedal, then press the
parking brake until it releases.
Brake pedal
Parking brake
The ABS may not function correctly if you use an incorrect tire type and\
size.
NOTICE
Brake Assist System During hard or emergency braking, the system increases braking force. The brake
pedal may move slightly or make a noise; this is normal. Continue to hol\
d the brake
pedal firmly down.
Anti-Lock Brake System (ABS) During hard or emergency braking, the system rapidly pumps the brakes to
prevent wheel lockup and help you maintain steering control. The brake p\
edal may
pulsate slightly during ABS operation; this is normal. Do not pump the b\
rake pedal,
and continue to hold it firmly down.
Release the parking brake fully before driving. The rear brakes and axle\
can be
damaged if you drive with the parking brake applied.
NOTICE
Page 60 of 89

112 || 113
DRIVING
DRIVING
*if equipped
Intelligent Traction Management System*
Adjusts vehicle handling performance while driving on various road surfa\
ces.
Press the Mode button to select one of four
appropriate modes. The mode you select appears on
the MID.
Normal: Provides balanced driving performance on
most road surfaces.
Snow: Use when driving on snowy road surfaces.
Mud*: Use when driving on muddy roads or off-road
surfaces.
Sand*: Use when driving on soft, sandy road or off-
road surfaces.
Cruise control/adaptive cruise control* is not available
when Snow, Mud, or Sand is selected.
Selected mode
Mode button
Auto Idle Stop*
Automatically stops and restarts the engine to help maximize fuel econom\
y,
depending on environmental and vehicle conditions.
Activating Auto Idle Stop
When the vehicle stops with the gear position in
Drive (D) and the brake pedal is pressed, the engine
turns off and the auto idle stop indicator appears if
conditions permit.
When you release the brake pedal, turn the steering
wheel, or press the accelerator pedal, the engine
restarts and the vehicle begins to move.
Auto idle stop does not activate (or the engine may automatically resta\
rt) when
the driver’s seat belt is unfastened, the vehicle is stopped on a steep hill, the
windshield defroster is on, and other conditions.
Turning the System On or OffPress the Auto Idle Stop Off button to turn the
system off. The amber auto idle stop indicator
comes on. Press the button again to turn it on.
*if equipped
Eco Assist System
Can help improve your fuel economy by adjusting the performance of the e\
ngine,
climate control system, and cruise control.
ECON ButtonPress the ECON button to turn the system on or off.
The ECON Mode indicator appears when the system
is turned on.
Ambient MeterColor-coded bars around the speedometer change
based on your driving style and brake or accelerator
pedal operation.
Green: Fuel efficient driving
Light green: Moderate acceleration/deceleration
White: Aggressive acceleration/deceleration
Vehicle Stability Assist (VSA®), aka Electronic Stability Control
(ESC) System
Helps to stabilize the vehicle during cornering if the vehicle turns mor\
e or less
than what was intended. It assists in maintaining traction on slippery s\
urfaces by
regulating engine output and selectively applying the brakes.
Turning VSA On or Off
VSA is turned on every time you start the engine,
even if you previously turned it off. If you turn VSA
off, your vehicle has normal braking and cornering
ability, but traction and stability enhancement
become less effective.
Press and hold the VSA OFF button until you hear a
beep to turn VSA on or off. The VSA OFF indicator
appears when the system is off.
Traction control stops functioning, which may make it easier when trying to free
your vehicle if it is stuck in mud or snow.
VSA OFF indicator
Ambient meter
Page 61 of 89

114 || 115
DRIVING
DRIVING
Cruise Control*
Maintain a constant vehicle speed without having to keep your foot on th\
e
accelerator pedal. Use cruise control on freeways or open roads where yo\
u can
travel at a constant speed with little acceleration or deceleration.
Cruise control is not available when Snow, Mud, or Sand is selected for Intelligent
Traction Management (see page 112).
Improper use of the cruise control can lead to a crash.
Use cruise control only when traveling on open highways in good weather.
WARNING
CRUISE
CRUISE button
RES/+ button
-/SET button CANCEL button
Adjusting the Vehicle SpeedPress the RES/+ button to increase speed or the -/SET
button to decrease speed.
Each time you press the button, the vehicle speed is
increased or decreased by about 1 mph (1.6 km/h).
If you keep the button pressed, the vehicle speed
increases or decreases until you release it.
Canceling Cruise ControlPress the CANCEL button or the brake pedal. The
CRUISE CONTROL indicator goes off.
After cruise control has been canceled, you can still
resume the prior set speed by pressing the RES/+ button
while driving at a speed of at least 25 mph (40 km/h).
Press CRUISE to turn the system off.
CRUISE
*if equipped
Adaptive Cruise Control (ACC)*
Helps maintain a constant vehicle speed and a set following interval beh\
ind a
vehicle detected ahead of yours.
Adaptive cruise control is not available when Snow, Mud, or Sand is selected for
Intelligent Traction Management (see page 112).
Activating and Setting the Vehicle Speed
1. Press the MAIN button. The ACC indicator appears
in the MID.
2. Accelerate to the desired speed (above 25 mph/
40 km/h). Take your foot off the pedal and press the
-/SET button to set the speed.
Adjusting the Vehicle Speed
Press the RES/+ button to increase speed or the -/SET
button to decrease speed.
Each time you press the button, the vehicle speed is
increased or decreased by about 1 mph (1.6 km/h).
If you keep the button pressed, the vehicle speed
increases or decreases by 5 mph (5 km/h) until you
release it.
Adjusting the Vehicle DistancePress the Distance button to change the following
interval. Each time you press the button, the setting
cycles through extra long, long, middle, and short.
Switching to Standard Cruise ControlPress and hold the Distance button. Cruise Mode appears in the multi-inf\
ormation
display. Press and hold the button again to switch back to ACC.
MAIN button
RES/+ button
CANCEL button
-/SET button
Distance button
Activating and Setting the Vehicle Speed
1. Press the CRUISE button. The CRUISE MAIN
indicator appears.
2. Accelerate to the desired speed (above 25 mph/
40 km/h). Take your foot off the pedal and press
the -/SET button to set the speed. The CRUISE
CONTROL indicator appears. CRUISE
*if equipped
Page 62 of 89

116 || 117
DRIVING
DRIVING
During Operation
If a vehicle is detected ahead of you when ACC is
turned on, the system maintains, accelerates, or
decelerates your vehicle’s set speed to keep the
vehicle’s set following interval from the vehicle
ahead.
If a vehicle detected ahead of you slows down
abruptly, or if another vehicle cuts in front of you,
a beep sounds and BRAKE appears on the multi-
information display to alert you.
ACC has limited braking capability.
When your vehicle speed drops below 22 mph (35 km/h), ACC will
automatically cancel and no longer will apply your vehicle’s brakes.
Always be prepared to apply the brake pedal when conditions require.
WARNING
Canceling ACCPress the CANCEL or MAIN button, or press the brake
pedal. The ACC indicator goes off.
Certain conditions may cause ACC to cancel
automatically. When this happens, the amber ACC
indicator appears on the multi-information display
(see page 24).
After cruise control has been canceled, you can still
resume the prior set speed by pressing RES/+ when
your vehicle speed is over 25 mph (40 km/h).
Improper use of ACC can lead to a crash.
Use ACC only when traveling on open highways in good weather.
WARNING
Beep
ACC indicator
LaneWatch™*
Check the passenger-side rear areas in the display when the right turn signal is
activated.
LaneWatch display
Activating LaneWatchActivate the right turn signal. The LaneWatch display
appears. Check the display for blind spots, and
visually confirm that it is safe to change lanes.
You can also press the LaneWatch button on the end
of the turn signal switch to view a constant real-time
display. Press it again to turn the display off.
*if equipped
Failure to visually confirm that it is safe to change lanes before doi\
ng so may
result in a crash and serious injury or death.
Do not rely only on LaneWatch while driving. Always look in your mirrors, to
either side of your vehicle, and behind you for other vehicles before ch\
anging
lanes.
WARNING
Important Safety Reminder
Like all assistance systems, LaneWatch has limitations. Over-reliance on the system
may result in a collision.
Changing SettingsCustomize the display and how and when the display appears.
1. From the Home screen, select Settings.
2. Select Camera.
3. Select LaneWatch.
4. Select an option and make the preferred changes.
5. Press BACK to exit the menu.
Page 63 of 89
*
Provides steering input to help keep the vehicle in the middle of a dete\
cted lane and
visual and tactile alerts if the veh")
118 || 119
DRIVING
DRIVING
Lane Keeping Assist System (LKAS)*
Provides steering input to help keep the vehicle in the middle of a dete\
cted lane and
visual and tactile alerts if the vehicle is detected drifting out of its\
lane while driving
between 45–90 mph (72–145 km/h).
If your vehicle is getting too close to detected left
or right side lane markings without a turn signal
activated, the system provides visual and tactile
alerts.
A Lane Departure message appears on the MID, and
the steering wheel vibrates. Steering torque is also
applied to help keep your vehicle within your driving
lane. Take appropriate action to stay within your
driving lane.
Turning the System On or Off
1. Press the MAIN button. LKAS appears in the
MID.
2. Press the LKAS button. Lane outlines appear in
the MID. Dotted lane lines turn solid when the
system operates.
3. Press the MAIN button or the LKAS button to turn
the system off.
Important Safety Reminder
LKAS is for your convenience only. It is not a substitute for your vehicle control. The
system does not work if you take your hands off the steering wheel or fa\
il to steer
the vehicle.
Do not place an object on the top of the instrument panel. It may refl\
ect onto the
windshield and prevent the system from detecting lane lines properly.
Do not use when towing.
*if equipped
Steering assistance
Road Departure Mitigation (RDM)*
Alerts and helps to assist you if the system determines a possibility of\
your vehicle
unintentionally crossing over detected lane markings while driving betwe\
en 45–90
mph (72–145 km/h).
If your vehicle is getting too close to detected lane
markings without a turn signal activated, a message
appears in the MID. Steering wheel torque and
vibrations are applied to help your vehicle stay in the
lane.
Braking may also be applied if the lane lines are solid
and continuous.
If the system operates several times without detecting driver response, \
the system
beeps to alert you.
Changing Settings Determine the warning timing.
1. From the HOME screen, select Settings.
2. Select Vehicle. The vehicle must be in Park (P).
3. Select Road Departure Mitigation Setting.
4. Select from the options.
Normal (default): Steering control starts from inside the lane edge.
Wide: Steering control starts from outside the lane edge.
Warning Only: The system only provides a BRAKE message, but does not apply
steering or braking.
5. Press BACK to exit the menu.
Important Safety Reminder
The RDM system has limitations. Overreliance on it may result in a colli\
sion. It is
always your responsibility to keep your vehicle within the driving lane.\
*if equipped
Beep
Turning the System On or Off Press the RDM button to turn the system on or off.
A green indicator appears on the button when the
system is on.
RDM button
Steering assistance
Page 64 of 89
*
Can assist you when there is a possibility of your vehicle colliding wit\
h a vehicle or a
pedestrian detecte")
120 || 121
DRIVING
DRIVING
Collision Mitigation Braking System™ (CMBS™)*
Can assist you when there is a possibility of your vehicle colliding wit\
h a vehicle or a
pedestrian detected in front of yours.
The system can give you visual, audible, and tactile
alerts when a potential collision is determined, and
reduce your vehicle speed to help minimize collision
severity when a collision is deemed unavoidable.
When a potential collision with a detected oncoming
vehicle is determined, the system also alerts you with
rapid vibrations on the steering wheel.
The system activates when:
• The speed difference between your vehicle and a vehicle or pedestrian de\
tected
in front of you is about 3 mph (5 km/h) and over with a chance of a co\
llision.
• Your vehicle speed is about 62 mph (100 km/h) or less and there is a ch\
ance of a
collision with an oncoming detected vehicle or a pedestrian in front of \
you.
Changing Settings
Determine the warning timing.
1. From the HOME screen, select Settings.
2. Select Vehicle. The vehicle must be in Park (P).
3. Select Forward Collision Warning Distance.
4. Select Long, Normal, or Short.
5. Press BACK to exit the menu.
*if equipped
Alert StagesThe system has three alert stages for a possible collision. Depending on\
the
circumstances or CMBS settings, CMBS may not go through all of the stage\
s
before initiating the last stage.
Stage 1: Visual and audible warning, steering wheel vibrations
Stage 2: Visual and audible warning and light brake application
Stage 3: Visual and audible warning and strong brake application
Beep
Steering vibrationsImportant Safety Reminder
CMBS is designed to reduce the severity of an unavoidable collision. It \
does not
prevent collisions nor stop the vehicle automatically. It is still your responsibility to
operate the brake pedal and steering wheel appropriately according to th\
e driving
conditions.
Turning CMBS On or OffPress and hold the CMBS OFF button. A beep sounds
and a message appears in the MID. The CMBS
indicator appears when the system is off.
CMBS OFF
button
Parking Sensor System*
When the system senses an object when you are parking or backing up, ind\
icators
appear on the display and a series of beeps will sound.
Turning the System On or OffPress the parking sensor button to turn the system
on or off. A green indicator light appears on the
button when the system is on.
Screen indicators
*if equipped