Page 49 of 89
 or handsfreelink")
| 91
NAVIGATION90 |
Models with touchscreen
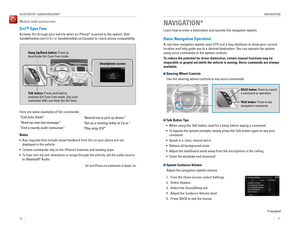
Siri™ Eyes Free
Activate Siri through your vehicle when an iPhone® is paired to the system. Visit
handsfreelink.com (U.S.) or handsfreelink.ca (Canada) to check phone compatibility.
Here are some examples of Siri commands:
“Call John Smith”
“Read my new text message”
“Find a nearby sushi restaurant”
Notes:
• Any requests that include visual feedback from Siri on your phone are no\
t
displayed in the vehicle.
• Certain commands rely on the iPhone’s features and existing apps.
• To hear turn-by-turn directions or songs through the vehicle, set the aud\
io source
to Bluetooth
® Audio.
Siri and iPhone are trademarks of Apple, Inc.
“Remind me to pick up dinner”
“Set up a meeting today at 3 p.m.”
“Play song XYZ”
Smartphone screen
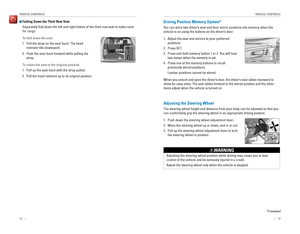
Talk button: Press and hold to
activate Siri Eyes Free mode. Say your
command after you hear the Siri tone. Hang-Up/Back button: Press to
deactivate Siri Eyes Free mode.
Learn how to enter a destination and operate the navigation system.
Basic Navigation Operation
A real-time navigation system uses GPS and a map database to show your current
location and help guide you to a desired destination. You can operate the system
using voice commands or the system controls.
To reduce the potential for driver distraction, certain manual functions \
may be
inoperable or grayed out while the vehicle is moving. Voice commands are always
available.
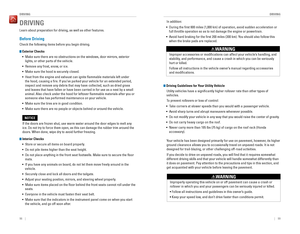
Steering Wheel Controls
Use the steering wheel controls to say voice commands.
Talk Button Tips• When using the Talk button, wait for a beep before saying a command.
• To bypass the system prompts, simply press the Talk button again to say your
command.
• Speak in a clear, natural voice.
• Reduce all background noise.
• Adjust the dashboard vents away from the microphone in the ceiling.
• Close the windows and moonroof.
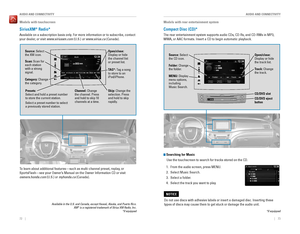
BACK button: Press to cancel
a command or operation.
TALK button: Press to say
navigation commands.
NAVIGATION*
*if equipped
System Guidance Volume
Adjust the navigation system volume.
1. From the Home screen, select Settings.
2. Select System.
3. Select the Sound/Beep tab.
4. Adjust the Guidance Volume level.
5. Press BACK to exit the menus.
BLUETOOTH® HANDSFREELINK®
Page 50 of 89

92 || 93
NAVIGATION
NAVIGATION
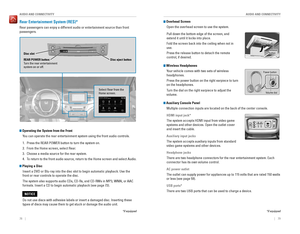
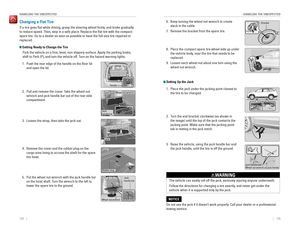
Navigation Display and Controls
Touch icons on the screen to enter information and make selections.
Navi: Display the
navigation screen.
BACK: Go back to
the previous display. MENU: Display
navigation options.
Traffic flow
Current vehicle
position Traffic incident
icon
Search icon
Map menu
Entering a Destination
Use several methods to enter a destination.
Home Address
Store your home address in the system so you can easily route to it.
1. From the map screen, select the Search icon.
2. Select MENU.
3. Select Set Home Location.
4. Select Enter My Address.
5. Select Search All.
6. Enter the street number and select Done.
7. Enter the street name and select Done. Select
the street from the list.
8. Select the address from the list. A map of the
address is shown. Select Select.
When your home address is stored, you can press the Talk button and say
“Navigation” and then “Go home” at any time. You can also select Go Home from
the Where To? menu.
Street AddressEnter a street address.
1. From the map screen, select the Search icon.
2. Select Address.
3. Select Search All.
4. Enter the street number and select Done.
5. Enter the street name and select Done. Select
the street from the list.
6. Select the address from the list.
7. Select Go!.
You can also enter a street address using voice
commands. Press the Talk button and say
“Navigation” and then “Find Address.” Follow the
prompts.
MAP: Display the
map screen.
Page 51 of 89

94 || 95
NAVIGATION
NAVIGATION
Place Category
Enter a destination using a point of interest or landmark.
1. From the map screen, press MENU.
2. Select Where To?.
3. Select Categories.
4. Select a category (and a subcategory if
necessary).
5. Select a place from the list.
6. Select Go!.
You can also enter a street address using voice
commands. Press the Talk button and say
“Navigation” and then “Find Place.” Follow the
prompts.
Recent Places Select an address from a list of your 50 most recent destinations.
1. From the map screen, press MENU.
2. Select Where To?.
3. Select Recent.
4. Select a place from the list.
5. Select Go!.
Saved PlacesSave locations so you can quickly route to them.
Saving a location
1. From the map screen, press MENU.
2. Select Where To?.
3. Select Enter Search.
4. Enter the address or place name.
5. Select the destination name when it appears on
the map screen.
6. Select the menu icon.
7. Select Save.
8. Select OK.
You can also save your current location. From the map screen, select the \
vehicle
icon. Select Save. Enter a name for the location. Select Done. Select OK\
.
Routing to a saved location
1. From the map screen, press MENU.
2. Select Where To?.
3. Select Saved.
4. Select the destination from the list.
5. Select Go!.
Page 52 of 89

96 || 97
NAVIGATION
NAVIGATION
Routing
After a destination is set, you can alter or cancel your route.
Map Legend
During route guidance
Next guidance
point
Speed limit Search icon
Turn-by-turn directions
Shows a more detailed view of the next maneuver on the MID.
Upcoming
maneuver
Distance to next
guidance point Current route
Cancel route
Using the navigation system while driving can take your attention away f\
rom
the road, causing a crash in which you could be seriously injured or kil\
led.
Operate system controls only when the conditions permit you to safely do\
so.
WARNING
Street name of
next guidance
point
Traffic
View traffic flow and incidents in major metro areas. Traffic alerts are
accompanied by an audible beep. Pop-up messages and traffic informatio\
n can
be viewed when you are on the map screen. You can also select traffic to avoid.
Traffic coverage is limited in Canada.
Viewing traffic
1. From the map screen, select the traffic icon.
2. Select Traffic Conditions.
3. Traffic icons are shown on the map. Select the
magnifying glass icon to display a full list of
traffic delays.
To mute traffic alerts and voice guidance: From the map screen, press MENU.
Select Mute. To lower voice guidance volume, see page 91.
Avoiding traffic on your route
1. From the map screen, select the traffic icon.
2. Select Traffic on Route.
3. Select an incident to avoid from the list.
4. Select the menu icon.
5. Select Avoid.
Page 53 of 89

98 || 99
DRIVING
DRIVING
DRIVING
Learn about preparation for driving, as well as other features.
Before Driving
Check the following items before you begin driving.
Exterior Checks
• Make sure there are no obstructions on the windows, door mirrors, exterior
lights, or other parts of the vehicle.
• Remove any frost, snow, or ice.
• Make sure the hood is securely closed.
• Heat from the engine and exhaust can ignite flammable materials left u\
nder
the hood, causing a fire. If you’ve parked your vehicle for an exte\
nded period,
inspect and remove any debris that may have collected, such as dried grass
and leaves that have fallen or have been carried in for use as a nest by\
a small
animal. Also check under the hood for leftover flammable materials aft\
er you or
someone else has performed maintenance on your vehicle.
• Make sure the tires are in good condition.
• Make sure there are no people or objects behind or around the vehicle.
Interior Checks
• Store or secure all items on board properly.
• Do not pile items higher than the seat height.
• Do not place anything in the front seat footwells. Make sure to secure t\
he floor
mats.
• If you have any animals on board, do not let them move freely around in \
the
vehicle.
• Securely close and lock all doors and the tailgate.
• Adjust your seating position, mirrors, and steering wheel properly.
• Make sure items placed on the floor behind the front seats cannot roll\
under the
seats.
• Everyone in the vehicle must fasten their seat belt.
• Make sure that the indicators in the instrument panel come on when you s\
tart
the vehicle, and go off soon after.
If the doors are frozen shut, use warm water around the door edges to me\
lt any
ice. Do not try to force them open, as this can damage the rubber trim a\
round the
doors. When done, wipe dry to avoid further freezing.
NOTICE
Improper accessories or modifications can affect your vehicle’s handling, and
stability, and performance, and cause a crash in which you can be seriously
hurt or killed.
Follow all instructions in the vehicle owner’s manual regarding accessories
and modifications.
WARNING
In addition:
• During the first 600 miles (1,000 km) of operation, avoid sudden acc\
eleration or
full throttle operation so as to not damage the engine or powertrain.
• Avoid hard braking for the first 200 miles (300 km). You should also follow this
when the brake pads are replaced.
Driving Guidelines for Your Utility Vehicle
Utility vehicles have a significantly higher rollover rate than other \
types of
vehicles.
To prevent rollovers or loss of control:
• Take corners at slower speeds than you would with a passenger vehicle.
• Avoid sharp turns and abrupt maneuvers whenever possible.
• Do not modify your vehicle in any way that you would raise the center of\
gravity.
• Do not carry heavy cargo on the roof.
• Never carry more than 165 lbs (75 kg) of cargo on the roof rack (Hond\
a
accessory).
Your vehicle has been designed primarily for use on pavement, however, its higher
ground clearance allows you to occasionally travel on unpaved roads. It \
is not
designed for trail-blazing, or other challenging off-road activities.
If you decide to drive on unpaved roads, you will find that it require\
s somewhat
different driving skills and that your vehicle will handle somewhat diff\
erently than
it does on pavement. Pay attention to the precautions and tips in this s\
ection, and
get acquainted with your vehicle before leaving the pavement.
Improperly operating this vehicle on or off pavement can cause a crash o\
r
rollover in which you and your passengers can be seriously injured or ki\
lled.
• Follow all instructions and guidelines in this owner’s guide.
• Keep your speed low, and don’t drive faster than conditions permit.
WARNING
Page 54 of 89

100 || 101
DRIVING
DRIVING
Maximum Load Limit
Carrying too much cargo or improperly storing it can affect your vehicle\
’s handling,
stability, stopping distance, and tires, and make it unsafe.
Maximum Load for Your Vehicle
LX, EX, and EX-L with AWD
The maximum load for your vehicle is 1340 lbs (608 kg).
Touring and Elite with AWD
The maximum load for your vehicle is 1173 lbs (532 kg).
All other models
See the Tire and Loading Information label on the driver’s doorjamb.
Label example
The headlight aim on your vehicle was set by the factory, and does not need to be
adjusted. However, if you regularly carry heavy items in the cargo area or tow a
trailer, have the aiming readjusted at your dealer or by a qualified technici\
an. Overloading or improper loading can affect handling and stability and ca\
use a
crash in which you can be hurt or killed.
Follow all load limits and other loading guidelines in this guide.
WARNING
This figure includes the total weight of all occupants, cargo, and
accessories, and the tongue load if you are towing a trailer. Below are the
steps for determining the correct load limit:
1. Locate the statement “The combined weight of occupants and cargo
should never exceed XXX kg or XXX lbs.” on your vehicle’s placard.
2. Determine the combined weight of the driver and passengers that will be \
riding in your vehicle.
3. Subtract the combined weight of the driver and passengers from XXX kg
or XXX lbs.
4. The resulting figure equals the available amount of cargo and luggage \
load capacity. For example, if the “XXX” amount equals 1,400 lbs. and
there will be five 150 lb. passengers in your vehicle, the amount of
available cargo and luggage load capacity is 650 lbs. (1,400 - 750 (5 \
x 150)
= 650 lbs.)
5. Determine the combined weight of luggage and cargo being loaded on
the vehicle. That weight may not safely exceed the available cargo and
luggage load capacity calculated in step 4.
6. If your vehicle will be towing a trailer, load from your trailer will be
transferred to your vehicle. Consult the Owner’s Manual on the Owner
Information CD or at owners.honda.com (U.S.) or myhonda.ca (Canada)
to determine how this reduces the available cargo and luggage load
capacity of your vehicle.
In addition, the total weight of the vehicle, all occupants, accessories\
,
cargo, and trailer tongue load must not exceed the Gross Vehicle Weight
Rating (GVWR) or the Gross Axle Weight Rating (GAWR). Both are on a label
on the driver’s doorjamb.
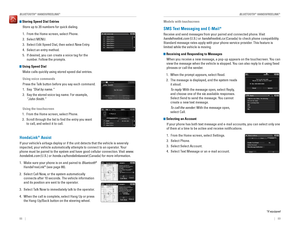
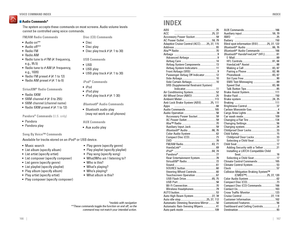
Load limits exampl e
Example 1
Max load
1,173 lbs (532 kg ) Passenger weight
150 lbs x 2 = 300 lbs (68 kg x 2 = 136 kg) Cargo
weight
873 lbs
(396 kg)
Example 2 Max load
1,173 lbs (532 kg ) Passenger weight
150 lbs x 5 = 750 lbs
(68 kg x 5 = 340 kg )Cargo weight
423 lbs
(192 kg )
Page 55 of 89

102 || 103
DRIVING
DRIVING
Towing a Trailer
Your vehicle can tow a trailer if you carefully observe the load limits, \
use the proper
equipment, and follow the towing guidelines. See the Owner’s Manual on the Owner
Information CD or at owners.honda.com (U.S.) or www.myhonda.ca (Canada) for
more information.
Towing Load Limits
Total trailer weight
Do not exceed the maximum allowable weight of
the trailer, cargo, and everything in or on it shown in
the table below. Towing loads in excess of this can
seriously affect vehicle handling and performance
and can damage the engine and drivetrain.
To ng ue Loa d
Total load
Number of
occupant s
AWD models with
ATF cooler
AWD models
without ATF cooler2WD models
25,000 lbs (2,268 kg)3,500 lbs (1,588 kg)3,500 lbs (1,588 kg)
34,750 lbs (2,155 kg)3,250 lbs (1,474 kg)3,250 lbs (1,474 kg)
44,500 lbs (2,041 kg)3,000 lbs (1,361 kg)3,000 lbs (1,361 kg)
54,250 lbs (1,928 kg)2,750 lbs (1,247 kg)2,750 lbs (1,247 kg)
64,000 lbs (1,814 kg)2,500 lbs (1,134 kg)2,500 lbs (1,134 kg)
7
8T owing not recommended
2,500 lbs (1,134 kg) 2,250 lbs (1,021 kg)
2,250 lbs (1,021 kg)
Each weight limit is calculated based on the following conditions:
• Occupants fill seats from the front of the vehicle to the back.
• Each occupant weighs 150 lbs (68 kg).
• Each occupant has 15 lbs (7 kg) of cargo in the cargo area.
Any additional weight, cargo, or accessories reduce the maximum trailer weight
and maximum tongue load. Tongue load
The weight of the tongue with a fully loaded trailer
on the hitch should be approximately:
• Boat trailers: 5 – 15% of the total trailer weight
• Other trailers: 10 – 15% of total trailer weight
To ng ue Loa dTongue load
To estimate the tongue load
Excessive tongue load reduces front tire traction and steering control. \
Too little
tongue load can make the trailer unstable and cause it to sway.
You can estimate the tongue load by measuring the trailer hitch height fr\
om the
ground in the following steps:
1. Park the vehicle on level ground.
2. Measure the distance between the ground and the bottom of the trailer hi\
tch.
3. Connect the fully loaded trailer to the hitch.
4. Measure the distance between the ground and the bottom of the trailer hi\
tch
again.
5. Subtract the second measurement from the first measurement, then refer\
to
the following table.
If the difference becomes more than indicated in the table, distribute t\
he load or
remove cargo as needed.
Number of
occupant s
AWD models with
ATF cooler2WD models
2500 lbs (227 kg)350 lbs (159 kg )
3475 lbs (215 kg)325 lbs (147 kg)
4450 lbs (204 kg)300 lbs (136 kg)
5375 lbs (170 kg)275 lbs (125 kg)
6250 lbs (113 kg)240 lbs (109 kg)
7
8 Towing not recommended
125 lbs (57 kg)
115 lbs (52 kg)
If the difference isAWD models2WD models
1 inches (2.5 cm)150 lbs (68 kg)
1 1/2 inches (3.8 cm )250 lbs (114 kg)
2 inches (5.1 cm)350 lbs (159 kg)
2 3/8 inches (6.0 cm )450 lbs (205 kg)—
2 5/8 inches (6.7 cm )500 lbs (227 kg)—
Page 56 of 89

104 || 105
DRIVING
DRIVING
How to weigh the trailer loads using a public scale
Check each weight in the order indicated as shown. Refer to the table be\
low for
each weight’s limit except for the tongue load.
• If you cannot weigh the rear axle, subtract 1 from 2.
• The maximum gross combined weight (4) decreases by 2% for every 1,000 feet
(305 m) of elevation.
• To calculate the tongue load, subtract 5 from 6.
• Refer to the trailer owner’s manual for additional information.
Fully load the vehicle and trailer. An attendant who watches the scale is needed
as all occupants should stay in the vehicle.
If a public scale is not available,
add the estimated weight of
your cargo load to the weight
of your trailer (as quoted by
the manufacturer), and then
measure the tongue load with
an appropriate scale or tongue
gauge or estimate it based on
cargo distribution.
1. Front gross axle weigh t
2. Gross vehicle weight 4. Gross combined weight
3. Rear gross axle weight 5. Hitched trailer weight
6. Unhitched trailer weight
Weight limit fo
r 2WD models AWD models
Front gross axle2,734 lbs
(1,240 kg)2,855 lbs
(1,295 kg)
Gross vehicle 5,545 lbs
(2,515 kg) 5,842 lbs
(2,650 kg)
Rear gross axle2,921 lbs
(1,325 kg)3,097 lbs
(1,405 kg)
Gross combine d8,025 lbs
(3,640 kg) 9,755 lbs
(4,425 kg)
Pre-tow checklist
When preparing to tow, and before driving away, ensure the following:
• The vehicle has been properly serviced, and the suspension and the cooli\
ng
system are in good operating condition.
• Avoid towing a trailer during your vehicle’s first 600 miles (1,000 km).
• The trailer has been properly serviced and is in good condition.
• All weights and loads are within limits. Never exceed the gross weight r\
atings.
• Check if all loads are within limits at a public scale. If a public scal\
e is not
available, add the estimated weight of your cargo load to the weight of \
your
trailer (as quoted by the manufacturer) and the tongue load.
• The hitch, safety chains, and any other attachments are secure.
• All items in or on the trailer are properly secured and cannot shift whi\
le you drive.
Exceeding any load limit or improperly loading your vehicle and trailer \
can
cause a crash in which you can be seriously hurt or killed.
Check the loading of your vehicle and trailer carefully before starting \
to driv
e.
WARNING