Page 9 of 250

8
Quick Reference GuideHow to Enter Information
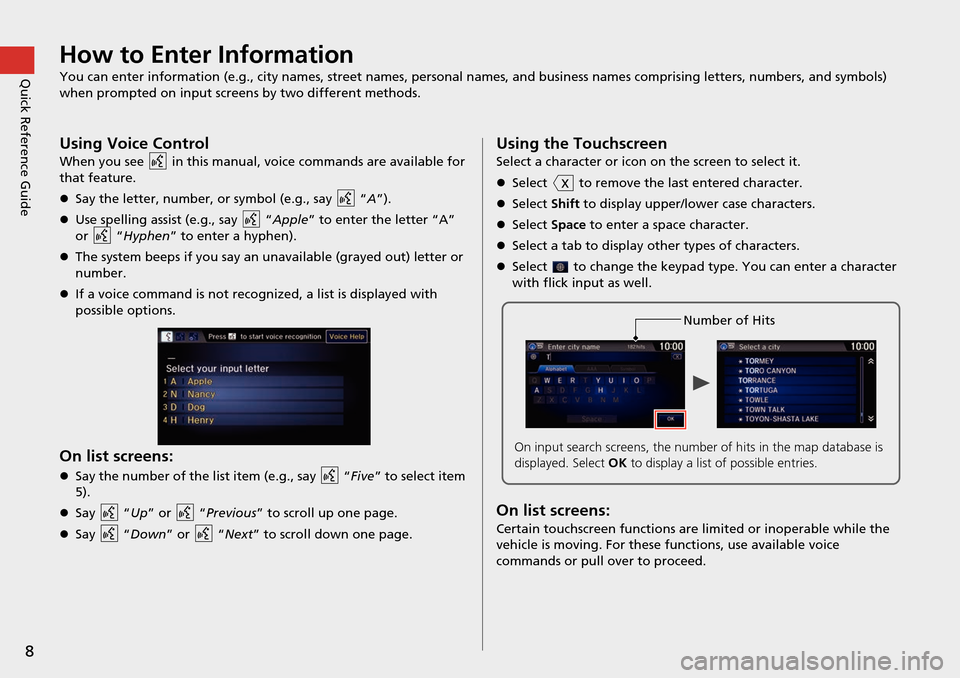
You can enter information (e.g., city names, street names, personal names, and business names comprising letters, numbers, and symbols)
when prompted on input scr eens by two different methods.
Using Voice Control
When you see in this manual, voice commands are available for
that feature.
Say the letter, number, or symbol (e.g., say “A”).
Use spelling assist (e.g., say “Apple
” to enter the letter “A”
or “Hyphen ” to en
ter a hyphen).
The system beeps if you say an unavailable (grayed out) letter or
numb
er.
If a voice command is not recognized, a list is displayed with
po
ssible options.
On list screens:
Say the number of the list item (e.g., say “Five ” to select item
5).
Say “
Up ” o r “
Previous” to scrol l up one page.
Say “Down” or “
Next” to scroll down one page.
Using the Touchscreen
Select a character or icon on the screen to select it.
Select to remove the last entered character.
Select Shift
to display upper/lower case characters.
Select Space to enter a space character.
Select a tab to dis
play other types of characters.
Select to change the keypad type. You can enter a character
with flick input as well.
On list screens:
Certain touchscreen functions are limited or inoperable while the
vehicle is moving. For these functions, use available voice
commands or pull over to proceed.
Number of Hits
On input search screens, the number of hits in the map database is
displayed. Select OK to display a list of possible entries.
Page 10 of 250
9
Quick Reference GuideAudio System
You can play music from a wide array of media sources. You can also control the audio system using voice commands.
Basic Operation
aPress the (Audio Power) button to turn the audio sy stem
on or off.
b Select HOME and then select Audio on the screen.
The audio control screen of the last selected sour c
e is
displayed.
c Select SOURCE and then select the audio source.
dSelect VOL (Volume) to adjust the volume.
Audio source
Audio Control Display
Track list
Play mode
Audio source
Displays selected source.
Displays or hides the
music information. Close tab
Music
information Open tab
Audio control
Folder/Track
tab
Displays the
list.
Page 11 of 250

10
Quick Reference GuideMap Screen Legend
Park
Hospital
Golf CourseWater Area
Cemetery
University
Airport/Business
Industrial complex
Feature areas
Traffic status indicator* (P109)
Map orientation (P54)
GPS signal strength
North up Heading up
Best receptionGood reception
No icon: Poor/No reception
Traffic information availableFlow or incident data not available
Traffic information not available
Traffic information off or map
scale too large
Current map scale
Current street name
Map menu
(P105)
Map scale
(P58)
Current vehicle position (P62) Streets
Landmark icons (P59)
Shopping Mall Freeways
State routes
Verified streets
Unverified streets
One-way streets
Acura dealer
Honda dealer (U.S.)
ATM
School
Parking lot
Parking garage
Grocery store
Hotel/Lodging
Gas station
Hospital
Post office
Restaurant
Freeway exit information
Congestion
Incident
Weather
Construction
Road Closed/Blocked
Traffic incident icons* (P109)
Traffic flow indicator* (P109)
Heavy
Moderate
Free flow
3D map
Honda dealer (Canada)
*: Traffic is only available in certain areas.
Military Base
Page 12 of 250
11
Quick Reference GuideDuring Route Guidance
During route guidance, route information is displayed on the map/guidance screen.
Select the map orientation icon to change the guidance mode.
Map Screen
Guidance Screen
Distance to destination
Distance of the actual
route.
Straight line guide (P55)
Calculated route
(P98)
Guidance indicator
Distance to the next
guidance point.
Estimated time to
destination
Destination/Waypoint icon (P112)Calculated route
(unverified roads)
(P102)
Street name of
guidance point
Distance to
guidance point
No entry icon
Map Screen during Scrolling
Select the open/close tab to view and
select map icon and street or traffic
information. Select the (Navi/Back)
icon to go back to the map screen.
(P 121)
List open/
close tab Selectable icons on
the cursor location
Page 13 of 250
12
Quick Reference GuideNavigation—Home Addresses and Going Home
The “Home” feature automatically routes you to your home address from any location simply by selecting Go Home 1 or 2, or saying
“Go Home.” You can store two home addresses. (P33
)
Storing Your Home Address
aSelect HOME.
bSelect Settings and select Navigation.
cSelect Personal Info tab.
dSelect Edit Go Home 1 .
eSelect Name.
fEnter a name and select OK .
gSelect Address.
hSelect Address from the Destination
menu.
i Enter an address.
jSelect Phone No.
kEnter a phone number and select OK.
l Select OK.
Going Home
a Select HOME and then
select Navi.
bSelect MENU and then select Go
Home 1.
Alternatively, you can say “Go Home
”
from
any screen. Your home address is
disp layed
on the calculate route screen.
cSelect Set as Destination .
Page 14 of 250
13
Quick Reference GuideNavigation—Entering a Destination
Enter your destination using one of several methods, then follow route guidance on the map or guidance screen to your destination. You
can also perform these steps using voice control.
aSelect HOME and then
select Navi.
bSelect MENU and then select Address .
cSelect Street.
dEnter the name of your destination
street and select OK if necessary.
e Select your destination street from
the list.
fEnter the street number. Select OK
when finished.
g If there is more than one city with the
specified street, a list of cities is
displayed. Select the desired city from
the list.
hSelect Set as Destination .
Route guidance to the destination
beg i
ns.
View Routes : Choo
se one of three
routes.
Route Preference : Ch
oo
se MAX or MIN
for the four settings.
Page 15 of 250

14
Quick Reference GuideNavigation—Changing Route or Destination
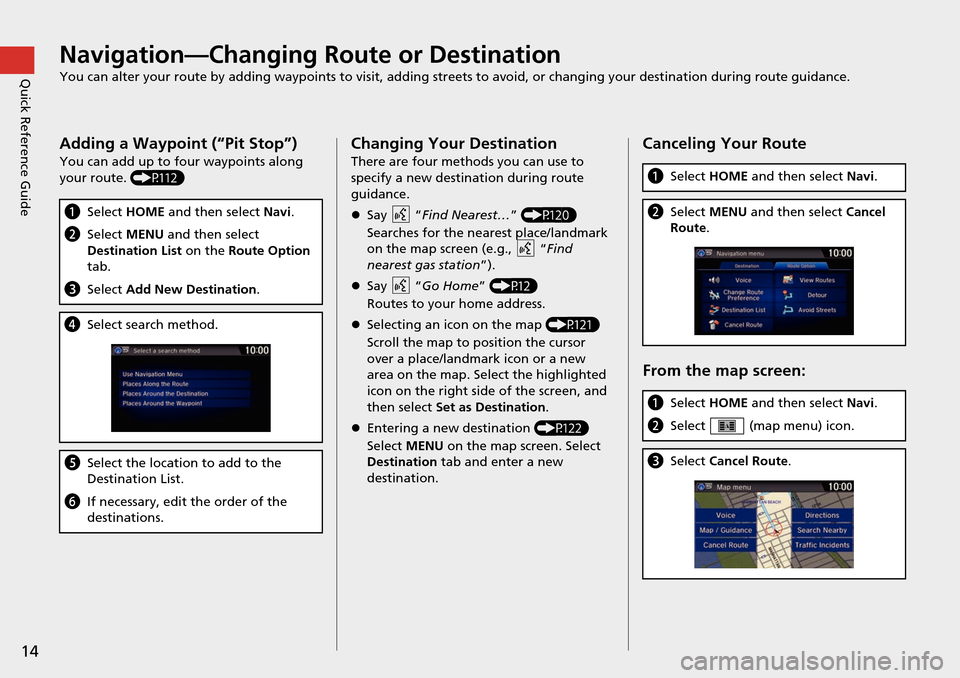
You can alter your route by adding waypoints to visit, adding streets to avoid, or changing your destination during route guida nce.
Adding a Waypoint (“Pit Stop”)
You can add up to four waypoints along
your route. (P112)
aSelect HOME and then select Navi.
bSelect MENU and then select
Destination List on the Route Option
tab.
c Select Add New Destination .
dSelect search method.
eSelect the location to add to the
Destination List.
fIf necessary, edit the order of the
destinations.
Changing Your Destination
There are four methods you can use to
specify a new destina tion during route
guidance.
Say “Find Nearest…
”
(P120)
Searches for the nearest place/landmark
o n
the map screen (e.g., “Find
nearest
gas station ”).
Say “
Go Home ”
(P12)
Routes to your home address.
Selecting an icon on the map (P121)
Scroll the map to position the cursor
o v
er a place/landmark icon or a new
area on the map. Select the highlighted
icon on the right side of the screen, and
then select Set as Destination .
Entering a new destination (P122)
Select MENU on the map screen. Selec
t
Destination tab and enter a new
destination.
Canceling Your Route
From the map screen:
a Select HOME and then select Navi.
bSelect MENU and then select Cancel
Route .
aSelect HOME and then select Navi.
bSelect (map menu) icon.
cSelect Cancel Route .
Page 16 of 250

15
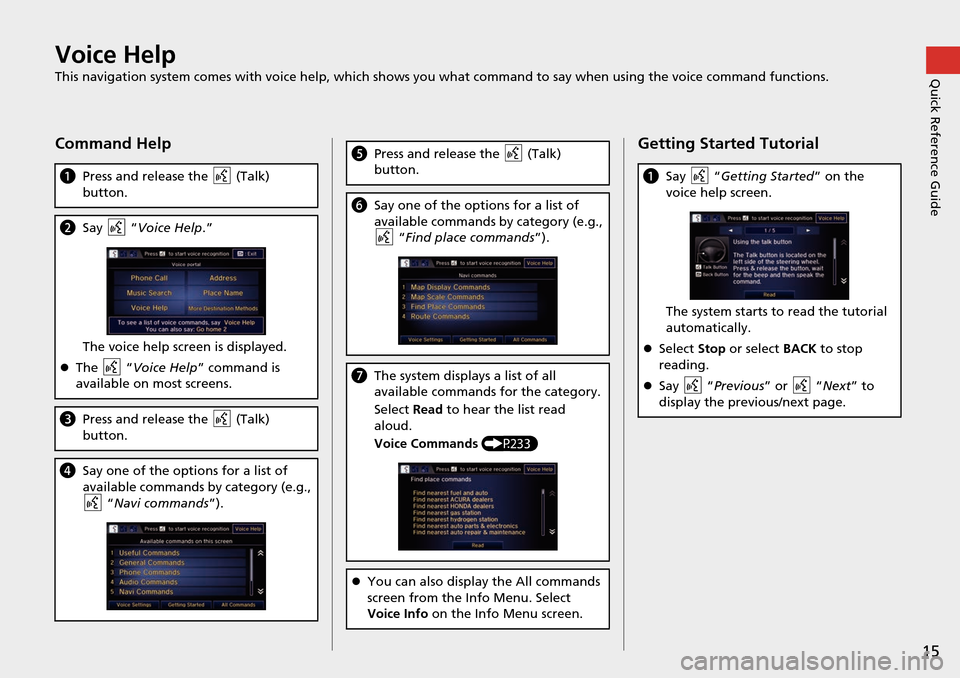
Quick Reference GuideVoice Help
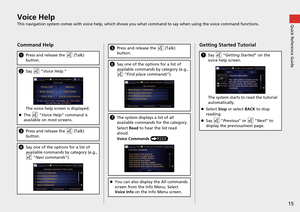
This navigation system comes with voice help, which shows you what command to say when using the voice command functions.
Command Help
aPress and release the (Talk)
button.
b Say “Voice Help .”
Th
e voice help screen is displayed.
The “Voice Help ” co
mmand is
available on most screens.
c Press and release the (Talk)
button.
d Say one of the options for a list of
available commands by category (e.g.,
“Navi com m
ands”).
ePress and release the (Talk)
button.
f Say one of the options for a list of
available commands by category (e.g.,
“Fin d place commands ”).
gThe system displays a list of all
available commands for the category.
Select Read to hear t
he list read
aloud.
Voice Commands (P 233)
You can also display the All commands
screen from the In
fo Menu. Select
Voice Info on the Info Menu screen.
Getting Started Tutorial
aSay “Getting Sta rted” on the
voice help screen.
The system starts to read the tutorial
automatically.
Select Stop or select BA C
K to stop
reading.
Say “Previou s” or “
Next” to
display the previous/next page.