2016 FORD F450 SUPER DUTY buttons
[x] Cancel search: buttonsPage 204 of 507
Trailer Brake Effort Setting
The trailer brake controller allows the userto customize how aggressively the trailerbrakes engage. The default value is "Low"and is the recommended setting for mosttrailers. If your trailer's brakes require moreinitial voltage, or if you prefer moreaggressive trailer braking, then select eitherthe "Medium" or the "High" setting. SeeInformation Displays (page 89).
Procedure for Adjusting Gain
Note:Only perform this procedure in atraffic-free environment at speeds ofapproximately 20-25 mph (30-40 km/h).
The gain setting adjusts the trailer brakecontroller for the specific towing condition.You should change the setting as towingconditions change. Changes to towingconditions include trailer load, vehicle load,road conditions and weather.
The gain should be set to provide themaximum trailer braking assistance whilemaking sure the trailer wheels do not lockwhen using the brakes. Locked trailerwheels may lead to trailer instability.
1.Make sure the trailer brakes are in goodworking condition, functioning normallyand properly adjusted. See your trailerdealer if necessary.
2. Hook up the trailer and make theelectrical connections according to thetrailer manufacturer's instructions.
3. When you plug in a trailer with electricor electric-over-hydraulic brakes,TRAILER CONNECTED appears inthe information display.
4. Use the gain adjustment (+ and -)buttons to increase or decrease thegain setting to the desired startingpoint. A gain setting of 6.0 is a goodstarting point for heavier loads.
5. In a traffic-free environment, tow thetrailer on a dry, level surface at a speedof 20-25 mph (30-40 km/h) andsqueeze the manual control levercompletely.
6. If the trailer wheels lock up, indicatedby squealing tires, reduce the gainsetting. If the trailer wheels turn freely,increase the gain setting. Repeat Steps5 and 6 until the gain setting is at apoint just below trailer wheel lock-up.If towing a heavier trailer, trailer wheellock-up may not be attainable evenwith the maximum gain setting of 10.
Information Display Warning Messages
Note:An authorized dealer can diagnosethe trailer brake controller to determineexactly which trailer fault has occurred.However, your Ford warranty does not coverthis diagnosis if the fault is with the trailer.
TRAILER BRAKE MODULE FAULT
Displays in response to faults sensed bythe trailer brake controller, accompaniedby a single tone. If this message appears,contact an authorized dealer as soon aspossible for diagnosis and repair. Thecontroller may still function, but withdegraded performance.
WIRING FAULT ON TRAILER
Displays when there is a short circuit onthe electric brake output wire.
If this message displays, with no trailerconnected, the problem is with your vehiclewiring or trailer brake controller. Contactan authorized dealer.
201
Super Duty (TFA) Canada/United States of America, enUSA, First Printing
Towing
Page 239 of 507

Only use oils certified for gasoline enginesby the American Petroleum Institute (API).An oil with this trademark symbolconforms to the current engine andemission system protection standards andfuel economy requirements of theInternational Lubricants SpecificationAdvisory Council (ILSAC), comprised ofU.S. and Japanese automobilemanufacturers.
1. Check the engine oil level.
2. If the engine oil level is not within thenormal range, add engine oil thatmeets Ford specifications. SeeCapacities and Specifications for moreinformation.
3. Remove the engine oil filler cap anduse a funnel to pour the engine oil intothe opening.
4.Recheck the engine oil level. Make surethe oil level is not above the normaloperating range on the engine oil leveldipstick.
5. Install the engine oil level dipstick andensure it is fully seated.
6. Fully install the engine oil filler cap byturning the filler cap clockwise untilthree clicks are heard or until the capis fully seated.
OIL CHANGE INDICATOR
RESET
Resetting the Oil Life MonitoringSystem
Only reset the oil life monitoring systemafter changing the engine oil and oil filter.
1.Switch the ignition on. Do not start theengine. For vehicles with push-buttonstart, press and hold the start buttonfor two seconds without pressing thebrake pedal. Do not start the engine.
2.Press the accelerator and brake pedalsat the same time.
3.Keep the accelerator and brake pedalsfully pressed.
4. After three seconds, a messageconfirming that the reset is in progresswill be displayed.
5. After 25 seconds, a messageconfirming that the reset is completewill be displayed.
6. Release the accelerator and brakepedals.
7.The message confirming that the resetis complete will no longer be displayed.
8.Switch the ignition off. For vehicles withpush-button start, press the startbutton to switch the ignition off.
ENGINE COOLANT CHECK
WARNINGS
Do not add engine coolant when theengine is hot. Steam and scaldingliquids released from a hot coolingsystem can burn you badly. Also, you canbe burned if you spill coolant on hot engineparts.
236
Super Duty (TFA) Canada/United States of America, enUSA, First Printing
MaintenanceE142732
Page 322 of 507

CLK: Press this button to switch the display between the clock and radiofrequency. To set the time, press and hold the button until the hours start toflash. Press the arrow buttons (B) to adjust the hours, then repeat to set theminutes. Press CLK again to exit clock mode.
A
Tune: Press these arrow buttons to manually search through the radio frequencyband. Press and hold for a fast search. In AUDIO mode, press the buttons toadjust different sound settings.
B
AUDIO: Press this button to access settings for Treble, Middle, Bass, Fade andBalance.C
SEEK: Press this button to go to the previous or next strong station on thefrequency band.D
Memory presets: Store your favorite radio stations. To store a radio station,tune to the station, then press and hold a preset button until sound returns.E
AM/FM: Press this button to select a frequency band.F
VOL-PUSH: Press the button to switch the system on and off. Turn the controlto adjust the volume.G
AUDIO UNIT - VEHICLES WITH:
AM/FM/CD/SYNC
WARNING
Driving while distracted can result inloss of vehicle control, crash andinjury. We strongly recommend thatyou use extreme caution when using anydevice that may take your focus off theroad. Your primary responsibility is the safeoperation of your vehicle. We recommendagainst the use of any hand-held devicewhile driving and encourage the use ofvoice-operated systems when possible.Make sure you are aware of all applicablelocal laws that may affect the use ofelectronic devices while driving.
319
Super Duty (TFA) Canada/United States of America, enUSA, First Printing
Audio System
Page 323 of 507
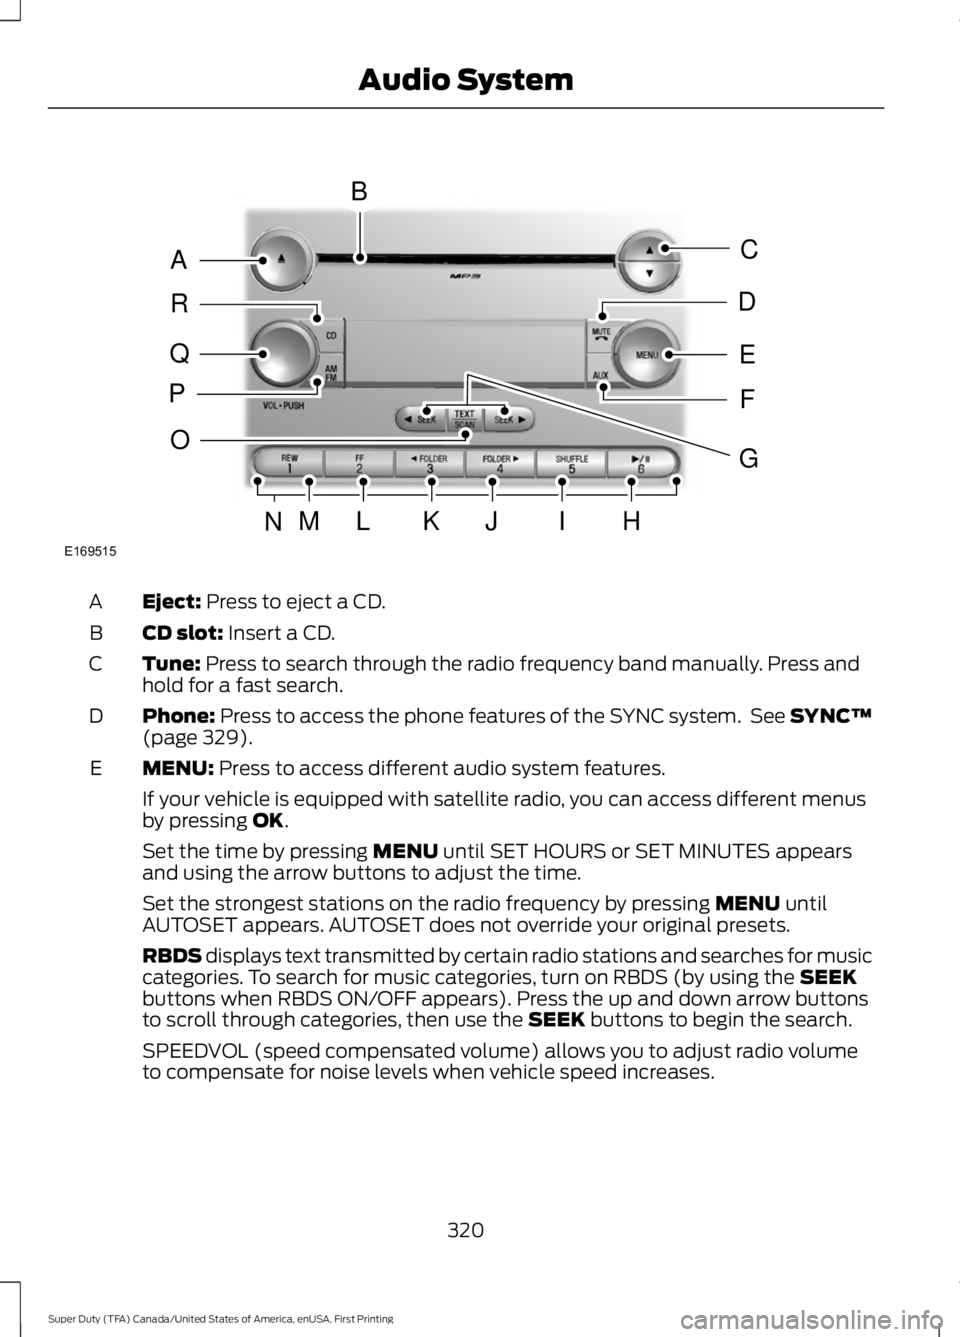
Eject: Press to eject a CD.A
CD slot: Insert a CD.B
Tune: Press to search through the radio frequency band manually. Press andhold for a fast search.C
Phone: Press to access the phone features of the SYNC system. See SYNC™(page 329).D
MENU: Press to access different audio system features.E
If your vehicle is equipped with satellite radio, you can access different menusby pressing OK.
Set the time by pressing MENU until SET HOURS or SET MINUTES appearsand using the arrow buttons to adjust the time.
Set the strongest stations on the radio frequency by pressing MENU untilAUTOSET appears. AUTOSET does not override your original presets.
RBDS displays text transmitted by certain radio stations and searches for musiccategories. To search for music categories, turn on RBDS (by using the SEEKbuttons when RBDS ON/OFF appears). Press the up and down arrow buttonsto scroll through categories, then use the SEEK buttons to begin the search.
SPEEDVOL (speed compensated volume) allows you to adjust radio volumeto compensate for noise levels when vehicle speed increases.
320
Super Duty (TFA) Canada/United States of America, enUSA, First Printing
Audio SystemE169515
B
A
Q
R
P
C
E
D
F
O
MLKJIHN
G
Page 324 of 507
Track/Folder is only available on MP3 files when in CD mode. In track mode,pressing the SEEK arrows allows you to scroll through all the tracks on the disc.In folder mode, pressing the SEEK arrows allows you to scroll through all thetracks within the selected folder. Press the FOLDER buttons to access otherfolders.
COMPRESS (Compression) is only available in CD and MP3 modes. Switchingcompression on brings the soft and loud passages together for a more consistentlistening level. Use the SEEK buttons and up and down arrow buttons to switchit on and off.
AUX: Press to access the media features of the SYNC system. See SYNC™(page 329).F
SEEK: In radio mode, press and release these buttons to go to the next (orprevious) preset radio station or disc track. In CD and MP3 modes, press thesebuttons to select the next (or previous) track, or press and hold to advance (orreverse) within the same track.
G
Play, Pause and OK: Play and Pause allow you to play or pause a track whenlistening to a CD.OK allows you to confirm commands with phone and mediafeatures of the SYNC system. See SYNC™ (page 329).
H
SHUFFLE: Play music on the selected CD or MP3 folder in random order.I
FOLDER >: Press to access the next folder on an MP3 disc.J
< FOLDER: Press to access the previous folder on an MP3 disc.K
FF: Press to fast forward in a CD track or MP3 file manually.L
REW: Press to rewind in a CD track or MP3 file manually.M
Memory presets: Store your favorite radio stations. To store a radio station,tune to the station, then press and hold a preset button until sound returns.N
TEXT/SCAN: In radio, CD and MP3 modes, press and hold to hear a briefsampling of radio stations, CD tracks or MP3 files. In CD and MP3 modes, pressand release to display track title, artist name and disc title. In text mode,sometimes the display requires additional text to show. When the < / > indicatoris on, press TEXT and then use the SEEK buttons to view the additional displaytext.
O
AM/FM: Press to select a frequency band.P
VOL-PUSH: Press to switch the system off and on. Turn it to adjust the volume.Q
CD: Press to enter CD or MP3 mode.R
321
Super Duty (TFA) Canada/United States of America, enUSA, First Printing
Audio System
Page 326 of 507
Memory presets: Store your favorite radio stations. To store a radio station,tune to the station, then press and hold a preset button until sound returns.E
Seek, Reverse and Fast Forward:F
In radio mode, select a frequency band and press one of these buttons. Thesystem stops at the first station it finds in that direction.
In Sirius mode, press these buttons to select the previous or next channel. If aspecific category is selected (such as Jazz, Rock or News), use these buttonsto find the previous or next channel in the selected category.
In CD mode, press these buttons to select the previous or next track.
MEDIA: Press this button to access different audio modes, such as AM, FM andA/V Input.G
DIGITAL RADIO
Note:HD Radio broadcasts are notavailable in all markets.
HD Radio technology is the digitalevolution of analog AM/FM radio. Yoursystem has a special receiver that allowsit to receive digital broadcasts (whereavailable) in addition to the analogbroadcasts, it already receives. Digitalbroadcasts provide a better sound qualitythan analog broadcasts with free,crystal-clear audio and no static ordistortion. For more information, and aguide to available stations andprogramming, please visitwww.hdradio.com.
When HD Radio is on and you tune to astation broadcasting HD Radio technology,you may notice the HD Radio logo on yourscreen. When this logo is available, youmay also see Title and Artist fieldson-screen.
The multicast indicator appears in FMmode (only) if the current station isbroadcasting multiple digital broadcasts.The highlighted numbers signify availabledigital channels where new or differentcontent is available. HD1 signifies the mainprogramming status and is available inanalog and digital broadcasts. Othermulticast stations (HD2 through HD7) areonly available digitally.
When HD Radio broadcasts are active, youcan access the following functions:
•Scan allows you to hear a briefsampling of all available stations. Thisfeature still works when HD Radioreception is on, although it does notscan for HD2-HD7 channels. You maysee the HD logo appear if the stationhas a digital broadcast.
•Memory presets allow you to save anactive channel as a memory preset.Touch and hold a memory preset slotuntil the sound returns. There is a briefmute while the radio saves the station.Sound returns when finished. Whenswitching to an HD2 or HD3 memorypreset, the sound mutes before thedigital audio plays, because the systemhas to reacquire the digital signal.
323
Super Duty (TFA) Canada/United States of America, enUSA, First Printing
Audio System
Page 340 of 507
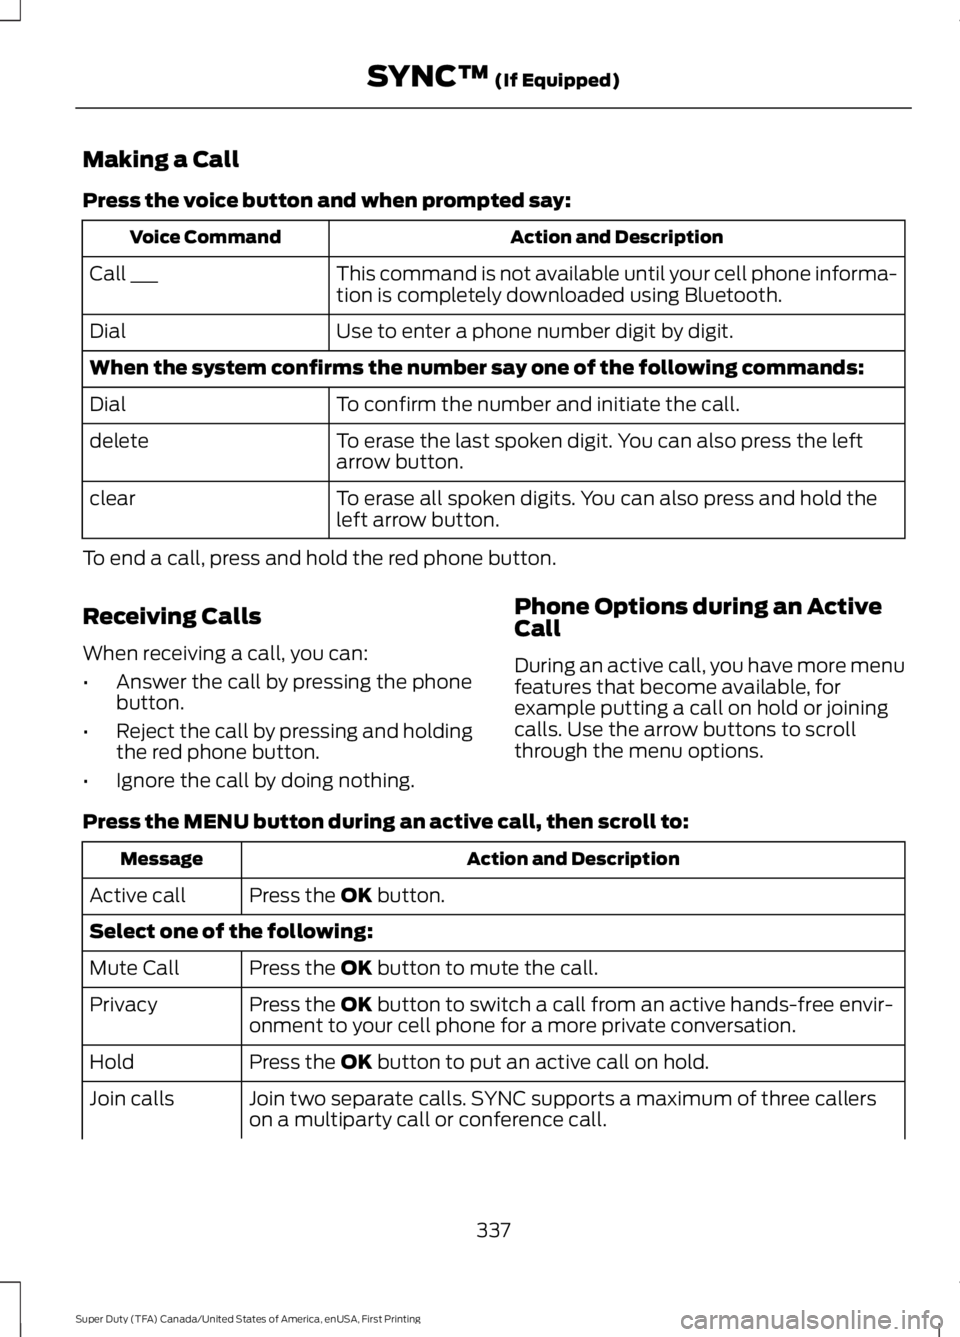
Making a Call
Press the voice button and when prompted say:
Action and DescriptionVoice Command
This command is not available until your cell phone informa-tion is completely downloaded using Bluetooth.Call ___
Use to enter a phone number digit by digit.Dial
When the system confirms the number say one of the following commands:
To confirm the number and initiate the call.Dial
To erase the last spoken digit. You can also press the leftarrow button.delete
To erase all spoken digits. You can also press and hold theleft arrow button.clear
To end a call, press and hold the red phone button.
Receiving Calls
When receiving a call, you can:
•Answer the call by pressing the phonebutton.
•Reject the call by pressing and holdingthe red phone button.
•Ignore the call by doing nothing.
Phone Options during an ActiveCall
During an active call, you have more menufeatures that become available, forexample putting a call on hold or joiningcalls. Use the arrow buttons to scrollthrough the menu options.
Press the MENU button during an active call, then scroll to:
Action and DescriptionMessage
Press the OK button.Active call
Select one of the following:
Press the OK button to mute the call.Mute Call
Press the OK button to switch a call from an active hands-free envir-onment to your cell phone for a more private conversation.Privacy
Press the OK button to put an active call on hold.Hold
Join two separate calls. SYNC supports a maximum of three callerson a multiparty call or conference call.Join calls
337
Super Duty (TFA) Canada/United States of America, enUSA, First Printing
SYNC™ (If Equipped)
Page 346 of 507
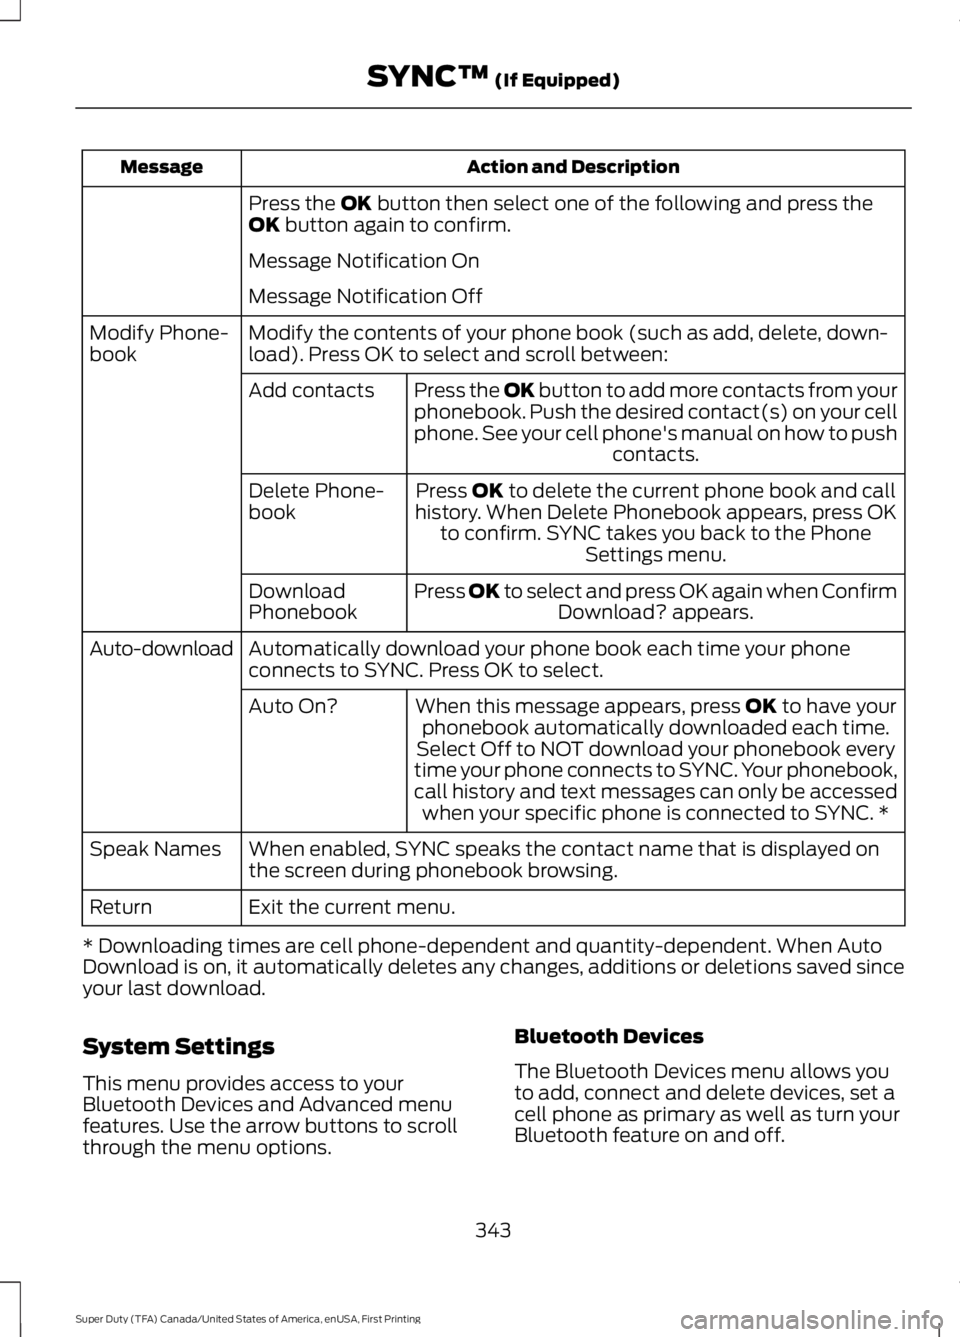
Action and DescriptionMessage
Press the OK button then select one of the following and press theOK button again to confirm.
Message Notification On
Message Notification Off
Modify the contents of your phone book (such as add, delete, down-load). Press OK to select and scroll between:Modify Phone-book
Press the OK button to add more contacts from yourphonebook. Push the desired contact(s) on your cellphone. See your cell phone's manual on how to pushcontacts.
Add contacts
Press OK to delete the current phone book and callhistory. When Delete Phonebook appears, press OKto confirm. SYNC takes you back to the PhoneSettings menu.
Delete Phone-book
Press OK to select and press OK again when ConfirmDownload? appears.DownloadPhonebook
Automatically download your phone book each time your phoneconnects to SYNC. Press OK to select.Auto-download
When this message appears, press OK to have yourphonebook automatically downloaded each time.Auto On?
Select Off to NOT download your phonebook everytime your phone connects to SYNC. Your phonebook,call history and text messages can only be accessedwhen your specific phone is connected to SYNC. *
When enabled, SYNC speaks the contact name that is displayed onthe screen during phonebook browsing.Speak Names
Exit the current menu.Return
* Downloading times are cell phone-dependent and quantity-dependent. When AutoDownload is on, it automatically deletes any changes, additions or deletions saved sinceyour last download.
System Settings
This menu provides access to yourBluetooth Devices and Advanced menufeatures. Use the arrow buttons to scrollthrough the menu options.
Bluetooth Devices
The Bluetooth Devices menu allows youto add, connect and delete devices, set acell phone as primary as well as turn yourBluetooth feature on and off.
343
Super Duty (TFA) Canada/United States of America, enUSA, First Printing
SYNC™ (If Equipped)