Page 161 of 240

"quick-type" battery charger is used
with the battery fitted on the vehicle,
before connecting it disconnect both
cables of the battery itself. Do not use a
"quick-type" battery charger to provide
the starting voltage.
VERSIONS WITHOUT
STOP/START SYSTEM
To recharge, proceed as follows:
disconnect the terminal from the
negative battery pole;
connect the charger cables to the
battery terminals, observing the polarity;
turn on the charger;
when it is recharged, turn the
charger off before disconnecting it from
the battery;
reconnect the terminal to the
negative battery pole.
VERSIONS WITH
STOP/START SYSTEM
(where provided)
To recharge, proceed as follows:
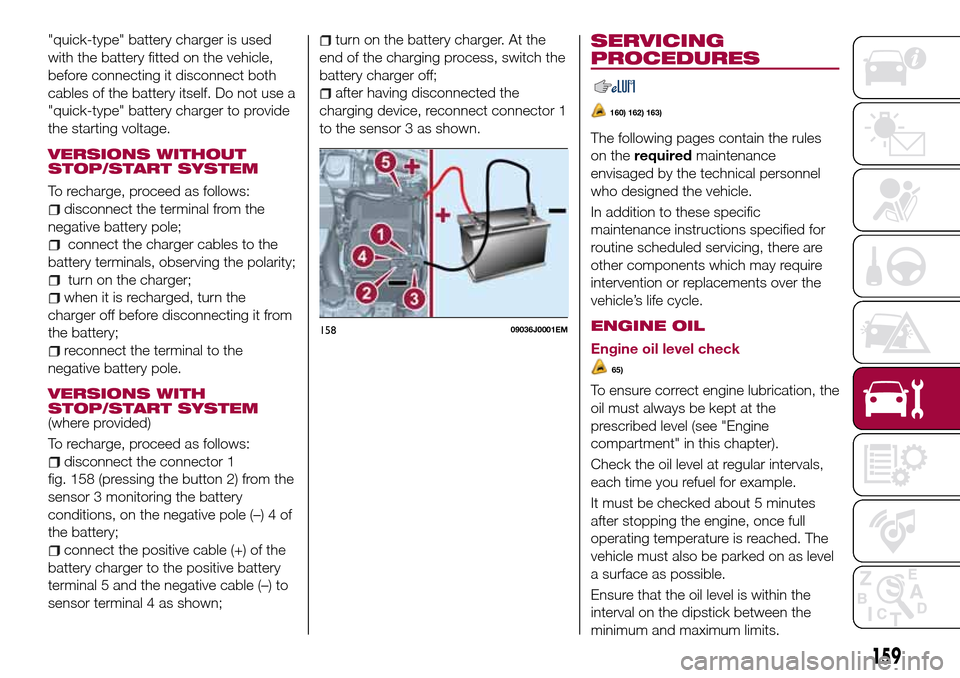
disconnect the connector 1
fig. 158 (pressing the button 2) from the
sensor 3 monitoring the battery
conditions, on the negative pole (–) 4 of
the battery;
connect the positive cable (+) of the
battery charger to the positive battery
terminal 5 and the negative cable (–) to
sensor terminal 4 as shown;
turn on the battery charger. At the
end of the charging process, switch the
battery charger off;
after having disconnected the
charging device, reconnect connector 1
to the sensor 3 as shown.
SERVICING
PROCEDURES
160) 162) 163)
The following pages contain the rules
on therequiredmaintenance
envisaged by the technical personnel
who designed the vehicle.
In addition to these specific
maintenance instructions specified for
routine scheduled servicing, there are
other components which may require
intervention or replacements over the
vehicle’s life cycle.
ENGINE OIL
Engine oil level check
65)
To ensure correct engine lubrication, the
oil must always be kept at the
prescribed level (see "Engine
compartment" in this chapter).
Check the oil level at regular intervals,
each time you refuel for example.
It must be checked about 5 minutes
after stopping the engine, once full
operating temperature is reached. The
vehicle must also be parked on as level
a surface as possible.
Ensure that the oil level is within the
15809036J0001EM
159
interval on the dipstick between the
minimum and maximum limits.
Page 199 of 240

SWITCHING THE SYSTEM
ON/OFF
The system is switched on/off by
pressing the
button/knob.
Turn the button/knob clockwise to
increase the radio volume or
anticlockwise to decrease it. The
electronic volume adjustment control
rotates continuously (360°) in both
directions, without stop positions.
RADIO (TUNER) MODE
The system is equipped with the
following tuners: AM, FM and DAB (for
versions/markets, where provided).
Radio mode selection
Press the RADIO button on the front
panel to activate radio mode.
Selecting a frequency band
The different tuning modes can be
selected by pressing the RADIO button
on the front panel.
Indications on display
After the desired radio station is
selected on the display, the following
information is shown (INFO mode
activated):
In the upper part: the preset station, the
time and the other active radio settings
are highlighted.
In the central part: the name of the
current station, the frequency and theradio text information (if any) are
highlighted.
FM station list
Press the BROWSE ENTER
button/knob to display the complete list
of the FM stations that can be received.
AM/FM radio station storage
The preset stations are available in all
system modes and are selected by
touching one of the presetting buttons
1-2-3-4-5-6on the front panel. If you
are tuned to a radio station that you
wish to store, hold down the button on
the display which corresponds to the
desired preset until an acoustic
confirmation signal is emitted.
AM/FM radio station selection
To search for the desired radio station
press the
orbutton or use the
wheel of the steering wheel controls, or
turn the "BROWSE ENTER" knob.
Previous/next radio station search
Briefly press the
orbutton:
when the button is released the
previous or the next radio station is
displayed.Previous/next radio station fast
search
Hold down the
orbutton to
start the fast search: when the button is
released, the first tunable radio is
played.
MEDIA MODE
Interaction modes for AUX, USB/iPod
operation.
Audio source selection
To select the desired audio source
among those available: AUX o
USB/iPod, press theMEDIAbutton.
WARNING Some multimedia player
devices may not be compatible with the
Uconnect™system.
Track change (next/previous)
Briefly press the
button to play the
next track or briefly press the
button to return to the beginning
of the selected track or to the beginning
of the previous track if this has been
played for less than 3 seconds.
Fast forward/rewind through tracks
Press and hold down the
button to
fast forward the selected track or keep
the
button pressed to fast rewind
the track.
Track selection (browse)
Use this function to scroll through and
select the tracks on the active device.
197
Page 236 of 240

Interior lights................23
Interiors (cleaning)............166
ISOFIX child restraint system
(installation)...............77
iTPMS (indirect Tyre Pressure
Monitoring System)..........65
Jump starting..............139
Keys.....................10
key with remote control.......10
Lifting the vehicle............164
Light beam direction...........35
Light bulbs
types of bulbs............118
Luggage Compartment.........34
Luggage compartment
(extension)................16
Main beam headlights..........21
Main Beam Headlights (bulb
replacement)..............120
Main menu.................40
Manual climate control..........27
Media mode...............218
Multimedia
Uconnect™ LIVE Services .207 ,221
Number plate lights (bulb
replacement)..............126
Occupant protection systems.....68
Paintwork (cleaning and
maintenance).............165
Parking lights................21Parking sensors.............108
Parking the vehicle............95
PBA (system)................59
Performance (top speed)........183
Periodic checks (scheduled
servicing)................151
Pre-tensioners...............71
Load limiters..............72
Prescriptions for handling the
vehicle at the end of its life.....187
Radio mode...............218
Rain sensor.................25
Rear seats..................16
Rear view camera............110
Rear View Camera............110
Rear view mirrors.............19
Reconfigurable Multifunction
Display..................38
Refuelling.................178
Refuelling procedure..........114
Emergency refuelling........114
Refuelling the vehicle..........113
Replacing a bulb.............117
Replacing an external bulb......120
Rims and tyres (dimensions)......173
Roof rack/ski rack.............36
SBR (Seat Belt Reminder).......70
SBR (Seat Belt Reminder) system.......................70
Scheduled servicing...........144Scheduled Servicing Plan.......145
Screen wiper/washer...........24
Smart washing function.......24
Seat belts..................68
Seats.....................15
Servicing procedures..........159
Side bag...................90
Side direction indicators (bulb
replacement)..............121
Snow chains...............164
Speed Limiter...............98
SRS (supplementary restraint
system)..................86
Starting the engine............94
Steering lock................12
Steering wheel...............19
Steering wheel controls.........215
Stop/Start system.............96
TC (system)................59
Technical data..............169
Third brake light (bulb
replacement)..............125
Towing the vehicle............142
Towing trailers..............112
Trip Computer...............43
TSC (system)................60
Tyres (inflation pressure)........174
Uconnect 3” Radio...........191
Uconnect 5” LIVE — Uconnect 5”
Nav LIVE................200
INDEX