2016 FIAT TIPO 5DOORS STATION WAGON air condition
[x] Cancel search: air conditionPage 43 of 240
is approaching ("coupon"), the word
"Service" will be displayed, followed by
the number of kilometres/miles or days
left, when the ignition device is turned
to MAR. Go to a Fiat Dealership, where
the "Scheduled Servicing Plan"
operations will be performed and the
message will be reset.
Driver Assist
This menu item allows you to view and
change the Adaptive Cruise Control
(ACC) settings on the instrument panel
display.
Audio
This Menu item allows some
information displayed on the
Uconnect™system to be repeated on
the instrument panel display (for further
information see the dedicated chapter).
Phone
(where provided)
This Menu item allows some
information displayed on the
Uconnect™system to be repeated on
the instrument panel display (for further
information see the dedicated chapter).
The information displayed includes the
mobile pairing condition (mobile paired
or not paired), active/incoming/on hold
calls and the management of double
calls (first incoming, second on hold,
etc.).In the phone menu, you can also select
3 sub-menus “SMS reader”, “recent
calls” and “favourite numbers” (available
with theUconnect™7'' HDsystem),
which can be selected with the arrows
or. This menu can also be used
to select and manage the last 10 calls
or the last 10 SMS using the directional
buttons on the steering wheel.
Navigation
(where provided)
This Menu item allows some
information displayed on the
Uconnect™ 5"o7" HDsystem to be
shown on the instrument panel display
(for further information see the
dedicated chapter).
Alerts
This menu item displays information/
failure messages stored by the system.
System Vehicle
This menu item allows you to change
the settings for:
Display;
Units;
Clock & Date;
Safety;
Safety & Assistance;
Lights;
Doors & Locks.Display
By selecting item "Display" you can
access the following settings:
System Display (changing instrument
panel display settings): this menu item
makes it possible to change the
displaying of the information, for
example the Compass (where present),
Outside temperature, Date (day/month),
Time (hours/minutes), Audio information
(where present). Selecting “Reset of the
default settings” makes it possible to
reset and restore the default settings;
Language: allows you to select the
language for showing the
information/warnings;
See phone: used to activate/
deactivate the display of pop-ups on
the instrument panel when there are
incoming calls, outgoing calls, on hold
calls, audio conference and incoming
SMS (where available);
See navigation: allows you to display
the information about the Navigation
mode on the instrument panel;
Automatic Trip B reset: allows you to
set the reset options for Trip B;
Display lighting: this function is used
to set the brightness level (8 levels) for
the display and all the other backlit
components. The display brightness
can be adjusted in all environmental
conditions, whereas all the other
components (e.g. climate control, radio,
41
When the following scheduled servicing
Page 48 of 240
Warning light What it means
ENGINE COOLANT TEMPERATURE TOO HIGH
The warning light on the display lights up when the engine has overheated.
In normal driving conditions: stop the car, switch off the engine and check that the coolant level in the
reservoir is not below the MIN mark. In this case, wait for the engine to cool down, then slowly and
carefully open the cap, top up with coolant and check that the level is between the MIN and MAX marks
on the reservoir itself. Also check visually for any fluid leaks. If, when restarting, the warning light on the
display switches on again, contact a Fiat Dealership;
If the vehicle is used under demanding conditions(e.g. in high-performance driving): slow down
and, if the warning light stays on, stop the vehicle. Stop for two or three minutes with the engine running
and slightly accelerated to facilitate better coolant circulation, then turn the engine off. Check that the
coolant level is correct as described above.
IMPORTANT Over demanding routes, it is advisable to keep the engine running and slightly accelerated
for a few minutes before turning it off.
AIRBAG FAILURE
If the warning light switches on constantly, this indicates a failure in the airbag system.
31) 32)
WARNING
31)If, when the ignition device is turned to MAR, thewarning light does not switch on or stays on whilst driving, a failure may have
occurred in the restraint systems. In this case the airbags or pretensioners may not be deployed in an impact or, in a lower number of cases,
they may be deployed accidentally. Before continuing, contact a Fiat Dealership immediately to have the system checked.
32)The failure of the
warning light is signalled by the lighting up of thesymbol on the instrument panel display (or, for versions where
provided, by the flashing of the generic failure warning light). In this case, the warning light may not indicate any faults with the restraint
systems. Before continuing, contact a Fiat Dealership immediately to have the system checked
46
KNOWING THE INSTRUMENT PANEL
Page 66 of 240
removing the decorative cover trim,
could be required. For this operation,
contact a Fiat Dealership.
IMPORTANT It is recommended that
you do not install devices, accessories
or aerodynamic attachments in front of
the sensor or darken it in any way, as
this can compromise the correct
functioning of the system. Any
modifications to the vehicle’s geometry
or its front area (including repairs not
done by the Fiat Dealership) can affect
the proper operation of the device.
Frontal collision alarm with active
braking
(where provided)
If this functions is enabled and the
system detects the risk of a collision, it
can activate the brakes to slow the car
down.
This function applies an additional
braking pressure if the braking pressure
applied by the driver does not suffice to
prevent potential frontal impact.
The function is active with speed above
7 km/h.
Driving in special conditions
In certain driving conditions, such as,
for example:
driving close to a bend;
vehicles with small dimensions
and/or not aligned in the driving lane;
lane change by other vehicles;
vehicles travelling at right angles to
the vehicle.
The system’s intervention might be
unexpected or delayed. The driver must
therefore be very careful, keeping
control of the vehicle to drive in
complete safety.
IMPORTANT In particularly complex
traffic conditions, the driver can
deactivate the system through the
Menu.
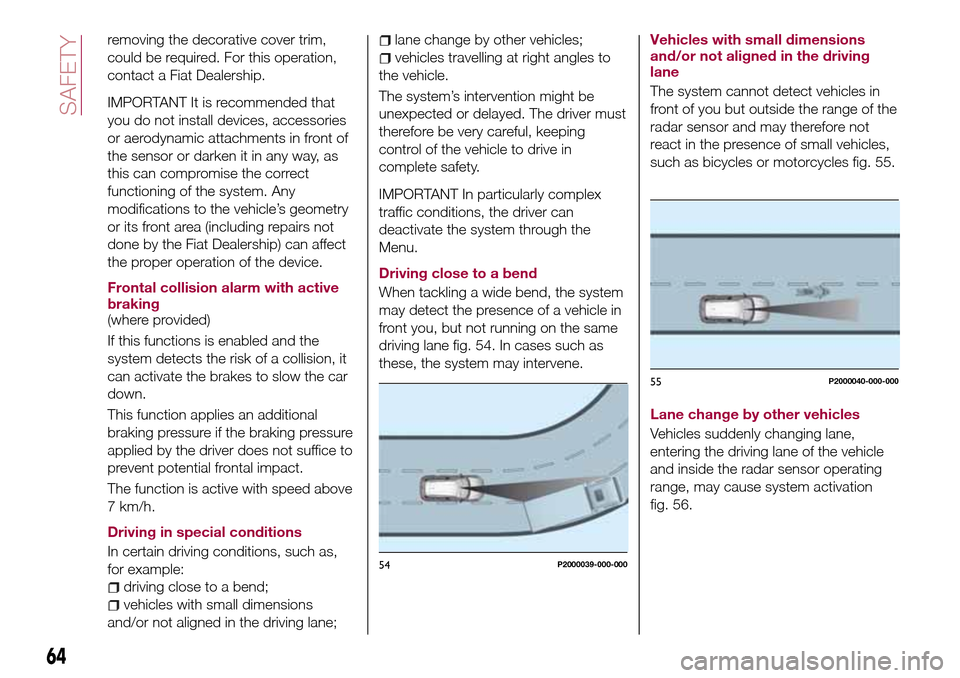
Driving close to a bend
When tackling a wide bend, the system
may detect the presence of a vehicle in
front you, but not running on the same
driving lane fig. 54. In cases such as
these, the system may intervene.Vehicles with small dimensions
and/or not aligned in the driving
lane
The system cannot detect vehicles in
front of you but outside the range of the
radar sensor and may therefore not
react in the presence of small vehicles,
such as bicycles or motorcycles fig. 55.
Lane change by other vehicles
Vehicles suddenly changing lane,
entering the driving lane of the vehicle
and inside the radar sensor operating
range, may cause system activation
fig. 56.
54P2000039-000-000
55P2000040-000-000
64
SAFETY
Page 68 of 240
each time tyre pressure is modified;
when even only one tyre is changed;
when tyres are rotated/inverted;
when the space-saver wheel is fitted.
Before carrying out the RESET
procedure, inflate the tyres to the rated
pressure values specified in the inflation
pressure table (see "Wheels" paragraph
in the "Technical specifications"
chapter).
If the RESET is not carried out, in all
above cases, the
warning light may
give false indications on one or more
tyres.
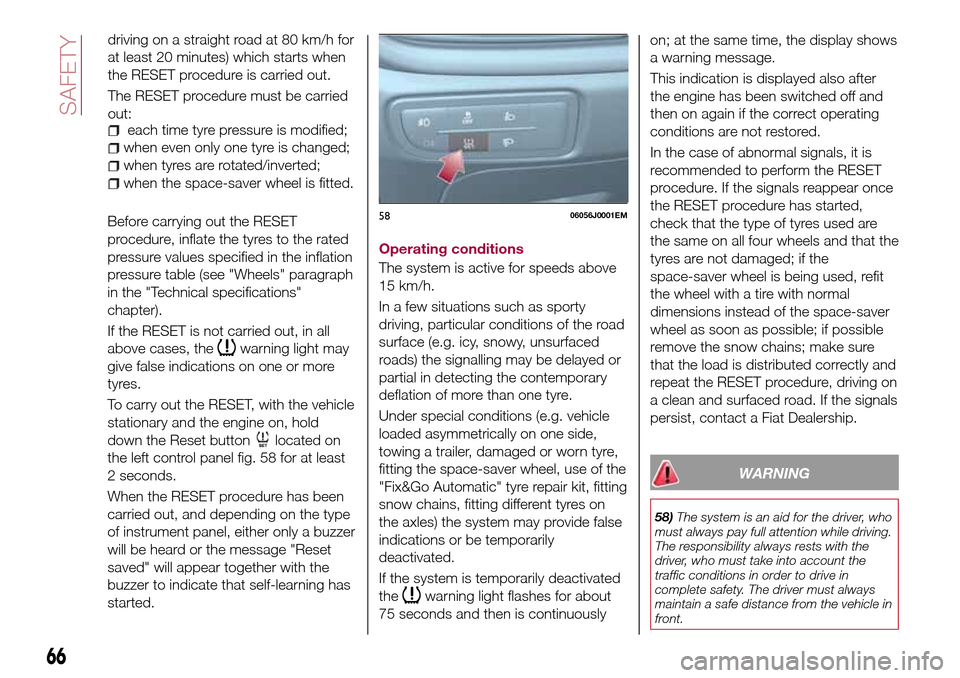
To carry out the RESET, with the vehicle
stationary and the engine on, hold
down the Reset button
located on
the left control panel fig. 58 for at least
2 seconds.
When the RESET procedure has been
carried out, and depending on the type
of instrument panel, either only a buzzer
will be heard or the message "Reset
saved" will appear together with the
buzzer to indicate that self-learning has
started.Operating conditions
The system is active for speeds above
15 km/h.
In a few situations such as sporty
driving, particular conditions of the road
surface (e.g. icy, snowy, unsurfaced
roads) the signalling may be delayed or
partial in detecting the contemporary
deflation of more than one tyre.
Under special conditions (e.g. vehicle
loaded asymmetrically on one side,
towing a trailer, damaged or worn tyre,
fitting the space-saver wheel, use of the
"Fix&Go Automatic" tyre repair kit, fitting
snow chains, fitting different tyres on
the axles) the system may provide false
indications or be temporarily
deactivated.
If the system is temporarily deactivated
the
warning light flashes for about
75 seconds and then is continuouslyon; at the same time, the display shows
a warning message.
This indication is displayed also after
the engine has been switched off and
then on again if the correct operating
conditions are not restored.
In the case of abnormal signals, it is
recommended to perform the RESET
procedure. If the signals reappear once
the RESET procedure has started,
check that the type of tyres used are
the same on all four wheels and that the
tyres are not damaged; if the
space-saver wheel is being used, refit
the wheel with a tire with normal
dimensions instead of the space-saver
wheel as soon as possible; if possible
remove the snow chains; make sure
that the load is distributed correctly and
repeat the RESET procedure, driving on
a clean and surfaced road. If the signals
persist, contact a Fiat Dealership.
WARNING
58)The system is an aid for the driver, who
must always pay full attention while driving.
The responsibility always rests with the
driver, who must take into account the
traffic conditions in order to drive in
complete safety. The driver must always
maintain a safe distance from the vehicle in
front.
5806056J0001EM
66
SAFETY
driving on a straight road at 80 km/h for
at least 20 minutes) which starts when
the RESET procedure is carried out.
The RESET procedure must be carried
out:
Page 69 of 240

59)If the driver depresses the brake pedal
fully or carries out a fast steering during
system operation, the automatic braking
function may stop (e.g. to allow a possible
manoeuvre to avoid the obstacle).
60)The system intervenes on vehicles
travelling in the same lane. People, animals
and things (e.g. pushchairs) are not taken
into consideration.
61)If the car must be placed on a roller
bench for maintenance interventions or if it
is washed in an automatic roller washing
tunnel with an obstacle in the front part
(e.g. another car, a wall or another
obstacle), the system may detect its
presence and activate. In this case the
system must be deactivated through the
settings of theUconnect™5"or7" HD
system.
62)If the iTMPS system signals a pressure
decrease on the tyres, it is recommended
to check the pressure on all four tyres.
63)The iTPMS does not relieve the driver
from the obligation to check the tyre
pressure every month; it is not even to be
considered a replacing system for
maintenance or a safety system.
64)Tyre pressure must be checked with
tyres cold. Should it become necessary for
whatever reason to check pressure with
warm tyres, do not reduce pressure even
though it is higher than the prescribed
value, but repeat the check when tyres are
cold
65)The iTPMS cannot indicate sudden tyre
pressure drops (e.g. if a tyre bursts). In this
case, stop the vehicle, braking with caution
and avoiding abrupt steering.
66)The system only warns that the tyre
pressure is low: it is not able to inflate
them.67)Insufficient tyre inflation increases fuel
consumption, reduces the tread duration
and may affect the capacity to drive safely.
IMPORTANT
18)The system may have limited or absent
operation due to weather conditions such
as: heavy rain, hail, thick fog, heavy snow.
19)The section of the bumper before the
sensor must not be covered with
adhesives, auxiliary headlights or any other
object.
20)System intervention might be
unexpected or delayed when other vehicles
transport loads projecting from the side,
above or from the rear, with respect to the
normal size of the vehicle.
21)Operation can be adversely affected by
any structural change made to the vehicle,
such as a modification to the front
geometry, tyre change, or a heavier load
than the standard load of the vehicle.
22)Incorrect repairs made on the front part
of the vehicle (e.g. bumper, chassis) may
alter the position of the radar sensor, and
adversely affect its operation. Go to a Fiat
Dealership for any operation of this type.
23)Do not tamper nor operate on the radar
sensor. In the event of a sensor failure,
contact a Fiat Dealership.
24)When towing a trailer (with modules
installed after purchasing the vehicle), a
vehicle or during loading manoeuvres on a
vehicle transporter (or in vehicle for
transport), the system must be deactivated
via theUconnect™5"or7" HDsystem.25)Do not wash with high-pressure jets in
the bumper lower area: in particular do not
operate on the system's electrical
connector.
26)Be careful in the case of repairs and
new paintings in the area around the
sensor (panel covering the sensor on the
left side of the bumper). In the event of a
frontal impact the sensor may automatically
deactivate and display a warning to indicate
that the sensor needs to be repaired. Even
without a malfunction warning, deactivate
the system operation if you think that the
position of the radar sensor has changed
(e.g. due to low-speed frontal impact as
during parking manoeuvres). In these
cases, go to a Fiat Dealership to have the
radar sensor realigned or replaced.
67
Page 88 of 240
82)After installing a child restraint system,
do not move the seat: always remove the
child restraint system before making any
adjustment.
83)Always make sure that the diagonal
section of the seat belt does not pass
under the arms or behind the back of the
child. In the event of an accident the seat
belt will not be able to secure the child,
with the risk of injury, including fatal injury.
Therefore the child must always wear the
seat belt correctly.
84)Do not use the same lower anchorage
to install more than one child restraint
system.
85)If a Universal ISOFIX child seat system
is not fixed to all three anchorages, it will
not be able to protect the child correctly. In
a crash, the child could be seriously or
fatally injured.
86)Fit the child restraint system when the
car is stationary. The child restraint system
is correctly fixed to the brackets when you
hear the click. Follow the instructions for
assembly, disassembly and positioning that
the Manufacturer must supply with the
child restraint system.SUPPLEMENTARY
RESTRAINT SYSTEM
(SRS) - AIRBAG
The vehicle is equipped with:
front driver airbag;
front passenger airbag;
driver and passenger front side bags
for pelvis, chest and shoulder
protection (Side bags);
side bags for head protection of front
seat passengers and rear side seat
passengers (window bag).
The location of the airbags on the
vehicle is marked by the word
"AIRBAG" in the middle of the steering
wheel, on the dashboard, on the side
trim or on a label placed next to the
airbag deployment area.
FRONT AIRBAGS
The front (driver and passenger) airbags
protect the front seat occupants in the
event of head-on crashes of
medium-high severity, by placing the
cushion between the occupant and the
steering wheel or dashboard.
Therefore non-activation of airbags in
other types of collisions (side impacts,
rear shunts, roll-overs, etc.) does not
indicate a system malfunction.
Driver and passenger front airbags are
not a replacement of but
complementary to the seat belts, whichshould always be worn, as specified by
law in Europe and most non-European
countries.
In the event of impact, those not
wearing a seat belt are projected
forwards and may come into contact
with the bag which is still inflating. The
protection offered by the bag is
compromised in these circumstances.
Front airbags may not activate in the
following situations:
frontal impacts against highly
deformable objects not involving the
front surface of the vehicle (e.g. wing
collision against guard rail, etc.);
vehicle wedging under other
vehicles or protective barriers (e.g.
trucks or guard rails).
Failure to activate in the conditions
described above is due to the fact that
they may not provide any additional
protection compared with seat belts, so
their activation would be inappropriate.
In these cases, non-deployment does
not indicate a system malfunction.
The driver's and passenger's front
airbags have been designed and
calibrated to protect front seat
occupants wearing seat belts. At their
maximum inflation, their volume fills
most of the space between the steering
wheel and the driver and between the
dashboard and the passenger.
86
SAFETY
Page 109 of 240

ELECTRONIC CRUISE
CONTROL MODE
Electronic Cruise Control mode is
available for travelling at constant speed
in addition to the Adaptive Cruise
Control (ACC) mode.
If the Adaptive Cruise Control (ACC)
function is implemented on the vehicle,
the electronic Cruise Control works in
the same manner as the ACC (by
pressing the
button of the Cruise
Control) with the difference that:
it does not hold the distance from the
vehicle ahead;
the device keeps working if the
radar sensor is obstructed.
Before returning to the previously set
speed, bring the speed close to that
value, press the RES (Resume) button
and then release it.
WARNING
114)Pay the utmost attention while driving
at all times and be always ready to press
the brakes if needed.
115)The system is an aid for the driver,
who must always pay full attention while
driving. The responsibility always rests with
the driver, who must take into account the
traffic conditions in order to drive in
complete safety. The driver must always
maintain a safe distance from the vehicle in
front.
116)The device is not activated in
presence of pedestrians, oncoming
vehicles in the opposite direction of travel
or moving in the crosswise direction and
stationary objects (e.g. a vehicle standing
in a queue or a broken down vehicle).
117)The device cannot take account of
road, traffic and weather conditions, and
conditions of poor visibility (e.g. fog).
118)The device cannot take account of
road, traffic and weather conditions, and
conditions of poor visibility (e.g. fog).
119)The device cannot apply the
maximum braking force: the car will not be
stopped completely.
IMPORTANT
34)The system may have limited or absent
operation due to weather conditions such
as: heavy rain, hail, thick fog, heavy snow.35)The section of the bumper before the
sensor must not be covered with
adhesives, auxiliary headlights or any other
object.
36)Operation can be adversely affected by
any structural change made to the vehicle,
such as a modification to the front
geometry, tyre change, or a heavier load
than the standard load of the vehicle.
37)Incorrect repairs made on the front part
of the vehicle (e.g. bumper, chassis) may
alter the position of the radar sensor, and
adversely affect its operation. Go to a Fiat
Dealership for any operation of this type.
38)Do not tamper nor operate on the radar
sensor. In the event of a sensor failure,
contact a Fiat Dealership.
39)Do not wash with high-pressure jets in
the bumper lower area: in particular do not
operate on the system's electrical
connector.
40)Be careful in the case of repairs and
new paintings in the area around the
sensor (panel covering the sensor on the
left side of the bumper). In the event of a
frontal impact the sensor may automatically
deactivate and display a warning to indicate
that the sensor needs to be repaired. Even
without a malfunction warning, deactivate
the system operation if you think that the
position of the radar sensor has changed
(e.g. due to low-speed frontal impact as
during parking manoeuvres). In these
cases, go to a Fiat Dealership to have the
radar sensor realigned or replaced.
94P2000046-000-000
107
Page 135 of 240
CHANGING A WHEEL
JACK
Please note that:
the jack weight is 2.15 kg;
the jack cannot be repaired and in
the event of a fault it must be replaced
by another genuine one;
No tool other than its cranking device
may be fitted on the jack.
Servicing
Prevent any dirt from depositing on
the "worm screw";
Keep the "worm screw" lubricated;
Never modify the jack.
Conditions for non-use
Temperatures below −40°C;
On sandy or muddy ground;
On uneven ground;
On steep roads;
In extreme weather conditions:
thunderstorms, typhoons, hurricanes,
blizzards, storms, etc.
In direct contact with the engine or
for repairs under the vehicle;
On boats.
CHANGING PROCEDURE
135) 136) 137) 138) 139)
49) 50)
Proceed as follows:
stop the car in a position that is not
dangerous for oncoming traffic where
you can change the wheel safely. The
ground must be flat and sufficiently
compact;
stop the engine, engage the hazard
warning lights and the parking brake;
engage first gear or reverse;
wear the reflective safety jacket
before getting out of the car (anyway
comply with the laws in force in the
country you are driving in);
open the boot and if there is a cargo
box, remove it as described in the
“Cargo box” paragraph in the “Getting
to know the car” chapter.
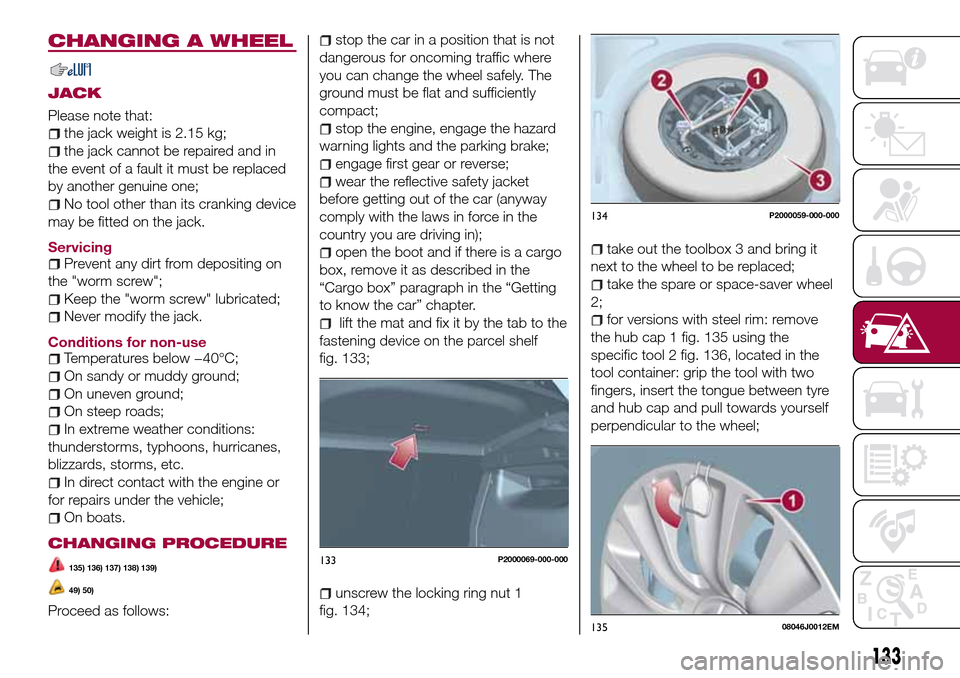
lift the mat and fix it by the tab to the
fastening device on the parcel shelf
fig. 133;
unscrew the locking ring nut 1
fig. 134;
take out the toolbox 3 and bring it
next to the wheel to be replaced;
take the spare or space-saver wheel
2;
for versions with steel rim: remove
the hub cap 1 fig. 135 using the
specific tool 2 fig. 136, located in the
tool container: grip the tool with two
fingers, insert the tongue between tyre
and hub cap and pull towards yourself
perpendicular to the wheel;
133P2000069-000-000
134P2000059-000-000
13508046J0012EM
133