2016 FIAT TIPO 5DOORS STATION WAGON buttons
[x] Cancel search: buttonsPage 10 of 240

INSTRUMENT PANEL
Version with Uconnect™3" Radio, Uconnect™5" LIVE and Uconnect™5" Nav
LIVE
1. Adjustable side air diffusers 2. Left stalk: direction indicators, main beam headlights, flashings 3. Instrument panel
4. Steering wheel controls 5. Right stalk: windscreen wiper/washer, rear window wiper/washer, rain sensor sensitivity level
setting 6.Uconnect™7. Control buttons 8. Passenger front airbag 9. Adjustable central air diffusers 10. Glove
compartment 11. Climate controls 12. Buttons on the central console: seat heating, USB port + AUX plug panel,
socket/cigarette lighter 13. Ignition device 14. Driver front airbag 15. Steering wheel controls 16. Control panel: front fog
lights (where present), rear fog lights, headlight alignment adjustment, iTPMS reset, ESC OFF (where present).
1P2000085-000-000
8
KNOWING YOUR CAR
Page 11 of 240

Version with Uconnect™7" HD LIVE and Uconnect™7" HD Nav LIVE
1. Adjustable side air diffusers 2. Left stalk: direction indicators, main beam headlights, flashings 3. Instrument panel
4. Steering wheel controls 5. Right stalk: windscreen wiper/washer, rear window wiper/washer, rain sensor sensitivity level
setting 6.Uconnect™7. Control buttons 8. Passenger front airbag 9. Adjustable central air diffusers 10. Glove
compartment 11. Climate controls 12. Buttons on the central console: seat heating, USB port + AUX plug panel,
socket/cigarette lighter 13. Ignition device 14. Driver front airbag 15. Steering wheel controls 16. Control panel: front fog
lights (where present), rear fog lights, headlight alignment adjustment, iTPMS reset, ESC OFF (where present).
2P2000050-000-000
9
Page 17 of 240
SEATS
The front seats can be adjusted so as
to ensure maximum comfort for the
occupants.
Driver seat adjustment must also be
carried out remembering that, keeping
the shoulders resting firmly against the
backrest, the wrists must be able to
reach the top of the steering wheel rim.
It must also be possible to fully depress
the clutch pedal with the left foot.
FRONT SEATS WITH
MANUAL ADJUSTMENT
10)
4)
Longitudinal adjustment
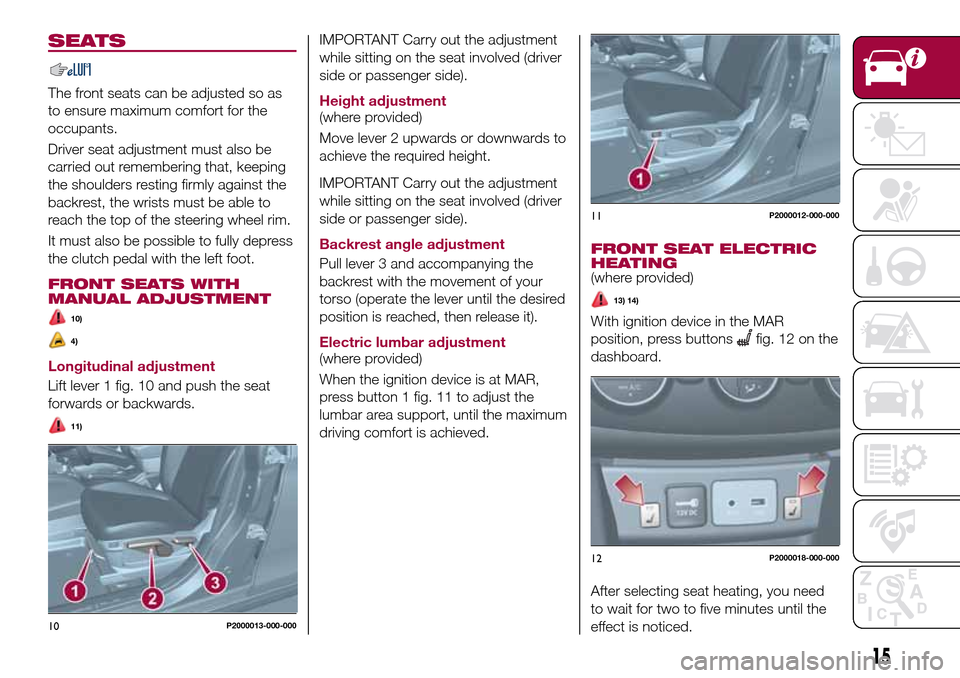
Lift lever 1 fig. 10 and push the seat
forwards or backwards.
11)
IMPORTANT Carry out the adjustment
while sitting on the seat involved (driver
side or passenger side).
Height adjustment
(where provided)
Move lever 2 upwards or downwards to
achieve the required height.
IMPORTANT Carry out the adjustment
while sitting on the seat involved (driver
side or passenger side).
Backrest angle adjustment
Pull lever 3 and accompanying the
backrest with the movement of your
torso (operate the lever until the desired
position is reached, then release it).
Electric lumbar adjustment
(where provided)
When the ignition device is at MAR,
press button 1 fig. 11 to adjust the
lumbar area support, until the maximum
driving comfort is achieved.FRONT SEAT ELECTRIC
HEATING
(where provided)
13) 14)
With ignition device in the MAR
position, press buttons
fig. 12 on the
dashboard.
After selecting seat heating, you need
to wait for two to five minutes until the
effect is noticed.
10P2000013-000-000
11P2000012-000-000
12P2000018-000-000
15
Page 20 of 240
HEAD RESTRAINTS
15)
FRONT HEAD
RESTRAINTS
Adjustment
They can be adjusted to 4 height
positions (completely raised / 2
intermediate positions / completely
lowered).
Upward adjustment: raise the head
restraint until it clicks into place.
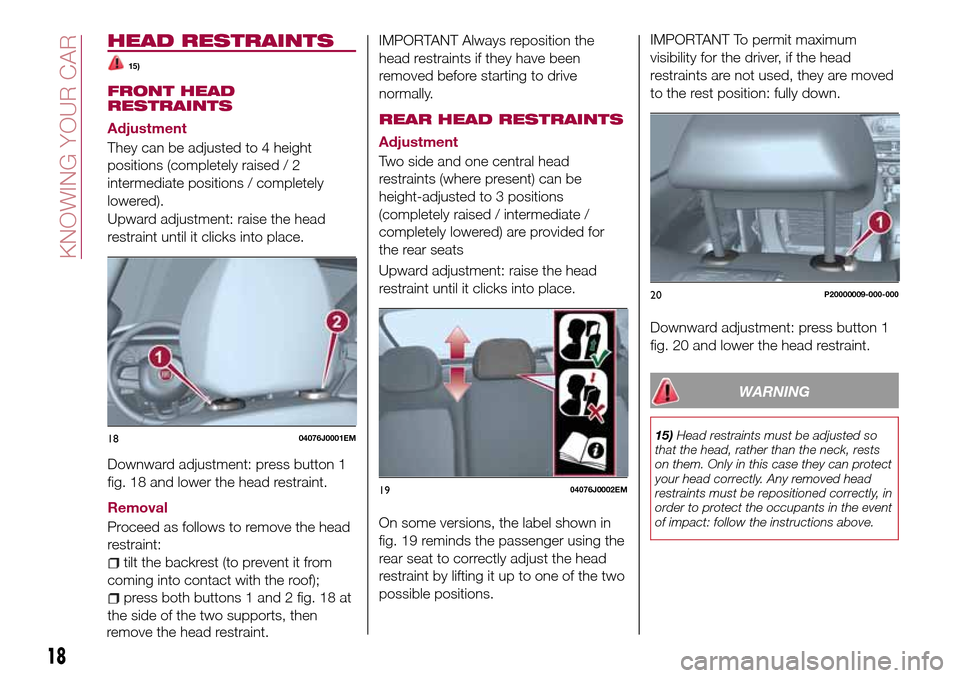
Downward adjustment: press button 1
fig. 18 and lower the head restraint.
Removal
Proceed as follows to remove the head
restraint:
tilt the backrest (to prevent it from
coming into contact with the roof);
press both buttons 1 and 2 fig. 18 at
the side of the two supports, then
remove the head restraint.
IMPORTANT Always reposition the
head restraints if they have been
removed before starting to drive
normally.
REAR HEAD RESTRAINTS
Adjustment
Two side and one central head
restraints (where present) can be
height-adjusted to 3 positions
(completely raised / intermediate /
completely lowered) are provided for
the rear seats
Upward adjustment: raise the head
restraint until it clicks into place.
On some versions, the label shown in
fig. 19 reminds the passenger using the
rear seat to correctly adjust the head
restraint by lifting it up to one of the two
possible positions.
IMPORTANT To permit maximum
visibility for the driver, if the head
restraints are not used, they are moved
to the rest position: fully down.
Downward adjustment: press button 1
fig. 20 and lower the head restraint.
WARNING
15)Head restraints must be adjusted so
that the head, rather than the neck, rests
on them. Only in this case they can protect
your head correctly. Any removed head
restraints must be repositioned correctly, in
order to protect the occupants in the event
of impact: follow the instructions above.1804076J0001EM
1904076J0002EM
20P20000009-000-000
18
KNOWING YOUR CAR
Page 32 of 240
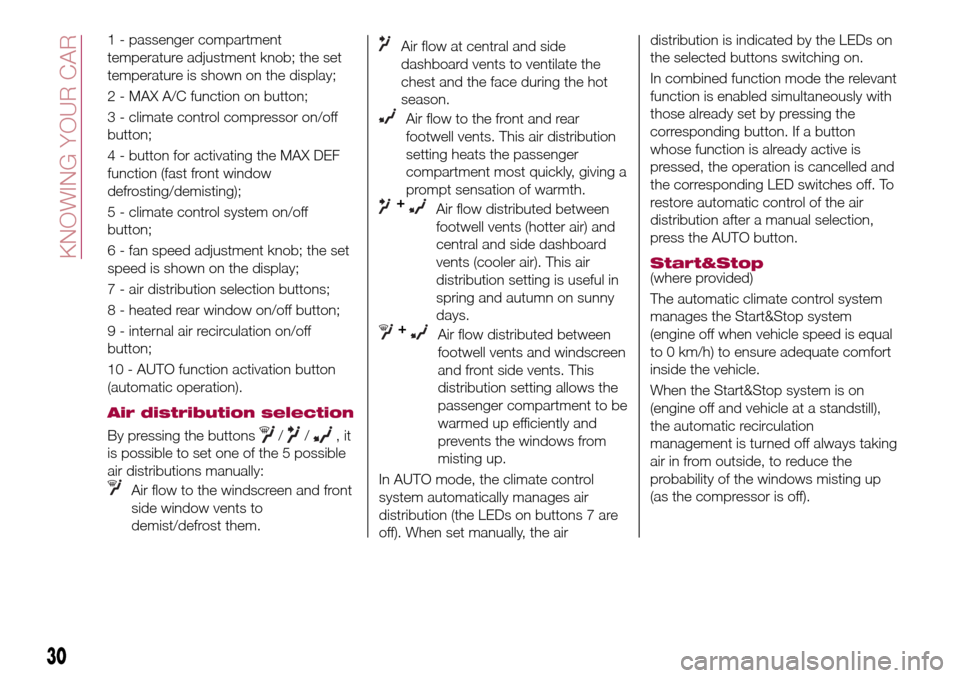
1 - passenger compartment
temperature adjustment knob; the set
temperature is shown on the display;
2 - MAX A/C function on button;
3 - climate control compressor on/off
button;
4 - button for activating the MAX DEF
function (fast front window
defrosting/demisting);
5 - climate control system on/off
button;
6 - fan speed adjustment knob; the set
speed is shown on the display;
7 - air distribution selection buttons;
8 - heated rear window on/off button;
9 - internal air recirculation on/off
button;
10 - AUTO function activation button
(automatic operation).
Air distribution selection
By pressing the buttons//,it
is possible to set one of the 5 possible
air distributions manually:
Air flow to the windscreen and front
side window vents to
demist/defrost them.
Air flow at central and side
dashboard vents to ventilate the
chest and the face during the hot
season.
Air flow to the front and rear
footwell vents. This air distribution
setting heats the passenger
compartment most quickly, giving a
prompt sensation of warmth.
+Air flow distributed between
footwell vents (hotter air) and
central and side dashboard
vents (cooler air). This air
distribution setting is useful in
spring and autumn on sunny
days.
+Air flow distributed between
footwell vents and windscreen
and front side vents. This
distribution setting allows the
passenger compartment to be
warmed up efficiently and
prevents the windows from
misting up.
In AUTO mode, the climate control
system automatically manages air
distribution (the LEDs on buttons 7 are
off). When set manually, the airdistribution is indicated by the LEDs on
the selected buttons switching on.
In combined function mode the relevant
function is enabled simultaneously with
those already set by pressing the
corresponding button. If a button
whose function is already active is
pressed, the operation is cancelled and
the corresponding LED switches off. To
restore automatic control of the air
distribution after a manual selection,
press the AUTO button.
Start&Stop(where provided)
The automatic climate control system
manages the Start&Stop system
(engine off when vehicle speed is equal
to 0 km/h) to ensure adequate comfort
inside the vehicle.
When the Start&Stop system is on
(engine off and vehicle at a standstill),
the automatic recirculation
management is turned off always taking
air in from outside, to reduce the
probability of the windows misting up
(as the compressor is off).
30
KNOWING YOUR CAR
Page 34 of 240
ELECTRIC WINDOWS
22)
Electric windows operate with the
ignition device at MAR and for about 3
minutes after the ignition device
switches to STOP (or key removed).
When one of the front doors is opened
this operation is disabled.
Driver side front door controls
All windows can be controlled from the
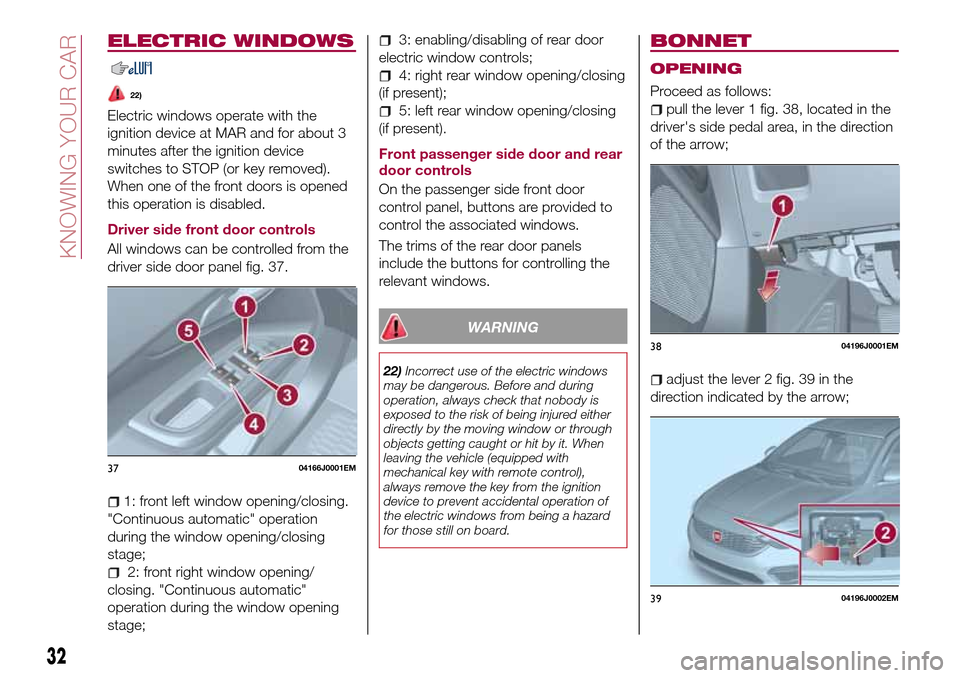
driver side door panel fig. 37.
1: front left window opening/closing.
"Continuous automatic" operation
during the window opening/closing
stage;
2: front right window opening/
closing. "Continuous automatic"
operation during the window opening
stage;
3: enabling/disabling of rear door
electric window controls;
4: right rear window opening/closing
(if present);
5: left rear window opening/closing
(if present).
Front passenger side door and rear
door controls
On the passenger side front door
control panel, buttons are provided to
control the associated windows.
The trims of the rear door panels
include the buttons for controlling the
relevant windows.
WARNING
22)Incorrect use of the electric windows
may be dangerous. Before and during
operation, always check that nobody is
exposed to the risk of being injured either
directly by the moving window or through
objects getting caught or hit by it. When
leaving the vehicle (equipped with
mechanical key with remote control),
always remove the key from the ignition
device to prevent accidental operation of
the electric windows from being a hazard
for those still on board.
BONNET
OPENING
Proceed as follows:
pull the lever 1 fig. 38, located in the
driver's side pedal area, in the direction
of the arrow;
adjust the lever 2 fig. 39 in the
direction indicated by the arrow;
3704166J0001EM
3804196J0001EM
3904196J0002EM
32
KNOWING YOUR CAR
Page 41 of 240
DISPLAY
DESCRIPTION
The vehicle is equipped with a display
that can show useful information to the
driver while driving.
With the ignition device in STOP
position and ignition key removed, the
display lights up and shows the time
and total odometer reading (in km or
miles) for a few seconds when a door is
opened/closed.
GEAR SHIFT INDICATOR
The Gear Shift Indicator (GSI) system
advises the driver to change gear
through a special indication on the
display.
Through the GSI, the driver is informed
that the gear change will allow a
reduction in fuel consumption.
When the
symbol appears on the
display, the GSI suggests switching to a
higher gear, while when the
symbol
is displayed, the GSI suggests
changing to a lower gear.
The indication in the display remains
until a gear is shifted or the driving
conditions go back to a situation where
gearshifting is not required to improve
consumption.
RECONFIGURABLE
MULTIFUNCTION
DISPLAY
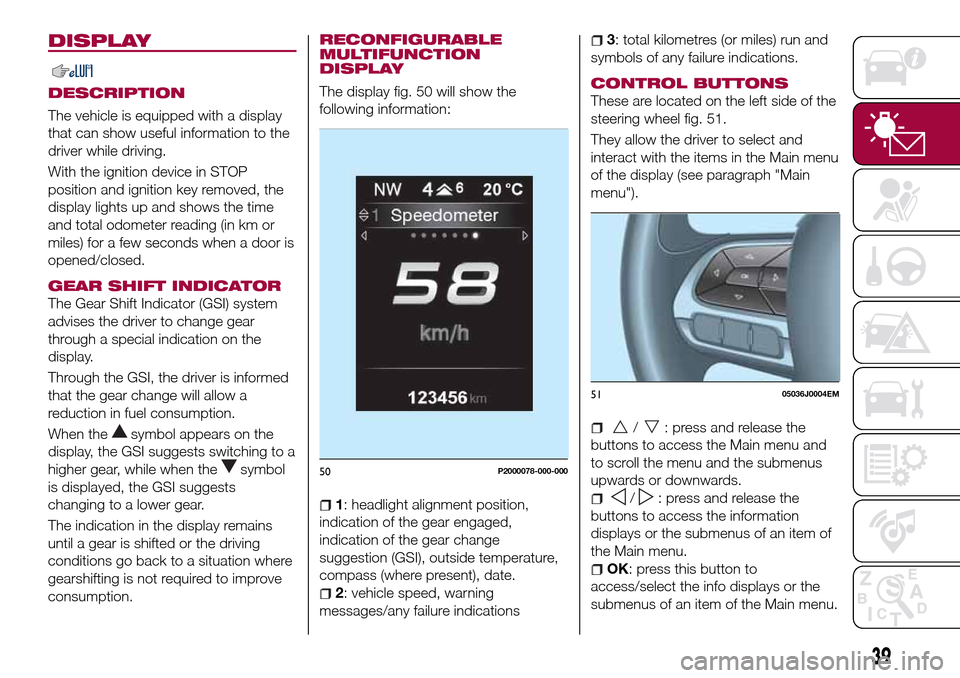
The display fig. 50 will show the
following information:
1: headlight alignment position,
indication of the gear engaged,
indication of the gear change
suggestion (GSI), outside temperature,
compass (where present), date.
2: vehicle speed, warning
messages/any failure indications
3: total kilometres (or miles) run and
symbols of any failure indications.
CONTROL BUTTONS
These are located on the left side of the
steering wheel fig. 51.
They allow the driver to select and
interact with the items in the Main menu
of the display (see paragraph "Main
menu").
/: press and release the
buttons to access the Main menu and
to scroll the menu and the submenus
upwards or downwards.
/: press and release the
buttons to access the information
displays or the submenus of an item of
the Main menu.
OK: press this button to
access/select the info displays or the
submenus of an item of the Main menu.
50P2000078-000-000
5105036J0004EM
39
Page 42 of 240
to reset the displayed/selected
functions.
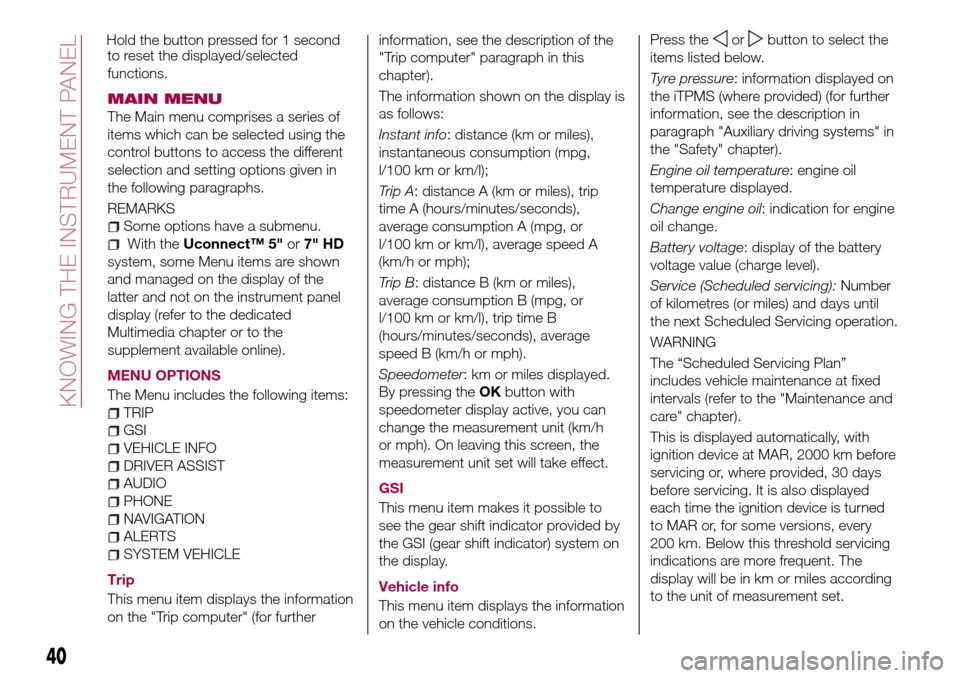
MAIN MENU
The Main menu comprises a series of
items which can be selected using the
control buttons to access the different
selection and setting options given in
the following paragraphs.
REMARKS
Some options have a submenu.
With theUconnect™ 5"or7" HD
system, some Menu items are shown
and managed on the display of the
latter and not on the instrument panel
display (refer to the dedicated
Multimedia chapter or to the
supplement available online).
MENU OPTIONS
The Menu includes the following items:
TRIP
GSI
VEHICLE INFO
DRIVER ASSIST
AUDIO
PHONE
NAVIGATION
ALERTS
SYSTEM VEHICLE
Trip
This menu item displays the information
on the "Trip computer" (for furtherinformation, see the description of the
"Trip computer" paragraph in this
chapter).
The information shown on the display is
as follows:
Instant info: distance (km or miles),
instantaneous consumption (mpg,
l/100 km or km/l);
Trip A: distance A (km or miles), trip
time A (hours/minutes/seconds),
average consumption A (mpg, or
l/100 km or km/l), average speed A
(km/h or mph);
Trip B: distance B (km or miles),
average consumption B (mpg, or
l/100 km or km/l), trip time B
(hours/minutes/seconds), average
speed B (km/h or mph).
Speedometer: km or miles displayed.
By pressing theOKbutton with
speedometer display active, you can
change the measurement unit (km/h
or mph). On leaving this screen, the
measurement unit set will take effect.
GSI
This menu item makes it possible to
see the gear shift indicator provided by
the GSI (gear shift indicator) system on
the display.
Vehicle info
This menu item displays the information
on the vehicle conditions.Press the
orbutton to select the
items listed below.
Tyre pressure: information displayed on
the iTPMS (where provided) (for further
information, see the description in
paragraph "Auxiliary driving systems" in
the "Safety" chapter).
Engine oil temperature: engine oil
temperature displayed.
Change engine oil: indication for engine
oil change.
Battery voltage: display of the battery
voltage value (charge level).
Service (Scheduled servicing):Number
of kilometres (or miles) and days until
the next Scheduled Servicing operation.
WARNING
The “Scheduled Servicing Plan”
includes vehicle maintenance at fixed
intervals (refer to the "Maintenance and
care" chapter).
This is displayed automatically, with
ignition device at MAR, 2000 km before
servicing or, where provided, 30 days
before servicing. It is also displayed
each time the ignition device is turned
to MAR or, for some versions, every
200 km. Below this threshold servicing
indications are more frequent. The
display will be in km or miles according
to the unit of measurement set.
40
KNOWING THE INSTRUMENT PANEL
Hold the button pressed for 1 second