2016 FIAT TIPO 5DOORS STATION WAGON oil level
[x] Cancel search: oil levelPage 42 of 240
to reset the displayed/selected
functions.
MAIN MENU
The Main menu comprises a series of
items which can be selected using the
control buttons to access the different
selection and setting options given in
the following paragraphs.
REMARKS
Some options have a submenu.
With theUconnect™ 5"or7" HD
system, some Menu items are shown
and managed on the display of the
latter and not on the instrument panel
display (refer to the dedicated
Multimedia chapter or to the
supplement available online).
MENU OPTIONS
The Menu includes the following items:
TRIP
GSI
VEHICLE INFO
DRIVER ASSIST
AUDIO
PHONE
NAVIGATION
ALERTS
SYSTEM VEHICLE
Trip
This menu item displays the information
on the "Trip computer" (for furtherinformation, see the description of the
"Trip computer" paragraph in this
chapter).
The information shown on the display is
as follows:
Instant info: distance (km or miles),
instantaneous consumption (mpg,
l/100 km or km/l);
Trip A: distance A (km or miles), trip
time A (hours/minutes/seconds),
average consumption A (mpg, or
l/100 km or km/l), average speed A
(km/h or mph);
Trip B: distance B (km or miles),
average consumption B (mpg, or
l/100 km or km/l), trip time B
(hours/minutes/seconds), average
speed B (km/h or mph).
Speedometer: km or miles displayed.
By pressing theOKbutton with
speedometer display active, you can
change the measurement unit (km/h
or mph). On leaving this screen, the
measurement unit set will take effect.
GSI
This menu item makes it possible to
see the gear shift indicator provided by
the GSI (gear shift indicator) system on
the display.
Vehicle info
This menu item displays the information
on the vehicle conditions.Press the
orbutton to select the
items listed below.
Tyre pressure: information displayed on
the iTPMS (where provided) (for further
information, see the description in
paragraph "Auxiliary driving systems" in
the "Safety" chapter).
Engine oil temperature: engine oil
temperature displayed.
Change engine oil: indication for engine
oil change.
Battery voltage: display of the battery
voltage value (charge level).
Service (Scheduled servicing):Number
of kilometres (or miles) and days until
the next Scheduled Servicing operation.
WARNING
The “Scheduled Servicing Plan”
includes vehicle maintenance at fixed
intervals (refer to the "Maintenance and
care" chapter).
This is displayed automatically, with
ignition device at MAR, 2000 km before
servicing or, where provided, 30 days
before servicing. It is also displayed
each time the ignition device is turned
to MAR or, for some versions, every
200 km. Below this threshold servicing
indications are more frequent. The
display will be in km or miles according
to the unit of measurement set.
40
KNOWING THE INSTRUMENT PANEL
Hold the button pressed for 1 second
Page 53 of 240

SYMBOLS ON THE DISPLAY
Symbol What it means
DOOR OPEN
The symbol switches on when one or more doors are not completely shut (for versions/
markets, where provided). An acoustic signal is activated with the doors open and the car
moving. Close the doors properly.
ALTERNATOR FAILURE
If this symbol switches on when the engine is running, this indicates a vehicle recharging
system failure. Contact a Fiat Dealership as soon as possible.
BONNET NOT PROPERLY SHUT
The symbol switches on when the engine bonnet is not properly shut (for versions/markets,
where provided). Close the bonnet properly.
TAILGATE NOT PROPERLY SHUT
The symbol switches on when the tailgate is not properly shut (for versions/markets, where
provided). Close the tailgate correctly.
LOW ENGINE OIL PRESSURE
The symbol switches on in the case of insufficient engine oil pressure.
13)
IMPORTANT Do not use the vehicle until the failure has been solved. The switching on of the
symbol does not show the quantity of oil in the engine: the oil level must be checked manually.
ENGINE OIL PRESSURE SENSOR FAILURE
The symbol switches on constantly together with the message in the display in the case of
engine oil pressure sensor failure.
51
Page 58 of 240
Symbol What it means
ELECTRONIC CRUISE CONTROL
The symbol switches on if the electronic Cruise Control is activated.
IMPORTANT
13)If the symbol switches on when driving, stop the engine immediately and contact a Fiat Dealership.
14)Deteriorated engine oil should be replaced as soon as possible after thesymbol switches on, and never more than 500 km after it
first switches on. Failure to observe the above may result in severe damage to the engine and invalidate the warranty. Remember that when
this symbol comes on, it does not mean that the level of engine oil is low, so if it flashes you do not need to top up the engine oil.
15)If the symbol flashes when driving, contact a Fiat Dealership.
16)The presence of water in the fuel system circuit may cause severe damage to the injection system and irregular engine operation. If the
symbol is displayed contact a Fiat Dealership as soon as possible to bleed the system. If the above indications come on immediately after
refuelling, water has probably been poured into the tank: switch the engine off immediately and contact a Fiat Dealership.
17)Vehicle travel speed should always be adapted to the traffic and weather conditions, and must always comply with traffic regulations. The
engine can be stopped even if the DPF symbol is on: however, repeated interruptions of the regeneration process could cause premature
deterioration of the engine oil. For this reason it is always advisable to wait for the symbol to go off before turning off the engine, following the
instructions above. Do not complete the DPF regeneration process when the vehicle is stopped.
56
KNOWING THE INSTRUMENT PANEL
Page 147 of 240
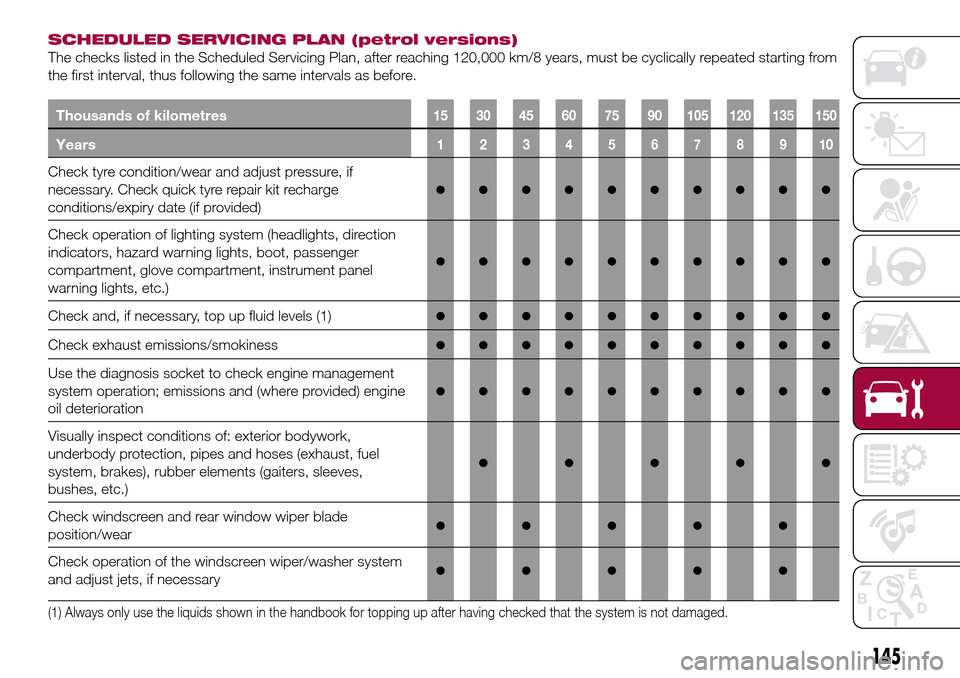
SCHEDULED SERVICING PLAN (petrol versions)
The checks listed in the Scheduled Servicing Plan, after reaching 120,000 km/8 years, must be cyclically repeated starting from
the first interval, thus following the same intervals as before.
Thousands of kilometres15 30 45 60 75 90 105 120 135 150
Years12345678910
Check tyre condition/wear and adjust pressure, if
necessary. Check quick tyre repair kit recharge
conditions/expiry date (if provided)
●●●●●●●●●●
Check operation of lighting system (headlights, direction
indicators, hazard warning lights, boot, passenger
compartment, glove compartment, instrument panel
warning lights, etc.)
●●●●●●●●●●
Check and, if necessary, top up fluid levels (1)●●●●●●●●●●
Check exhaust emissions/smokiness●●●●●●●●●●
Use the diagnosis socket to check engine management
system operation; emissions and (where provided) engine
oil deterioration
●●●●●●●●●●
Visually inspect conditions of: exterior bodywork,
underbody protection, pipes and hoses (exhaust, fuel
system, brakes), rubber elements (gaiters, sleeves,
bushes, etc.)
●●●●●
Check windscreen and rear window wiper blade
position/wear●●●●●
Check operation of the windscreen wiper/washer system
and adjust jets, if necessary●●●●●
(1) Always only use the liquids shown in the handbook for topping up after having checked that the system is not damaged.
145
Page 150 of 240
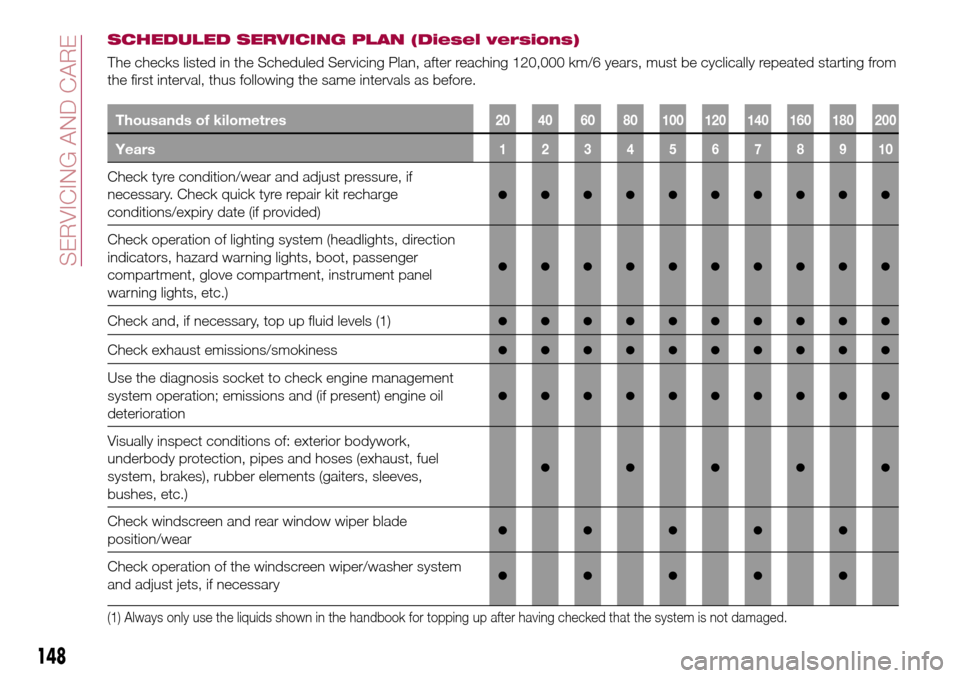
SCHEDULED SERVICING PLAN (Diesel versions)
The checks listed in the Scheduled Servicing Plan, after reaching 120,000 km/6 years, must be cyclically repeated starting from
the first interval, thus following the same intervals as before.
Thousands of kilometres20 40 60 80 100 120 140 160 180 200
Years12345678910
Check tyre condition/wear and adjust pressure, if
necessary. Check quick tyre repair kit recharge
conditions/expiry date (if provided)
●●●●●●●●●●
Check operation of lighting system (headlights, direction
indicators, hazard warning lights, boot, passenger
compartment, glove compartment, instrument panel
warning lights, etc.)
●●●●●●●●●●
Check and, if necessary, top up fluid levels (1)●●●●●●●●●●
Check exhaust emissions/smokiness●●●●●●●●●●
Use the diagnosis socket to check engine management
system operation; emissions and (if present) engine oil
deterioration
●●●●●●●●●●
Visually inspect conditions of: exterior bodywork,
underbody protection, pipes and hoses (exhaust, fuel
system, brakes), rubber elements (gaiters, sleeves,
bushes, etc.)
●●●●●
Check windscreen and rear window wiper blade
position/wear●●●●●
Check operation of the windscreen wiper/washer system
and adjust jets, if necessary●●●●●
(1) Always only use the liquids shown in the handbook for topping up after having checked that the system is not damaged.
148
SERVICING AND CARE
Page 153 of 240
PERIODIC CHECKS
Every1,000km or before long trips
check and, if necessary, top up:
engine coolant level;
brake fluid level;
windscreen washer fluid level;
tyre inflation pressure and condition;
operation of lighting system
(headlights, direction indicators, hazard
warning lights, etc.);
operation of screen washer/wiper
system and positioning/wear of
windscreen/rear window wiper blades.
Every3,000km, check and top up if
required: engine oil level.
DEMANDING USE OF THE
CAR
If the vehicle is used mainly under one
of the following conditions:
dusty roads;
short, repeated journeys (less than
7-8 km) at sub-zero outside
temperatures;
engine often idling or driving long
distances at low speeds or long periods
of inactivity;
the following checks must be carried
out more often than indicated in the
Scheduled Servicing Plan:
check front disc brake pad condition
and wear;
check cleanliness of bonnet and
luggage compartment locks,cleanliness and lubrication of linkage;
visually inspect conditions of: engine,
gearbox, transmission, pipes and hoses
(exhaust/fuel system/brakes) and
rubber elements (gaiters/sleeves/
bushes, etc.);
check battery charge and battery
fluid level (electrolyte);
visually inspect conditions of the
accessory drive belts;
check and, if necessary, change
engine oil and replace oil filter;
check and, if necessary, replace
pollen filter;
check and, if necessary, replace air
cleaner.
151
Page 154 of 240
ENGINE COMPARTMENT
CHECKING LEVELS
149) 150)
55)
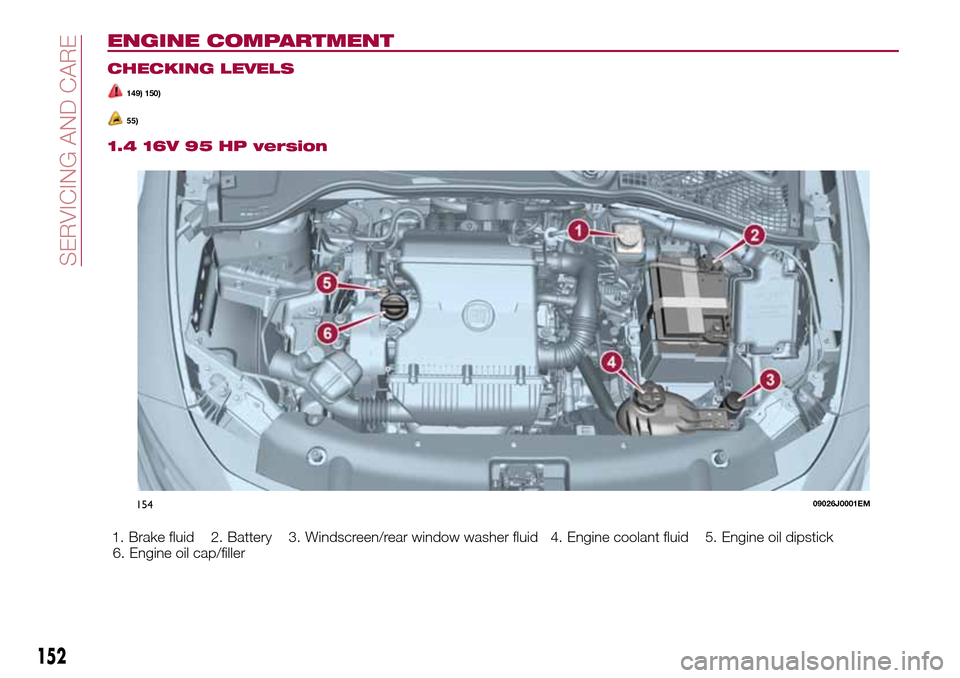
1.4 16V 95 HP version
1. Brake fluid 2. Battery 3. Windscreen/rear window washer fluid 4. Engine coolant fluid 5. Engine oil dipstick
6. Engine oil cap/filler
15409026J0001EM
152
SERVICING AND CARE
Page 158 of 240
ENGINE OIL
151)
56)
Check the oil level a few minutes (about
5) after the engine has stopped, with
the vehicle parked on level ground.
Check that the oil level is between the
MIN and MAX references on the
dipstick.
If the level of the oil is close to or below
the MIN mark, add oil via the filler fitting
until the MAX mark is reached.
Take out the engine oil dipstick, clean it
with a lint-free cloth and reinsert it.
Extract it again and check that the level
is between the MIN and MAX marks on
the dipstick.
Engine oil consumption
57)
3)
The maximum engine oil consumption
is usually 400 grams every 1000 km.
When the car is new, the engine needs
to be run in; therefore the engine oil
consumption can only be considered
stabilised after the first 5000 - 6000 km.
IMPORTANT After adding or changing
the oil, let the engine turn over for a few
seconds and wait a few minutes after
turning it off before you check the level.ENGINE COOLANT FLUID
152)
58)
If the level is too low, unscrew the cap
of reservoir 4 and add the fluid
described in the "Technical
Specifications" chapter.
WINDSCREEN / REAR
WINDOW WASHING FLUID
153) 154)
If the level is too low, raise the reservoir
cap 3 and add the fluid described in the
"Technical Specifications" chapter.
BRAKE FLUID
155) 156)
59)
Check that the fluid is at the max. level.
If the fluid level in the reservoir is too
low, undo the reservoir cap 1 and add
the fluid described in the "Technical
Specifications" chapter.
IMPORTANT Carefully clean the cap of
the reservoir and the surrounding
surface. Take great care to ensure that
impurities do not enter the reservoir
when the cap is opened.
For topping-up, always use a funnel
with integrated filter with mesh equal to
or lower than 0.12 mm.
IMPORTANT Brake fluid is hygroscopic
(i.e. it absorbs moisture). For this
reason, if the vehicle is mainly used in
areas with a high degree of
atmospheric humidity, the fluid should
be replaced at more frequent intervals
than specified in the "Scheduled
Servicing Plan".
BATTERY
157) 158) 159)
59)
4)
The battery does not require the
electrolyte to be topped up with distilled
water.
A periodic check carried out at a Fiat
Dealership is, however, necessary to
check efficiency.
Replacing the battery
If necessary, replace the battery with
another original battery with the same
specifications. Follow the battery
Manufacturer’s instructions for
maintenance.
156
SERVICING AND CARE