2016 FIAT TIPO 5DOORS STATION WAGON warning
[x] Cancel search: warningPage 35 of 240
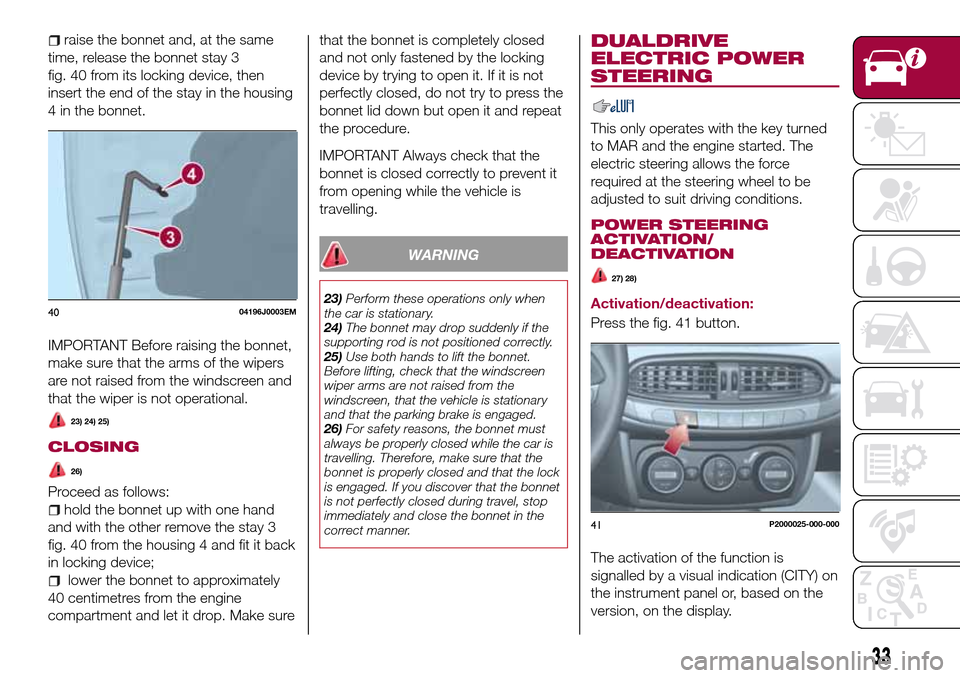
raise the bonnet and, at the same
time, release the bonnet stay 3
fig. 40 from its locking device, then
insert the end of the stay in the housing
4 in the bonnet.
IMPORTANT Before raising the bonnet,
make sure that the arms of the wipers
are not raised from the windscreen and
that the wiper is not operational.
23) 24) 25)
CLOSING
26)
Proceed as follows:
hold the bonnet up with one hand
and with the other remove the stay 3
fig. 40 from the housing 4 and fit it back
in locking device;
lower the bonnet to approximately
40 centimetres from the engine
compartment and let it drop. Make surethat the bonnet is completely closed
and not only fastened by the locking
device by trying to open it. If it is not
perfectly closed, do not try to press the
bonnet lid down but open it and repeat
the procedure.
IMPORTANT Always check that the
bonnet is closed correctly to prevent it
from opening while the vehicle is
travelling.
WARNING
23)Perform these operations only when
the car is stationary.
24)The bonnet may drop suddenly if the
supporting rod is not positioned correctly.
25)Use both hands to lift the bonnet.
Before lifting, check that the windscreen
wiper arms are not raised from the
windscreen, that the vehicle is stationary
and that the parking brake is engaged.
26)For safety reasons, the bonnet must
always be properly closed while the car is
travelling. Therefore, make sure that the
bonnet is properly closed and that the lock
is engaged. If you discover that the bonnet
is not perfectly closed during travel, stop
immediately and close the bonnet in the
correct manner.
DUALDRIVE
ELECTRIC POWER
STEERING
This only operates with the key turned
to MAR and the engine started. The
electric steering allows the force
required at the steering wheel to be
adjusted to suit driving conditions.
POWER STEERING
ACTIVATION/
DEACTIVATION
27) 28)
Activation/deactivation:
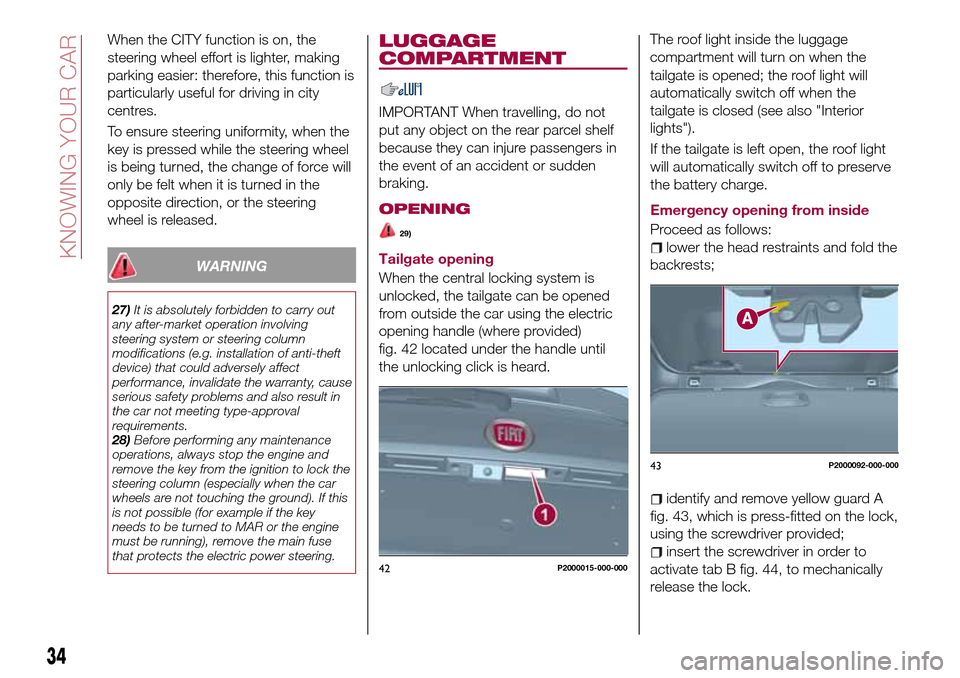
Press the fig. 41 button.
The activation of the function is
signalled by a visual indication (CITY) on
the instrument panel or, based on the
version, on the display.4004196J0003EM
41P2000025-000-000
33
Page 36 of 240
When the CITY function is on, the
steering wheel effort is lighter, making
parking easier: therefore, this function is
particularly useful for driving in city
centres.
To ensure steering uniformity, when the
key is pressed while the steering wheel
is being turned, the change of force will
only be felt when it is turned in the
opposite direction, or the steering
wheel is released.
WARNING
27)It is absolutely forbidden to carry out
any after-market operation involving
steering system or steering column
modifications (e.g. installation of anti-theft
device) that could adversely affect
performance, invalidate the warranty, cause
serious safety problems and also result in
the car not meeting type-approval
requirements.
28)Before performing any maintenance
operations, always stop the engine and
remove the key from the ignition to lock the
steering column (especially when the car
wheels are not touching the ground). If this
is not possible (for example if the key
needs to be turned to MAR or the engine
must be running), remove the main fuse
that protects the electric power steering.
LUGGAGE
COMPARTMENT
IMPORTANT When travelling, do not
put any object on the rear parcel shelf
because they can injure passengers in
the event of an accident or sudden
braking.
OPENING
29)
Tailgate opening
When the central locking system is
unlocked, the tailgate can be opened
from outside the car using the electric
opening handle (where provided)
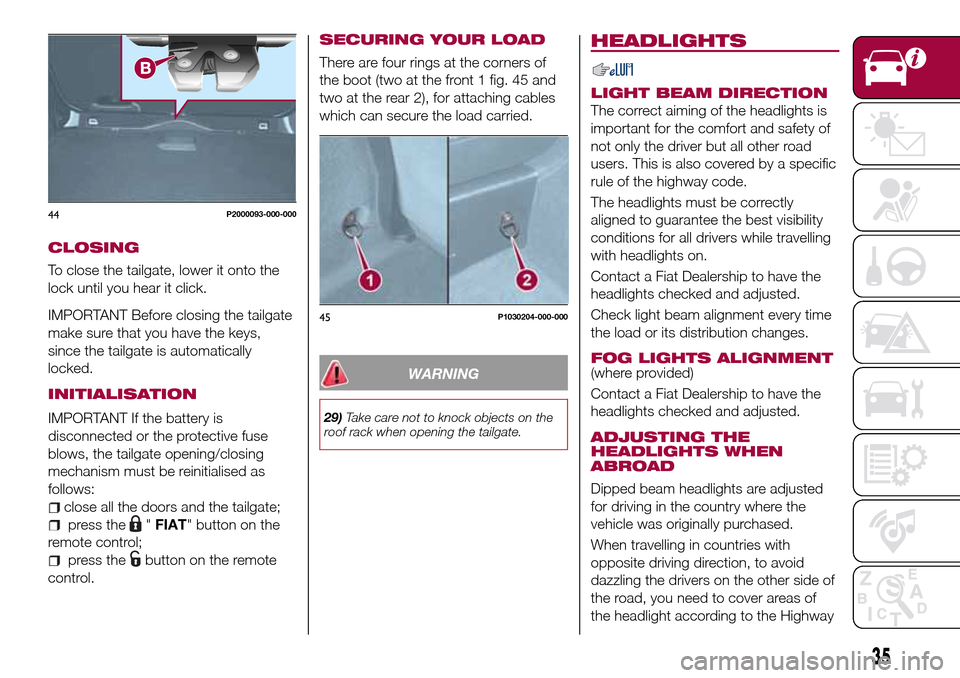
fig. 42 located under the handle until
the unlocking click is heard.The roof light inside the luggage
compartment will turn on when the
tailgate is opened; the roof light will
automatically switch off when the
tailgate is closed (see also "Interior
lights").
If the tailgate is left open, the roof light
will automatically switch off to preserve
the battery charge.
Emergency opening from inside
Proceed as follows:lower the head restraints and fold the
backrests;
identify and remove yellow guard A
fig. 43, which is press-fitted on the lock,
using the screwdriver provided;
insert the screwdriver in order to
activate tab B fig. 44, to mechanically
release the lock.42P2000015-000-000
43P2000092-000-000
34
KNOWING YOUR CAR
Page 37 of 240
CLOSING
To close the tailgate, lower it onto the
lock until you hear it click.
IMPORTANT Before closing the tailgate
make sure that you have the keys,
since the tailgate is automatically
locked.
INITIALISATION
IMPORTANT If the battery is
disconnected or the protective fuse
blows, the tailgate opening/closing
mechanism must be reinitialised as
follows:
close all the doors and the tailgate;
press the"FIAT" button on the
remote control;
press thebutton on the remote
control.
SECURING YOUR LOAD
There are four rings at the corners of
the boot (two at the front 1 fig. 45 and
two at the rear 2), for attaching cables
which can secure the load carried.
WARNING
29)Take care not to knock objects on the
roof rack when opening the tailgate.
HEADLIGHTS
LIGHT BEAM DIRECTION
The correct aiming of the headlights is
important for the comfort and safety of
not only the driver but all other road
users. This is also covered by a specific
rule of the highway code.
The headlights must be correctly
aligned to guarantee the best visibility
conditions for all drivers while travelling
with headlights on.
Contact a Fiat Dealership to have the
headlights checked and adjusted.
Check light beam alignment every time
the load or its distribution changes.
FOG LIGHTS ALIGNMENT(where provided)
Contact a Fiat Dealership to have the
headlights checked and adjusted.
ADJUSTING THE
HEADLIGHTS WHEN
ABROAD
Dipped beam headlights are adjusted
for driving in the country where the
vehicle was originally purchased.
When travelling in countries with
opposite driving direction, to avoid
dazzling the drivers on the other side of
the road, you need to cover areas of
the headlight according to the Highway
44P2000093-000-000
45P1030204-000-000
35
Page 38 of 240
code of the country you are travelling in:
(front right headlight), (front left
headlight).
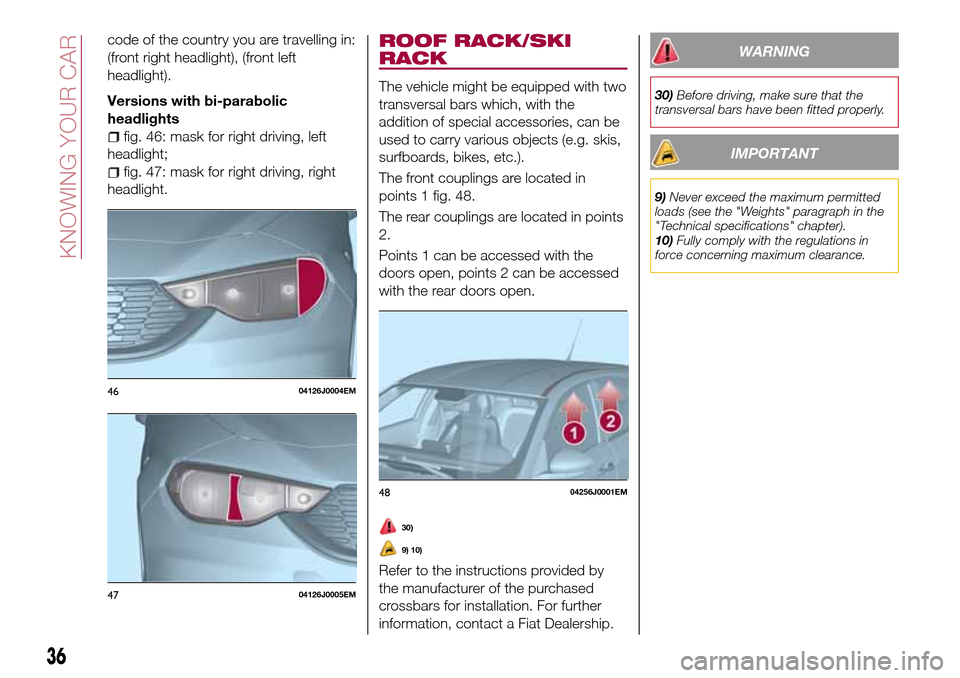
Versions with bi-parabolic
headlights
fig. 46: mask for right driving, left
headlight;
fig. 47: mask for right driving, right
headlight.
ROOF RACK/SKI
RACK
The vehicle might be equipped with two
transversal bars which, with the
addition of special accessories, can be
used to carry various objects (e.g. skis,
surfboards, bikes, etc.).
The front couplings are located in
points 1 fig. 48.
The rear couplings are located in points
2.
Points 1 can be accessed with the
doors open, points 2 can be accessed
with the rear doors open.
30)
9) 10)
Refer to the instructions provided by
the manufacturer of the purchased
crossbars for installation. For further
information, contact a Fiat Dealership.
WARNING
30)Before driving, make sure that the
transversal bars have been fitted properly.
IMPORTANT
9)Never exceed the maximum permitted
loads (see the "Weights" paragraph in the
"Technical specifications" chapter).
10)Fully comply with the regulations in
force concerning maximum clearance.
4604126J0004EM
4704126J0005EM
4804256J0001EM
36
KNOWING YOUR CAR
Page 39 of 240
KNOWING THE INSTRUMENT PANEL
This section of the handbook gives you
all the information you need to
understand, interpret and use the
instrument panel correctly.CONTROL PANEL AND ON-BOARD
INSTRUMENTS..............38
DISPLAY..................39
TRIP COMPUTER.............43
WARNING LIGHTS AND
MESSAGES................44
37
Page 40 of 240
CONTROL PANEL AND ON-BOARD INSTRUMENTS
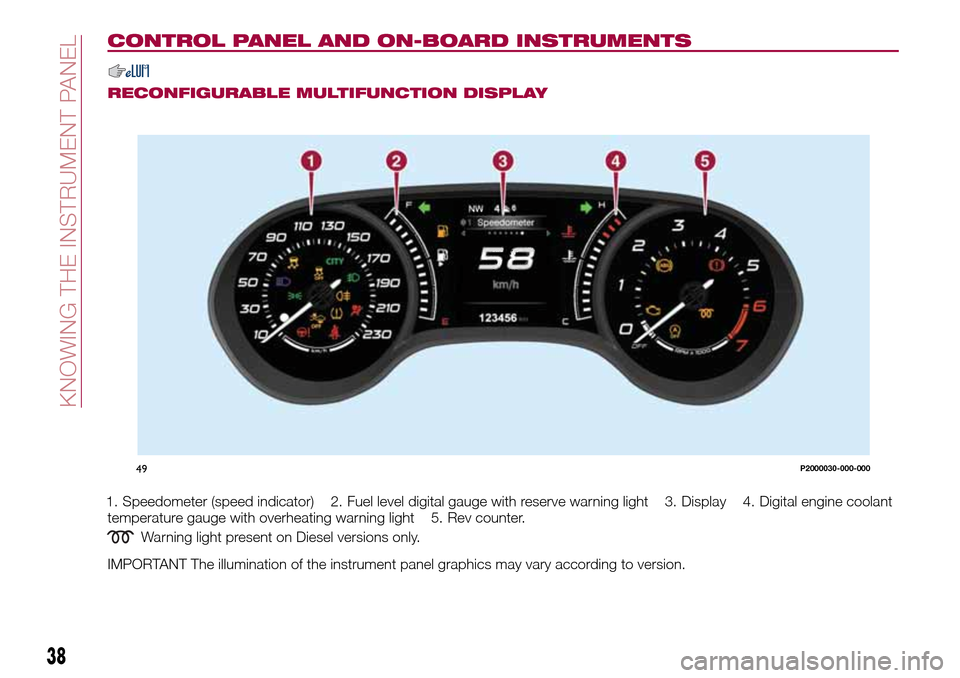
RECONFIGURABLE MULTIFUNCTION DISPLAY
1. Speedometer (speed indicator) 2. Fuel level digital gauge with reserve warning light 3. Display 4. Digital engine coolant
temperature gauge with overheating warning light 5. Rev counter.
Warning light present on Diesel versions only.
IMPORTANT The illumination of the instrument panel graphics may vary according to version.
49P2000030-000-000
38
KNOWING THE INSTRUMENT PANEL
Page 41 of 240
DISPLAY
DESCRIPTION
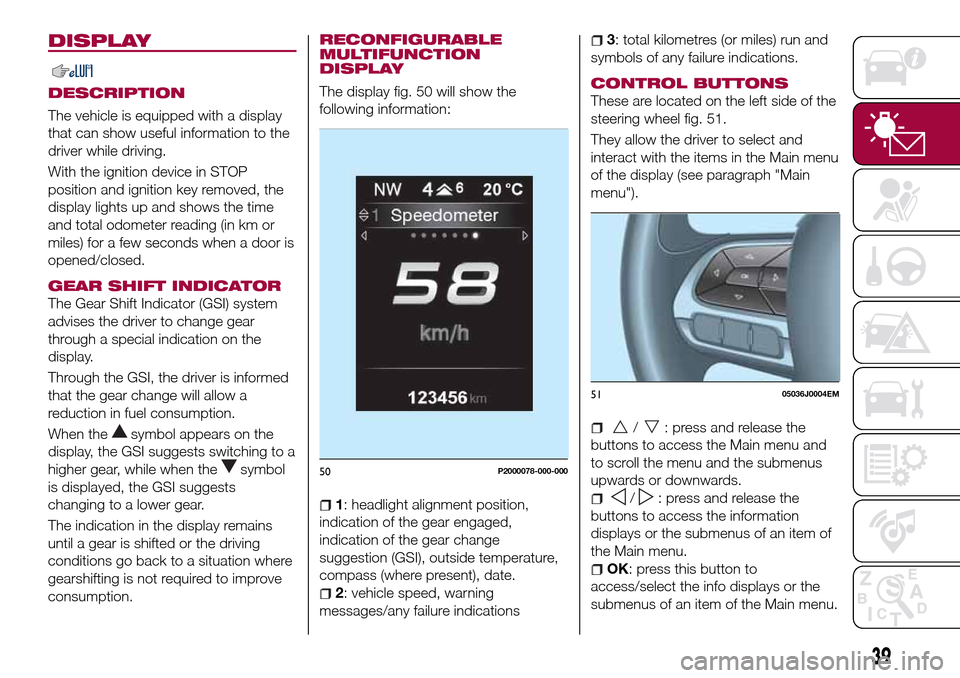
The vehicle is equipped with a display
that can show useful information to the
driver while driving.
With the ignition device in STOP
position and ignition key removed, the
display lights up and shows the time
and total odometer reading (in km or
miles) for a few seconds when a door is
opened/closed.
GEAR SHIFT INDICATOR
The Gear Shift Indicator (GSI) system
advises the driver to change gear
through a special indication on the
display.
Through the GSI, the driver is informed
that the gear change will allow a
reduction in fuel consumption.
When the
symbol appears on the
display, the GSI suggests switching to a
higher gear, while when the
symbol
is displayed, the GSI suggests
changing to a lower gear.
The indication in the display remains
until a gear is shifted or the driving
conditions go back to a situation where
gearshifting is not required to improve
consumption.
RECONFIGURABLE
MULTIFUNCTION
DISPLAY
The display fig. 50 will show the
following information:
1: headlight alignment position,
indication of the gear engaged,
indication of the gear change
suggestion (GSI), outside temperature,
compass (where present), date.
2: vehicle speed, warning
messages/any failure indications
3: total kilometres (or miles) run and
symbols of any failure indications.
CONTROL BUTTONS
These are located on the left side of the
steering wheel fig. 51.
They allow the driver to select and
interact with the items in the Main menu
of the display (see paragraph "Main
menu").
/: press and release the
buttons to access the Main menu and
to scroll the menu and the submenus
upwards or downwards.
/: press and release the
buttons to access the information
displays or the submenus of an item of
the Main menu.
OK: press this button to
access/select the info displays or the
submenus of an item of the Main menu.
50P2000078-000-000
5105036J0004EM
39
Page 42 of 240
to reset the displayed/selected
functions.
MAIN MENU
The Main menu comprises a series of
items which can be selected using the
control buttons to access the different
selection and setting options given in
the following paragraphs.
REMARKS
Some options have a submenu.
With theUconnect™ 5"or7" HD
system, some Menu items are shown
and managed on the display of the
latter and not on the instrument panel
display (refer to the dedicated
Multimedia chapter or to the
supplement available online).
MENU OPTIONS
The Menu includes the following items:
TRIP
GSI
VEHICLE INFO
DRIVER ASSIST
AUDIO
PHONE
NAVIGATION
ALERTS
SYSTEM VEHICLE
Trip
This menu item displays the information
on the "Trip computer" (for furtherinformation, see the description of the
"Trip computer" paragraph in this
chapter).
The information shown on the display is
as follows:
Instant info: distance (km or miles),
instantaneous consumption (mpg,
l/100 km or km/l);
Trip A: distance A (km or miles), trip
time A (hours/minutes/seconds),
average consumption A (mpg, or
l/100 km or km/l), average speed A
(km/h or mph);
Trip B: distance B (km or miles),
average consumption B (mpg, or
l/100 km or km/l), trip time B
(hours/minutes/seconds), average
speed B (km/h or mph).
Speedometer: km or miles displayed.
By pressing theOKbutton with
speedometer display active, you can
change the measurement unit (km/h
or mph). On leaving this screen, the
measurement unit set will take effect.
GSI
This menu item makes it possible to
see the gear shift indicator provided by
the GSI (gear shift indicator) system on
the display.
Vehicle info
This menu item displays the information
on the vehicle conditions.Press the
orbutton to select the
items listed below.
Tyre pressure: information displayed on
the iTPMS (where provided) (for further
information, see the description in
paragraph "Auxiliary driving systems" in
the "Safety" chapter).
Engine oil temperature: engine oil
temperature displayed.
Change engine oil: indication for engine
oil change.
Battery voltage: display of the battery
voltage value (charge level).
Service (Scheduled servicing):Number
of kilometres (or miles) and days until
the next Scheduled Servicing operation.
WARNING
The “Scheduled Servicing Plan”
includes vehicle maintenance at fixed
intervals (refer to the "Maintenance and
care" chapter).
This is displayed automatically, with
ignition device at MAR, 2000 km before
servicing or, where provided, 30 days
before servicing. It is also displayed
each time the ignition device is turned
to MAR or, for some versions, every
200 km. Below this threshold servicing
indications are more frequent. The
display will be in km or miles according
to the unit of measurement set.
40
KNOWING THE INSTRUMENT PANEL
Hold the button pressed for 1 second