2016 FIAT TIPO 5DOORS STATION WAGON warning
[x] Cancel search: warningPage 169 of 240
PLASTIC AND COATED
PARTS
72)
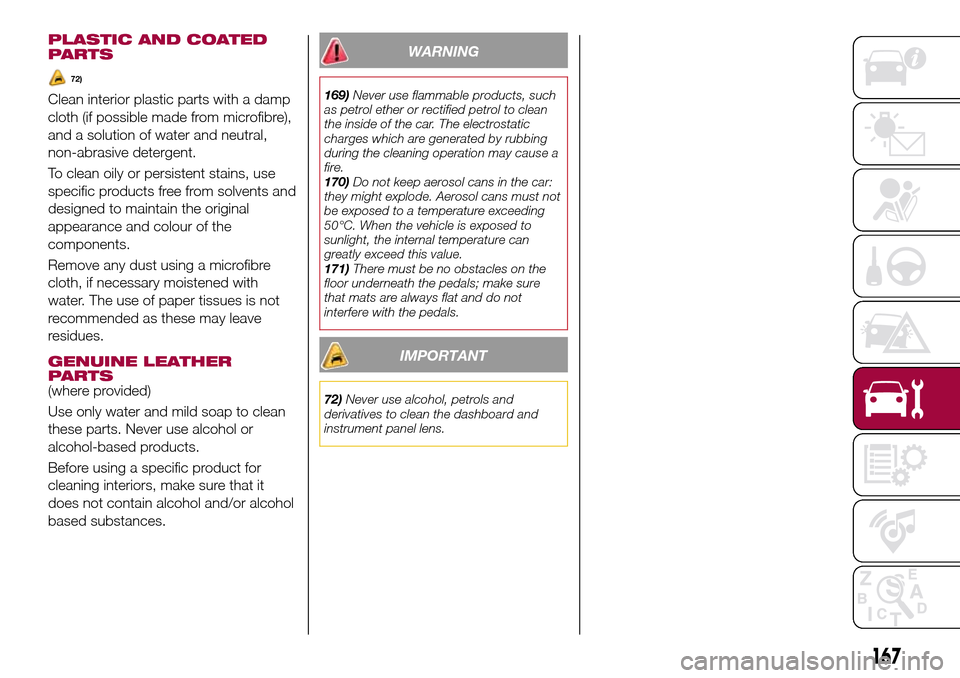
Clean interior plastic parts with a damp
cloth (if possible made from microfibre),
and a solution of water and neutral,
non-abrasive detergent.
To clean oily or persistent stains, use
specific products free from solvents and
designed to maintain the original
appearance and colour of the
components.
Remove any dust using a microfibre
cloth, if necessary moistened with
water. The use of paper tissues is not
recommended as these may leave
residues.
GENUINE LEATHER
PARTS
(where provided)
Use only water and mild soap to clean
these parts. Never use alcohol or
alcohol-based products.
Before using a specific product for
cleaning interiors, make sure that it
does not contain alcohol and/or alcohol
based substances.
WARNING
169)Never use flammable products, such
as petrol ether or rectified petrol to clean
the inside of the car. The electrostatic
charges which are generated by rubbing
during the cleaning operation may cause a
fire.
170)Do not keep aerosol cans in the car:
they might explode. Aerosol cans must not
be exposed to a temperature exceeding
50°C. When the vehicle is exposed to
sunlight, the internal temperature can
greatly exceed this value.
171)There must be no obstacles on the
floor underneath the pedals; make sure
that mats are always flat and do not
interfere with the pedals.
IMPORTANT
72)Never use alcohol, petrols and
derivatives to clean the dashboard and
instrument panel lens.
167
Page 173 of 240
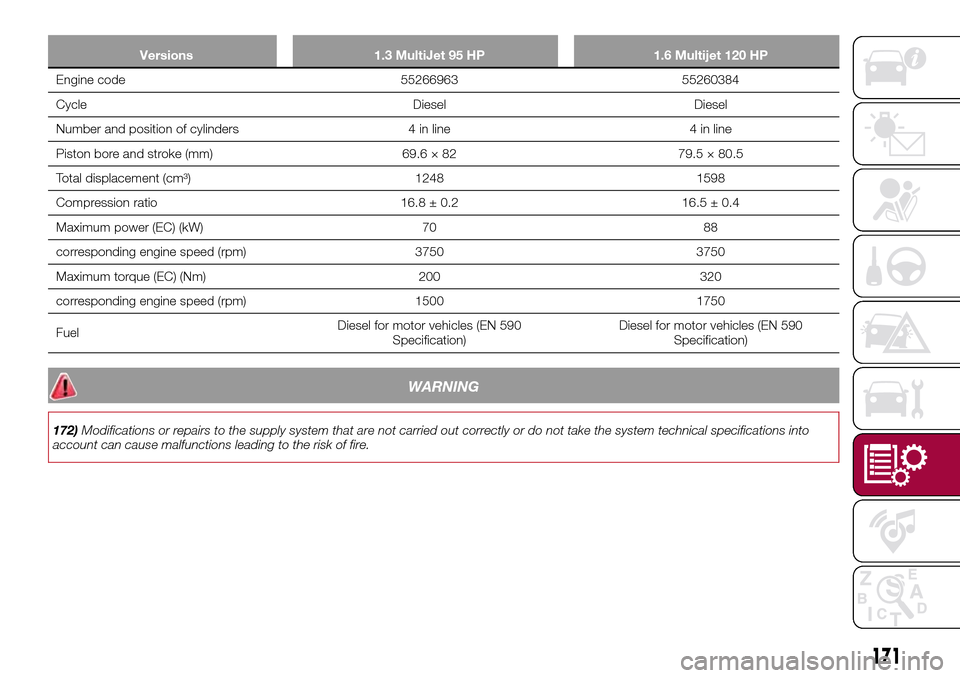
Versions 1.3 MultiJet 95 HP 1.6 Multijet 120 HP
Engine code 55266963 55260384
Cycle Diesel Diesel
Number and position of cylinders 4 in line 4 in line
Piston bore and stroke (mm) 69.6 × 82 79.5 × 80.5
Total displacement (cm³) 1248 1598
Compression ratio 16.8 ± 0.2 16.5 ± 0.4
Maximum power (EC) (kW) 70 88
corresponding engine speed (rpm) 3750 3750
Maximum torque (EC) (Nm) 200 320
corresponding engine speed (rpm) 1500 1750
FuelDiesel for motor vehicles (EN 590
Specification)Diesel for motor vehicles (EN 590
Specification)
WARNING
172)Modifications or repairs to the supply system that are not carried out correctly or do not take the system technical specifications into
account can cause malfunctions leading to the risk of fire.
171
Page 176 of 240
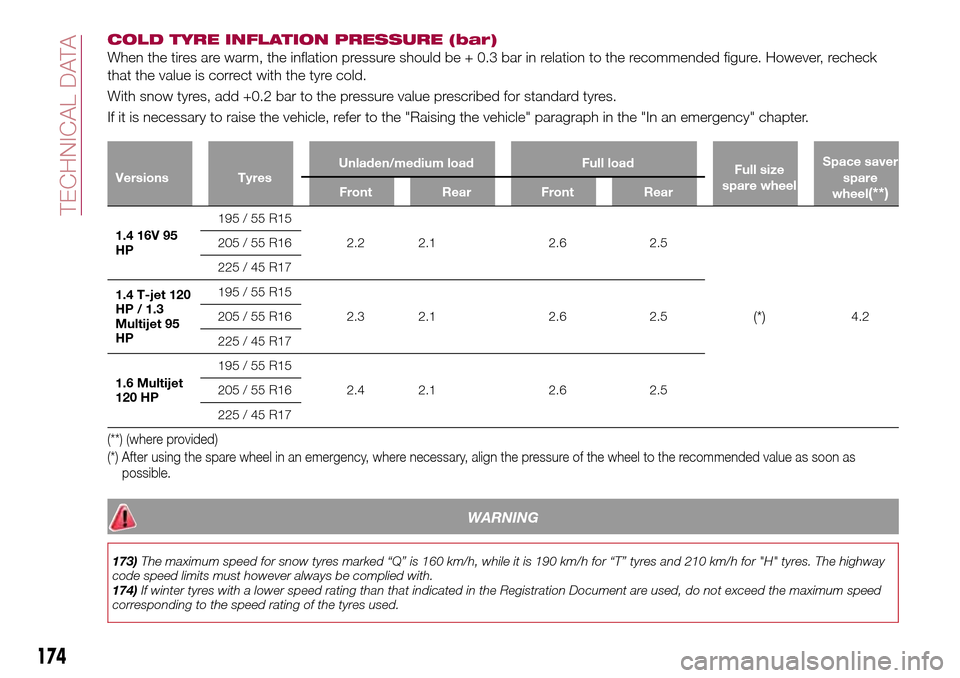
COLD TYRE INFLATION PRESSURE (bar)
When the tires are warm, the inflation pressure should be + 0.3 bar in relation to the recommended figure. However, recheck
that the value is correct with the tyre cold.
With snow tyres, add +0.2 bar to the pressure value prescribed for standard tyres.
If it is necessary to raise the vehicle, refer to the "Raising the vehicle" paragraph in the "In an emergency" chapter.
Versions TyresUnladen/medium load Full load
Full size
spare wheelSpace saver
spare
wheel(**)Front Rear Front Rear
1.4 16V 95
HP195 / 55 R15
2.2 2.1 2.6 2.5
(*)4.2 205 / 55 R16
225 / 45 R17
1.4 T-jet 120
HP / 1.3
Multijet 95
HP195 / 55 R15
2.3 2.1 2.6 2.5 205 / 55 R16
225 / 45 R17
1.6 Multijet
120 HP195 / 55 R15
2.4 2.1 2.6 2.5 205 / 55 R16
225 / 45 R17
(**) (where provided)
(*) After using the spare wheel in an emergency, where necessary, align the pressure of the wheel to the recommended value as soon as
possible.
WARNING
173)The maximum speed for snow tyres marked “Q” is 160 km/h, while it is 190 km/h for “T” tyres and 210 km/h for "H" tyres. The highway
code speed limits must however always be complied with.
174)If winter tyres with a lower speed rating than that indicated in the Registration Document are used, do not exceed the maximum speed
corresponding to the speed rating of the tyres used.
174
TECHNICAL DATA
Page 192 of 240
can give the information to the relevant
authorities if the system is stolen.
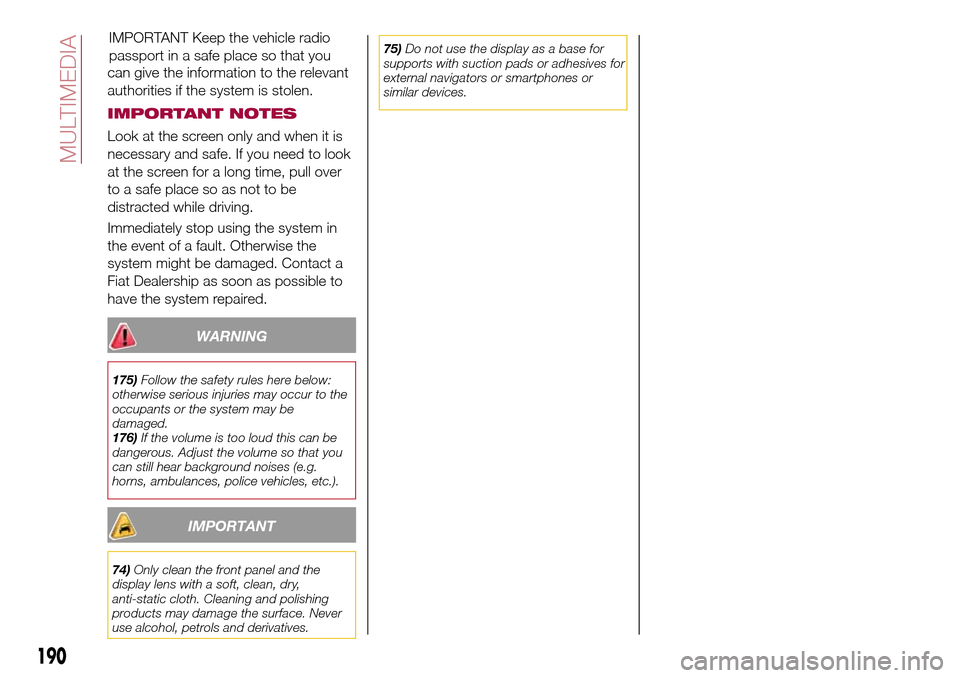
IMPORTANT NOTES
Look at the screen only and when it is
necessary and safe. If you need to look
at the screen for a long time, pull over
to a safe place so as not to be
distracted while driving.
Immediately stop using the system in
the event of a fault. Otherwise the
system might be damaged. Contact a
Fiat Dealership as soon as possible to
have the system repaired.
WARNING
175)Follow the safety rules here below:
otherwise serious injuries may occur to the
occupants or the system may be
damaged.
176)If the volume is too loud this can be
dangerous. Adjust the volume so that you
can still hear background noises (e.g.
horns, ambulances, police vehicles, etc.).
IMPORTANT
74)Only clean the front panel and the
display lens with a soft, clean, dry,
anti-static cloth. Cleaning and polishing
products may damage the surface. Never
use alcohol, petrols and derivatives.75)Do not use the display as a base for
supports with suction pads or adhesives for
external navigators or smartphones or
similar devices.
190
MULTIMEDIA
IMPORTANT Keep the vehicle radio
passport in a safe place so that you
Page 199 of 240
SWITCHING THE SYSTEM
ON/OFF
The system is switched on/off by
pressing the
button/knob.
Turn the button/knob clockwise to
increase the radio volume or
anticlockwise to decrease it. The
electronic volume adjustment control
rotates continuously (360°) in both
directions, without stop positions.
RADIO (TUNER) MODE
The system is equipped with the
following tuners: AM, FM and DAB (for
versions/markets, where provided).
Radio mode selection
Press the RADIO button on the front
panel to activate radio mode.
Selecting a frequency band
The different tuning modes can be
selected by pressing the RADIO button
on the front panel.
Indications on display
After the desired radio station is
selected on the display, the following
information is shown (INFO mode
activated):
In the upper part: the preset station, the
time and the other active radio settings
are highlighted.
In the central part: the name of the
current station, the frequency and theradio text information (if any) are
highlighted.
FM station list
Press the BROWSE ENTER
button/knob to display the complete list
of the FM stations that can be received.
AM/FM radio station storage
The preset stations are available in all
system modes and are selected by
touching one of the presetting buttons
1-2-3-4-5-6on the front panel. If you
are tuned to a radio station that you
wish to store, hold down the button on
the display which corresponds to the
desired preset until an acoustic
confirmation signal is emitted.
AM/FM radio station selection
To search for the desired radio station
press the
orbutton or use the
wheel of the steering wheel controls, or
turn the "BROWSE ENTER" knob.
Previous/next radio station search
Briefly press the
orbutton:
when the button is released the
previous or the next radio station is
displayed.Previous/next radio station fast
search
Hold down the
orbutton to
start the fast search: when the button is
released, the first tunable radio is
played.
MEDIA MODE
Interaction modes for AUX, USB/iPod
operation.
Audio source selection
To select the desired audio source
among those available: AUX o
USB/iPod, press theMEDIAbutton.
WARNING Some multimedia player
devices may not be compatible with the
Uconnect™system.
Track change (next/previous)
Briefly press the
button to play the
next track or briefly press the
button to return to the beginning
of the selected track or to the beginning
of the previous track if this has been
played for less than 3 seconds.
Fast forward/rewind through tracks
Press and hold down the
button to
fast forward the selected track or keep
the
button pressed to fast rewind
the track.
Track selection (browse)
Use this function to scroll through and
select the tracks on the active device.
197
Page 208 of 240

PAIRING A Bluetooth®
AUDIO DEVICE
To pair aBluetooth®audio device,
proceed as follows:
activate theBluetooth®function on
the device;
press the MEDIA button on the front
panel;
if the "Media" source is active, press
the "Source" button;
select theBluetooth®Media
source;
press the "Add Device" button;
search forUconnect™on the
Bluetooth®audio device (during the
pairing stage a screen is displayed
showing the progress of the operation);
when requested by the audio device,
enter the PIN code shown on the
system display or confirm on the device
the PIN displayed;
if the pairing procedure is completed
successfully, a screen is displayed.
Answer "Yes" to the question to pair the
Bluetooth®audio device as favourite
(the device will have priority over all
other devices to be paired
subsequently). If "No" is selected, the
priority is determined according to the
order of connection. The last device
connected will have the highest priority;
an audio device can also be paired
by pressing the PHONE button on the
front panel and by selecting "Settings"
or, from the "Settings" menu, selecting
"Phone/Bluetooth".WARNING If the
Bluetooth®
connection between mobile phone and
system is lost, consult the mobile
phone handbook.
USB/iPod SOURCE
To activate the USB/iPod mode insert
the corresponding device (USB or iPod)
in the USB port located in the central
console.
If a USB/iPod device is inserted with the
system on, this starts playing the tracks
present on the device.
AUX SOURCE
To activate AUX mode, insert an
appropriate device in the AUX socket
on the vehicle.
When a device is inserted using the
AUX output socket the system starts
reproducing the AUX source
connected, if it is already being played.
Adjust the volume using the
button/knob on the front panel or
using the volume adjustment control on
the connected device.
IMPORTANT NOTES
The functions of the device connected
with the AUX socket are directly
managed by the device itself: it is not
possible to change track/folder/playlist
or control playing start/end/pause with
the controls on the front panel or on the
steering wheel.Do not leave the cable of your portable
player connected to the AUX socket
after disconnection, to avoid possible
hiss from the speakers.
PHONE MODE
PHONE MODE ACTIVATION
Press the PHONE button on the front
panel to activate the Phone mode.
NOTE To consult the list of mobile
phones and supported functions, visit
the www.DriveUconnect.eu website.
Use the buttons on the display to:
dial the phone number (using the
graphic keypad on the display);
display and call the contacts in the
mobile phone phonebook;
display and call contacts from the
registers of previous calls;
pair up to 10 phones/audio devices
to make access and connection easier
and quicker;
transfer calls from the system to the
mobile phone and vice versa and
deactivate the microphone audio for
private conversations.
The mobile phone audio is transmitted
through the vehicle’s audio system; the
system automatically mutes the radio
when the Phone function is used.
206
MULTIMEDIA
Page 211 of 240

expiry of the servicing interval. Press the
"my:Car" button to interact with the
application.
The display will show a screen with the
"care:Index" section, which provides all
the detailed information about the
status of the vehicle. Press the "Active
warnings" button to show (if present)
the details of the vehicle's faults which
caused a warning light to switch on.
SETTINGS
Press thebutton on the front panel
to display the main "Settings" menu.
NOTE The menu items displayed vary
according to the versions.
The menu includes the following items:
Display;
Units;
Voice commands;
Clock & Date;
Safety / Assistance;
Lights;
Doors & Locks;
Vehicle Shutdown Options;
Audio;
Phone / Bluetooth;
Configurat. SiriusXM (where
provided);
Radio Setup;
Restore settings
Safety/Assistance(where provided)
This function can be used to carry out
the following adjustments:
"Rear View camera"(where
provided): this function can be used to
carry out the following adjustments:
- "Active Guidelines" (where provided):
permits the activation of dynamic grids
that indicate the route of the vehicle on
the display.
- "Rit. telec. - "Rear View cam.delay"
(where provided): permits a delay in the
disappearance of images from the
camera when reverse is disengaged.
"Frnt Coll. Warning"(where
provided): this function can be used to
select the Full Brake Control system
intervention mode.
The options available are:
- "Off": the system is deactivated;
- "Only warning": the system intervenes
only by providing the driver with an
acoustic warning (where provided);
- "Only active braking": the system
intervenes by activating automatic
braking (where provided);
- "Warning + active braking": the
system intervenes by providing the
driver with an acoustic warning and
activating automatic braking.
"Fwd Coll. Sensitivity"(where
provided): this function can be used toselect the "readiness" of the system to
intervene, on the basis of distance from
the obstacle.
The options available are "Near",
"Med", "Far".
"Park Assist"(where provided): this
function can be used to select the type
of warning provided by the Park Assist
system.
The options available are:
- "Sound Only": the system warns the
driver that an obstacle is present
through acoustic warnings only, via the
speakers in the vehicle.
- "Sound & Display": the system warns
the driver that an obstacle is present
through acoustic (via the speakers in
the vehicle) and visual (on the
instrument panel) warnings.
"Front Park Assist vol."(where
provided): this function can be used to
select the volume of the acoustic
warnings provided by the front Park
Assist system.
"Rear Park Assist vol."(where
provided): this function can be used to
select the volume of the acoustic
warnings provided by the rear Park
Assist system.
"Park Assist vol."(where provided):
this function can be used to select the
volume of the acoustic warnings
provided by the Park Assist system.
209
Page 212 of 240
"Lane Assist Warning"(where
provided): this function can be used to
select the LaneAssist system
intervention "readiness".
"Lane Assist Strength"(where
provided): this function can be used to
select the force to apply to the steering
wheel to put the vehicle back in the
lane through the electric steering
system, in the event of Lane Assist
system intervention.
"Blind Spot Alert"(where provided):
this function can be used to select the
type of warning ("Sound Only" or
"Sound & Display") to indicate the
presence of objects in the blind spot of
the door mirror.
"Rain sensor"(where provided): this
function can be used to activate/
deactivate the automatic operation of
the wipers in the event of rain.
"Brakes"(where provided): this
function can be used to select the
following submenus:
- "Brake Service" (where provided):
allows you to activate the procedure for
carrying out braking system servicing;
- "Auto Park Brake" (where provided):
allows you to activate/deactivate the
automatic park brake engagement.
NAVIGATION(UConnect™ 5" Nav LIVE only)
Programming a route
WARNING In the interest of safety and
to reduce distractions while you are
driving, you should always plan a route
before you start driving.
Using the destination search function, it
is possible to find and reach your
destinations in different ways: searching
for a specific address, a partial address,
a specific type of location (for example
a service station or a restaurant), a
postal code, a POI (Point Of Interest)
near your current position (for example,
a restaurant with the search type set to
"nearby"), a pair of latitude and
longitude coordinates, or by selecting a
point on the map.
Select “Search” in the Main menu and
set the search for a destination.
While entering the information, the list
displays the corresponding addresses
and POIs in two separate lists. The
corresponding address and city are
displayed in the Address list and the
POI, the type of POIs and the locations
are displayed in the Point of Interest
lists.
To plan a route towards the destination,
select the “Guide” button.
A route is planned and you are guided
to your destination, using spoken
instructions and on-screen directions.VOICE COMMANDS
NoteFor languages not supported by
the system, voice commands are not
available.
To use the voice commands, press the
button on the steering wheel ("Voice"
button) and say out loud the command
you want to activate.
Global
The following voice commands can be
given after pressing the
button on
the steering wheel:
Help
Cancel
Repeat
Voice Prompts
Phone
The following voice commands can be
given after pressing the
button on
the steering wheel:
Call
Dial
Redial
Call back
Last calls
Outgoing calls
Missed calls
Incoming calls
Contacts
Search
Show SMS
Send an SMS
210
MULTIMEDIA
Show messages