2016 FIAT TIPO 4DOORS lock
[x] Cancel search: lockPage 121 of 204

FUEL CUT-OFF
SYSTEM
DESCRIPTION
This intervenes in the case of an impact
causing:
the interruption of the fuel supply
with the engine consequently switching
off;
the automatic unlocking of the
doors;
turning on of the lights inside the
vehicle;
deactivation of climate control
system ventilation;
switching on of the hazard warning
lights (to deactivate the lights press the
button on the dashboard).
On some versions, the intervention of
the system is indicated by a message
shown on the display. In the same way,
a dedicated message on the display
warns the driver if system operation is
compromised.
IMPORTANT Carefully check the vehicle
for fuel leaks, for instance in the engine
compartment, under the vehicle or near
the tank area. After a collision, bring the
ignition device to STOP to prevent the
battery from running down.FUEL CUT-OFF SYSTEM
RESET
To restore correct operation of the
vehicle, carry out the following
procedure (this procedure must be
started and completed within less than
1 minute):
138)
Operations to be carried out
With direction indicator lever in neutral
position, bring the ignition device to STOP
Bring the ignition device to MAR
Activate the right direction indicator
Activate the left direction indicator
Activate the right direction indicator
Activate the left direction indicator
Deactivate the left direction indicator
Bring the ignition device to STOP
Bring the ignition device to MAR
WARNING
138)If, after an impact, you smell fuel or
notice leaks from the fuel system, do not
reactivate the system to avoid the risk of
fire.
AUTOMATIC
TRANSMISSION
Lever release
In the event of a fault, to move the gear
lever from P (Park), proceed as follows:
stop the engine;
engage the parking brake;
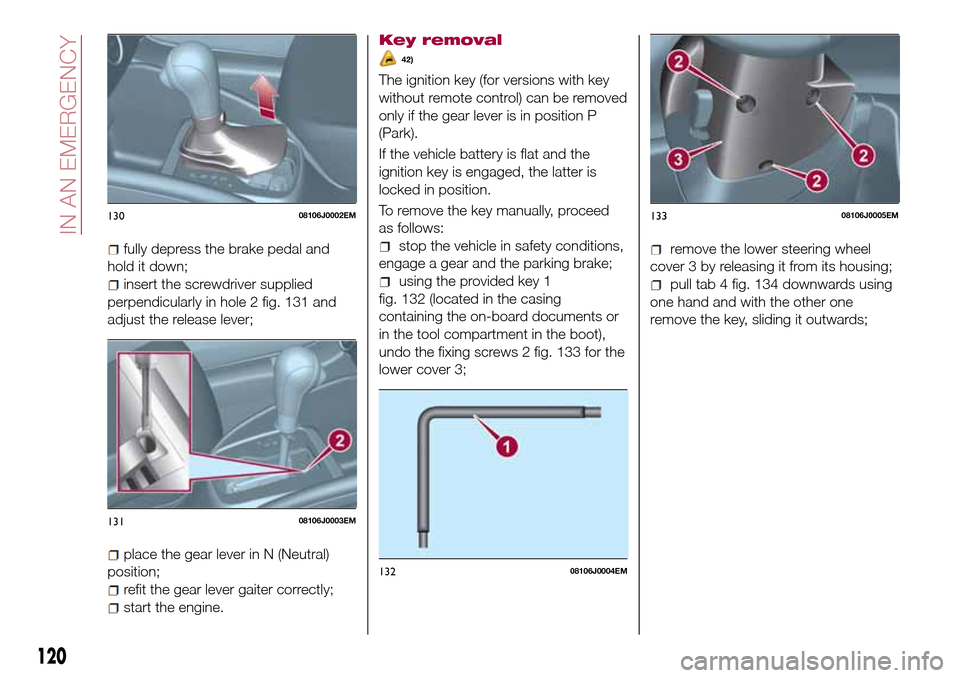
working carefully in the point
indicated by the arrow, remove the gear
lever gaiter 1 fig. 129 (also see
fig. 130 );
12908106J0001EM
119
Page 122 of 204
fully depress the brake pedal and
hold it down;
insert the screwdriver supplied
perpendicularly in hole 2 fig. 131 and
adjust the release lever;
place the gear lever in N (Neutral)
position;
refit the gear lever gaiter correctly;
start the engine.
Key removal
42)
The ignition key (for versions with key
without remote control) can be removed
only if the gear lever is in position P
(Park).
If the vehicle battery is flat and the
ignition key is engaged, the latter is
locked in position.
To remove the key manually, proceed
as follows:
stop the vehicle in safety conditions,
engage a gear and the parking brake;
using the provided key 1
fig. 132 (located in the casing
containing the on-board documents or
in the tool compartment in the boot),
undo the fixing screws 2 fig. 133 for the
lower cover 3;
remove the lower steering wheel
cover 3 by releasing it from its housing;
pull tab 4 fig. 134 downwards using
one hand and with the other one
remove the key, sliding it outwards;
13008106J0002EM
13108106J0003EM
13208106J0004EM
13308106J0005EM
120
IN AN EMERGENCY
Page 123 of 204
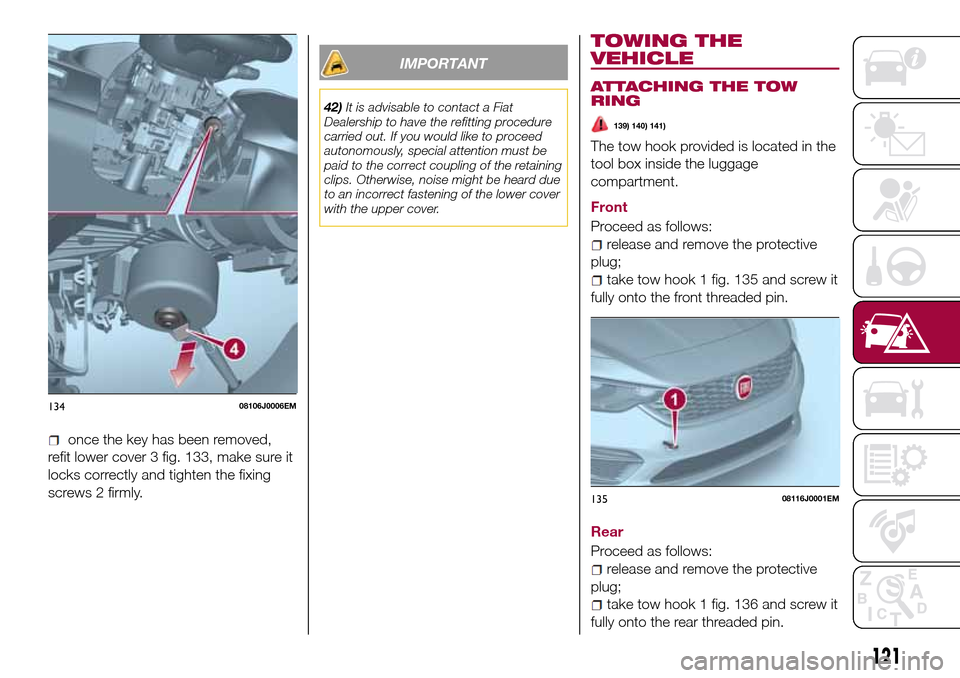
once the key has been removed,
refit lower cover 3 fig. 133, make sure it
locks correctly and tighten the fixing
screws 2 firmly.
IMPORTANT
42)It is advisable to contact a Fiat
Dealership to have the refitting procedure
carried out. If you would like to proceed
autonomously, special attention must be
paid to the correct coupling of the retaining
clips. Otherwise, noise might be heard due
to an incorrect fastening of the lower cover
with the upper cover.
TOWING THE
VEHICLE
ATTACHING THE TOW
RING
139) 140) 141)
The tow hook provided is located in the
tool box inside the luggage
compartment.
Front
Proceed as follows:
release and remove the protective
plug;
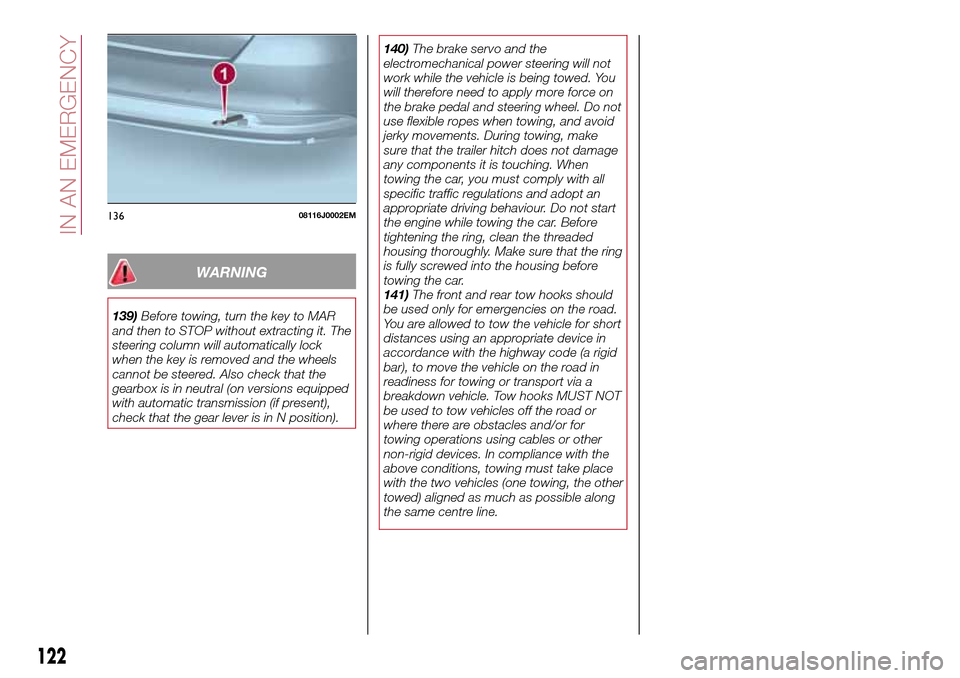
take tow hook 1 fig. 135 and screw it
fully onto the front threaded pin.
Rear
Proceed as follows:
release and remove the protective
plug;
take tow hook 1 fig. 136 and screw it
fully onto the rear threaded pin.
13408106J0006EM
13508116J0001EM
121
Page 124 of 204
WARNING
139)Before towing, turn the key to MAR
and then to STOP without extracting it. The
steering column will automatically lock
when the key is removed and the wheels
cannot be steered. Also check that the
gearbox is in neutral (on versions equipped
with automatic transmission (if present),
check that the gear lever is in N position).140)The brake servo and the
electromechanical power steering will not
work while the vehicle is being towed. You
will therefore need to apply more force on
the brake pedal and steering wheel. Do not
use flexible ropes when towing, and avoid
jerky movements. During towing, make
sure that the trailer hitch does not damage
any components it is touching. When
towing the car, you must comply with all
specific traffic regulations and adopt an
appropriate driving behaviour. Do not start
the engine while towing the car. Before
tightening the ring, clean the threaded
housing thoroughly. Make sure that the ring
is fully screwed into the housing before
towing the car.
141)The front and rear tow hooks should
be used only for emergencies on the road.
You are allowed to tow the vehicle for short
distances using an appropriate device in
accordance with the highway code (a rigid
bar), to move the vehicle on the road in
readiness for towing or transport via a
breakdown vehicle. Tow hooks MUST NOT
be used to tow vehicles off the road or
where there are obstacles and/or for
towing operations using cables or other
non-rigid devices. In compliance with the
above conditions, towing must take place
with the two vehicles (one towing, the other
towed) aligned as much as possible along
the same centre line.
13608116J0002EM
122
IN AN EMERGENCY
Page 128 of 204

Thousands of kilometres 15 30 45 60 75 90 105 120 135 150
Years 1 2 3 4 5 6 7 8 9 10
Check cleanliness of bonnet and rear lid locks, cleanliness
and lubrication of linkage●●●●●
Check handbrake lever travel and adjust, if necessary●●●●●
Visually inspect conditions and wear of front disc brake
pads and check the integrity of the pad wear sensor●●●●●●●●●●
Visually inspect condition and wear of rear disc brake
pads and check the integrity of pad wear sensor (for
versions/markets where provided)
●●●●●●●●●●
Visually inspect rear drum brake lining condition and wear
(for versions/markets, where provided)●●●●●●●●●●
Visually inspect conditions of toothed timing drive belt
(1.4 16v 95 HP versions)●●
Visually inspect condition of various drive belt(s) (1.4 16v
95 HP versions)●●
Visually inspect condition of various drive belts (1.6
E.Torque versions)●●●●●●●●●●
Check tension of accessory drive belt (versions without
automatic tensioner) (1.4 16v 95 HP versions)●●
Check tension of accessory drive belt (versions without
automatic tensioner) (1.6 E.Torque versions)●●●●●●●●●●
Change engine oil and oil filter (1.6 E.Torque versions)●●●●●●●●●●
126
SERVICING AND CARE
Page 131 of 204
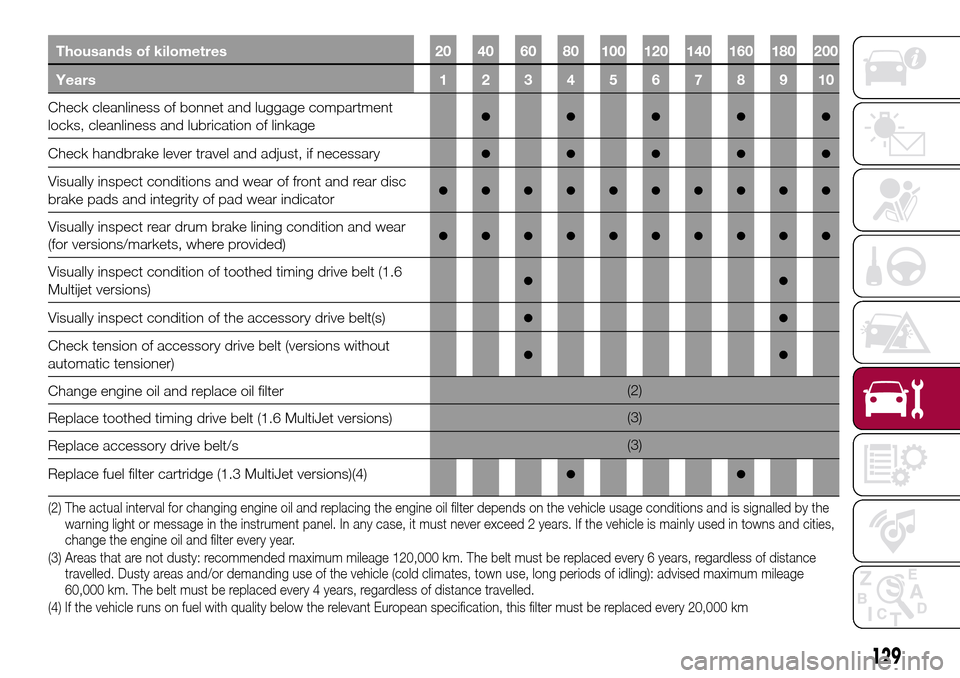
Thousands of kilometres 20 40 60 80 100 120 140 160 180 200
Years12345678910
Check cleanliness of bonnet and luggage compartment
locks, cleanliness and lubrication of linkage●●●●●
Check handbrake lever travel and adjust, if necessary●●●●●
Visually inspect conditions and wear of front and rear disc
brake pads and integrity of pad wear indicator●●●●●●●●●●
Visually inspect rear drum brake lining condition and wear
(for versions/markets, where provided)●●●●●●●●●●
Visually inspect condition of toothed timing drive belt (1.6
Multijet versions)●●
Visually inspect condition of the accessory drive belt(s)●●
Check tension of accessory drive belt (versions without
automatic tensioner)●●
Change engine oil and replace oil filter(2)
Replace toothed timing drive belt (1.6 MultiJet versions)(3)
Replace accessory drive belt/s(3)
Replace fuel filter cartridge (1.3 MultiJet versions)(4)
●●
(2) The actual interval for changing engine oil and replacing the engine oil filter depends on the vehicle usage conditions and is signalled by the
warning light or message in the instrument panel. In any case, it must never exceed 2 years. If the vehicle is mainly used in towns and cities,
change the engine oil and filter every year.
(3) Areas that are not dusty: recommended maximum mileage 120,000 km. The belt must be replaced every 6 years, regardless of distance
travelled. Dusty areas and/or demanding use of the vehicle (cold climates, town use, long periods of idling): advised maximum mileage
60,000 km. The belt must be replaced every 4 years, regardless of distance travelled.
(4) If the vehicle runs on fuel with quality below the relevant European specification, this filter must be replaced every 20,000 km
129
Page 133 of 204
PERIODIC CHECKS
Every1,000km or before long trips
check and, if necessary, top up:
engine coolant level;
brake fluid level;
windscreen washer fluid level;
tyre inflation pressure and condition;
operation of lighting system
(headlights, direction indicators, hazard
warning lights, etc.);
operation of screen washer/wiper
system and positioning/wear of
windscreen.
Every3,000km, check and top up if
required: engine oil level.
HEAVY USAGE OF THE
CAR
If the vehicle is used mainly under one
of the following conditions:
dusty roads;
short, repeated journeys (less than
7-8 km) at sub-zero outside
temperatures;
engine often idling or driving long
distances at low speeds or long periods
of inactivity;
the following checks must be carried
out more often than indicated in the
Scheduled Servicing Plan:
check front disc brake pad condition
and wear;
check cleanliness of bonnet and
luggage compartment locks,cleanliness and lubrication of linkage;
visually inspect conditions of: engine,
gearbox, transmission, pipes and hoses
(exhaust/fuel system/brakes) and
rubber elements (gaiters/sleeves/
bushes, etc.);
check battery charge and battery
fluid level (electrolyte);
visually inspect conditions of the
accessory drive belts;
check and, if necessary, change
engine oil and replace oil filter;
check and, if necessary, replace
pollen filter;
check and, if necessary, replace air
cleaner.
On versions with AT6 automatic
transmission, change the oil and
replace filters every 90,000 km (or 2
years) if the vehicle is used in the
following conditions: city driving, short
and repeated journeys (less than
78 km) or frequent towing of trailers or
caravans.
131
Page 143 of 204
Replacing the air cleaner
See the "Scheduled servicing plan" for
the correct servicing intervals.
It is advisable to replace it with a
genuine spare part, specifically
designed for this vehicle.
AIR CONDITIONING
SYSTEM MAINTENANCE
54) 55)
To ensure the best possible
performance, the air conditioning
system must be checked and undergo
maintenance at a Fiat Dealership at the
beginning of the summer.
WINDOWS
When cleaning the heated rear window
be careful, if the defrosting function is
active, regarding the temperature of the
glass; also make sure that children do
not come into contact with the heated
surface. The glass may be hot.
Never use an abrasive detergent to
clean the surface of the windows.
Do not use scrapers or sharp items that
might scratch the windows.
Spray the detergent on the cloth to be
used for cleaning the rear view mirror.
Do not spray the detergent directly on
the glass.Cleaning the window with hot water
could cause the removal of any labels.
WINDSCREEN WIPER
Replacing the windscreen wiper
blades
Proceed as follows:
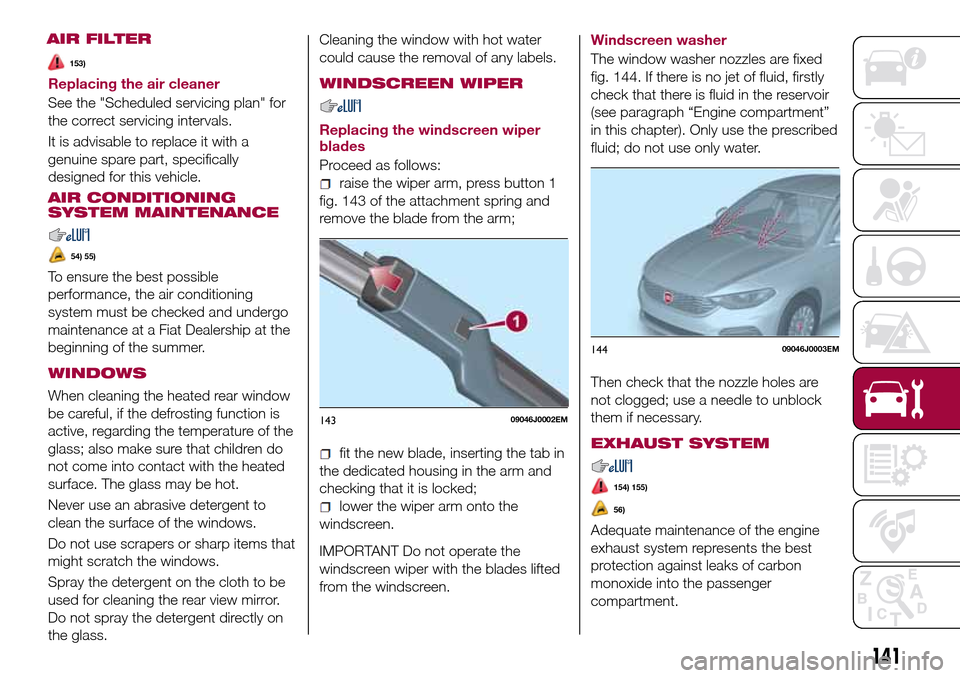
raise the wiper arm, press button 1
fig. 143 of the attachment spring and
remove the blade from the arm;
fit the new blade, inserting the tab in
the dedicated housing in the arm and
checking that it is locked;
lower the wiper arm onto the
windscreen.
IMPORTANT Do not operate the
windscreen wiper with the blades lifted
from the windscreen.
Windscreen washer
The window washer nozzles are fixed
fig. 144. If there is no jet of fluid, firstly
check that there is fluid in the reservoir
(see paragraph “Engine compartment”
in this chapter). Only use the prescribed
fluid; do not use only water.
Then check that the nozzle holes are
not clogged; use a needle to unblock
them if necessary.
EXHAUST SYSTEM
154) 155)
56)
Adequate maintenance of the engine
exhaust system represents the best
protection against leaks of carbon
monoxide into the passenger
compartment.
14309046J0002EM
14409046J0003EM
141
AIR FILTER
153)