2016 FIAT FULLBACK ESP
[x] Cancel search: ESPPage 156 of 312

100)For vehicles equipped with the shift
paddles, do not use the left- and right-hand
shift paddles at the same time. Doing so
could cause a shift of gear ratio that you do
not expect.
101)If the selector lever position display
blinks while you are driving, it is likely that a
safety device is operating because of a
malfunction in the automatic transmission.
Have the vehicle inspected by a Fiat
Dealership as soon as possible.
102)If the lamp comes on, reduce the
engine speed and stop the vehicle in a safe
area. Then set the selector lever to “P”
(PARK) position and idle the engine until the
warning lamp goes off. When the warning
lamp goes off, resume normal driving. If the
warning lamp does not go off, we
recommend you to have your vehicle
inspected.
103)Before selecting a gear with the
engine running and the vehicle stationary,
fully depress the brake pedal to prevent the
vehicle from creeping. The vehicle will begin
to move as soon as the gear is engaged,
especially when the engine speed is high,
at fast idle or with the air conditioner
operating, the brakes should only be
released when you are ready to drive away.
104)Depress the brake pedal with the right
foot at all times. Using the left foot could
cause driver movement delay in case of an
emergency.
105)To prevent sudden acceleration, never
race the engine when shifting from the “P”
(PARK) or “N” (NEUTRAL) position.
106)Operating the accelerator pedal while
the other foot is resting on the brake pedal
will affect braking efficiency and may cause
premature wear of brake pads.107)Use the selector lever in the correct
shift position in accordance with driving
conditions. Never coast downhill backward
with the selector lever in the {“D” (DRIVE) or
sports mode} or coast forward with the
selector lever in the “R” (REVERSE)
position. The engine may stop and the
unexpected increase in brake pedal effort
and steering wheel weight could lead to an
accident.
108)Do not race the engine with brake
pedal pressed when the vehicle is
stationary. This can damage the A/T. Also,
when you depress the accelerator pedal
while holding down the brake pedal with
the selector lever in the “P” (PARK), “N”
(NEUTRAL) or “D” (DRIVE) position, the
engine revolutions may not rise as high as
when performing the same operation with
the selector lever in the “N” (NEUTRAL)
position.
109)Never hold the vehicle stationary on a
hill using the accelerator pedal (without
using the brake pedal). Always apply the
parking brake and/or service brakes.EASY SELECT 4WD
(where provided)
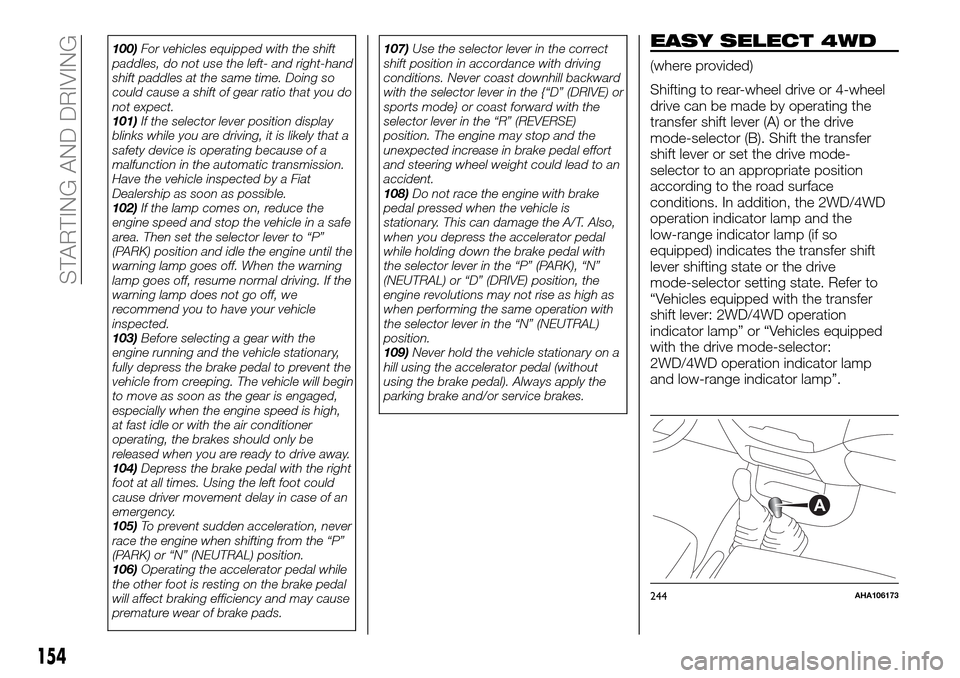
Shifting to rear-wheel drive or 4-wheel
drive can be made by operating the
transfer shift lever (A) or the drive
mode-selector (B). Shift the transfer
shift lever or set the drive mode-
selector to an appropriate position
according to the road surface
conditions. In addition, the 2WD/4WD
operation indicator lamp and the
low-range indicator lamp (if so
equipped) indicates the transfer shift
lever shifting state or the drive
mode-selector setting state. Refer to
“Vehicles equipped with the transfer
shift lever: 2WD/4WD operation
indicator lamp” or “Vehicles equipped
with the drive mode-selector:
2WD/4WD operation indicator lamp
and low-range indicator lamp”.
A
244AHA106173
154
STARTING AND DRIVING
Page 157 of 312

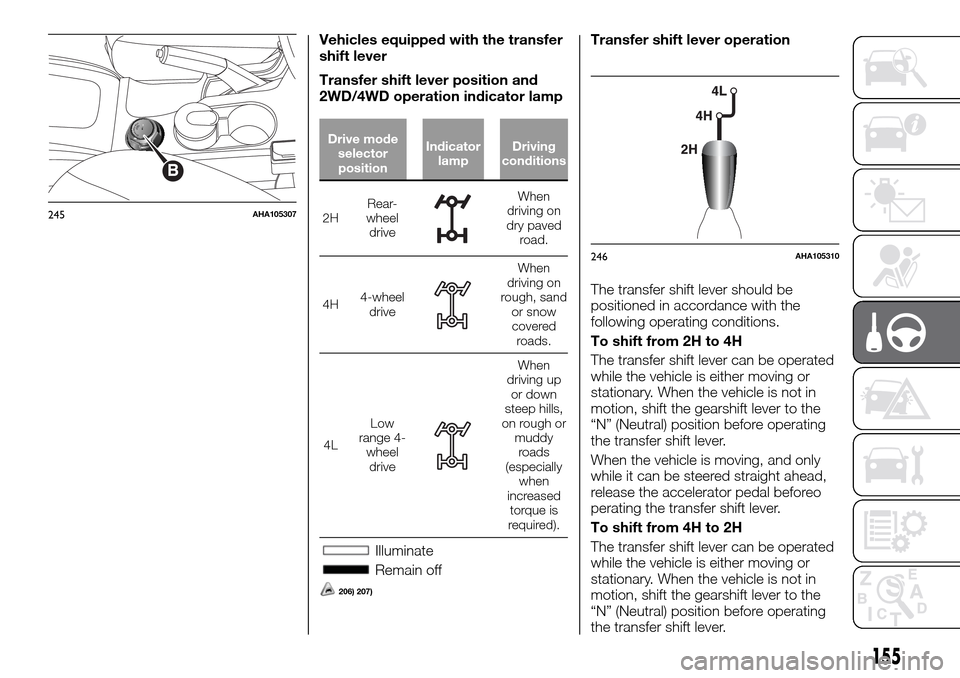
Vehicles equipped with the transfer
shift lever
Transfer shift lever position and
2WD/4WD operation indicator lamp
Drive mode
selector
positionIndicator
lampDriving
conditions
2HRear-
wheel
drive
When
driving on
dry paved
road.
4H4-wheel
drive
When
driving on
rough, sand
or snow
covered
roads.
4LLow
range 4-
wheel
drive
When
driving up
or down
steep hills,
on rough or
muddy
roads
(especially
when
increased
torque is
required).
Illuminate
Remain off
206) 207)
Transfer shift lever operation
The transfer shift lever should be
positioned in accordance with the
following operating conditions.
To shift from 2H to 4H
The transfer shift lever can be operated
while the vehicle is either moving or
stationary. When the vehicle is not in
motion, shift the gearshift lever to the
“N” (Neutral) position before operating
the transfer shift lever.
When the vehicle is moving, and only
while it can be steered straight ahead,
release the accelerator pedal beforeo
perating the transfer shift lever.
To shift from 4H to 2H
The transfer shift lever can be operated
while the vehicle is either moving or
stationary. When the vehicle is not in
motion, shift the gearshift lever to the
“N” (Neutral) position before operating
the transfer shift lever.
B
245AHA105307
246AHA105310
155
Page 160 of 312

Vehicles equipped with the drive
mode-selector
Drive mode-selector position and
2WD/4WD operation indicator lamp
Drive
mode
selector
positionIndicator
lampDriving
conditions
2H
Rear-
wheel
driveWhen driving on
dry paved road.
4H
4–wheel
drive
When driving on
rough, sand or
snow covered
roads.
4L
Low range
4- wheel
drive
and
When driving up
or down steep
hills, on rough
or muddy roads
(especially
when increased
torque is
required).
— Illuminate
— Remain off
206) 207)
Drive mode-selector operation
The drive mode is shown on the drive
mode selector.
Turn the drive mode-selector.
Turn the drive mode-selector while
holding it down.
The drive mode-selector should be
positioned in accordance with the
following operating conditions:
248AHA106131
158
STARTING AND DRIVING
Page 164 of 312

209)If a problem is detected in the transfer
system, a safety device will activate. The
2WD/4WD operation indicator blinks (twice
per second), and transfer shifting will
become impossible. Park your vehicle in a
safe place, turn off the engine for a few
moments. Restart the engine. The lamp
should resume normal operation. If the
lamp continue to blink, have the vehicle
checked by a Fiat Dealership as soon as
possible.SUPER SELECT 4WD
II
(where provided)
Shifting to rear-wheel drive or 4-wheel
drive can be made by operating the
drive mode-selector (A). Set the drive
mode-selector to an appropriate
position according to the road surface
conditions. In addition, the 2WD/4WD
operation indicator lamp and low-range
indicator lamp indicates the drive
mode-selector setting state. Refer to
“2WD/4WD operation indicator lamp
and low-range indicator lamp”.Drive mode-selector position and
2WD/4WD operation indicator lampSelector
positionIndicator
lampDriving
conditions
2H
Rear
wheel
driveWhen driving
on dry paved
road
4H
Fulltime
4- wheel
drive
When driving
on dry paved
or slippery
roads.
4HLc
Centre
differential
lock
engaged
4-wheel
drive
When driving
on rough,
sand or snow
covered
roads.
4LLc
Low
range
centre
differential
lock
engaged
4-wheel
drive
and
When driving
up or down
steep hills, on
rough or
muddy roads
(especially
when
increased
torque is
required).
— Illuminate
— Remain off
210) 211)
250AHA103635
162
STARTING AND DRIVING
Page 172 of 312

112)Use the rear differential lock only as an
emergency measure when the vehicle is
stuck and cannot be freed with the drive
mode-selector in “4L” or “4H” position
(Easy select 4WD) or in “4LLc” or “4HLc”
position (Super select 4WD II). Deactivate
the rear differential lock immediately after
using it.4 WHEEL DRIVE
OPERATION
By selecting 4-wheel drive, both axles
of the vehicle are rigidly connected with
each other. This improves the traction
characteristics. When turning sharp
corners or moving forward and
backward repeatedly, however, the
drive line is stressed, which is felt as a
braking effect. A 4-wheel drive vehicle
can accelerate more quickly and
smoothly.
However, note that the braking distance
is not shorter than that of a rear-wheel
drive vehicle.
When using 4-wheel drive on rough
roads (snow, mud, sand, etc.), it is
important to operate the vehicle
correctly.
The driving posture should be more
upright and closer to the wheel than
usual; adjust the seat to a good
position for easy steering and pedal
operation. Be sure to wear the seat belt
After driving on rough roads, check
each part of the vehicle and wash it
thoroughly with water. Refer to the
“Vehicle care” section and “Inspection
and maintenance following rough road
operation”.Driving on dry paved road and
highway
Select “2H” position (Easy select 4WD),
“2H” or “4H” position (Super select
4WD II) to drive on the dry paved road.
Especially on dry highway, never select
the “4H” or “4L” position (Easy select
4WD), “4HLc” or “4LLc” position (Super
select 4WD II).
113)
Driving on snowy or icy roads
Set the drive mode-selector to “4H”
position (Easy select 4WD), “4H” or
“4HLc” position in accordance with the
road conditions (Super select 4WD II)
and then gradually depress the
accelerator pedal for a smooth start.
Keep the pressure on the accelerator
pedal as constant as possible, and
drive at low speed. The use of snow
tyres and/or tyre chains is
recommended.
Maintain a safe distance between
vehicles, avoid sudden braking, and
use engine braking (downshifting).
114)
170
STARTING AND DRIVING
Page 173 of 312

Driving on sandy or muddy roads
Set the drive mode-selector to “4H” or
“4L” position (Easy select 4WD), “4HLc”
or “4LLc” position (Super select 4WD II)
and then gradually depress the
accelerator pedal for a smooth start.
Keep the pressure on the accelerator
pedal as constant as possible, and
drive at low speed.
115) 116)
218)
Avoid sudden braking, acceleration,
and turning; such operations could
result in the vehicle becoming stuck.
If the vehicle becomes stuck in sandy
or muddy roads, it can often be moved
a rocking motion. Move the selector
lever rhythmically between the “D”
(DRIVE) and “R” (REVERSE) position
(with manual transmission, between 1st
and Reverse), while applying slight
pressure to the accelerator pedal.
It is recommended to start the vehicle
with parking brake partially, but not
completely, applied by slightly pulling
the parking brake lever. After the vehicle
has become free, do not forget to
release the parking brake.
If it is necessary to drive in extremely
muddy conditions, the use of tyre
chains is recommended. Because the
extent of muddy conditions is difficult to
judge and the vehicle could become
bogged down very deeply, operationshould be at a low speed. If possible,
get out of the vehicle and check the
conditions ahead before proceeding.
Driving over roads in coastal areas or
roads on which anti-skid preparations
have been spread can cause rust on
the vehicle; wash the vehicle thoroughly
as soon as possible after such use.
Climbing sharp grades
Set the drive mode-selector to “4L”
position (Easy select 4WD), “4LLc”
position (Super select 4WD II) to
maximize the engine torque.
219) 220)
Choose as smooth a slope as possible
with few stones or other obstacles.
Before attempting to drive up the slope,
walk up it to confirm that the vehicle
can handle the grade.Descending sharp grades
Set the drive mode-selector to “4L”
position (Easy select 4WD), “4LLc”
position (Super select 4WD II), use the
engine brake (downshifting) and
descend slowly.
221)
When descending a sharp grade, if the
brakes are applied suddenly because of
an obstacle encountered, control of the
vehicle could be lost. Before
descending the slope, walk down it and
confirm the path.
Before descending a grade, it is
necessary to choose the appropriate
gear. Avoid changing gears or
depressing the clutch while descending
the grade.
Fiat. is not responsible to the operator
for any damage or injury caused or
liability incurred by the improper and
negligent operation of a vehicle. All
techniques of vehicle operation
described herein depend on the skill
and experience of the operator and
other participating parties and any
deviation from the recommended
operation instructions above is at their
own risk.
171
Page 177 of 312

WARNING
222)Do not crank the engine while jacking
up the vehicle. The tyre on the ground may
turn and the vehicle may roll off the jack.
BRAKING SYSTEM
All the parts of the brake system are
critical to safety. We recommend you to
have the vehicle checked at regular
intervals.
123)
Brake system
The service brake is divided into two
brake circuits. And your vehicle is
equipped with power brakes. If one
brake circuit fails, the other is available
to stop the vehicle. If your vehicle
should lose the power assist for some
reason, the brakes will still work.
In these situations even if the brake
pedal moves down to the very end of
its possible stroke or resists being
depressed, keep depressing the brake
pedal down harder and further than
usual; stop driving as soon as possible
and have the brake system repaired.
223) 224)
Warning lamp
The brake warning lamp illuminates to
indicate a fault in the braking system.
Refer to “Brake warning lamp”.When brakes are wet
Check the brake system while driving at
a low speed immediately after starting,
especially when the brakes are wet, to
confirm they work normally.
A film of water can be formed on the
brake discs or brake drums and
prevent normal braking after driving in
heavy rain or through large puddles, or
after the vehicle is washed. If this
occurs, dry the brakes out by driving
slowly while lightly depressing the brake
pedal.
When driving downhill
It is important to take advantage of the
engine braking by shifting to a lower
shift position while driving on steep
downhill roads in order to prevent the
brakes from overheating.
225)
Brake pads and linings
Avoid hard braking situations. New
brakes need to be broken-in by
moderate use for the first 200 km.
The disc brakes are provided with a
warning device which emits a shrieking
metallic sound while braking if the brake
pads have reached their wear limit. If
you hear this sound, have the brake
pads replaced.
226)
175
Page 185 of 312

and A in order of distance. The point A
and B actually are the same distances
from the vehicle, and the point C is
farther off than the point A and B.
WARNING
228)The responsibility for parking and
other manoeuvres is always and in any
case charged to the driver. While carrying
out these manoeuvres, always make sure
that no people (especially children) or
animals are in the area concerned. The
camera is an aid for the driver, but the
driver must never allow his/her attention to
lapse during potentially dangerous
manoeuvres, even those executed at low
speeds. Always keep a slow speed, so as
to promptly brake in the case of obstacles.229)The rear-view camera is an assistance
system that enables the driver to check for
obstacles behind the vehicle. Its range of
view is limited, so you should not overly
depend on it. Please drive just as carefully
as you would if the vehicle did not have the
rear-view camera.
230)Be sure to visually confirm safety
around the vehicle with your own eyes. Do
not depend entirely on the rear-view
camera.
IMPORTANT
128)It is vital, for correct operation, that
the camera is always kept clean and free
from mud, dirt, snow or ice. Be careful not
to scratch or damage the camera while
cleaning it. Avoid using dry, rough or hard
cloths. The camera must be washed using
clean water, with the addition of car
shampoo if necessary. In washing stations
which use steam or high-pressure jets,
clean the camera quickly, keeping the
nozzle more than 10 cm away from the
sensors. Do not apply stickers to the
camera.
129)The rear-view camera has a special
lens that can make objects shown on the
screen appear to be closer or further away
than they actually are.130)Due to the number of people in the
vehicle, the fuel quantity, the weight and
positioning of luggage, and/or the condition
of the road surface, the lines in the view
from the rearview camera may not be
accurately positioned relative to the actual
road. Use the reference lines only as a
guideline, and always do a safety check of
your behind and surroundings directly while
driving.
B
A
C
C
A
B
282AHA103765
183