2016 FIAT 500E ESP
[x] Cancel search: ESPPage 2 of 132

This guide has been prepared to help you get quickly acquainted
with your new FIAT® vehicle and to provide a convenient reference
source for common questions. However, it is not a substitute for your
Owner’s Manual.
For complete operational instructions, maintenance procedures and
important safety messages, please consult your Owner’s Manual,
Navigation/Uconnect Manuals and other Warning Labels in your vehicle.
Not all features shown in this guide may apply to your vehicle. For
additional information on accessories to help personalize your vehicle,
visit www.mopar.com (U.S.), www.mopar.ca (Canada) or your
local FIAT
® Dealer.
DRIVING AND ALCOHOL: Drunken driving is one of the most frequent
causes of collisions. Your driving ability can be seriously impaired with
blood alcohol levels far below the legal minimum. If you are drinking,
don’t drive. Ride with a designated non-drinking driver, call a cab, a friend,
or use public transportation.
If you are the first registered retail owner of your
vehicle, you may obtain a complimentary printed copy
of the Owner’s Manual, Navigation/Uconnect Manuals or
Warranty Booklet by calling 1-888-242-6342 (U.S.) or
1-800-387-1143 (Canada) or by contacting your dealer.
Driving after drinking can lead to a collision. Your perceptions are less
sharp, your reflexes are slower, and your judgment is impaired when you
have been drinking. Never drink and then drive.
WARNING
2111090_16c_500e_UG_102715.indd 210/27/15 2:12 PM
The driver’s primary responsibility is the safe operation of the
vehicle. Driving while distracted can result in loss of vehicle
control, resulting in a collision and personal injury. FCA US LLC
strongly recommends that the driver use extreme caution when
using any device or feature that may take their attention off the
road. Use of any electrical devices, such as cellular phones,
computers, portable radios, vehicle navigation or other devices,
by the driver while the vehicle is moving is dangerous and could
lead to a serious collision. Texting while driving is also dangerous
and should never be done while the vehicle is moving. If you find
yourself unable to devote your full attention to vehicle operation,
pull off the road to a safe location and stop your vehicle. Some
states or provinces prohibit the use of cellular telephones or
texting while driving. It is always the driver’s responsibility to
comply with all local laws.
IMPORTANT: This User Guide is intended to familiarize you with
the important features of your vehicle. The DVD enclosed
contains your Owner’s Manual, Navigation/Uconnect Manuals,
Warranty Booklets, Tire Warranty and Roadside Assistance (new
vehicles purchased in the U.S.) or Roadside Assistance (new
vehicles purchased in Canada) in electronic format. We hope you
find it useful. U.S. residents can purchase replacement �'�9�' kits
by visiting www.techauthority.com and Canadian residents
can purchase replacement DVD kits by calling 1-800-387-1143 .
Page 3 of 132

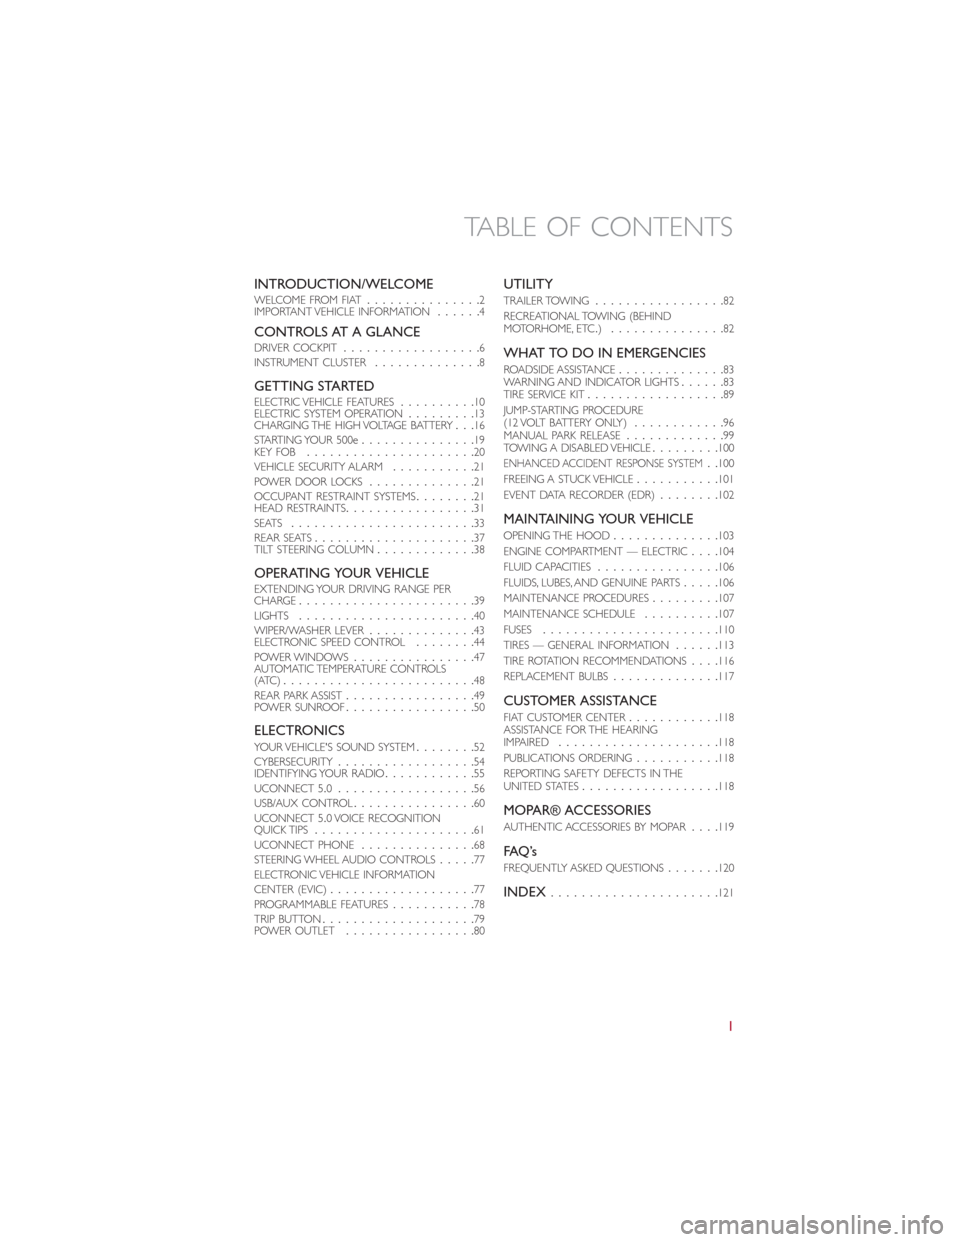
INTRODUCTION/WELCOMEWELCOME FROM FIAT...............2
IMPORTANT VEHICLE INFORMATION......4
CONTROLS AT A GLANCEDRIVER COCKPIT..................6
INSTRUMENT CLUSTER..............8
GETTING STARTEDELECTRIC VEHICLE FEATURES..........10
ELECTRIC SYSTEM OPERATION.........13
CHARGING THE HIGH VOLTAGE BATTERY...16
STARTING YOUR 500e...............19
KEY FOB......................20
VEHICLE SECURITY ALARM...........21
POWER DOOR LOCKS..............21
OCCUPANT RESTRAINT SYSTEMS........21
HEAD RESTRAINTS.................31
SEATS........................33
REAR SEATS.....................37
TILT STEERING COLUMN.............38
OPERATING YOUR VEHICLEEXTENDING YOUR DRIVING RANGE PER
CHARGE.......................39
LIGHTS.......................40
WIPER/WASHER LEVER..............43
ELECTRONIC SPEED CONTROL........44
POWER WINDOWS................47
AUTOMATIC TEMPERATURE CONTROLS
(ATC).........................48
REAR PARK ASSIST.................49
POWER SUNROOF.................50
ELECTRONICSYOUR VEHICLE'S SOUND SYSTEM........52
CYBERSECURITY..................54
IDENTIFYING YOUR RADIO............55
UCONNECT 5.0..................56
USB/AUX CONTROL................60
UCONNECT 5.0 VOICE RECOGNITION
QUICK TIPS.....................61
UCONNECT PHONE...............68
STEERING WHEEL AUDIO CONTROLS.....77
ELECTRONIC VEHICLE INFORMATION
CENTER (EVIC)...................77
PROGRAMMABLE FEATURES...........78
TRIP BUTTON....................79
POWER OUTLET.................80
UTILITY
TRAILER TOWING.................82
RECREATIONAL TOWING (BEHIND
MOTORHOME, ETC.)...............82
WHAT TO DO IN EMERGENCIES
ROADSIDE ASSISTANCE..............83
WARNING AND INDICATOR LIGHTS......83
TIRE SERVICE KIT..................89
JUMP-STARTING PROCEDURE
(12 VOLT BATTERY ONLY)............96
MANUAL PARK RELEASE.............99
TOWING A DISABLED VEHICLE.........100
ENHANCED ACCIDENT RESPONSE SYSTEM..100
FREEING A STUCK VEHICLE...........101
EVENT DATA RECORDER (EDR)........102
MAINTAINING YOUR VEHICLE
OPENING THE HOOD..............103
ENGINE COMPARTMENT — ELECTRIC....104
FLUID CAPACITIES................106
FLUIDS, LUBES, AND GENUINE PARTS.....106
MAINTENANCE PROCEDURES.........107
MAINTENANCE SCHEDULE..........107
FUSES.......................110
TIRES — GENERAL INFORMATION......113
TIRE ROTATION RECOMMENDATIONS....116
REPLACEMENT BULBS..............117
CUSTOMER ASSISTANCE
FIAT CUSTOMER CENTER............118
ASSISTANCE FOR THE HEARING
IMPAIRED.....................118
PUBLICATIONS ORDERING...........118
REPORTING SAFETY DEFECTS IN THE
UNITED STATES..................118
MOPAR® ACCESSORIES
AUTHENTIC ACCESSORIES BY MOPAR....119
FAQ ’s
FREQUENTLY ASKED QUESTIONS.......120
INDEX......................121
TABLE OF CONTENTS
1
Page 27 of 132

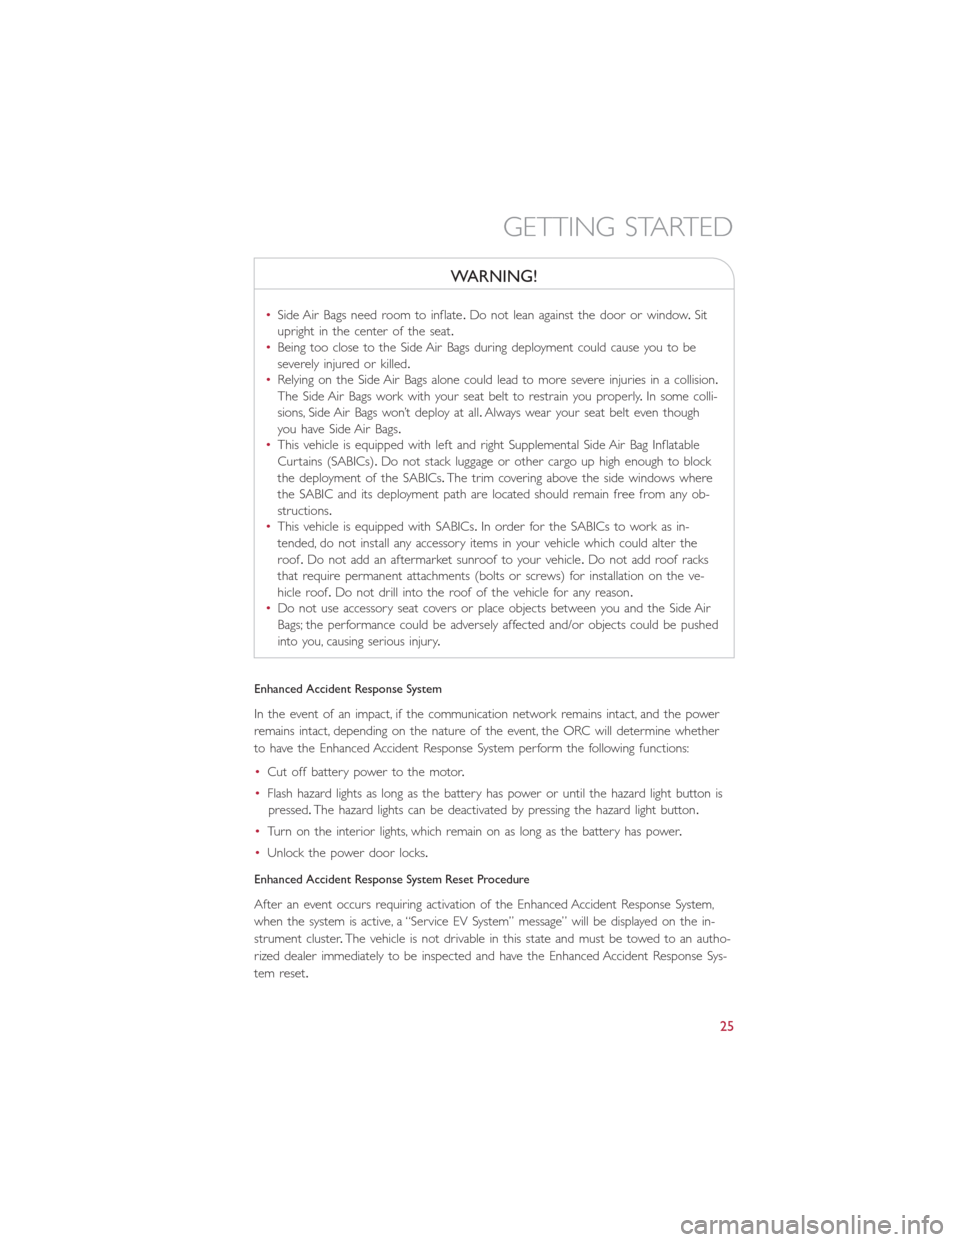
WARNING!
•Side Air Bags need room to inflate.Do not lean against the door or window.Sit
upright in the center of the seat.
•Being too close to the Side Air Bags during deployment could cause you to be
severely injured or killed.
•Relying on the Side Air Bags alone could lead to more severe injuries in a collision.
The Side Air Bags work with your seat belt to restrain you properly.In some colli-
sions, Side Air Bags won’t deploy at all.Always wear your seat belt even though
you have Side Air Bags.
•This vehicle is equipped with left and right Supplemental Side Air Bag Inflatable
Curtains (SABICs).Do not stack luggage or other cargo up high enough to block
the deployment of the SABICs.The trim covering above the side windows where
the SABIC and its deployment path are located should remain free from any ob-
structions.
•This vehicle is equipped with SABICs.In order for the SABICs to work as in-
tended, do not install any accessory items in your vehicle which could alter the
roof.Do not add an aftermarket sunroof to your vehicle.Do not add roof racks
that require permanent attachments (bolts or screws) for installation on the ve-
hicle roof.Do not drill into the roof of the vehicle for any reason.
•Do not use accessory seat covers or place objects between you and the Side Air
Bags; the performance could be adversely affected and/or objects could be pushed
into you, causing serious injury.
Enhanced Accident Response System
In the event of an impact, if the communication network remains intact, and the power
remains intact, depending on the nature of the event, the ORC will determine whether
to have the Enhanced Accident Response System perform the following functions:
•Cut off battery power to the motor.
•Flash hazard lights as long as the battery has power or until the hazard light button is
pressed.The hazard lights can be deactivated by pressing the hazard light button.
•Turn on the interior lights, which remain on as long as the battery has power.
•Unlock the power door locks.
Enhanced Accident Response System Reset Procedure
After an event occurs requiring activation of the Enhanced Accident Response System,
when the system is active, a “Service EV System” message” will be displayed on the in-
strument cluster.The vehicle is not drivable in this state and must be towed to an autho-
rized dealer immediately to be inspected and have the Enhanced Accident Response Sys-
tem reset.
GETTING STARTED
25
Page 39 of 132

WARNING!
•Persons who are unable to feel pain to the skin because of advanced age, chronic
illness, diabetes, spinal cord injury, medication, alcohol use, exhaustion or other
physical condition must exercise care when using the seat heater.It may cause
burns even at low temperatures, especially if used for long periods of time.
•Do not place anything on the seat or seatback that insulates against heat, such as a
blanket or cushion.This may cause the seat heater to overheat.Sitting in a seat
that has been overheated could cause serious burns due to the increased surface
temperature of the seat.
REAR SEATS
Folding Rear Seatback
To fold each rear seatback, push down on the button located on the upper outboard side
of the seat and fold the seatback flat.
NOTE:
Be sure that the front seats are fully up-
right and positioned forward.This will allow
the rear seatback to fold down easily.
Rear Folding Seat Button
GETTING STARTED
37
Page 43 of 132

Turn Signals
Push the multifunction lever upward to signal a right turn or downward to signal a left
turn.The corresponding indicator in the instrument cluster will blink to indicate the op-
eration of the turn signal.
NOTE:
The indicators will automatically turn off when the turn has been completed and the
steering wheel is returned to a straight position.
Lane Change Assist
Tap the lever up or down once, without moving beyond the detent, and the turn signal
(right or left) will flash three times then automatically turn off.
Follow Me Home/Headlight Delay
When this feature is selected the driver can choose to have the headlights remain on for
a preset period of time.
Activation
Remove the key or turn the ignition to the OFF/LOCK position, and pull the multifunc-
tion lever toward the steering wheel, within two minutes.Each time the lever is pulled,
the activation of the lights will be extended by 30 seconds.The activation of the lights
can be extended to a maximum of 210 seconds.
Deactivation
Pull the multifunction lever toward the steering wheel and hold it for more than two
seconds.
Interior Lights
The interior light switches are located in the overhead console.The interior lights can be
set to three different positions (Off/Left Position, Center Position, On/Right Position).
Using the switch on the left overhead, push the switch to the right from its center posi-
tion and the lights are always on.Push the switch to the left from its center position and
the lights are always off.Leave the switch in the center position, and the lights are turned
on and off when the doors are opened or closed.The switch on the right side of the
overhead console controls the map or reading function of the lights.Push the switch to
the right to turn on the right light and push the switch to the left to turn on the left
light.
CAUTION!
Before getting out of the vehicle be sure that the switch is in the center position or
that the lights are off to avoid draining the battery.
OPERATING YOUR VEHICLE
41
Page 62 of 132

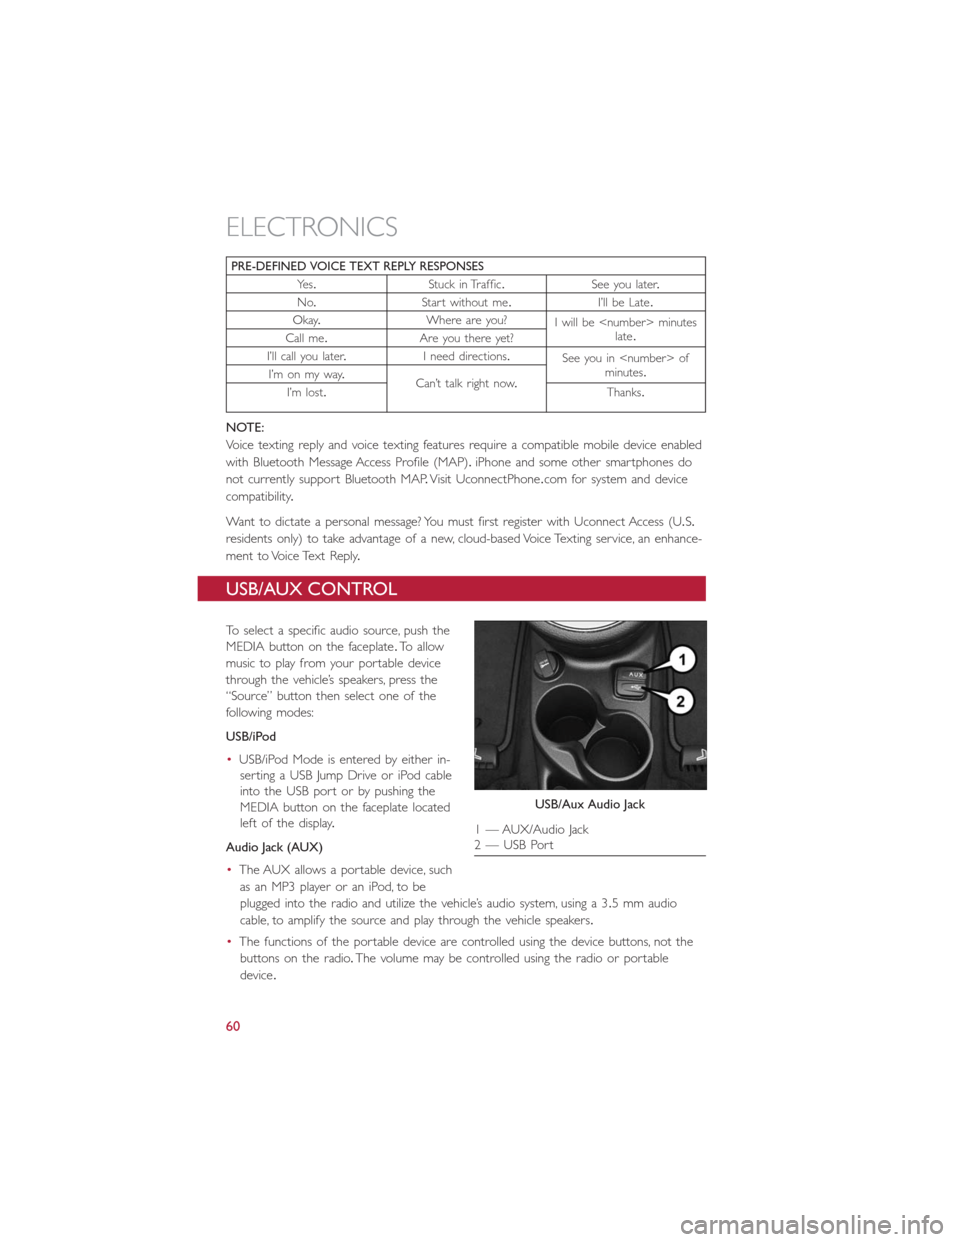
PRE-DEFINED VOICE TEXT REPLY RESPONSES
Ye s.Stuck in Traffic.See you later.
No.Start without me.I’ll be Late.
Okay.Where are you?
I will be
late.
Call me.Are you there yet?
I’ll call you later.I need directions.
See you in
minutes.
I’m on my way.
Can’t talk right now.
I’m lost.Thanks.
NOTE:
Voice texting reply and voice texting features require a compatible mobile device enabled
with Bluetooth Message Access Profile (MAP).iPhone and some other smartphones do
not currently support Bluetooth MAP.Visit UconnectPhone.com for system and device
compatibility.
Want to dictate a personal message? You must first register with Uconnect Access (U.S.
residents only) to take advantage of a new, cloud-based Voice Texting service, an enhance-
ment to Voice Text Reply.
USB/AUX CONTROL
To select a specific audio source, push the
MEDIA button on the faceplate.To allow
music to play from your portable device
through the vehicle’s speakers, press the
“Source” button then select one of the
following modes:
USB/iPod
•USB/iPod Mode is entered by either in-
serting a USB Jump Drive or iPod cable
into the USB port or by pushing the
MEDIA button on the faceplate located
left of the display.
Audio Jack (AUX)
•The AUX allows a portable device, such
as an MP3 player or an iPod, to be
plugged into the radio and utilize the vehicle’s audio system, using a 3.5 mm audio
cable, to amplify the source and play through the vehicle speakers.
•The functions of the portable device are controlled using the device buttons, not the
buttons on the radio.The volume may be controlled using the radio or portable
device.
USB/Aux Audio Jack
1 — AUX/Audio Jack
2 — USB Port
ELECTRONICS
60
Page 77 of 132

Voice Text Reply (Not Compatible With iPhone)
NOTE:
Voice texting reply and voice texting features require a compatible mobile device enabled
with Bluetooth Message Access Profile (MAP).iPhone, and some other smartphones, may
not entirely support Bluetooth MAP.Visit UconnectPhone.com for the latest system and
device compatibility.
•Due to the extremely large number of mobile phone manufacturers, your mobile de-
vice may not be listed.For further assistance, contact Uconnect Customer Care @
1-877-855-8400 for U.S.residents or, 1-800-465-2001 (English) / 1-800-387-9983
(French) for Canadian residents.
Once your Uconnect system is paired with a compatible mobile device, the system can
announce a new incoming text message, and read it to your over the vehicle audio sys-
tem.You can reply to the message using Voice Recognition by selecting, or saying, one of
the 18 pre-defined messages.
Here’s How:
1.Push the Uconnect Phone button
and wait for the beep, then say “reply.”
Uconnect will give the following prompt: “Please say the message you would like to
send.”
2.Wait for the beep and say one of the pre-defined messages.(If you are not sure, you
can say “help”).Uconnect will then read the pre-defined messages allowed.
3.As soon as you hear the message you would like to send, you can interrupt the list of
prompts by pushing the Uconnect phone button and saying the phrase.Uconnect will
confirm the message by reading it back to you.
4.Push the Phone button and say “Send.”
PRE-DEFINED VOICE TEXT REPLY RESPONSES
Ye s.Stuck in Traffic.See you later.
No.Start without me.I’ll be Late.
Okay.Where are you?
I will be <5, 10, 15,...etc.>
minutes late.
Call me.Are you there yet?
I’ll call you later.I need directions.
See you in <5, 10, 15,...etc.>
of minutes.
I’m on my way.
Can’t talk right now.
I’m lost.Thanks.
NOTE:
To make the SMS voice reading function available, the SMS notification option on phone
must be enabled; this option is usually available on the phone, in the Bluetooth connec-
tions menu for a device registered as Uconnect.After enabling this function on the mo-
bile phone, it must be disconnected and reconnected with the Uconnect system in order
to make it effective.
ELECTRONICS
75
Page 88 of 132

– Tire Pressure Monitoring System (TPMS) Light
Each tire, including the spare (if provided), should be checked monthly when cold and
inflated to the inflation pressure recommended by the vehicle manufacturer on the ve-
hicle placard or tire inflation pressure label.(If your vehicle has tires of a different size
than the size indicated on the vehicle placard or tire inflation pressure label, you should
determine the proper tire inflation pressure for those tires.)
As an added safety feature, your vehicle has been equipped with a Tire Pressure Monitor-
ing System (TPMS) that illuminates a low tire pressure telltale when one or more of your
tires is significantly under-inflated.Accordingly, when the low tire pressure telltale illumi-
nates, you should stop and check your tires as soon as possible, and inflate them to the
proper pressure.Driving on a significantly under-inflated tire causes the tire to overheat
and can lead to tire failure.Under-inflation also increases high voltage battery consump-
tion and tire tread life, and may affect the vehicle’s handling and stopping ability.
IF THE LIGHT STARTS FLASHING INDICATING A LOW TIRE PRESSURE, ADJUST
THE AIR PRESSURE IN THE LOW TIRE TO THE AIR PRESSURE SHOWN ON THE
VEHICLE PLACARD OR TIRE INFLATION PRESSURE LABEL LOCATED ON THE
DRIVER'S DOOR.
NOTE:
After inflation, the vehicle may need to be driven for 20 minutes before the flashing light
will turn off.
Please note that the TPMS is not a substitute for proper tire maintenance, and it is the
driver’s responsibility to maintain correct tire pressure, even if under-inflation has not
reached the level to trigger illumination of the TPMS low tire pressure telltale.
Your vehicle has also been equipped with a TPMS malfunction indicator to indicate when
the system is not operating properly.The TPMS malfunction indicator is combined with
the low tire pressure telltale.When the system detects a malfunction, the telltale will
flash for approximately one minute and then remain continuously illuminated.This se-
quence will continue upon subsequent vehicle start-ups as long as the malfunction exists.
When the malfunction indicator is illuminated, the system may not be able to detect or
signal low tire pressure as intended.TPMS malfunctions may occur for a variety of rea-
sons, including the installation of replacement or alternate tires or wheels on the vehicle
that prevent the TPMS from functioning properly.Always check the TPMS malfunction
telltale after replacing one or more tires or wheels on your vehicle, to ensure that the
replacement or alternate tires and wheels allow the TPMS to continue to function prop-
erly.
WHAT TO DO IN EMERGENCIES
86