2016 CHEVROLET MALIBU display
[x] Cancel search: displayPage 19 of 420
Chevrolet Malibu Owner Manual (GMNA-Localizing-U.S./Canada/Mexico-
9087641) - 2016 - crc - 9/3/15
18 In Brief
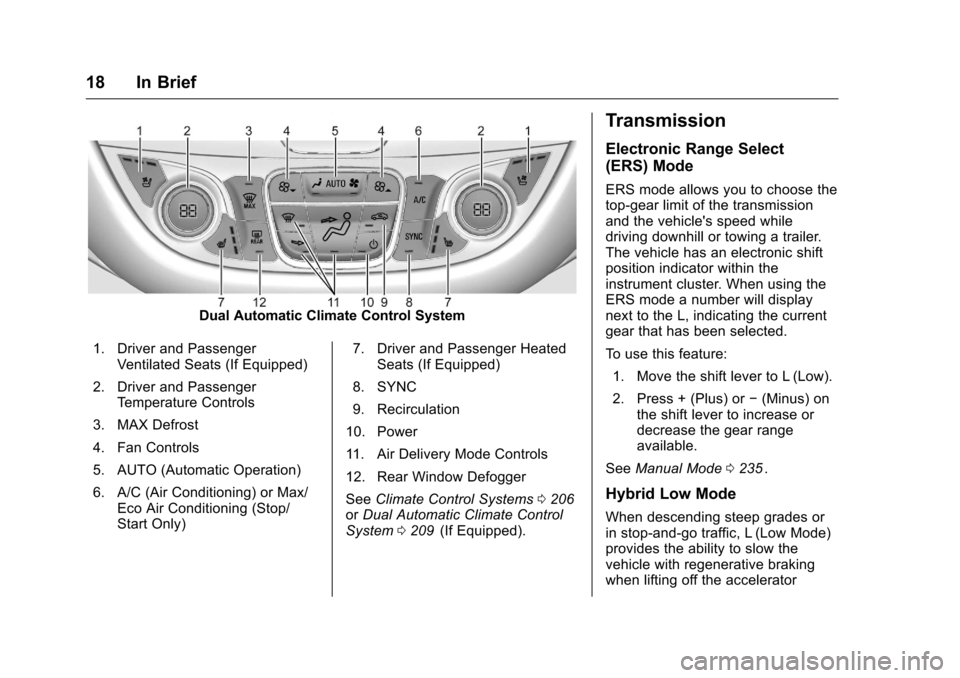
Dual Automatic Climate Control System
1. Driver and Passenger Ventilated Seats (If Equipped)
2. Driver and Passenger Temperature Controls
3. MAX Defrost
4. Fan Controls
5. AUTO (Automatic Operation)
6. A/C (Air Conditioning) or Max/ Eco Air Conditioning (Stop/
Start Only) 7. Driver and Passenger Heated
Seats (If Equipped)
8. SYNC
9. Recirculation
10. Power
11. Air Delivery Mode Controls
12. Rear Window Defogger
See Climate Control Systems 0206
iior Dual Automatic Climate Control
System 0209ii(If Equipped).
Transmission
Electronic Range Select
(ERS) Mode
ERS mode allows you to choose the
top-gear limit of the transmission
and the vehicle's speed while
driving downhill or towing a trailer.
The vehicle has an electronic shift
position indicator within the
instrument cluster. When using the
ERS mode a number will display
next to the L, indicating the current
gear that has been selected.
To use this feature:
1. Move the shift lever to L (Low).
2. Press + (Plus) or −(Minus) on
the shift lever to increase or
decrease the gear range
available.
See Manual Mode 0235
ii.
Hybrid Low Mode
When descending steep grades or
in stop-and-go traffic, L (Low Mode)
provides the ability to slow the
vehicle with regenerative braking
when lifting off the accelerator
Page 20 of 420
Chevrolet Malibu Owner Manual (GMNA-Localizing-U.S./Canada/Mexico-
9087641) - 2016 - crc - 9/3/15
In Brief 19
pedal. L2 (Low 2) provides moderate
braking and L1 (Low 1) provides
maximum braking below 80 km/h
(50 mph). When the battery reaches
full charge the engine may run to
maintain braking.
To use this feature:1. Move the shift lever to L (Low). The transmission will enter
L2 (Low 2).
2. Press + (Plus) or −(Minus) on
the shift lever to shift between
L2 (Low 2) and L1 (Low 1).
See Manual Mode 0235
ii.
Vehicle Features
Infotainment System
Base radio information is included in
this manual. See the infotainment
manual for information on other
available infotainment systems.
Read the following pages to
become familiar with these features.
{Warning
Taking your eyes off the road for
too long or too often while using
any infotainment feature can
cause a crash. You or others
could be injured or killed. Do not
give extended attention to
infotainment tasks while driving.
Limit your glances at the vehicle
displays and focus your attention
on driving. Use voice commands
whenever possible.
The infotainment system has built-in
features intended to help avoid
distraction by disabling some
functions when driving. These functions may gray out when they
are unavailable. Many infotainment
features are also available through
the instrument cluster and steering
wheel controls.
Before driving:
.
Become familiar with the
operation, faceplate buttons, and
screen buttons.
. Set up the audio by presetting
favorite stations, setting the
tone, and adjusting the
speakers.
. Set up phone numbers in
advance so they can be called
easily by pressing a single
button or by using a single voice
command if equipped with
Bluetooth phone capability.
See Defensive Driving 0217
ii.
To play the infotainment system with
the ignition off, see Retained
Accessory Power (RAP) 0231
ii.
Page 23 of 420
Chevrolet Malibu Owner Manual (GMNA-Localizing-U.S./Canada/Mexico-
9087641) - 2016 - crc - 9/3/15
22 In Brief
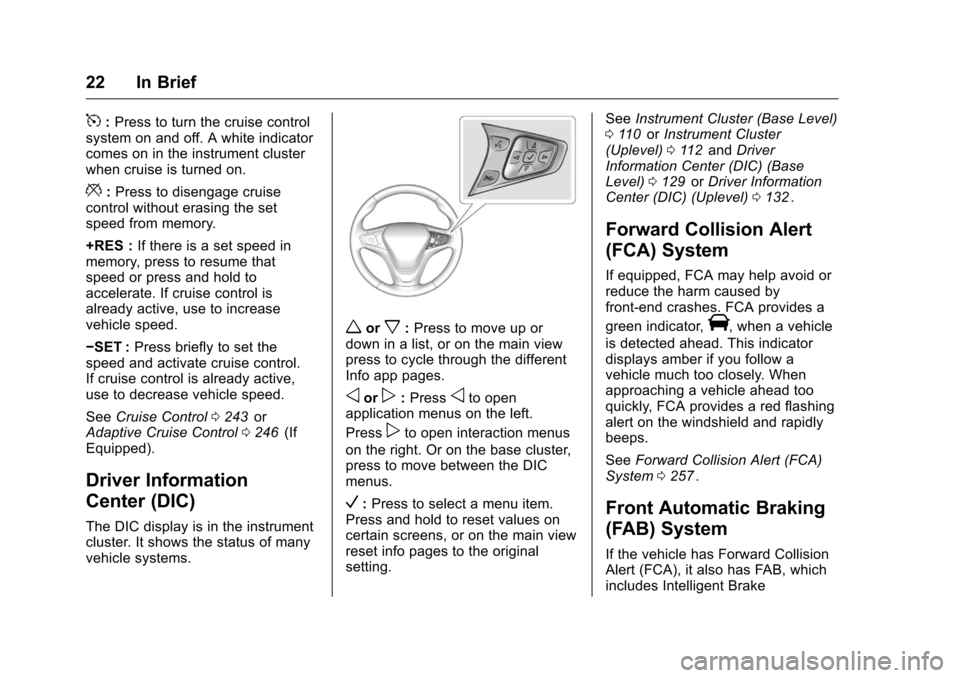
5:Press to turn the cruise control
system on and off. A white indicator
comes on in the instrument cluster
when cruise is turned on.
*: Press to disengage cruise
control without erasing the set
speed from memory.
+RES : If there is a set speed in
memory, press to resume that
speed or press and hold to
accelerate. If cruise control is
already active, use to increase
vehicle speed.
−SET : Press briefly to set the
speed and activate cruise control.
If cruise control is already active,
use to decrease vehicle speed.
See Cruise Control 0243
iior
Adaptive Cruise Control 0246ii(If
Equipped).
Driver Information
Center (DIC)
The DIC display is in the instrument
cluster. It shows the status of many
vehicle systems.
worx: Press to move up or
down in a list, or on the main view
press to cycle through the different
Info app pages.
oorp: Pressoto open
application menus on the left.
Press
pto open interaction menus
on the right. Or on the base cluster,
press to move between the DIC
menus.
V: Press to select a menu item.
Press and hold to reset values on
certain screens, or on the main view
reset info pages to the original
setting. See
Instrument Cluster (Base Level)
0 110
iior Instrument Cluster
(Uplevel) 0112iiand Driver
Information Center (DIC) (Base
Level) 0129
iior Driver Information
Center (DIC) (Uplevel) 0132ii.
Forward Collision Alert
(FCA) System
If equipped, FCA may help avoid or
reduce the harm caused by
front-end crashes. FCA provides a
green indicator,
V, when a vehicle
is detected ahead. This indicator
displays amber if you follow a
vehicle much too closely. When
approaching a vehicle ahead too
quickly, FCA provides a red flashing
alert on the windshield and rapidly
beeps.
See Forward Collision Alert (FCA)
System 0257
ii.
Front Automatic Braking
(FAB) System
If the vehicle has Forward Collision
Alert (FCA), it also has FAB, which
includes Intelligent Brake
Page 24 of 420
Chevrolet Malibu Owner Manual (GMNA-Localizing-U.S./Canada/Mexico-
9087641) - 2016 - crc - 9/3/15
In Brief 23
Assist (IBA). When the system
detects a vehicle ahead in your path
that is traveling in the same
direction that you may be about to
crash into, it can provide a boost to
braking or automatically brake the
vehicle. This can help avoid or
lessen the severity of crashes when
driving in a forward gear.
SeeFront Automatic Braking (FAB)
System 0259
ii.
Front Pedestrian Braking
(FPB) System
If equipped, the FPB system may
help avoid or reduce the harm
caused by front-end crashes with
nearby pedestrians when driving in
a forward gear. FPB displays a
pedestrian ahead indicator when a
nearby pedestrian is detected
directly ahead. When approaching a
detected pedestrian too quickly,
FPB provides a red flashing alert on
the windshield and rapidly beeps.
FPB can provide a boost to braking
or automatically brake the vehicle.
See Front Pedestrian Braking (FPB)
System 0261
ii.
Lane Keep Assist (LKA)
If equipped, LKA may help avoid
crashes due to unintentional lane
departures. It may assist by gently
turning the steering wheel if the
vehicle approaches a detected lane
marking without using a turn signal
in that direction. It may also provide
a Lane Departure Warning (LDW)
alert as the lane marking is crossed.
The system will not assist or alert if
it detects that you are actively
steering. Override LKA by turning
the steering wheel. LKA uses a
camera to detect lane markings
between 60 km/h (37 mph) and
180 km/h (112 mph).
See Lane Departure Warning (LDW)
0 265
iiand Lane Keep Assist (LKA)
0 265ii.
Lane Change Alert (LCA)
If equipped, the LCA system is a
lane-changing aid that assists
drivers with avoiding lane change
crashes that occur with moving
vehicles in the side blind zone (or
spot) areas or with vehicles rapidly
approaching these areas from behind. The LCA warning display
will light up in the corresponding
outside side mirror and will flash if
the turn signal is on. The Side Blind
Zone Alert (SBZA) system is
included as part of the LCA system.
See
Side Blind Zone Alert (SBZA)
0 263
iiand Lane Change Alert (LCA)
0 263ii.
Rear Vision
Camera (RVC)
If equipped, RVC displays a view of
the area behind the vehicle on the
center stack display when the
vehicle is shifted into R (Reverse) to
aid with parking and low-speed
backing maneuvers.
See Assistance Systems for Parking
or Backing 0253
ii.
Rear Cross Traffic Alert
(RCTA) System
If equipped, the RCTA system uses
a triangle with an arrow displayed
on the RVC screen to warn of traffic
behind your vehicle that may cross
Page 25 of 420
Chevrolet Malibu Owner Manual (GMNA-Localizing-U.S./Canada/Mexico-
9087641) - 2016 - crc - 9/3/15
24 In Brief
your vehicle's path while in
R (Reverse). In addition, beeps will
sound.
SeeAssistance Systems for Parking
or Backing 0253
ii.
Parking Assist
If equipped, Front and Rear Parking
Assist (FRPA) uses sensors on the
front and rear bumpers to assist
with parking and avoiding objects
during low-speed parking
maneuvers. It operates at speeds
less than 8 km/h (5 mph). The
system may display a warning
triangle on the RVC screen and a
graphic on the instrument cluster to
provide the object distance. In
addition, multiple beeps may occur
if very close to an object.
See Assistance Systems for Parking
or Backing 0253
ii.
Automatic Parking
Assist (APA)
If equipped, the APA system helps
to search for and maneuver the
vehicle into parallel or perpendicular parking spots using automatic
steering, DIC displays, and beeps.
When the vehicle speed is below
30 km/h (18 mph), press
Oto
enable the system.
See “Automatic Parking Assist
(APA)” underAssistance Systems
for Parking or Backing 0253
ii.
Power Outlets
The accessory power outlets can be
used to plug in electrical equipment,
such as a cell phone or MP3 player.
There are two accessory power
outlets:
.
One on the center stack below
the climate control system.
. One on the rear of the center
floor console.
Open the protective cover to use the
accessory power outlet.
See Power Outlets 0107
ii.
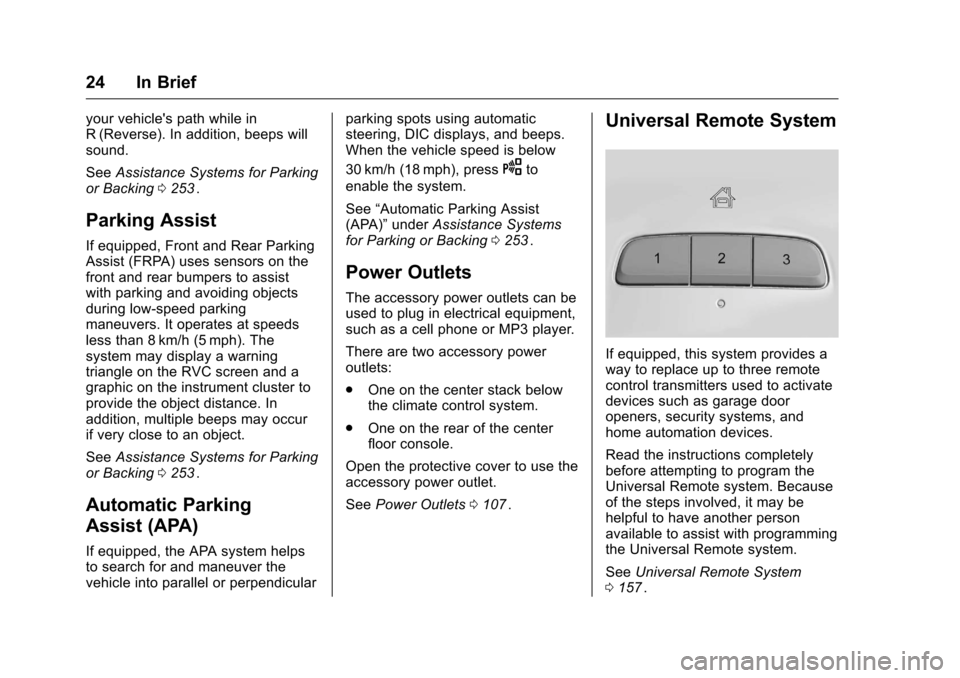
Universal Remote System
If equipped, this system provides a
way to replace up to three remote
control transmitters used to activate
devices such as garage door
openers, security systems, and
home automation devices.
Read the instructions completely
before attempting to program the
Universal Remote system. Because
of the steps involved, it may be
helpful to have another person
available to assist with programming
the Universal Remote system.
See Universal Remote System
0 157
ii.
Page 27 of 420
Chevrolet Malibu Owner Manual (GMNA-Localizing-U.S./Canada/Mexico-
9087641) - 2016 - crc - 9/3/15
26 In Brief
High Voltage Safety
Information
{Warning
Exposure to high voltage can
cause shock, burns, and even
death. The high voltage
components in the vehicle can
only be serviced by technicians
with special training.
High voltage components are
identified by labels. Do not
remove, open, take apart,
or modify these components.
High voltage cable or wiring has
orange covering or labels. Do not
probe, tamper with, cut, or modify
high voltage cable or wiring.
This vehicle has a high voltage
battery and a standard 12-volt
battery.
If the vehicle is in a crash, the
sensing system may shut down the
high voltage system. When this
occurs, the high voltage battery is
disconnected and the vehicle will not start. The SERVICE VEHICLE
SOON message in the Driver
Information Center (DIC) will be
displayed. Before the vehicle can be
operated again, it must be serviced
at your dealer.
{Warning
Damage to the high voltage
battery or high voltage system
can create a risk of electric shock,
overheating, or fire.
If the vehicle is damaged from a
moderate to severe crash, flood,
fire, or other event, the vehicle
should be inspected as soon as
possible. Until the vehicle has
been inspected, store it outside at
least 15 m (50 ft) from any
structure or anything that can
burn. Ventilate the vehicle by
opening a window or a door.
Contact Customer Assistance as
soon as possible to determine
whether an inspection is needed.
See
Customer Assistance Offices
0 386
ii. See
Battery - North America 0302
iifor important safety information.
If an airbag has inflated, see What
Will You See after an Airbag
Inflates? 074
ii.
Only a trained service technician
with the proper knowledge and tools
should inspect, test, or replace the
high voltage battery. See your
dealer if the high voltage battery
needs service.
Regenerative Braking
Regenerative braking takes some of
the energy from the moving vehicle
and turns it back into electrical
energy. This energy is then stored in
the high voltage battery system,
contributing to increased energy
efficiency. See Regenerative
Braking (Hybrid Only) 0241
ii.
Page 29 of 420
Chevrolet Malibu Owner Manual (GMNA-Localizing-U.S./Canada/Mexico-
9087641) - 2016 - crc - 9/3/15
28 In Brief
Loading Information label. See
Vehicle Load Limits0222ii. The
warning light will remain on until the
tire pressure is corrected.
The low tire pressure warning light
may come on in cool weather when
the vehicle is first started, and then
turn off as the vehicle is driven. This
may be an early indicator that the
tire pressures are getting low and
the tires need to be inflated to the
proper pressure.
The TPMS does not replace normal
monthly tire maintenance. Maintain
the correct tire pressures.
See Tire Pressure Monitor System
0 327
ii.
Engine Oil Life System
The engine oil life system calculates
engine oil life based on vehicle use
and displays the CHANGE ENGINE
OIL SOON message when it is time
to change the engine oil and filter.
The oil life system should be reset
to 100% only following an oil
change. Resetting the Oil Life System
1. Using the DIC controls on the right side of the steering wheel,
display REMAINING OIL LIFE
on the DIC. See Driver
Information Center (DIC) (Base
Level) 0129
iior Driver
Information Center (DIC)
(Uplevel) 0132
ii. When
remaining oil life is low, the
CHANGE ENGINE OIL SOON
message will appear on the
display. See Engine Oil
Messages 0139
ii.
2. Press
Von the DIC controls
and hold down for a few
seconds to clear the CHANGE
ENGINE OIL SOON message
and reset the oil life at 100%.
Be careful not to reset the oil
life display accidentally at any
time other than after the oil is
changed. It cannot be reset
accurately until the next oil
change. The system is reset when the
CHANGE ENGINE OIL SOON
message is off and the REMAINING
OIL LIFE 100% message is
displayed.
See
Engine Oil Life System 0291
ii.
Driving for Better Fuel
Economy
Driving habits can affect fuel
mileage. Here are some driving tips
to get the best fuel economy
possible.
.
Avoid fast starts and accelerate
smoothly.
. Brake gradually and avoid
abrupt stops.
. Avoid idling the engine for long
periods of time.
. When road and weather
conditions are appropriate, use
cruise control.
. Always follow posted speed
limits or drive more slowly when
conditions require.
. Keep vehicle tires properly
inflated.
Page 35 of 420
Chevrolet Malibu Owner Manual (GMNA-Localizing-U.S./Canada/Mexico-
9087641) - 2016 - crc - 9/3/15
34 Keys, Doors, and Windows
Keyless Trunk Opening
Press the touch pad on the rear of
the trunk to open it if the RKE
transmitter is within 1 m (3 ft) of the
trunk.
Keyed Access
To access a vehicle with a dead
transmitter battery, seeDoor Locks
0 38
ii.
Programming Transmitters to
the Vehicle
Only RKE transmitters programmed
to the vehicle will work. If a
transmitter is lost or stolen, a
replacement can be purchased and
programmed through your dealer.
The vehicle can be reprogrammed
so that lost or stolen transmitters no
longer work. Any remaining
transmitters will need to be
reprogrammed. Each vehicle can
have up to eight transmitters
matched to it. Programming with a Recognized
Transmitter
A new transmitter can be
programmed to the vehicle when
there is one recognized transmitter.
To program, the vehicle must be off
and all of the transmitters, both
currently recognized and new, must
be with you.
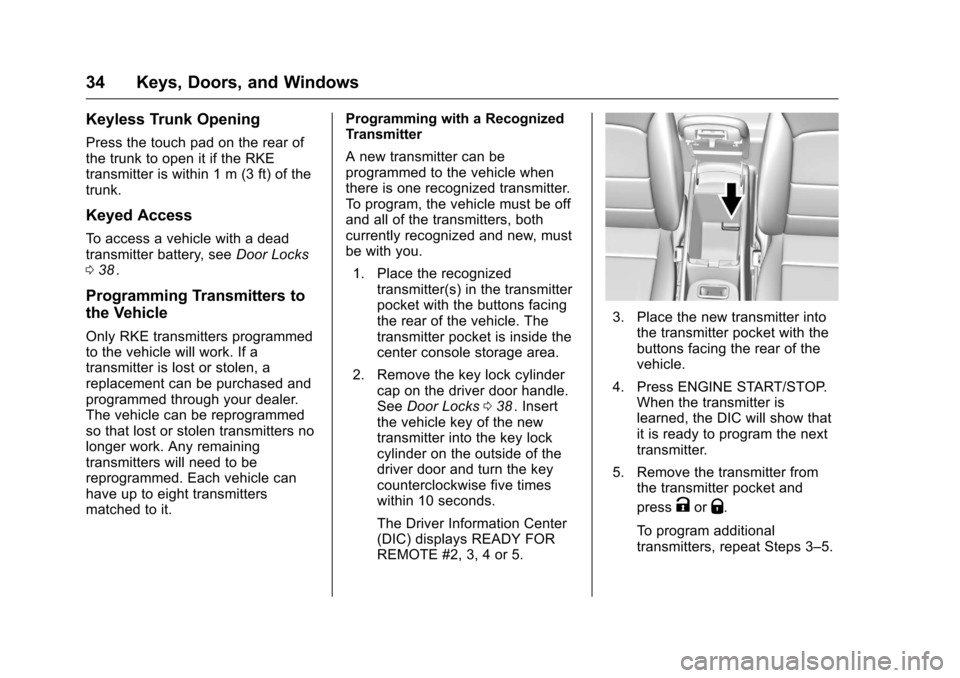
1. Place the recognized transmitter(s) in the transmitter
pocket with the buttons facing
the rear of the vehicle. The
transmitter pocket is inside the
center console storage area.
2. Remove the key lock cylinder cap on the driver door handle.
See Door Locks 038
ii. Insert
the vehicle key of the new
transmitter into the key lock
cylinder on the outside of the
driver door and turn the key
counterclockwise five times
within 10 seconds.
The Driver Information Center
(DIC) displays READY FOR
REMOTE #2, 3, 4 or 5.
3. Place the new transmitter into the transmitter pocket with the
buttons facing the rear of the
vehicle.
4. Press ENGINE START/STOP. When the transmitter is
learned, the DIC will show that
it is ready to program the next
transmitter.
5. Remove the transmitter from the transmitter pocket and
press
KorQ.
To program additional
transmitters, repeat Steps 3–5.