Page 249 of 360

Chevrolet Malibu Limited Owner Manual (GMNA-Localizing-U.S/Canada-
9086425) - 2016 - crc - 7/30/15
248 Vehicle Care
that the filler neck clip engages
into the underhood electrical
center retainer.
HID Headlamp Assembly
The HID assembly has a high
intensity discharge (HID) high/low
beam, a DRL/parking lamp,
sidemarker lamp, and a turn signal
lamp on the headlamp assembly.
For replacement of the headlamp on
an HID assembly, contact your
dealer. SeeHigh Intensity
Discharge (HID) Lighting 0245.
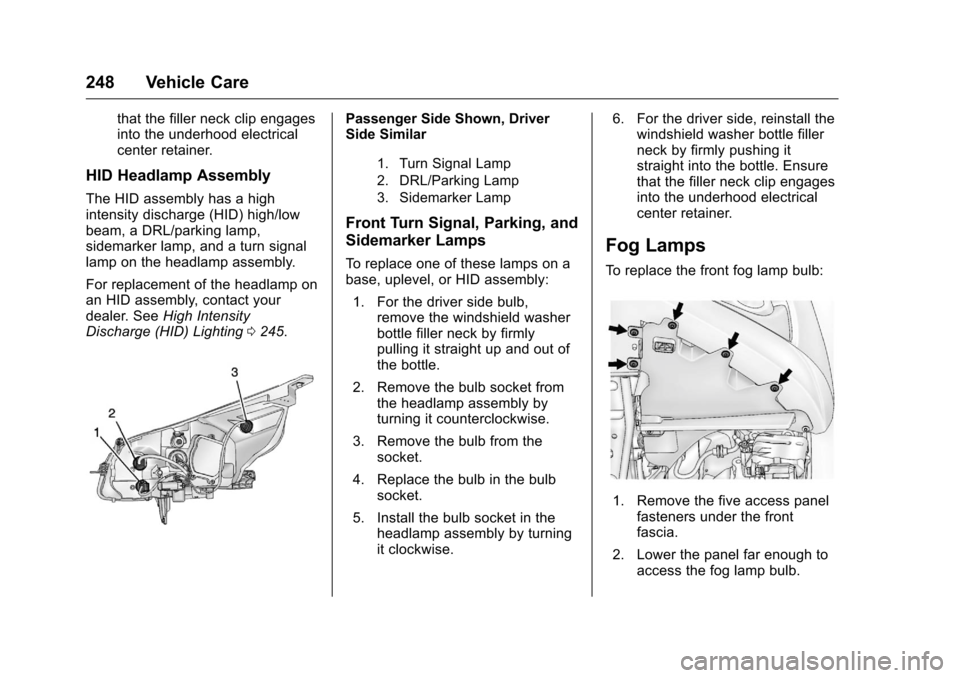
Passenger Side Shown, Driver
Side Similar
1. Turn Signal Lamp
2. DRL/Parking Lamp
3. Sidemarker Lamp
Front Turn Signal, Parking, and
Sidemarker Lamps
To replace one of these lamps on a
base, uplevel, or HID assembly:
1. For the driver side bulb, remove the windshield washer
bottle filler neck by firmly
pulling it straight up and out of
the bottle.
2. Remove the bulb socket from the headlamp assembly by
turning it counterclockwise.
3. Remove the bulb from the socket.
4. Replace the bulb in the bulb socket.
5. Install the bulb socket in the headlamp assembly by turning
it clockwise. 6. For the driver side, reinstall the
windshield washer bottle filler
neck by firmly pushing it
straight into the bottle. Ensure
that the filler neck clip engages
into the underhood electrical
center retainer.
Fog Lamps
To replace the front fog lamp bulb:
1. Remove the five access panelfasteners under the front
fascia.
2. Lower the panel far enough to access the fog lamp bulb.
Page 250 of 360
Chevrolet Malibu Limited Owner Manual (GMNA-Localizing-U.S/Canada-
9086425) - 2016 - crc - 7/30/15
Vehicle Care 249
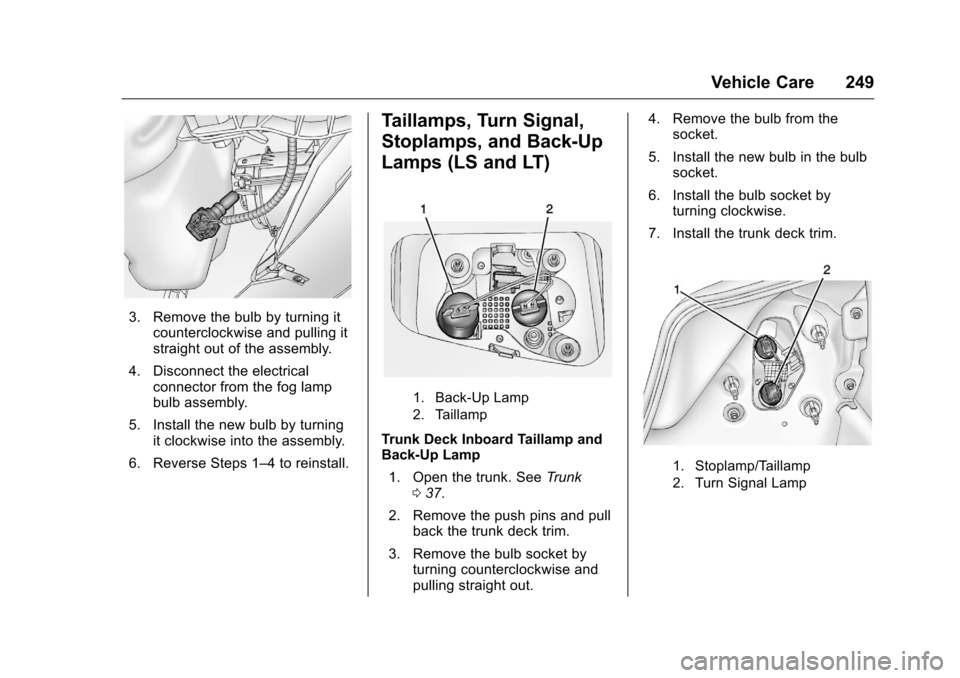
3. Remove the bulb by turning itcounterclockwise and pulling it
straight out of the assembly.
4. Disconnect the electrical connector from the fog lamp
bulb assembly.
5. Install the new bulb by turning it clockwise into the assembly.
6. Reverse Steps 1–4 to reinstall.
Taillamps, Turn Signal,
Stoplamps, and Back-Up
Lamps (LS and LT)
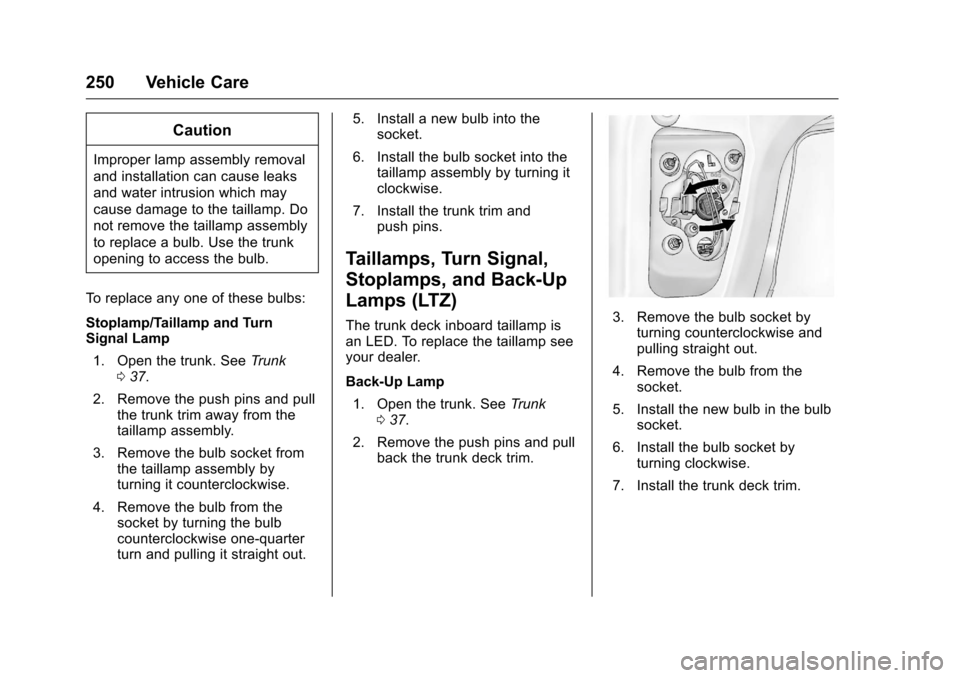
1. Back-Up Lamp
2. Taillamp
Trunk Deck Inboard Taillamp and
Back-Up Lamp 1. Open the trunk. See Trunk
0 37.
2. Remove the push pins and pull back the trunk deck trim.
3. Remove the bulb socket by turning counterclockwise and
pulling straight out. 4. Remove the bulb from the
socket.
5. Install the new bulb in the bulb socket.
6. Install the bulb socket by turning clockwise.
7. Install the trunk deck trim.
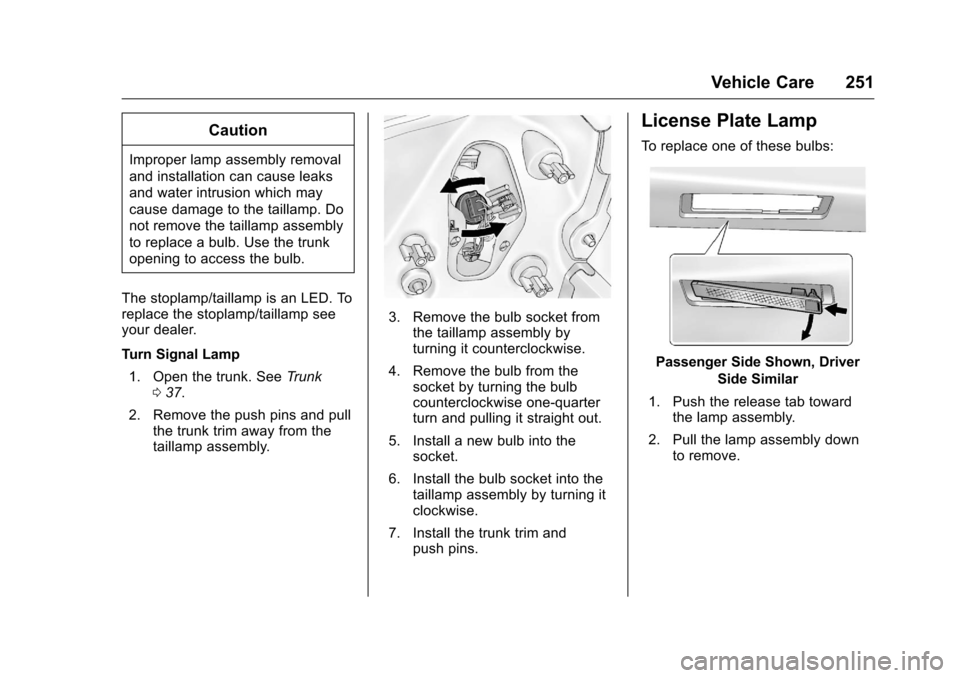
1. Stoplamp/Taillamp
2. Turn Signal Lamp
Page 251 of 360

Chevrolet Malibu Limited Owner Manual (GMNA-Localizing-U.S/Canada-
9086425) - 2016 - crc - 7/30/15
250 Vehicle Care
Caution
Improper lamp assembly removal
and installation can cause leaks
and water intrusion which may
cause damage to the taillamp. Do
not remove the taillamp assembly
to replace a bulb. Use the trunk
opening to access the bulb.
To replace any one of these bulbs:
Stoplamp/Taillamp and Turn
Signal Lamp 1. Open the trunk. See Trunk
0 37.
2. Remove the push pins and pull the trunk trim away from the
taillamp assembly.
3. Remove the bulb socket from the taillamp assembly by
turning it counterclockwise.
4. Remove the bulb from the socket by turning the bulb
counterclockwise one-quarter
turn and pulling it straight out. 5. Install a new bulb into the
socket.
6. Install the bulb socket into the taillamp assembly by turning it
clockwise.
7. Install the trunk trim and push pins.
Taillamps, Turn Signal,
Stoplamps, and Back-Up
Lamps (LTZ)
The trunk deck inboard taillamp is
an LED. To replace the taillamp see
your dealer.
Back-Up Lamp
1. Open the trunk. See Trunk
0 37.
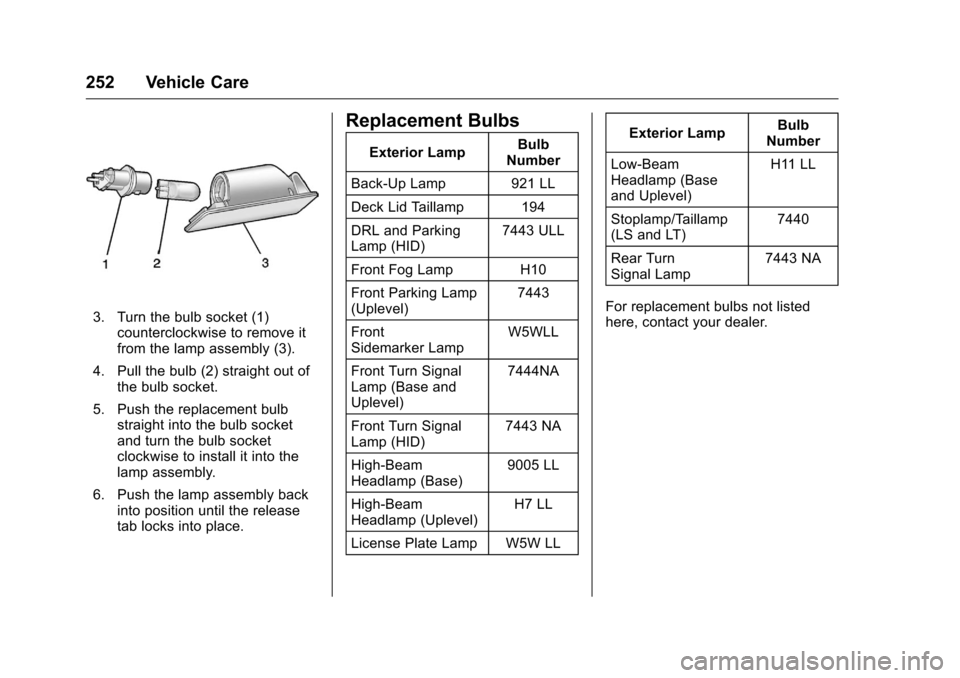
2. Remove the push pins and pull back the trunk deck trim.3. Remove the bulb socket by
turning counterclockwise and
pulling straight out.
4. Remove the bulb from the socket.
5. Install the new bulb in the bulb socket.
6. Install the bulb socket by turning clockwise.
7. Install the trunk deck trim.
Page 252 of 360

Chevrolet Malibu Limited Owner Manual (GMNA-Localizing-U.S/Canada-
9086425) - 2016 - crc - 7/30/15
Vehicle Care 251
Caution
Improper lamp assembly removal
and installation can cause leaks
and water intrusion which may
cause damage to the taillamp. Do
not remove the taillamp assembly
to replace a bulb. Use the trunk
opening to access the bulb.
The stoplamp/taillamp is an LED. To
replace the stoplamp/taillamp see
your dealer.
Turn Signal Lamp 1. Open the trunk. See Trunk
0 37.
2. Remove the push pins and pull the trunk trim away from the
taillamp assembly.
3. Remove the bulb socket fromthe taillamp assembly by
turning it counterclockwise.
4. Remove the bulb from the socket by turning the bulb
counterclockwise one-quarter
turn and pulling it straight out.
5. Install a new bulb into the socket.
6. Install the bulb socket into the taillamp assembly by turning it
clockwise.
7. Install the trunk trim and push pins.
License Plate Lamp
To replace one of these bulbs:
Passenger Side Shown, Driver
Side Similar
1. Push the release tab toward the lamp assembly.
2. Pull the lamp assembly down to remove.
Page 253 of 360

Chevrolet Malibu Limited Owner Manual (GMNA-Localizing-U.S/Canada-
9086425) - 2016 - crc - 7/30/15
252 Vehicle Care
3. Turn the bulb socket (1)counterclockwise to remove it
from the lamp assembly (3).
4. Pull the bulb (2) straight out of the bulb socket.
5. Push the replacement bulb straight into the bulb socket
and turn the bulb socket
clockwise to install it into the
lamp assembly.
6. Push the lamp assembly back into position until the release
tab locks into place.
Replacement Bulbs
Exterior Lamp Bulb
Number
Back-Up Lamp 921 LL
Deck Lid Taillamp 194
DRL and Parking
Lamp (HID) 7443 ULL
Front Fog Lamp H10
Front Parking Lamp
(Uplevel) 7443
Front
Sidemarker Lamp W5WLL
Front Turn Signal
Lamp (Base and
Uplevel) 7444NA
Front Turn Signal
Lamp (HID) 7443 NA
High-Beam
Headlamp (Base) 9005 LL
High-Beam
Headlamp (Uplevel) H7 LL
License Plate Lamp W5W LL Exterior Lamp
Bulb
Number
Low-Beam
Headlamp (Base
and Uplevel) H11 LL
Stoplamp/Taillamp
(LS and LT) 7440
Rear Turn
Signal Lamp 7443 NA
For replacement bulbs not listed
here, contact your dealer.
Page 254 of 360

Chevrolet Malibu Limited Owner Manual (GMNA-Localizing-U.S/Canada-
9086425) - 2016 - crc - 7/30/15
Vehicle Care 253
Electrical System
High Voltage Devices and
Wiring
{Warning
Exposure to high voltage can
cause shock, burns, and even
death. The high voltage
components in the vehicle can
only be serviced by technicians
with special training.
High voltage components are
identified by labels. Do not
remove, open, take apart,
or modify these components.
High voltage cable or wiring has
orange covering or labels. Do not
probe, tamper with, cut, or modify
high voltage cable or wiring.
Electrical System
Overload
The vehicle has fuses and circuit
breakers to protect against an
electrical system overload.When the current electrical load is
too heavy, the circuit breaker opens
and closes, protecting the circuit
until the current load returns to
normal or the problem is fixed. This
greatly reduces the chance of circuit
overload and fire caused by
electrical problems.
Fuses and circuit breakers protect
power devices in the vehicle.
Replace a bad fuse with a new one
of the identical size and rating.
If there is a problem on the road and
a fuse needs to be replaced, the
same amperage fuse can be
borrowed. Choose some feature of
the vehicle that is not needed to use
and replace it as soon as possible.
Headlamp Wiring
An electrical overload may cause
the lamps to go on and off, or in
some cases to remain off. Have the
headlamp wiring checked right away
if the lamps go on and off or
remain off.
Windshield Wipers
If the wiper motor overheats due to
heavy snow or ice, the windshield
wipers will stop until the motor cools
and will then restart.
Although the circuit is protected
from electrical overload, overload
due to heavy snow or ice may
cause wiper linkage damage.
Always clear ice and heavy snow
from the windshield before using the
windshield wipers.
If the overload is caused by an
electrical problem and not snow or
ice, be sure to get it fixed.
Fuses
The wiring circuits in the vehicle are
protected from short circuits by
fuses. This greatly reduces the
chance of damage caused by
electrical problems.
To check a fuse, look at the
silver-colored band inside the fuse.
If the band is broken or melted,
replace the fuse. Be sure to replace
a bad fuse with a new one of the
identical size and rating.
Page 255 of 360
Chevrolet Malibu Limited Owner Manual (GMNA-Localizing-U.S/Canada-
9086425) - 2016 - crc - 7/30/15
254 Vehicle Care
Fuses of the same amperage can
be temporarily borrowed from
another fuse location, if a fuse goes
out. Replace the fuse as soon as
possible.
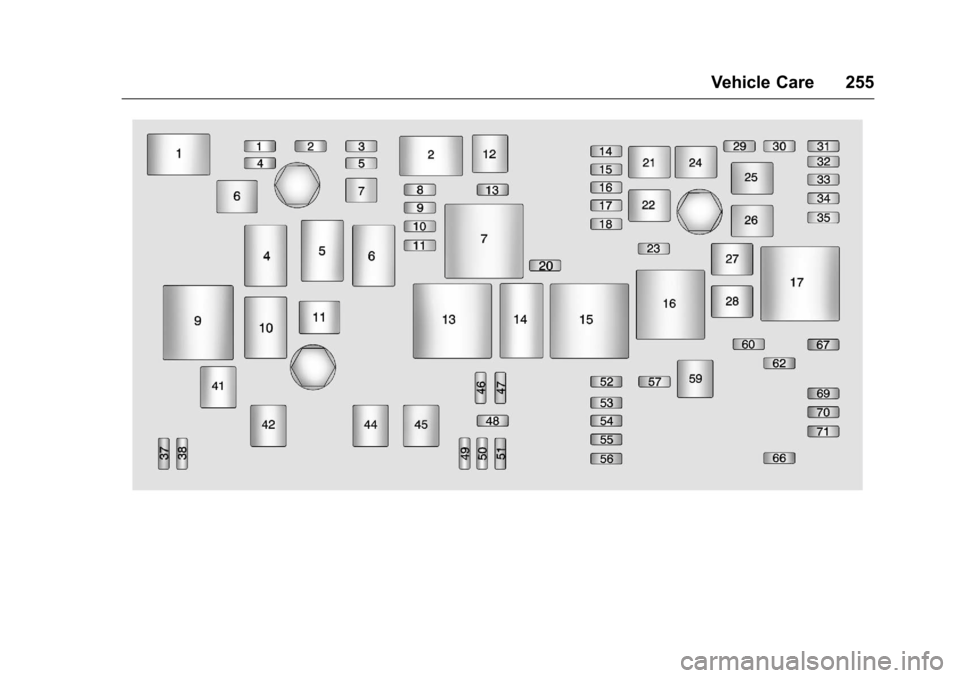
To identify and check fuses, circuit
breakers, and relays, seeEngine
Compartment Fuse Block 0254 and
Instrument Panel Fuse Block 0258.
Engine Compartment
Fuse Block
The engine compartment fuse block
is on the driver side of the engine
compartment, near the battery.
Caution
Spilling liquid on any electrical
component on the vehicle may
damage it. Always keep the
covers on any electrical
component.
Page 256 of 360
Chevrolet Malibu Limited Owner Manual (GMNA-Localizing-U.S/Canada-
9086425) - 2016 - crc - 7/30/15
Vehicle Care 255