2016 CHEVROLET CRUZE LIMITED change wheel
[x] Cancel search: change wheelPage 138 of 357
Chevrolet Cruze Limited Owner Manual (GMNA-Localizing-U.S./Canada-
9282844) - 2016 - crc - 9/3/15
Infotainment System 137
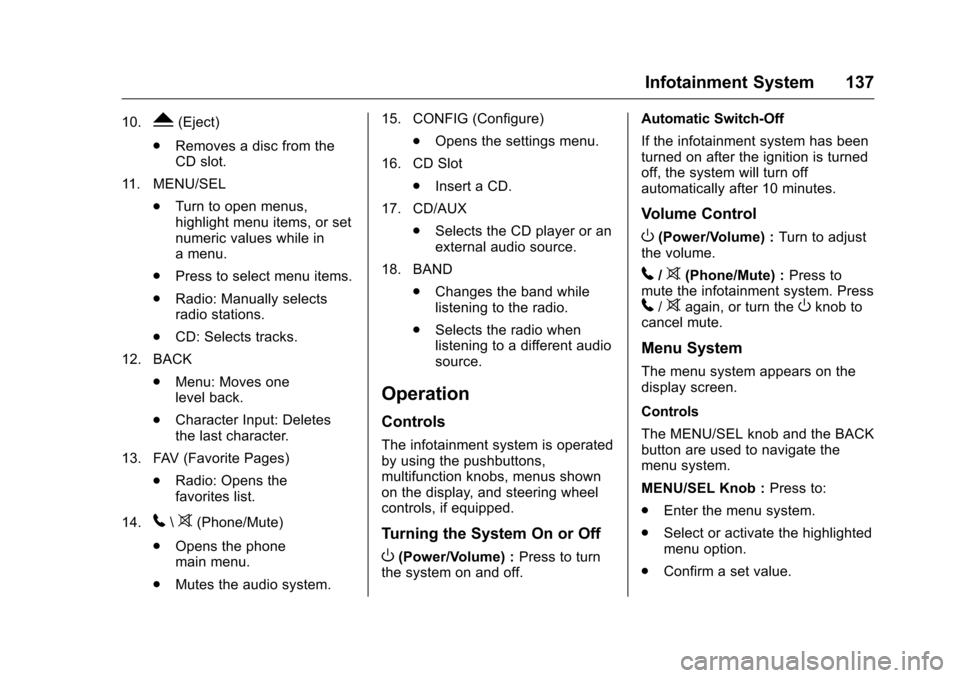
10.Y(Eject)
. Removes a disc from the
CD slot.
11. MENU/SEL .Turn to open menus,
highlight menu items, or set
numeric values while in
a menu.
. Press to select menu items.
. Radio: Manually selects
radio stations.
. CD: Selects tracks.
12. BACK .Menu: Moves one
level back.
. Character Input: Deletes
the last character.
13. FAV (Favorite Pages) .Radio: Opens the
favorites list.
14.
5\>(Phone/Mute)
. Opens the phone
main menu.
. Mutes the audio system. 15. CONFIG (Configure)
.Opens the settings menu.
16. CD Slot .Insert a CD.
17. CD/AUX .Selects the CD player or an
external audio source.
18. BAND .Changes the band while
listening to the radio.
. Selects the radio when
listening to a different audio
source.
Operation
Controls
The infotainment system is operated
by using the pushbuttons,
multifunction knobs, menus shown
on the display, and steering wheel
controls, if equipped.
Turning the System On or Off
O(Power/Volume) : Press to turn
the system on and off. Automatic Switch-Off
If the infotainment system has been
turned on after the ignition is turned
off, the system will turn off
automatically after 10 minutes.
Volume Control
O(Power/Volume) :
Turn to adjust
the volume.
5/>(Phone/Mute) : Press to
mute the infotainment system. Press
5/>again, or turn theOknob to
cancel mute.
Menu System
The menu system appears on the
display screen.
Controls
The MENU/SEL knob and the BACK
button are used to navigate the
menu system.
MENU/SEL Knob : Press to:
. Enter the menu system.
. Select or activate the highlighted
menu option.
. Confirm a set value.
Page 155 of 357
Chevrolet Cruze Limited Owner Manual (GMNA-Localizing-U.S./Canada-
9282844) - 2016 - crc - 9/3/15
154 Infotainment System
5. To add more callers to theconference call, repeat
Steps 1–4. The number of
callers that can be added is
limited by your wireless service
carrier.
Ending a Call
Turn or press the MENU/SEL knob
and select Hang Up.
Muting a Call
To Mute a Call
Turn or press the MENU/SEL knob
and select Mute Call.
To Cancel Mute
Turn or press the MENU/SEL knob
and select Mute Call.
Dual Tone Multi-Frequency
(DTMF) Tones
The in-vehicle Bluetooth system can
send numbers during a call. This is
used when calling a menu-driven
phone system.
1. Turn or press the MENU/SEL knob and select Enter Number. 2. Enter the character sequence.
See “Entering a Character
Sequence” inOperation 0137
ii.
Bluetooth (Voice
Recognition)
Using Voice Recognition
To use voice recognition, press
the
b/gbutton on the steering
wheel. Use the commands below for
the various voice features. For
additional information, say “Help”
while you are in a voice
recognition menu.
Pairing
A Bluetooth-enabled cell phone
must be paired to the Bluetooth
system and then connected to the
vehicle before it can be used. See
your cell phone manufacturer's user
guide for Bluetooth functions before
pairing the cell phone. If a Bluetooth
phone is not connected, calls will be
made using OnStar Hands-Free
Calling, if available. See Operation
0 137
ii. Pairing Information
.
A Bluetooth phone with MP3
capability cannot be paired to
the vehicle as a phone and an
MP3 player at the same time.
. Up to five cell phones can be
paired to the Bluetooth system.
. The pairing process is disabled
when the vehicle is moving.
. Pairing only needs to be
completed once, unless the
pairing information on the cell
phone changes or the cell phone
is deleted from the system.
. Only one paired cell phone can
be connected to the Bluetooth
system at a time.
. If multiple paired cell phones are
within range of the system, the
system connects to the first
available paired cell phone in the
order that they were first paired
to the system. To link to a
different paired phone, see
“Linking to a Different Phone”
later in this section.
Page 169 of 357
Chevrolet Cruze Limited Owner Manual (GMNA-Localizing-U.S./Canada-
9282844) - 2016 - crc - 9/3/15
168 Climate Controls
Air Vents
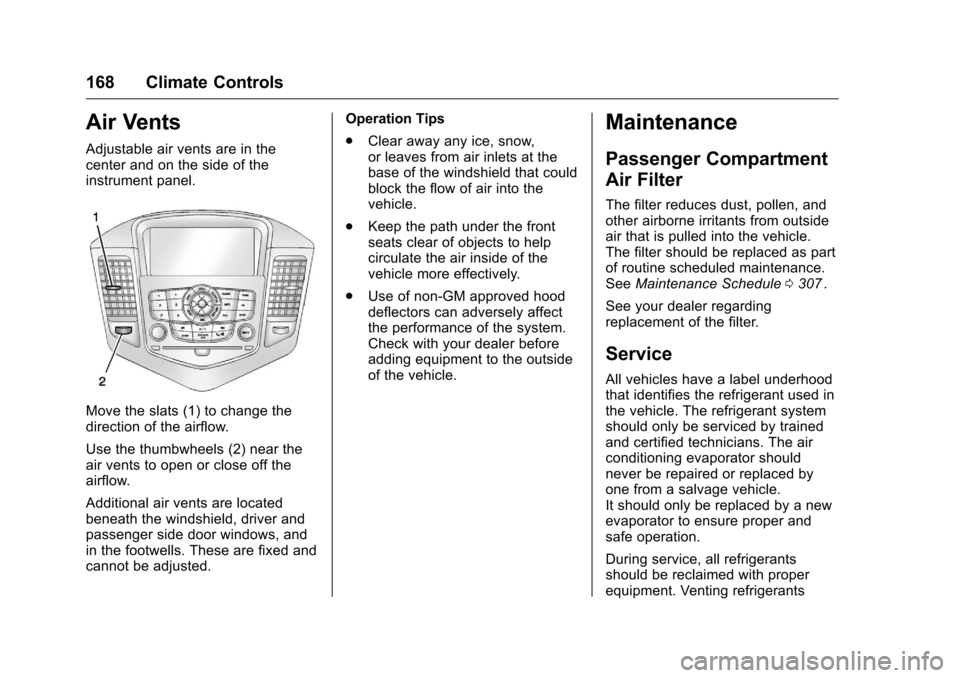
Adjustable air vents are in the
center and on the side of the
instrument panel.
Move the slats (1) to change the
direction of the airflow.
Use the thumbwheels (2) near the
air vents to open or close off the
airflow.
Additional air vents are located
beneath the windshield, driver and
passenger side door windows, and
in the footwells. These are fixed and
cannot be adjusted.Operation Tips
.
Clear away any ice, snow,
or leaves from air inlets at the
base of the windshield that could
block the flow of air into the
vehicle.
. Keep the path under the front
seats clear of objects to help
circulate the air inside of the
vehicle more effectively.
. Use of non-GM approved hood
deflectors can adversely affect
the performance of the system.
Check with your dealer before
adding equipment to the outside
of the vehicle.
Maintenance
Passenger Compartment
Air Filter
The filter reduces dust, pollen, and
other airborne irritants from outside
air that is pulled into the vehicle.
The filter should be replaced as part
of routine scheduled maintenance.
See Maintenance Schedule 0307
ii.
See your dealer regarding
replacement of the filter.
Service
All vehicles have a label underhood
that identifies the refrigerant used in
the vehicle. The refrigerant system
should only be serviced by trained
and certified technicians. The air
conditioning evaporator should
never be repaired or replaced by
one from a salvage vehicle.
It should only be replaced by a new
evaporator to ensure proper and
safe operation.
During service, all refrigerants
should be reclaimed with proper
equipment. Venting refrigerants
Page 178 of 357
Chevrolet Cruze Limited Owner Manual (GMNA-Localizing-U.S./Canada-
9282844) - 2016 - crc - 9/3/15
Driving and Operating 177
If stuck too severely for the traction
system to free the vehicle, turn the
traction system off and use the
rocking method. SeeTraction
Control/Electronic Stability Control
0 199
ii.
{Warning
If the vehicle's tires spin at high
speed, they can explode, and you
or others could be injured. The
vehicle can overheat, causing an
engine compartment fire or other
damage. Spin the wheels as little
as possible and avoid going
above 56 km/h (35 mph).
Rocking the Vehicle to Get
it Out
Turn the steering wheel left and
right to clear the area around the
front wheels. Turn off any traction
system. Shift back and forth
between R (Reverse) and a low
forward gear, spinning the wheels
as little as possible. To prevent
transmission wear, wait until the
wheels stop spinning before shifting gears. Release the accelerator
pedal while shifting, and press
lightly on the accelerator pedal
when the transmission is in gear.
Slowly spinning the wheels in the
forward and reverse directions
causes a rocking motion that could
free the vehicle. If that does not get
the vehicle out after a few tries, it
might need to be towed out. If the
vehicle does need to be towed out,
see
Towing the Vehicle 0293
ii.
Vehicle Load Limits
It is very important to know how
much weight the vehicle can
carry. This weight is called the
vehicle capacity weight and
includes the weight of all
occupants, cargo, and all
nonfactory-installed options.
Two labels on the vehicle may
show how much weight it may
properly carry: the Tire and
Loading Information label and
the Certification label.
{Warning
Do not load the vehicle any
heavier than the Gross
Vehicle Weight Rating
(GVWR), or either the
maximum front or rear Gross
Axle Weight Rating (GAWR).
This can cause systems to
break and change the way the
vehicle handles. This could
cause loss of control and a
crash. Overloading can also
reduce stopping distance,
damage the tires, and shorten
the life of the vehicle.
Page 199 of 357
Chevrolet Cruze Limited Owner Manual (GMNA-Localizing-U.S./Canada-
9282844) - 2016 - crc - 9/3/15
198 Driving and Operating
avoid a sudden obstacle, a
computer senses the wheels are
slowing down. If one of the wheels
is about to stop rolling, the computer
will separately work the brakes at
each wheel.
ABS can change the brake pressure
to each wheel, as required, faster
than any driver could. This can help
you steer around the obstacle while
braking hard.
As the brakes are applied, the
computer keeps receiving updates
on wheel speed and controls
braking pressure accordingly.
Remember: ABS does not change
the time needed to get a foot up to
the brake pedal or always decrease
stopping distance. If you get too
close to the vehicle in front of you,
there will not be enough time to
apply the brakes if that vehicle
suddenly slows or stops. Always
leave enough room up ahead to
stop, even with ABS.Using ABS
Do not pump the brakes. Just hold
the brake pedal down firmly and let
ABS work. You may hear the ABS
pump or motor operating and feel
the brake pedal pulsate. This is
normal.
Braking in Emergencies
ABS allows you to steer and brake
at the same time. In many
emergencies, steering can help
more than even the very best
braking.
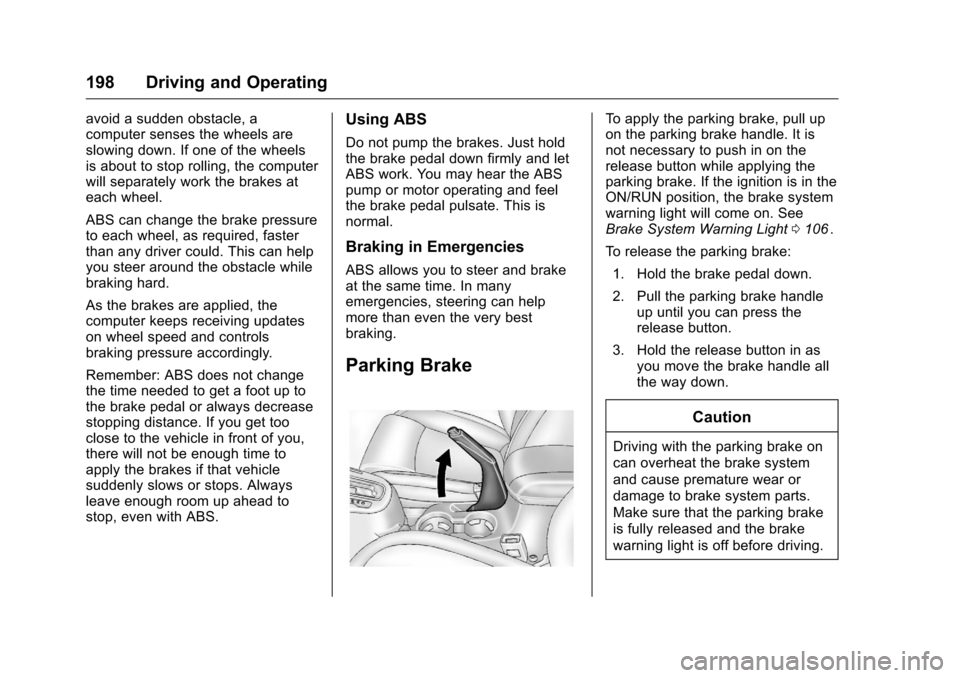
Parking Brake
To apply the parking brake, pull up
on the parking brake handle. It is
not necessary to push in on the
release button while applying the
parking brake. If the ignition is in the
ON/RUN position, the brake system
warning light will come on. See
Brake System Warning Light0106
ii.
To release the parking brake:
1. Hold the brake pedal down.
2. Pull the parking brake handle up until you can press the
release button.
3. Hold the release button in as you move the brake handle all
the way down.
Caution
Driving with the parking brake on
can overheat the brake system
and cause premature wear or
damage to brake system parts.
Make sure that the parking brake
is fully released and the brake
warning light is off before driving.
Page 202 of 357
Chevrolet Cruze Limited Owner Manual (GMNA-Localizing-U.S./Canada-
9282844) - 2016 - crc - 9/3/15
Driving and Operating 201
To turn off only TCS, press and
release the
gbutton. The traction
off light
idisplays in the instrument
cluster. To turn TCS on again, press
and release the
gbutton. The
traction off light
idisplayed in the
instrument cluster will turn off.
If TCS is limiting wheel spin when
the
gbutton is pressed, the system
will not turn off until the wheels stop
spinning.
To turn off both TCS and StabiliTrak,
press and hold the
gbutton until
the traction off light
iand
StabiliTrak OFF light
gcome on
and stay on in the instrument
cluster. To turn TCS and StabiliTrak
on again, press and release the
g
button. The traction off lightiand
StabiliTrak OFF light
gin the
instrument cluster turn off.
Adding accessories can affect the
vehicle performance. See
Accessories and Modifications
0 220
ii.
Cruise Control
If equipped with cruise control, the
vehicle can maintain a speed of
about 40 km/h (25 mph) or more
without keeping your foot on the
accelerator. Cruise control does not
work at speeds below 40 km/h
(25 mph).
{Warning
Cruise control can be dangerous
where you cannot drive safely at
a steady speed. Do not use
cruise control on winding roads or
in heavy traffic.
Cruise control can be dangerous
on slippery roads. On such roads,
fast changes in tire traction can
cause excessive wheel slip, and
you could lose control. Do not use
cruise control on slippery roads.
The vehicle has a Traction Control
System (TCS) or StabiliTrak system
that begins to limit wheel spin while
using cruise control and the cruise
control will automatically disengage. See
Traction Control/Electronic
Stability Control 0199
ii. When road
conditions allow you to safely use it
again, the cruise control can be
turned on.
If the brakes are applied, the cruise
control shuts off.
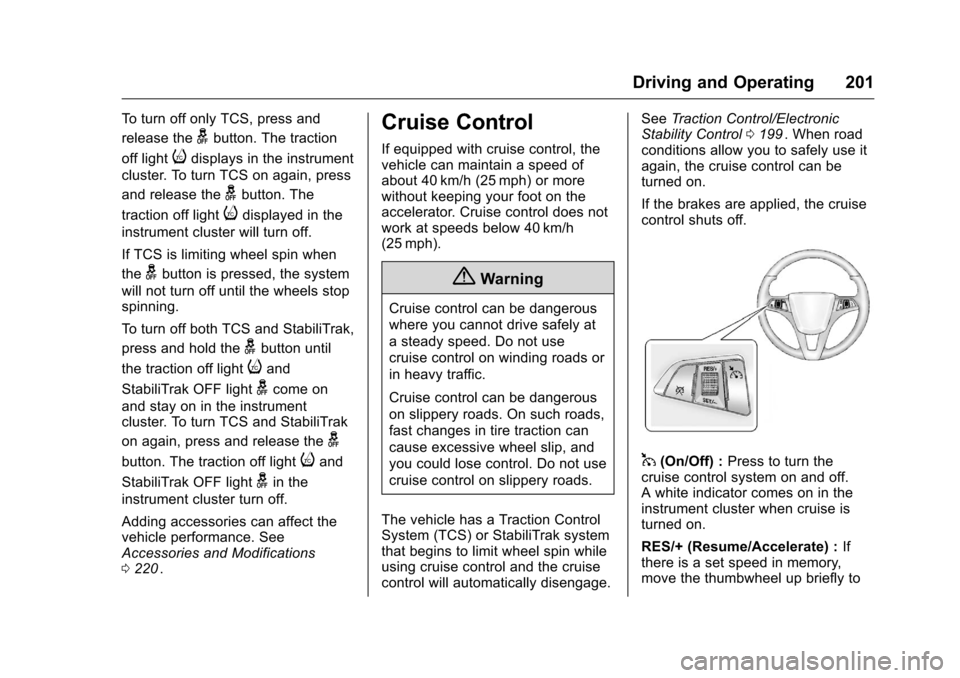
1(On/Off) : Press to turn the
cruise control system on and off.
A white indicator comes on in the
instrument cluster when cruise is
turned on.
RES/+ (Resume/Accelerate) : If
there is a set speed in memory,
move the thumbwheel up briefly to
Page 215 of 357
Chevrolet Cruze Limited Owner Manual (GMNA-Localizing-U.S./Canada-
9282844) - 2016 - crc - 9/3/15
214 Driving and Operating
Passing
More passing distance is needed
when towing a trailer. Because the
rig is longer, it is necessary to go
farther beyond the passed vehicle
before returning to the lane.
Backing Up
Hold the bottom of the steering
wheel with one hand. To move the
trailer to the left, move your hand to
the left. To move the trailer to the
right, move your hand to the right.
Always back up slowly and,
if possible, have someone
guide you.
Making TurnsCaution
Making very sharp turns while
trailering could cause the trailer to
come in contact with the vehicle.
The vehicle could be damaged.
Avoid making very sharp turns
while trailering. When turning with a trailer, make
wider turns than normal so the
trailer will not strike soft shoulders,
curbs, road signs, trees or other
objects. Use the turn signal well in
advance and avoid jerky or sudden
maneuvers.
Turn Signals When Towing a
Trailer
The turn signal indicators on the
instrument cluster flash whenever
signaling a turn or lane change.
Properly hooked up, the trailer
lamps also flash, telling other
drivers the vehicle is turning,
changing lanes or stopping.
When towing a trailer, the arrows on
the instrument cluster flash for turns
even if the bulbs on the trailer are
burned out. Check occasionally to
be sure the trailer bulbs are still
working.
Driving on Grades
Reduce speed and shift to a lower
gear before starting down a long or
steep downgrade. If the
transmission is not shifted down, the brakes might have to be used so
much that they would get hot and no
longer work well.
The vehicle can tow in D (Drive).
Use a lower gear if the transmission
shifts too often.
When towing at high altitude on
steep uphill grades, engine coolant
boils at a lower temperature than at
normal altitudes. If the engine is
turned off immediately after towing
at high altitude on steep uphill
grades, the vehicle could show
signs similar to engine overheating.
To avoid this, let the engine run
while parked, preferably on level
ground, with the transmission in
P (Park) for a few minutes before
turning the engine off. If the
overheat warning comes on, see
Engine Overheating
0236
ii.
Page 231 of 357
Chevrolet Cruze Limited Owner Manual (GMNA-Localizing-U.S./Canada-
9282844) - 2016 - crc - 9/3/15
230 Vehicle Care
If the system is ever reset
accidentally, the oil must be
changed at 5 000 km (3,000 mi)
since the last oil change.
Remember to reset the oil life
system whenever the oil is changed.
How to Reset the Engine Oil
Life System
Reset the system whenever the
engine oil is changed so that the
system can calculate the next
engine oil change. To reset the
system:1. Using the DIC MENU button and thumbwheel, scroll until
you reach REMAINING OIL
LIFE on the DIC (
:% for
Canada).
2. Press the SET/CLR button to reset the oil life at 100%. When
prompted, use the thumbwheel
to highlight YES or NO. Press
the SET/CLR button to confirm.
Be careful not to reset the oil life
display accidentally at any time
other than after the oil is changed.
It cannot be reset accurately. If the CHANGE ENGINE OIL SOON
DIC message comes back on when
the vehicle is started, the engine oil
life system has not reset. Repeat
the procedure.
Automatic Transmission
Fluid
How to Check Automatic
Transmission Fluid
It is not necessary to check the
transmission fluid level.
A transmission fluid leak is the only
reason for fluid loss. If a leak
occurs, take the vehicle to your
dealer and have it repaired as soon
as possible.
The vehicle is not equipped with a
transmission fluid level dipstick.
There is a special procedure for
checking and changing the
transmission fluid. Because this
procedure is difficult, this should be
done at the dealer. Contact the
dealer for additional information.
Change the fluid at the intervals
listed in
Maintenance Schedule
0 307
ii, and be sure to use the fluid
listed in Recommended Fluids and
Lubricants 0317
ii.
Manual Transmission
Fluid
How to Check Manual
Transmission Fluid
It is not necessary to check the
manual transmission fluid level.
A transmission fluid leak is the only
reason for fluid loss. If a leak
occurs, take the vehicle to your
dealer and have it repaired as soon
as possible. See Recommended
Fluids and Lubricants 0317
iifor the
proper fluid to use.
Hydraulic Clutch
For vehicles with a manual
transmission, it is not necessary to
regularly check brake/clutch fluid
unless there is a leak suspected.
Adding fluid will not correct a leak.