2016 CHEVROLET CRUZE LIMITED change wheel
[x] Cancel search: change wheelPage 240 of 357
Chevrolet Cruze Limited Owner Manual (GMNA-Localizing-U.S./Canada-
9282844) - 2016 - crc - 9/3/15
Vehicle Care 239
Brakes
Disc brake pads have built-in wear
indicators that make a high-pitched
warning sound when the brake pads
are worn and new pads are needed.
The sound can come and go or be
heard all the time the vehicle is
moving, except when applying the
brake pedal firmly.
{Warning
The brake wear warning sound
means that soon the brakes will
not work well. That could lead to
a crash. When the brake wear
warning sound is heard, have the
vehicle serviced.
Caution
Continuing to drive with worn-out
brake pads could result in costly
brake repair.Some driving conditions or climates
can cause a brake squeal when the
brakes are first applied or lightly
applied. This does not mean
something is wrong with the brakes.
Properly torqued wheel nuts are
necessary to help prevent brake
pulsation. When tires are rotated,
inspect brake pads for wear and
evenly tighten wheel nuts in the
proper sequence to torque
specifications in
Capacities and
Specifications 0321
ii.
If the vehicle has rear drum brakes,
they do not have wear indicators,
but if a rear brake rubbing noise is
heard, have the rear brake linings
inspected immediately. Rear brake
drums should be removed and
inspected each time the tires are
removed for rotation or changing.
Drum brakes have an inspection
hole to inspect lining wear during
scheduled maintenance. When the
front brake pads are replaced, have
the rear brakes inspected, too.
Brake linings should always be
replaced as complete axle sets.
Brake Pedal Travel
See your dealer if the brake pedal
does not return to normal height,
or if there is a rapid increase in
pedal travel. This could be a sign
that brake service may be required.
Replacing Brake System Parts
Always replace brake system parts
with new, approved replacement
parts. If this is not done, the brakes
may not work properly. The braking
performance expected can change
in many other ways if the wrong
replacement brake parts are
installed or parts are improperly
installed.
Brake Fluid
The brake/clutch master cylinder
reservoir is filled with GM approved
DOT 3 brake fluid as indicated on
Page 257 of 357
Chevrolet Cruze Limited Owner Manual (GMNA-Localizing-U.S./Canada-
9282844) - 2016 - crc - 9/3/15
256 Vehicle Care
Warning (Continued)
.Replace any tires that
have been damaged by
impacts with potholes,
curbs, etc.
.Improperly repaired tires
can cause a crash. Only
the dealer or an
authorized tire service
center should repair,
replace, dismount, and
mount the tires.
.Do not spin the tires in
excess of 56 km/h
(35 mph) on slippery
surfaces such as snow,
mud, ice, etc. Excessive
spinning may cause the
tires to explode.
All-Season Tires
This vehicle may come with
all-season tires. These tires are
designed to provide good overall
performance on most road surfacesand weather conditions. Original
equipment tires designed to GM's
specific tire performance criteria
have a TPC specification code
molded onto the sidewall. Original
equipment all-season tires can be
identified by the last two characters
of this TPC code, which will
be
“MS.”
Consider installing winter tires on
the vehicle if frequent driving on
snow or ice-covered roads is
expected. All-season tires provide
adequate performance for most
winter driving conditions, but they
may not offer the same level of
traction or performance as winter
tires on snow or ice-covered roads.
See Winter Tires 0256
ii.
Winter Tires
This vehicle was not originally
equipped with winter tires. Winter
tires are designed for increased
traction on snow and ice-covered
roads. Consider installing winter
tires on the vehicle if frequent
driving on ice or snow covered
roads is expected. See your dealer for details regarding winter tire
availability and proper tire selection.
Also, see
Buying New Tires 0270
ii.
With winter tires, there may be
decreased dry road traction,
increased road noise, and shorter
tread life. After changing to winter
tires, be alert for changes in vehicle
handling and braking.
If using winter tires:
. Use tires of the same brand and
tread type on all four wheel
positions.
. Use only radial ply tires of the
same size, load range, and
speed rating as the original
equipment tires.
Winter tires with the same speed
rating as the original equipment tires
may not be available for H, V, W, Y,
and ZR speed rated tires. If winter
tires with a lower speed rating are
chosen, never exceed the tire's
maximum speed capability.
Page 270 of 357
Chevrolet Cruze Limited Owner Manual (GMNA-Localizing-U.S./Canada-
9282844) - 2016 - crc - 9/3/15
Vehicle Care 269
Warning (Continued)
off and cause an accident. When
changing a wheel, remove any
rust or dirt from places where the
wheel attaches to the vehicle. In
an emergency, a cloth or a paper
towel can be used; however, use
a scraper or wire brush later to
remove all rust or dirt.
Lightly coat the center of the
wheel hub with wheel bearing
grease after a wheel change or
tire rotation to prevent corrosion
or rust build-up. Do not get
grease on the flat wheel
mounting surface or on the
wheel nuts or bolts.
When It Is Time for New
Tires
Factors such as maintenance,
temperatures, driving speeds,
vehicle loading, and road conditions
affect the wear rate of the tires.
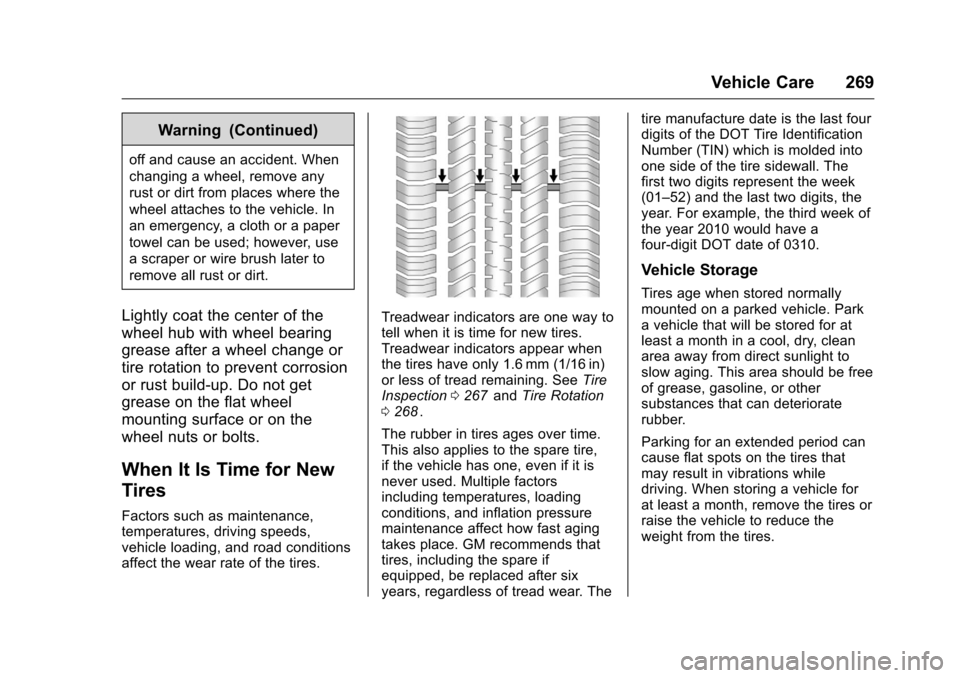
Treadwear indicators are one way to
tell when it is time for new tires.
Treadwear indicators appear when
the tires have only 1.6 mm (1/16 in)
or less of tread remaining. SeeTire
Inspection 0267
iiand Tire Rotation
0 268ii.
The rubber in tires ages over time.
This also applies to the spare tire,
if the vehicle has one, even if it is
never used. Multiple factors
including temperatures, loading
conditions, and inflation pressure
maintenance affect how fast aging
takes place. GM recommends that
tires, including the spare if
equipped, be replaced after six
years, regardless of tread wear. The tire manufacture date is the last four
digits of the DOT Tire Identification
Number (TIN) which is molded into
one side of the tire sidewall. The
first two digits represent the week
(01–52) and the last two digits, the
year. For example, the third week of
the year 2010 would have a
four-digit DOT date of 0310.
Vehicle Storage
Tires age when stored normally
mounted on a parked vehicle. Park
a vehicle that will be stored for at
least a month in a cool, dry, clean
area away from direct sunlight to
slow aging. This area should be free
of grease, gasoline, or other
substances that can deteriorate
rubber.
Parking for an extended period can
cause flat spots on the tires that
may result in vibrations while
driving. When storing a vehicle for
at least a month, remove the tires or
raise the vehicle to reduce the
weight from the tires.
Page 276 of 357
Chevrolet Cruze Limited Owner Manual (GMNA-Localizing-U.S./Canada-
9282844) - 2016 - crc - 9/3/15
Vehicle Care 275
{Warning
Driving on a flat tire will cause
permanent damage to the tire.
Re-inflating a tire after it has been
driven on while severely
underinflated or flat may cause a
blowout and a serious crash.
Never attempt to re-inflate a tire
that has been driven on while
severely underinflated or flat.
Have your dealer or an authorized
tire service center repair or
replace the flat tire as soon as
possible.
{Warning
Lifting a vehicle and getting under
it to do maintenance or repairs is
dangerous without the
appropriate safety equipment and
training. If a jack is provided with
the vehicle, it is designed only for
changing a flat tire. If it is used for
anything else, you or others could(Continued)
Warning (Continued)
be badly injured or killed if the
vehicle slips off the jack. If a jack
is provided with the vehicle, only
use it for changing a flat tire.
If a tire goes flat, avoid further tire
and wheel damage by driving slowly
to a level place, well off the road,
if possible. Turn on the hazard
warning flashers. See Hazard
Warning Flashers 0130
ii.
{Warning
Changing a tire can be
dangerous. The vehicle can slip
off the jack and roll over or fall
causing injury or death. Find a
level place to change the tire. To
help prevent the vehicle from
moving:
1. Set the parking brake firmly. (Continued)
Warning (Continued)
2. Put an automatictransmission in P (Park) or a
manual transmission in
1 (First) or R (Reverse).
3. Turn off the engine and do not restart while the vehicle
is raised.
4. Do not allow passengers to remain in the vehicle.
5. Place wheel blocks, if equipped, on both sides of
the tire at the opposite
corner of the tire being
changed.
This vehicle may come with a jack,
spare tire, and wheel block(s) or a
tire sealant and compressor kit. To
use the jacking equipment to
change a spare tire safely, follow
the instructions below. Then see
Tire Changing 0283
ii. To use the tire
sealant and compressor kit, see Tire
Sealant and Compressor Kit 0276
ii.
Page 277 of 357
Chevrolet Cruze Limited Owner Manual (GMNA-Localizing-U.S./Canada-
9282844) - 2016 - crc - 9/3/15
276 Vehicle Care
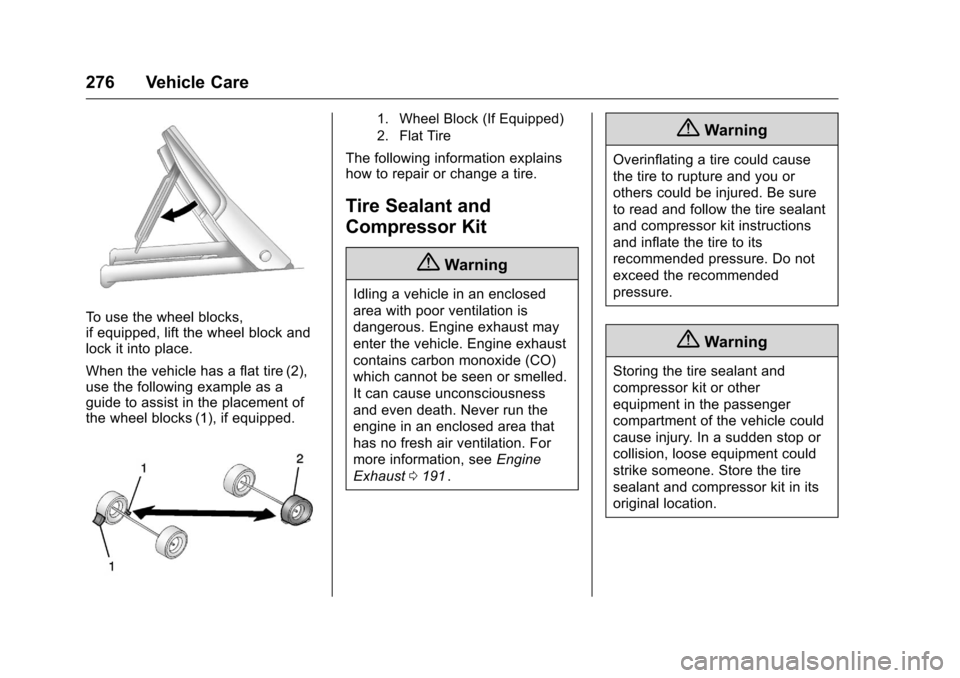
To use the wheel blocks,
if equipped, lift the wheel block and
lock it into place.
When the vehicle has a flat tire (2),
use the following example as a
guide to assist in the placement of
the wheel blocks (1), if equipped.
1. Wheel Block (If Equipped)
2. Flat Tire
The following information explains
how to repair or change a tire.
Tire Sealant and
Compressor Kit
{Warning
Idling a vehicle in an enclosed
area with poor ventilation is
dangerous. Engine exhaust may
enter the vehicle. Engine exhaust
contains carbon monoxide (CO)
which cannot be seen or smelled.
It can cause unconsciousness
and even death. Never run the
engine in an enclosed area that
has no fresh air ventilation. For
more information, seeEngine
Exhaust 0191
ii.
{Warning
Overinflating a tire could cause
the tire to rupture and you or
others could be injured. Be sure
to read and follow the tire sealant
and compressor kit instructions
and inflate the tire to its
recommended pressure. Do not
exceed the recommended
pressure.
{Warning
Storing the tire sealant and
compressor kit or other
equipment in the passenger
compartment of the vehicle could
cause injury. In a sudden stop or
collision, loose equipment could
strike someone. Store the tire
sealant and compressor kit in its
original location.
Page 285 of 357
Chevrolet Cruze Limited Owner Manual (GMNA-Localizing-U.S./Canada-
9282844) - 2016 - crc - 9/3/15
284 Vehicle Care
This vehicle may have one of the
following: A coin/pierce jack (4), a
jack handle extension (3), and a
two-piece wrench (5), or a hex head
jack (2) and three-piece wrench (1).
Removing the Flat Tire and
Installing the Spare Tire
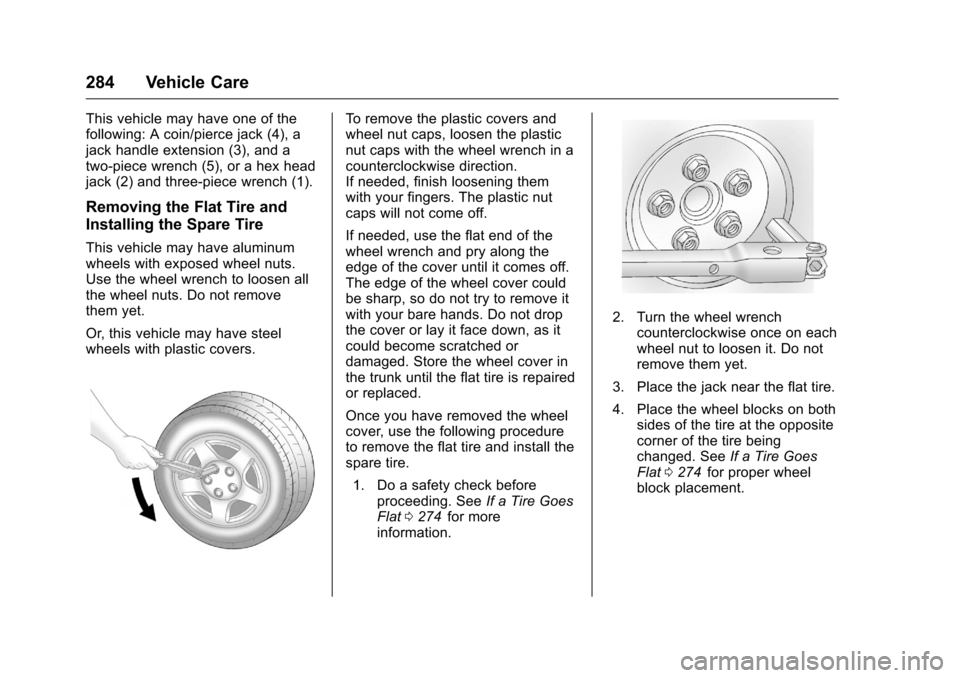
This vehicle may have aluminum
wheels with exposed wheel nuts.
Use the wheel wrench to loosen all
the wheel nuts. Do not remove
them yet.
Or, this vehicle may have steel
wheels with plastic covers.
To remove the plastic covers and
wheel nut caps, loosen the plastic
nut caps with the wheel wrench in a
counterclockwise direction.
If needed, finish loosening them
with your fingers. The plastic nut
caps will not come off.
If needed, use the flat end of the
wheel wrench and pry along the
edge of the cover until it comes off.
The edge of the wheel cover could
be sharp, so do not try to remove it
with your bare hands. Do not drop
the cover or lay it face down, as it
could become scratched or
damaged. Store the wheel cover in
the trunk until the flat tire is repaired
or replaced.
Once you have removed the wheel
cover, use the following procedure
to remove the flat tire and install the
spare tire.1. Do a safety check before proceeding. See If a Tire Goes
Flat 0274
iifor more
information.
2. Turn the wheel wrench counterclockwise once on each
wheel nut to loosen it. Do not
remove them yet.
3. Place the jack near the flat tire.
4. Place the wheel blocks on both sides of the tire at the opposite
corner of the tire being
changed. See If a Tire Goes
Flat 0274
iifor proper wheel
block placement.
Page 328 of 357
Chevrolet Cruze Limited Owner Manual (GMNA-Localizing-U.S./Canada-
9282844) - 2016 - crc - 9/3/15
Customer Information 327
GM Mobility
Reimbursement Program
This program is available to
qualified applicants for cost
reimbursement of eligible
aftermarket adaptive equipment
required for the vehicle, such as
hand controls or a wheelchair/
scooter lift for the vehicle.
For more information on the limited
offer, visit www.gmmobility.com or
call the GM Mobility Assistance
Center at 1-800-323-9935. Text
Telephone (TTY) users, call
1-800-833-9935.
General Motors of Canada also has
a Mobility Program. Visit www.gm.ca
or call 1-800-GM-DRIVE (463-7483)
for details. TTY users call
1-800-263-3830.
Roadside Assistance
Program
For U.S.-purchased vehicles, call
1-800-243-8872. (Text Telephone
(TTY): 1-888-889-2438.)
For Canadian-purchased vehicles,
call 1-800-268-6800.
Service is available 24 hours a day,
365 days a year.
Calling for Assistance
When calling Roadside Assistance,
have the following information
ready:
.Your name, home address, and
home telephone number.
. Telephone number of your
location.
. Location of the vehicle.
. Model, year, color, and license
plate number of the vehicle.
. Odometer reading, Vehicle
Identification Number (VIN), and
delivery date of the vehicle.
. Description of the problem.
Coverage
Services are provided for the
duration of the vehicle’s powertrain
warranty.
In the U.S., anyone driving the
vehicle is covered. In Canada, a
person driving the vehicle without
permission from the owner is not
covered.
Roadside Assistance is not a part of
the New Vehicle Limited Warranty.
General Motors North America and
Chevrolet reserve the right to make
any changes or discontinue the
Roadside Assistance program at
any time without notification.
General Motors North America and
Chevrolet reserve the right to limit
services or payment to an owner or
driver if they decide the claims are
made too often, or the same type of
claim is made many times.
Services Provided
.Emergency Fuel Delivery:
Delivery of enough fuel for the
vehicle to get to the nearest
service station.
Page 355 of 357
Chevrolet Cruze Limited Owner Manual (GMNA-Localizing-U.S./Canada-
9282844) - 2016 - crc - 9/3/15
354 Index
Rotation, Tires . . . . . . . . . . . . . . . . . . 268
Routing, Engine Drive Belt . . . . . . 322
Running the Vehicle WhileParked . . . . . . . . . . . . . . . . . . . . . . . . 191
S
Safety Belts . . . . . . . . . . . . . . . . . . . . . 53Care . . . . . . . . . . . . . . . . . . . . . . . . . . . . 59
Extender . . . . . . . . . . . . . . . . . . . . . . . . 58
How to Wear Safety BeltsProperly . . . . . . . . . . . . . . . . . . . . . . . 55
Lap-Shoulder Belt . . . . . . . . . . . . . . 55
Messages . . . . . . . . . . . . . . . . . . . . .119
Reminders . . . . . . . . . . . . . . . . . . . . 102
Replacing after a Crash . . . . . . . . 59
Use During Pregnancy . . . . . . . . . . 58
Safety Defects Reporting
Canadian Government . . . . . . . . 334
General Motors . . . . . . . . . . . . . . . 334
U.S. Government . . . . . . . . . . . . . 333
Safety Locks . . . . . . . . . . . . . . . . . . . . . 36
Safety System Check . . . . . . . . . . . . 58
Satellite Radio . . . . . . . . . . . . . . . . . . 142
Satellite Radio Antenna . . . . . . . . . 144
Scheduling Appointments . . . . . . . 329
Sealant Kit, Tire . . . . . . . . . . . . . . . . 276
Seats
Adjustment, Front . . . . . . . . . . . . . . . 48
Head Restraints . . . . . . . . . . . . . . . . 47 Seats (cont'd)
Heated Front . . . . . . . . . . . . . . . . . . . 50
Power Adjustment, Front . . . . . . . 49
Rear . . . . . . . . . . . . . . . . . . . . . . . . . . . . 52
Reclining Seatbacks . . . . . . . . . . . . 49
Securing Child Restraints . . . . 85, 87
Security Light . . . . . . . . . . . . . . . . . . . . . . . . . . .110
Messages . . . . . . . . . . . . . . . . . . . . 120
OnStar
®. . . . . . . . . . . . . . . . . . . . . . 337
Vehicle . . . . . . . . . . . . . . . . . . . . . . . . . 38
Vehicle Alarm . . . . . . . . . . . . . . . . . . . 38
Service . . . . . . . . . . . . . . . . . . . . . . . . . 168 Accessories and
Modifications . . . . . . . . . . . . . . . . 220
Climate Control System . . . . . . . 163
Doing Your Own Work . . . . . . . . 221
Engine Soon Light . . . . . . . . . . . . 104
Maintenance Records . . . . . . . . 319
Maintenance, General Information . . . . . . . . . . . . . . . . . . 306
Parts Identification Label . . . . . 320
Publications Ordering Information . . . . . . . . . . . . . . . . . . 332
Scheduling Appointments . . . . . 329
Vehicle Messages . . . . . . . . . . . . 120
Services Special Application . . . . . . . . . . . 313 Servicing the Airbag . . . . . . . . . . . . . 70
Shift Lock Control Function
Check, Automatic
Transmission . . . . . . . . . . . . . . . . . . 242
Shifting Into Park . . . . . . . . . . . . . . . . . . . . . . 188
Out of Park . . . . . . . . . . . . . . . . . . . 189
Side Blind Zone Alert (SBZA) . . . 207
Sidemarker Bulb Replacement . . . . . . . . . . . . 246
Signals, Turn and
Lane-Change . . . . . . . . . . . . . . . . . 130
Spare Tire Compact . . . . . . . . . . . . . . . . . . . . . . 289
Special Application Services . . . . 313
Specifications and Capacities . . . . . . . . . . . . . . . . . . . . . 321
Speedometer . . . . . . . . . . . . . . . . . . . 101
StabiliTrak OFF Light . . . . . . . . . . . . . . . . . . . . . 108
Start Vehicle, Remote . . . . . . . . . . . 32
Starter Switch Check . . . . . . . . . . . 241
Starting the Engine . . . . . . . . . . . . . 185
Starting the Vehicle Messages . . . . . . . . . . . . . . . . . . . . . 120
Steering . . . . . . . . . . . . . . . . . . . . . . . . 172 Power, Warning Lights . . . . . . . . 108
Wheel Adjustment . . . . . . . . . . . . . . 94