Page 9 of 20

9
IntelliLink Infotainment System
Setting the Time
1. Press the
Time button or
CONFIG button.
2. Touch
Time and Date.
3. Touch Time.
4. Touch the screen buttons to adjust the hours and minutes.
5. Press the BACK button to exit the menu.
Storing Favorites
Radio stations from all bands (AM, FM or SiriusXM
F) can be stored in any order.
1. Tune in the desired radio station.
2. Press the FAV button to display the page where the station is to be stored.
3. Press and hold one of the 6 numeric pushbuttons or one of the favorite screen buttons
until a beep is heard.
4. Repeat the steps to store another favorite station.
Natural Voice Recognition
Control the music source and make phone calls hands-free (after pairing your Bluetooth-
enabled phone) using the natural voice recognition system.
1. Press the
Push to Talk button on the steering wheel.
2. The radio will say “Please say a command,” followed by a beep.
3. After the beep, say what you want it to do using natural speech.
• Phone (using your paired phone) – Example command: “Call Amanda” or “Dial 555-1212”
• Media Music Device Search (when connected to USB only) – Example command: “Play artist [name]” or “Play song [name]”
• Radio control – Example command: “Tune FM 104.3” or “Tune XM Classic Vinyl”
• Help – Say “Help” for voice recognition assistance
PANDORA® Internet Radio
Listen to personalized radio stations based on favorite artists or genres.
1. Download the Pandora app to your smartphone and sign in to Pandora.
2. Create a station on your phone to listen to a customized song list in the vehicle.
3. Connect your smartphone to the system by Bluetooth or, for Apple devices, by a
USB cable.
4. Touch the Pandora icon on the touch screen to access Pandora. A slight delay may
occur when loading a song or changing a station.
Voice Pass-Thru
Voice Pass-Thru allows access to the voice recognition commands on a compatible cell
phone; i.e. Siri or Voice Command. Visit my.buick.com/learn for more information.
To activate phone voice recognition, press and hold the Push to Talk button on the
steering wheel for 2 seconds.
F Optional equipmentSee Infotainment System in your Owner Manual.
Page 10 of 20

10
OnStar® with 4G LTE and Wi-Fi®
Refer to your Owner Manual for important information about using the Bluetooth system while driving.
Before using a Bluetooth-enabled device in the vehicle, it must be paired with the in-
vehicle Bluetooth system. The pairing process is disabled when the vehicle is moving.
Not all devices will support all functions. Visit my.buick.com/learn for more information.
Pair a Phone
1. To use voice recognition, press the
Push to Talk button on the steering wheel;
after the beep, say “Pair.”
To use the infotainment controls, press the CONFIG button and then touch Phone
Settings > Pair Device.
2. Start the pairing process on the phone. Locate Your Vehicle or Buick IntelliLink on
the phone.
3. Confirm the codes that appear on the touch screen and the phone.
4. If your phone prompts you to accept the connection or phone book download, select
Always Accept and Allow.
See Infotainment System in your Owner Manual.
Bluetooth® System
Portable Audio Devices
With OnStar 4G LTE and Wi-Fi, up to seven devices (smartphones, tablets and laptops)
can be connected to high-speed Internet through the vehicle’s built-in Wi-Fi hotspot.
To retrieve the SSID and password for the hotspot, press the OnStar Voice Command
button on the overhead console or rearview mirror, wait for the prompt, and then say
“Wi-Fi settings.” The information will be displayed on the screen.
For assistance, press the blue OnStar button or call 1-888-4-ONSTAR (1-888-466-7827).
Note: See onstar.com for a detailed instruction guide, vehicle availability, details, and system
limitations.
See Infotainment System in your Owner Manual.
USB ports and auxiliary jacks are located at
the front of the center console and inside
the storage compartment to connect
portable audio devices.
An iPod®, iPhone®, MP3 Player, a USB
flash drive or a USB mass storage device
can be connected to the USB port.
Search for music on-screen or by voice
commands.
Press the SRCE Source button to select
a portable device as the audio source.
See Infotainment System in your Owner Manual.
Page 11 of 20
11
Navigation SystemF
Entering a Destination
1. Press the DEST button.
2. To enter a specific address, touch the Address Entry screen button. The Destination
Entry menu also lists other options to plan a route.
3. Select State/Province, City or Street and enter the information. Touch the List button
to select the desired name from the generated list for each entry.
4. Enter the house number. Touch the Done screen button.
5. The entered address is displayed.
6. Select the Route Options and touch the Start Guidance screen button.
See Infotainment System in your Owner Manual.
NAVI Map screensDEST Destination
menus RPT Repeat voice
guidance 4-Way Control: Move the 4-way control in the
knob in different directions to move the map display
F Optional equipment
Page 12 of 20

12
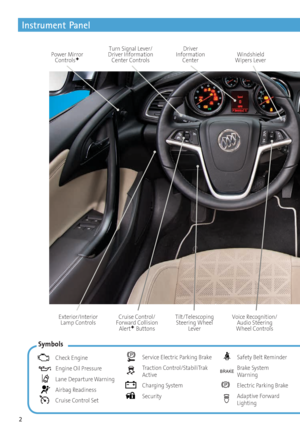
Vehicle Personalization
Windshield Wipers
Some vehicle features can be custom-ized using the Settings menus and the
touch screen button or infotainment
controls. The Settings menus may include
Languages, Time and Date, Radio Settings,
Phone Settings, Navigation Settings,
Display Settings, and Vehicle Settings.
1. Press the CONFIG button (A) or touch
the CONFIG screen button (B) on the
home page.
2. Use the Tune/Menu knob or the touch
screen to select the desired menu item.
3. Use the Tune/Menu knob or the touch
screen to select the desired feature and
setting.
4. Press BACK to exit each menu.
HI Fast Wipes
LO Slow Wipes
INT Intermittent
Rotate the band to adjust the delay
between wipes. The wipers activate more
often as the band is rotated upward.
OFF
1x Single Wipe
Washer Fluid
Pull the lever toward you to spray washer
fluid on the windshield.
See Instruments and Controls in your Owner Manual.
Raise or lower the lever to activate
the wipers.
See Instruments and Controls in your Owner Manual.
A
B
Page 13 of 20
13
Automatic Climate Controls
F Optional equipment
Automatic Operation
Press AUTO.
Set the temperature.
The system automatically controls the fan speed, air delivery, air conditioning and recir
-culation to reach the set temperature. Allow time for the system to reach the desired
temperature. If the fan speed or air delivery mode is manually adjusted, automatic
operation is canceled.
Air Delivery Modes
Press the Air Delivery Mode buttons to change the direction of the airflow. Air delivery
settings can be combined.
Defrost Mode
Press the Defrost button to direct air at the maximum fan speed to the windshield.
See Climate Controls in your Owner Manual.
Air
Conditioning Heated Steering WheelF
Recirculation Mode Defrost Mode Rear Window/
Heated Outside
Mirrors
F Defog
Driver’s
Heated Seat Button
F
AUTO Automatic Operation Air Delivery Modes:
Defog Vent Floor
Passenger’s
Temperature Control
Driver’s
Temperature Control
Fan Speed
Control
Passenger’s
Heated Seat Button
F
Page 14 of 20
 or the headlamps
and other exterior lamps depending on
outside light conditions.
Parkin")
14
Lighting
Off/On
AUTO Automatic Headlamp System
Automatically activates the Daytime
Running Lamps (DRLs) or the headlamps
and other exterior lamps depending on
outside light conditions.
Parking Lamps
Headlamps
Front Fog Lamps
Press to turn the fog lamps on or off.
To apply the parking brake, pull the
Parking Brake switch (A).
To release the parking brake, turn on
the ignition, press the brake pedal, and
then press the
switch.
Note: The parking brake will release
automatically if the vehicle is running, placed
into gear and an attempt is made to drive.
See Driving and Operating in your Owner Manual.
Electric Parking Brake
F Optional equipment
Exterior Lamps
Rotate the knob to activate the exterior
lamps.
Adaptive Forward Lighting
F
The Adaptive Forward Lighting system pivots the headlamps left or right in the direction
of travel.
Note: The system operates only when the exterior lamps control knob is in the AUTO position,
at speeds greater than 2 mph, and after driving a short distance to calibrate the system.
Instrument Panel Lighting
Instrument Panel Brightness
Rotate and hold the thumbwheel to adjust the instrument panel lighting.
See Lighting in your Owner Manual.
A
Page 15 of 20

15
Cruise Control
Traction Control and StabiliTrak® Systems
Setting Cruise Control
1. Press the
On/Off button. The
Cruise Control symbol will illuminate in
white on the instrument cluster.
2. When traveling at the desired speed,
rotate the thumbwheel down to the
SET– position to set the speed. The
symbol will illuminate in green on the
instrument cluster.
Adjusting Cruise Control
RES+ Resume/Accelerate
Rotate the thumbwheel up to resume a set speed. When the system is active, rotate and
hold the thumbwheel up to increase speed.
SET– Set/Coast
When the system is active, rotate and hold the thumbwheel down to decrease speed.
Cancel
Press to cancel the cruise control without erasing the set speed from memory. Pressing
the brake pedal also will cancel the cruise control.
The cruise control set speed is erased when cruise control or the vehicle ignition is
turned off.
See Driving and Operating in your Owner Manual.
The traction control system limits wheel-spin and the StabiliTrak® stability control
system assists with directional control
of the vehicle in difficult driving condi
-tions. Both systems turn on automatically
every time the vehicle is started. Turn off
traction control if the vehicle is stuck and
rocking the vehicle is required.
Press the Traction Control/
StabiliTrak Off button on the center of
the instrument panel to turn traction
control on or off.
See Driving and Operating in your Owner Manual.
Page 16 of 20

16
Automatic Transmission
Driving Assistance Systems
Driver Shift Control
Driver Shift Control is a manual mode that
allows the driver to shift gears manually.
This feature can be used to drive the vehicle
in a sportier manner, or to downshift when
driving on a downhill grade to provide
engine braking.
1. Move the shift lever left to the +/–
position.
2. Tap the shift lever forward (+) to upshift
or rearward (–) to downshift. The current
gear will be displayed on the Driver Information Center.
If vehicle speed is too high or too low for the requested gear, the shift will not occur.
When coming to a stop, the transmission will downshift automatically.
See Driving and Operating in your Owner Manual.
Forward Collision AlertF
The Vehicle Ahead indicator illuminates
in green on the instrument cluster when a
vehicle is detected and illuminates in amber
when following a vehicle ahead too closely.
If your vehicle approaches another vehicle
too rapidly, a visual alert flashes on the
Driver Information Center and rapid beeps
sound.
Press the Collision Alert button (A)
on the steering wheel to set the alert
timing to Far, Medium, Near or Off. The
setting is displayed on the Driver
Information Center.
Lane Departure Warning
F
When crossing a detected lane marking
without using a turn signal in that direction,
the
Lane Departure Warning indicator
flashes on the instrument panel and beeps
sound.
To turn the system on or off, press the Lane Departure Warning button (B) on the center of the instrument panel.Note:
The camera sensor is located ahead of the rearview mirror. Keep the windshield clean for proper
operation.
See Driving and Operating in your Owner Manual.
F Optional equipment
A
B