2016 BMW M4 service
[x] Cancel search: servicePage 194 of 228
ist workshop, if you are not familiar with it or it
is not described here.
A box containing spare bulbs is available from
a Service Partner or a qualified specialist work‐
shop.
WARNING
Lamps can become hot during operation.
Contact with the lamps can lead to burns. Dan‐
ger of injury. Only replace lamps in cooled-
down condition.◀
WARNING
Short circuits can occur when working on
switched on lighting systems. Danger of injury
or damage to property. Switch the respective
lights off when working on the lighting system.
Observe the possibly enclosed notes of the
lamp manufacturer.◀
DANGER
High voltages can be applied to the light‐
ing system. Danger of fatal injury. Have work
on the lighting system including replacing the
lamps performed by a Service Partner or a
qualified specialist workshop.◀
ATTENTION
Dirty lamps have a reduced lifetime. Dan‐
ger of damage to property. Do not touch the
glass of new lamps with your bare hands. Use
a clean tissue, cloth or similar, or hold the bulb
by its base.◀
Light-emitting diodes, LEDs
Some equipment versions have light-emitting
diodes behind a cover as a light source.
These resemble conventional lasers and are
classified by legislation as Class 1 light-emit‐
ting diodes.
WARNING
Excessively intense brightness can irri‐
tate or harm the retina of the eye. Danger of in‐
jury. Do not look directly at the headlights orother light sources for a sustained period. Do
not remove covers from LEDs.◀
Headlight glass
During cool or humid weather, the exterior
lights can mist over. When driving with the light
switched on, the condensation disappears af‐
ter a short time. There is no need to replace
the headlight glass.
If the headlights do not demist, even when
driving with the lights switched on and increas‐ ing moisture builds up, for example water
droplets in the lights, have these checked by a
Service Partner or a qualified specialist work‐
shop.
Headlight adjustment The adjustments of the headlight can be affec‐
ted by changing lights and bulbs. Have the
headlight adjustment checked and if necessary
corrected by a Service Partner or a qualified
specialist workshop after changing lights and
lamps.
Front lights, replacing the bulbs
Xenon headlight Notes DANGER
High voltages can be applied to the light‐
ing system. Danger of fatal injury. Have work
on the lighting system including replacing the
lamps performed by a Service Partner or a
qualified specialist workshop.◀
These bulbs have a very long service life and
are highly unlikely to fail. Frequent switching
on and off shortens the service life.Seite 194MobilityReplacing parts194
Online Edition for Part no. 01 40 2 964 013 - VI/15
Page 195 of 228
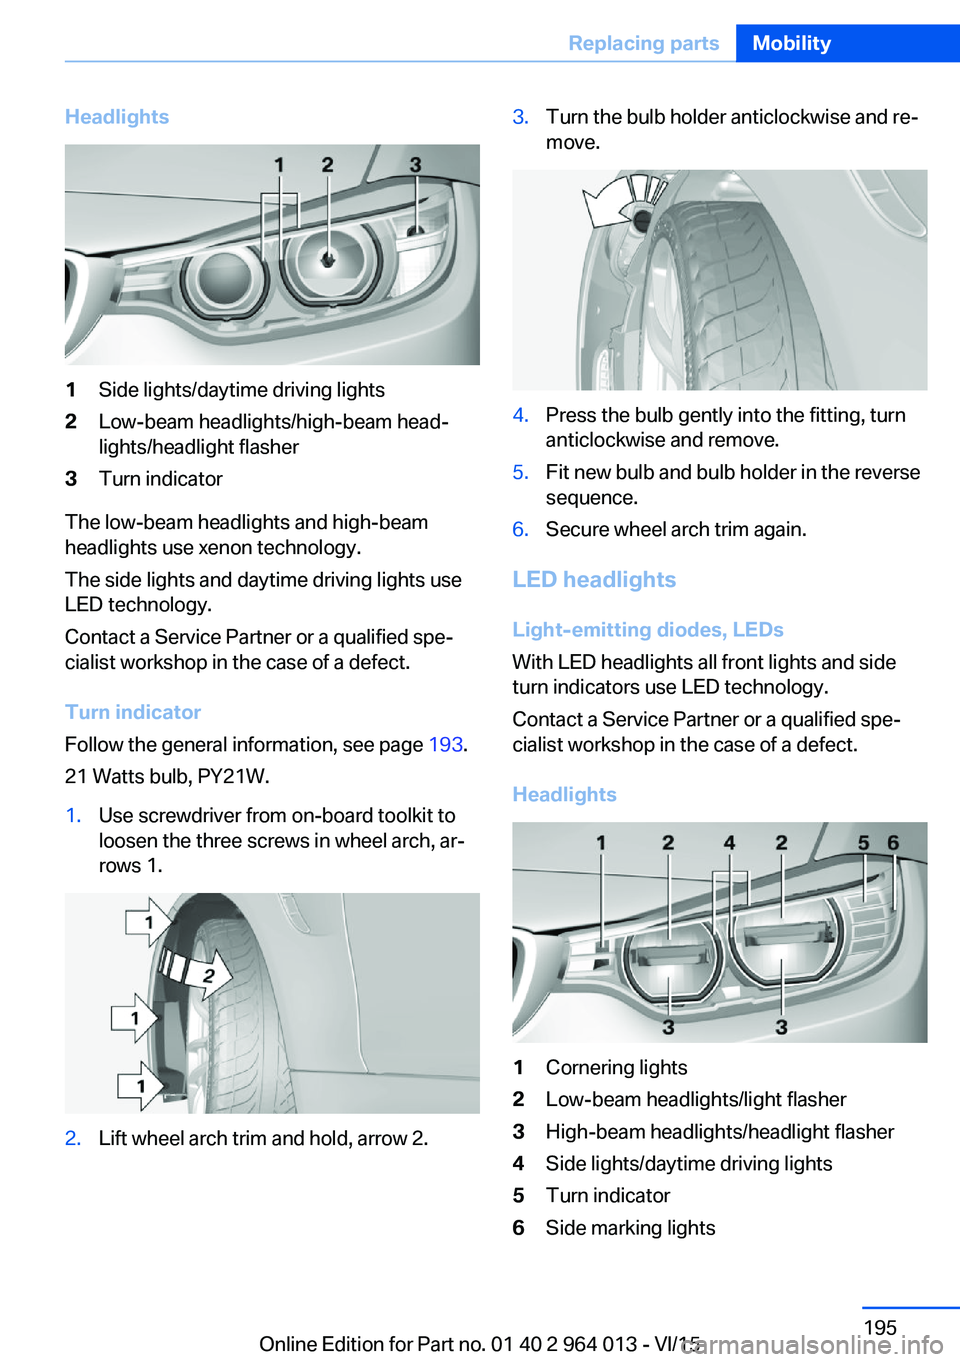
Headlights1Side lights/daytime driving lights2Low-beam headlights/high-beam head‐
lights/headlight flasher3Turn indicator
The low-beam headlights and high-beam
headlights use xenon technology.
The side lights and daytime driving lights use
LED technology.
Contact a Service Partner or a qualified spe‐
cialist workshop in the case of a defect.
Turn indicator
Follow the general information, see page 193.
21 Watts bulb, PY21W.
1.Use screwdriver from on-board toolkit to
loosen the three screws in wheel arch, ar‐
rows 1.2.Lift wheel arch trim and hold, arrow 2.3.Turn the bulb holder anticlockwise and re‐
move.4.Press the bulb gently into the fitting, turn
anticlockwise and remove.5.Fit new bulb and bulb holder in the reverse
sequence.6.Secure wheel arch trim again.
LED headlights
Light-emitting diodes, LEDs
With LED headlights all front lights and side
turn indicators use LED technology.
Contact a Service Partner or a qualified spe‐
cialist workshop in the case of a defect.
Headlights
1Cornering lights2Low-beam headlights/light flasher3High-beam headlights/headlight flasher4Side lights/daytime driving lights5Turn indicator6Side marking lightsSeite 195Replacing partsMobility195
Online Edition for Part no. 01 40 2 964 013 - VI/15
Page 196 of 228
In the event of a defect, contact the Service
Centre.
Turn indicator in exterior mirror Turn indicators in the exterior mirrors are de‐
signed in the LED technology. Contact a Serv‐
ice Partner or a qualified specialist workshop in
the case of a defect.
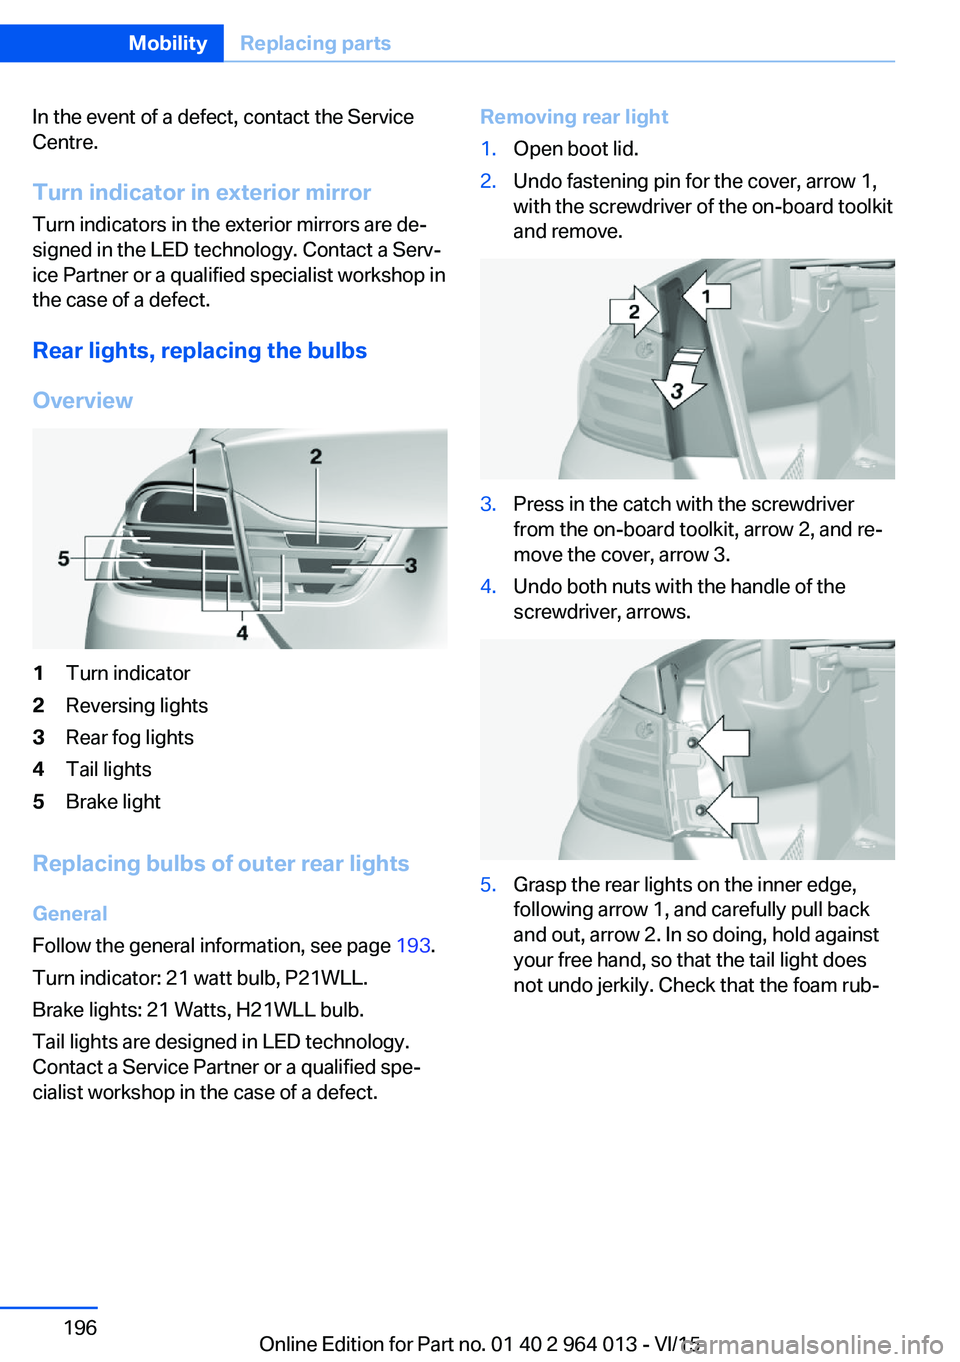
Rear lights, replacing the bulbs
Overview1Turn indicator2Reversing lights3Rear fog lights4Tail lights5Brake light
Replacing bulbs of outer rear lights
General
Follow the general information, see page 193.
Turn indicator: 21 watt bulb, P21WLL.
Brake lights: 21 Watts, H21WLL bulb.
Tail lights are designed in LED technology.
Contact a Service Partner or a qualified spe‐
cialist workshop in the case of a defect.
Removing rear light1.Open boot lid.2.Undo fastening pin for the cover, arrow 1,
with the screwdriver of the on-board toolkit
and remove.3.Press in the catch with the screwdriver
from the on-board toolkit, arrow 2, and re‐
move the cover, arrow 3.4.Undo both nuts with the handle of the
screwdriver, arrows.5.Grasp the rear lights on the inner edge,
following arrow 1, and carefully pull back
and out, arrow 2. In so doing, hold against
your free hand, so that the tail light does
not undo jerkily. Check that the foam rub‐Seite 196MobilityReplacing parts196
Online Edition for Part no. 01 40 2 964 013 - VI/15
Page 197 of 228
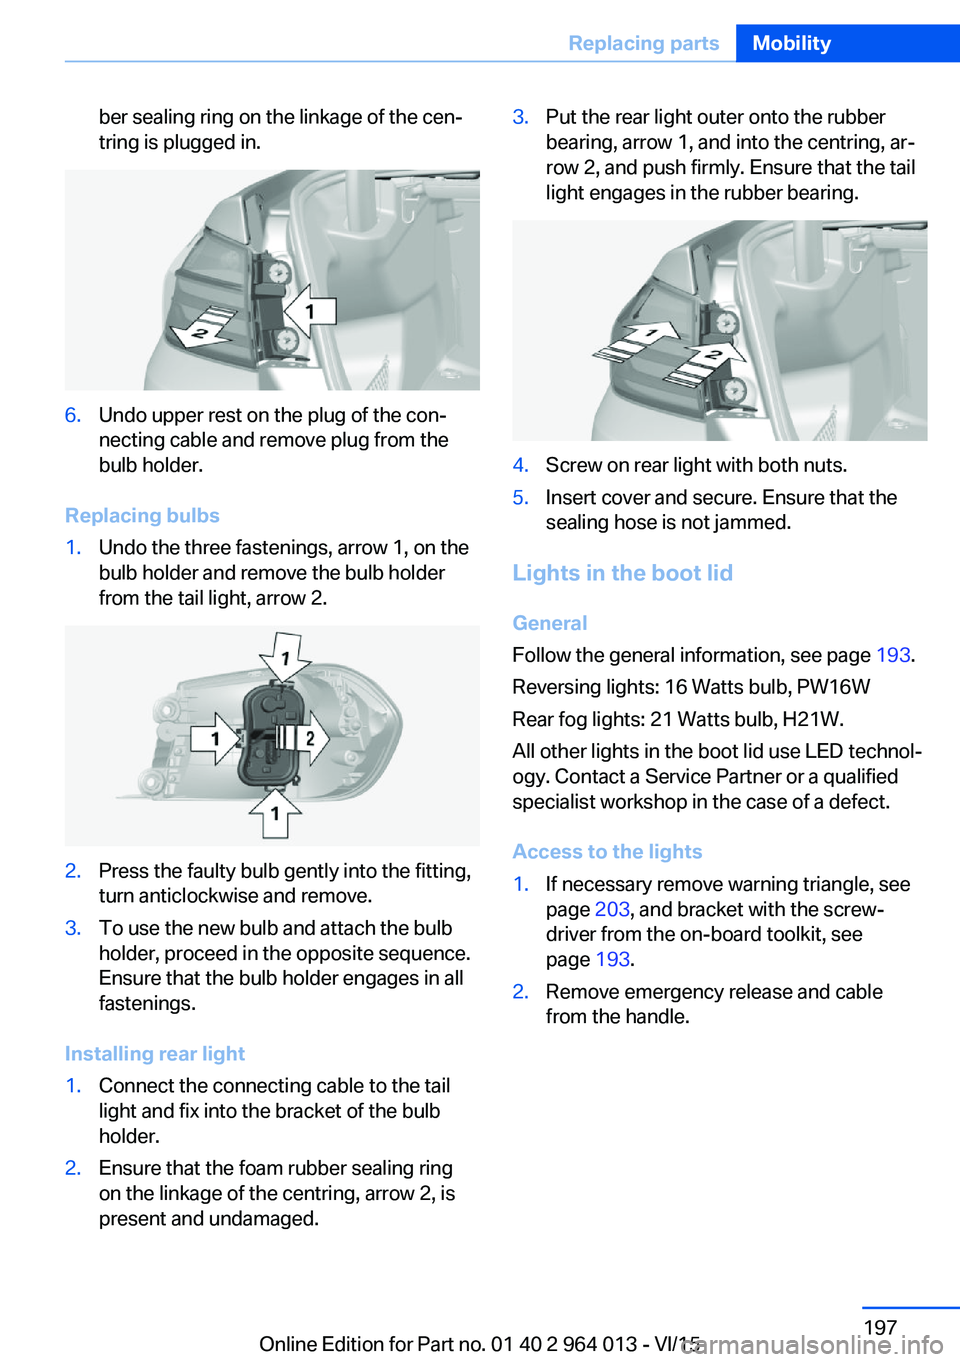
ber sealing ring on the linkage of the cen‐
tring is plugged in.6.Undo upper rest on the plug of the con‐
necting cable and remove plug from the
bulb holder.
Replacing bulbs
1.Undo the three fastenings, arrow 1, on the
bulb holder and remove the bulb holder
from the tail light, arrow 2.2.Press the faulty bulb gently into the fitting,
turn anticlockwise and remove.3.To use the new bulb and attach the bulb
holder, proceed in the opposite sequence.
Ensure that the bulb holder engages in all
fastenings.
Installing rear light
1.Connect the connecting cable to the tail
light and fix into the bracket of the bulb
holder.2.Ensure that the foam rubber sealing ring
on the linkage of the centring, arrow 2, is
present and undamaged.3.Put the rear light outer onto the rubber
bearing, arrow 1, and into the centring, ar‐
row 2, and push firmly. Ensure that the tail
light engages in the rubber bearing.4.Screw on rear light with both nuts.5.Insert cover and secure. Ensure that the
sealing hose is not jammed.
Lights in the boot lid
General
Follow the general information, see page 193.
Reversing lights: 16 Watts bulb, PW16W
Rear fog lights: 21 Watts bulb, H21W.
All other lights in the boot lid use LED technol‐
ogy. Contact a Service Partner or a qualified
specialist workshop in the case of a defect.
Access to the lights
1.If necessary remove warning triangle, see
page 203, and bracket with the screw‐
driver from the on-board toolkit, see
page 193.2.Remove emergency release and cable
from the handle.Seite 197Replacing partsMobility197
Online Edition for Part no. 01 40 2 964 013 - VI/15
Page 199 of 228

5.Install the cable on the handle of the emer‐
gency release and engage the handle into
the fastening.6.Fit the bracket for the warning triangle.7.Attach the warning triangle.
Tail lights, number plate lights and
centre brake light
These lights use LED technology. Contact a
Service Partner or a qualified specialist work‐
shop in the case of a defect.
Changing a wheel
Notes
When using sealants, immediate wheel change
in the event of loss of tyre pressure in case of
puncture is not required.
As a result, no spare wheel is available.
The tools for changing wheels are available as
optional accessories from a Service Partner or
a qualified specialist workshop.
Jack mounting points
The jack mounting points are located in the il‐
lustrated positions.
Thiefproof wheel studs
The adapter of the thiefproof wheel studs can
be found in the tool kit or in an oddments tray
in the tool kit.
▷Wheel stud, arrow 1.▷Adapter, arrow 2.
Removing
1.Place the adapter on the wheel stud.2.Unscrew wheel stud.
After reattaching the wheel stud, remove the
adapter again.
Car battery Maintenance
The battery is maintenance-free.
More information regarding the battery can be
enquired with a Service Partner or a qualified
specialist workshop.
Replacing the battery ATTENTION
Vehicle batteries that have been categor‐
ised by the manufacturer of the vehicle as un‐
suitable can damage systems, or prevent func‐
tions from being carried out. Danger of
damage to property. Only use vehicle batteries
that have been classified as suitable by the ve‐
hicle manufacturer.◀
When the vehicle battery has been changed,
have the battery registered on the vehicle by a
Service Partner or a qualified specialist work‐
shop to ensure that all comfort functions are
fully available and any appropriate Check Con‐
trol messages are no longer displayed.
Seite 199Replacing partsMobility199
Online Edition for Part no. 01 40 2 964 013 - VI/15
Page 200 of 228
Recharging the battery
General Ensure the battery is sufficiently charged to
guarantee the entire lifetime of the battery.
In the following cases, charging the battery is
necessary:▷When making frequent short trips.▷When leaving for periods of longer than
one month.
Notes
ATTENTION
Unsuitable external chargers can dam‐
age the vehicle. Danger of damage to property.
Use chargers that have been categorised as
suitable for the respective vehicle type by the
vehicle manufacturer. Observe the maximum
charge voltage.◀
Maximum charge voltage: 14.4 Volt. ATTENTION
Battery chargers for the vehicle battery
can operate with high voltages and high cur‐
rents, which can overload or damage the
12 volt on-board network. Danger of damage
to property. Only connect battery chargers for
the vehicle battery to the jump-starting con‐
nections in the engine compartment.◀
Jump-starting connections
Recharge the battery only with the engine
stopped, via the jump-starting connections,
see page 204, in the engine compartment.
Charger
Chargers developed especially for the vehicle
and attuned to the on-board network can be
obtained from Service Partner or a qualified
specialist workshop.
Power failure
Following a temporary electrical power outage,
some equipment will have to be reinitialised or
individual settings will need to be updated, for
example:▷Seat and mirror memory: re-save positions.▷Time: update.▷Date: update.▷Glass Roof and sun blind: initialise system,
see page 47.
Disposing of the old battery
Dispose of old batteries at a Service
Partner or a qualified specialist work‐
shop or hand them into an authorised
collecting point.
Fuses
Notes WARNING
Incorrect or repaired fuses can overload
electrical cables and components. Fire risk. Do
not repair blown fuses or renew them by fuses
with a different colour or amp rating.◀
Plastic tweezers and details of the fuse assign‐
ment can be found with the fuses in the boot.
Seite 200MobilityReplacing parts200
Online Edition for Part no. 01 40 2 964 013 - VI/15
Page 205 of 228
Systems, for example approach control warn‐
ing with light braking function. Danger of acci‐
dents. Switch off all Intelligent Safety Systems
before tow-starting/towing.◀
Manual gearboxGearshift lever in idle position.
Being towed Observe the following information:▷Make sure that the ignition is switched on,
otherwise low-beam headlights, rear lights,
turn indicators and wipers would not be
available.▷Do not tow the vehicle with the rear axle
raised, otherwise the steering can turn.▷When the engine is not running, there is no
power assistance and the brake servo is
out of action. The steering and brakes will
require extra effort to operate.▷Greater steering wheel movements are
necessary.▷The towing vehicle must not be lighter
than the towed vehicle, otherwise it may be
unable to keep the towed vehicle reliably
under control.▷Do not exceed a towing speed of on
50 km/h, 30 mph.▷Do not exceed a towing distance of 50 km,
30 miles.Towing truck
With driven rear axle
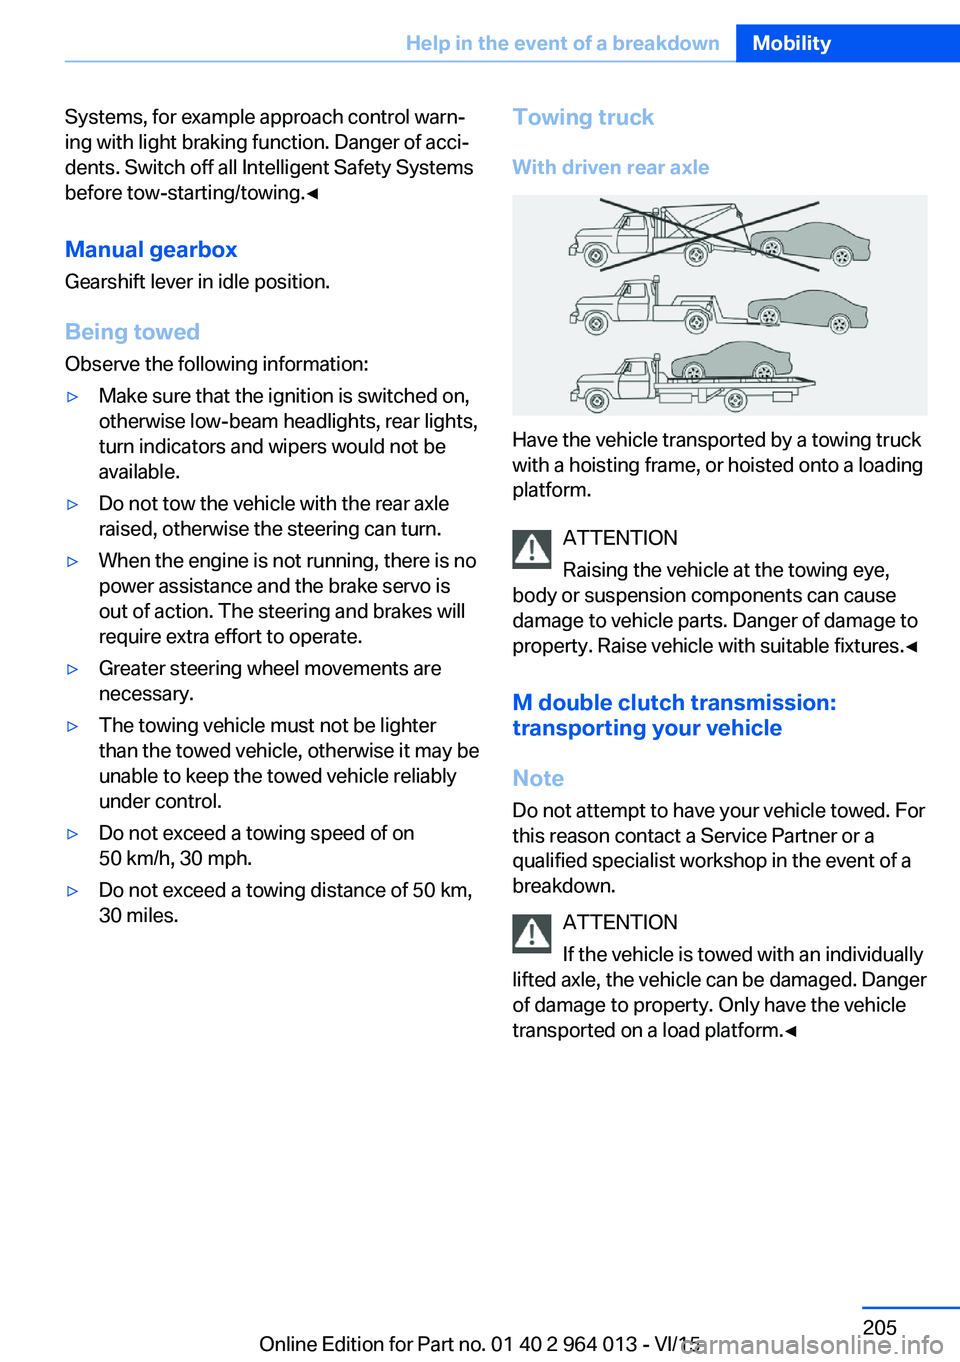
Have the vehicle transported by a towing truck
with a hoisting frame, or hoisted onto a loading
platform.
ATTENTION
Raising the vehicle at the towing eye,
body or suspension components can cause
damage to vehicle parts. Danger of damage to
property. Raise vehicle with suitable fixtures.◀
M double clutch transmission:
transporting your vehicle
Note
Do not attempt to have your vehicle towed. For
this reason contact a Service Partner or a
qualified specialist workshop in the event of a
breakdown.
ATTENTION
If the vehicle is towed with an individually
lifted axle, the vehicle can be damaged. Danger
of damage to property. Only have the vehicle
transported on a load platform.◀
Seite 205Help in the event of a breakdownMobility205
Online Edition for Part no. 01 40 2 964 013 - VI/15
Page 209 of 228

Manual gearbox:1.Drive into the car wash.2.Engage idle position.3.Stop the engine.4.Switch on ignition.
M double clutch transmission:
1.Drive into the car wash.2.Engage selector lever position N.3.Stop the engine.
In this way the ignition remains switched
on and a Check Control message is dis‐
played.
It is not possible to lock the vehicle from the
outside in selector lever position N. If an at‐
tempt is made to lock the vehicle, a signal
sounds.
When starting engine with manual gearbox:
1.Press clutch pedal.2.Press the start/stop button.
When starting engine with M double clutch
transmission:
1.Press the brake.2.Press the start/stop button.
Pressing the start/stop button or depressing
the brake switches off the ignition.
Transmission position
Transmission position P is automatically en‐
gaged:
▷With the ignition switched off.▷After approximately 15 minutes.
Headlights
▷Do not rub them when dry or use abrasive
or corrosive cleaning agents.▷Soak impurities such as insects with sham‐
poo and wash off with water.▷Remove ice with a de-icer spray; do not
use an ice scraper.After washing the car
After washing the car, drive it briefly and apply
the brakes to dry them out; this is necessary to
prevent reduced braking action, and also to
avoid corrosion of the brake discs.
Completely remove residues on the wind‐
screens to avoid affecting visibility due to
smearing, and to reduce wiping noise and
wiper blade wear.
Car care Care products The manufacturer of your vehicle recommends
the use of BMW care and cleaning products,
as they are tested by BMW and categorised as
suitable for the use on the vehicle.
WARNING
Cleaning agents can contain hazardous
substances or constitute a health risk. Danger
of injury. When cleaning the interior, open the
doors or windows. Use only products that are
intended for cleaning the vehicle's interior. Ob‐
serve the notes on the pack.◀
Vehicle paintwork Regular care promotes driving safety and pre‐
serves your vehicle's value. Environmental ef‐
fects in areas with higher air pollution or natu‐
ral contaminations, for example tree resin or
leaf dust, may have an effect on the vehicle
paintwork. Base the frequency and extent of
vehicle care on such factors.
Remove corrosive substances, such as run-off
fuel, oil, grease or bird droppings immediately
to avoid changes to the paint or discoloura‐
tions.
Only use suitable cleaning and care products
for matt paintwork. Suitable matt paintwork
care products are available from a Service
Partner or a qualified specialist workshop.Seite 209General careMobility209
Online Edition for Part no. 01 40 2 964 013 - VI/15