2016 AUDI RS7 SPORTBACK height adjustment
[x] Cancel search: height adjustmentPage 11 of 282

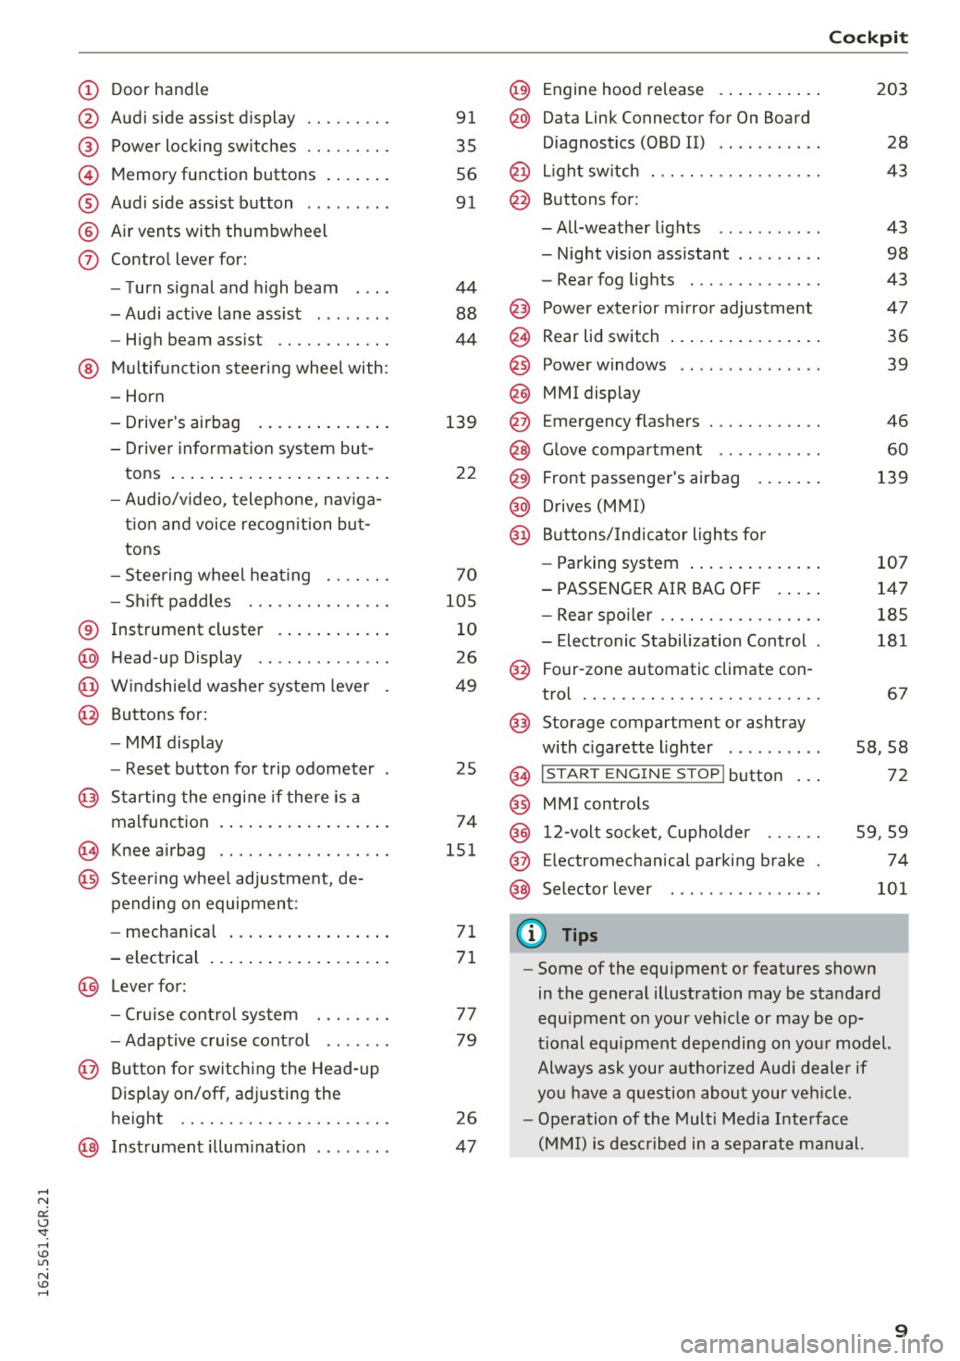
(!) Door handle
@
®
©
®
®
(j)
Audi side assist display
Power locking switches ...... .. .
Memory function buttons ...... .
Audi side assist button .. .. ... . .
Air vents with thumbwheel
Control lever for:
- Turn signal and high beam
- Audi active lane assist . .. ... . .
- High beam assist ......... .. .
@ Multifunction steering wheel with:
- Horn
- Driver's airbag
- Driver information system but-
tons ...................... .
- Audio/video, telephone, naviga
tion and voice recognition but
tons
- Steering wheel heating ...... .
- Shift paddles ............ .. .
® Instrument cluster ........... .
@ Head-up Display ............ . .
@ Windshield washer system lever
@ Buttons for:
- MMI display
- Reset button for trip odometer
@ Starting the engine if there is a
malfunction ................. .
~ Knee airbag .. ............. .. .
@ Steering wheel adjustment, de
pending on equipment:
- mechanical ................ .
- electrical
@ Lever for :
- Cruise control system ... .. .. .
- Adaptive cruise control ...... .
@ Button for switching the Head-up
Display on/off, adjusting the
height .. .. ............... .. .
@ Instrument illumination ....... .
91
35
56
91
44
88
44
139
22
70
105
10
26
49
25
74
151
71
71
77
79
26
47
@) Engine hood release .......... .
@ Data Link Connector for On Board
Diagnostics (OBD II) .... ...... .
@ Light switch . .. .............. .
@ Buttons for :
-All-weather lights - Night vision assistant .. ...... .
- Rear fog lights ............. .
@ Power exterior mirror adjustment
@ Rear lid switch ............... .
@
@
@ Power windows
MMI display
E mergency flashers
@ Glove compartment .......... .
@ Front passenger's airbag ...... .
@ Drives (MMI)
@ Buttons/Indicator lights for
- Parking system ............. .
- PASSENGER AIR BAG OFF .... .
- Rear spoiler .. .............. .
- Electronic Stabilization Control .
@ Four-zone automatic climate con-
trol .... .... .. .............. .
@) Storage compartment or ashtray
with cigarette lighter ......... .
@ I ST AR T ENGINE ST OP ! button
@ MMI controls
@
@
@ 12-volt socket, (upholder
E lectromechanical parking brake
Selector lever
(D Tips
Cockpit
203
28
43
43
98
43
47
36
39
46
60
139
107
147
185
181
67
58,58
72
59 ,59
74
101
- Some of the equipment or features shown
in the general illustration may be standard
equipment on your vehicle or may be op
tional equipment depending on your model.
Always ask your authorized Audi dealer if
you have a question about your vehicle.
- Operation of the Multi Media Interface
(MMI) is described in a separate manual.
9
Page 28 of 282

Instruments and indicator lights
Head-up display
Applies to: vehicles with Head-up display
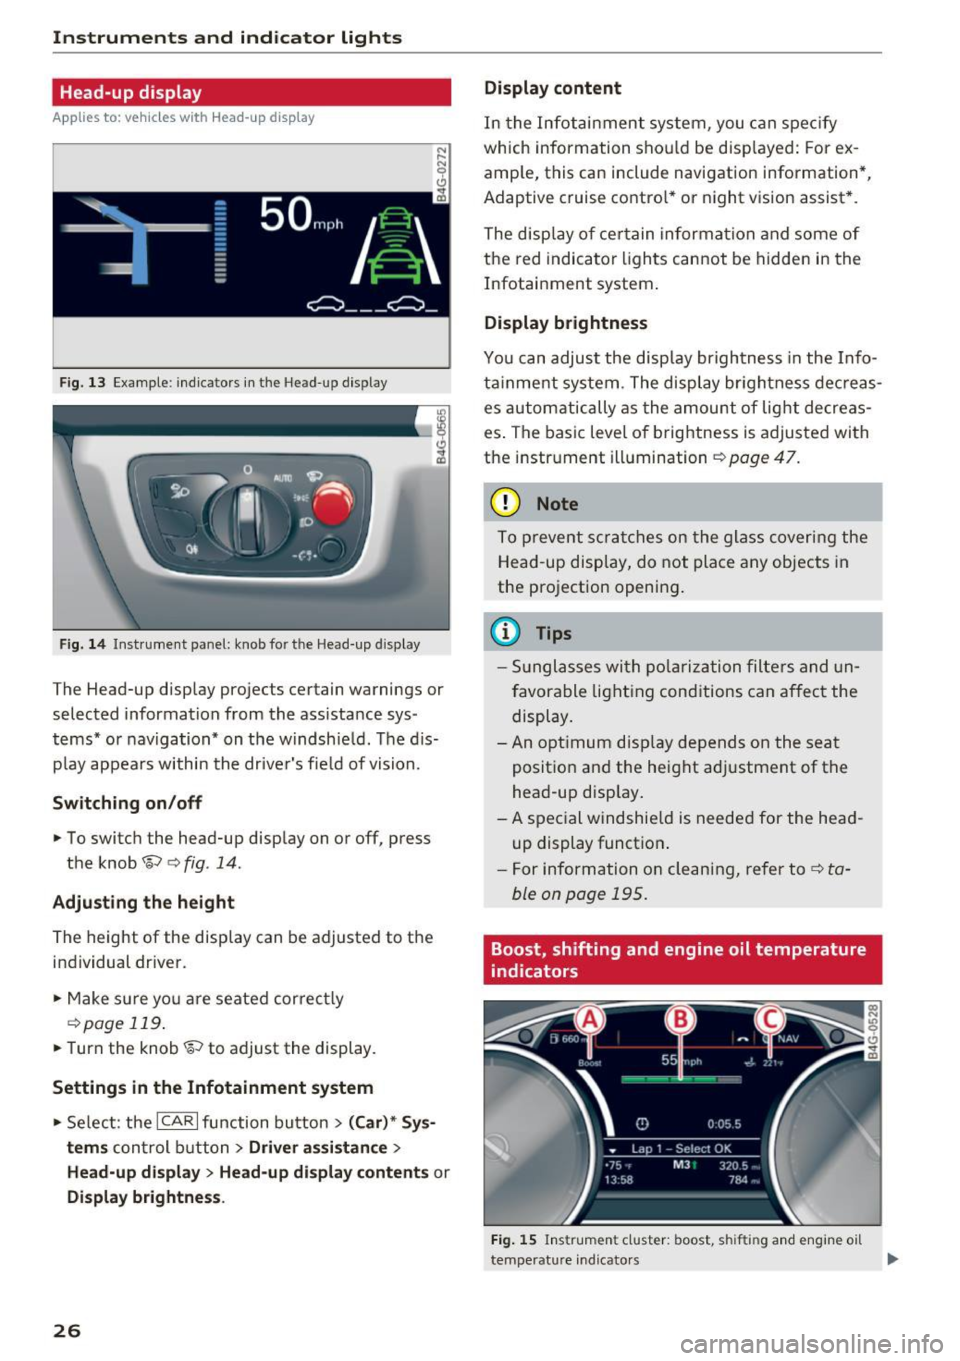
Fig. 13 Example: indicators in the Head-up display
F ig. 14 Inst rument panel: knob for the Head-up display
The Head-up display projects certain warnings or
selected information from the ass istance sys
tems* or navigation* on the windshie ld. The d is
p lay appears within the driver's fie ld of vision.
Switching on/off
• To switch the head-up disp lay on or off, press
the knob~
c:> fig. 14.
Adjusting the height
The height of the display can be adjusted to the
individual driver.
• Make sure yo u are seated correct ly
c:> page 119.
• Turn the knob~ to adjust the display.
Settings in the Infotainment system
• Select: the ICAR I function bu tton > (Car)* Sys
tems
control b utton > Driver assistance >
Head-up displ ay> Head-up di splay contents or
Display brightness .
26
Display content
In the Infotainment system, you can spec ify
which information shou ld be disp layed: For ex
amp le, this can include navigation information*,
Adaptive cruise contro l* or night vision assist *.
The display of certain information and some of
the red indicator lights cannot be hidden in the
Infotainment system.
Display brightness
You can adjust the display brightness in the Info
ta inment system . The display br ightness dec reas
es automatically as the amount of light decreas
es . The basic leve l of brightness is adjusted with
the instrument illumination
c:> page 47.
(D Note
To prevent scratches on the glass covering the
Head-up display, do not place any objects in
the projection opening.
(D Tips
- Sunglasses with polarization filters and un
favorable lighting conditions can affect the
display.
- An optimum display depends on the seat
position and the height adjustment of the
head-up display.
- A special windshie ld is needed for the head
up display function .
- For information on cleaning, refer to
c:> ta
ble on page 195.
Boost, shifting and engine oil temperature
indicators
Fig. 15 Instrument cluster: boost, shifting and engine oil
temperature indicators
Page 55 of 282

Front passenger's seat
Always move the front passenger seat into the
rearmost position .
To avoid contact with the airbag while it is de
ploying, do not sit any closer to the instrument
panel than necessary and always wear the three
point safety belt provided adjusted correctly. We
recommend that you adjust the passenger's seat
in the following manner:
.. Bring the backrest up to an (almost) upright
posit ion . Do not ride with the seat reclined .
.. For adjustable head restraints: adjust the head
restraint so the upper edge is as even as poss i
ble with the top of your head. If that is not pos
sible, try to adjust the head restraint so that it
is as close to this position as possible
¢ page 55. Mov e the head restraint so that it
is as close to the back of the head as possible.
.. Place your feet on the floor in front of the pas
senger's seat.
Front seats
Controls
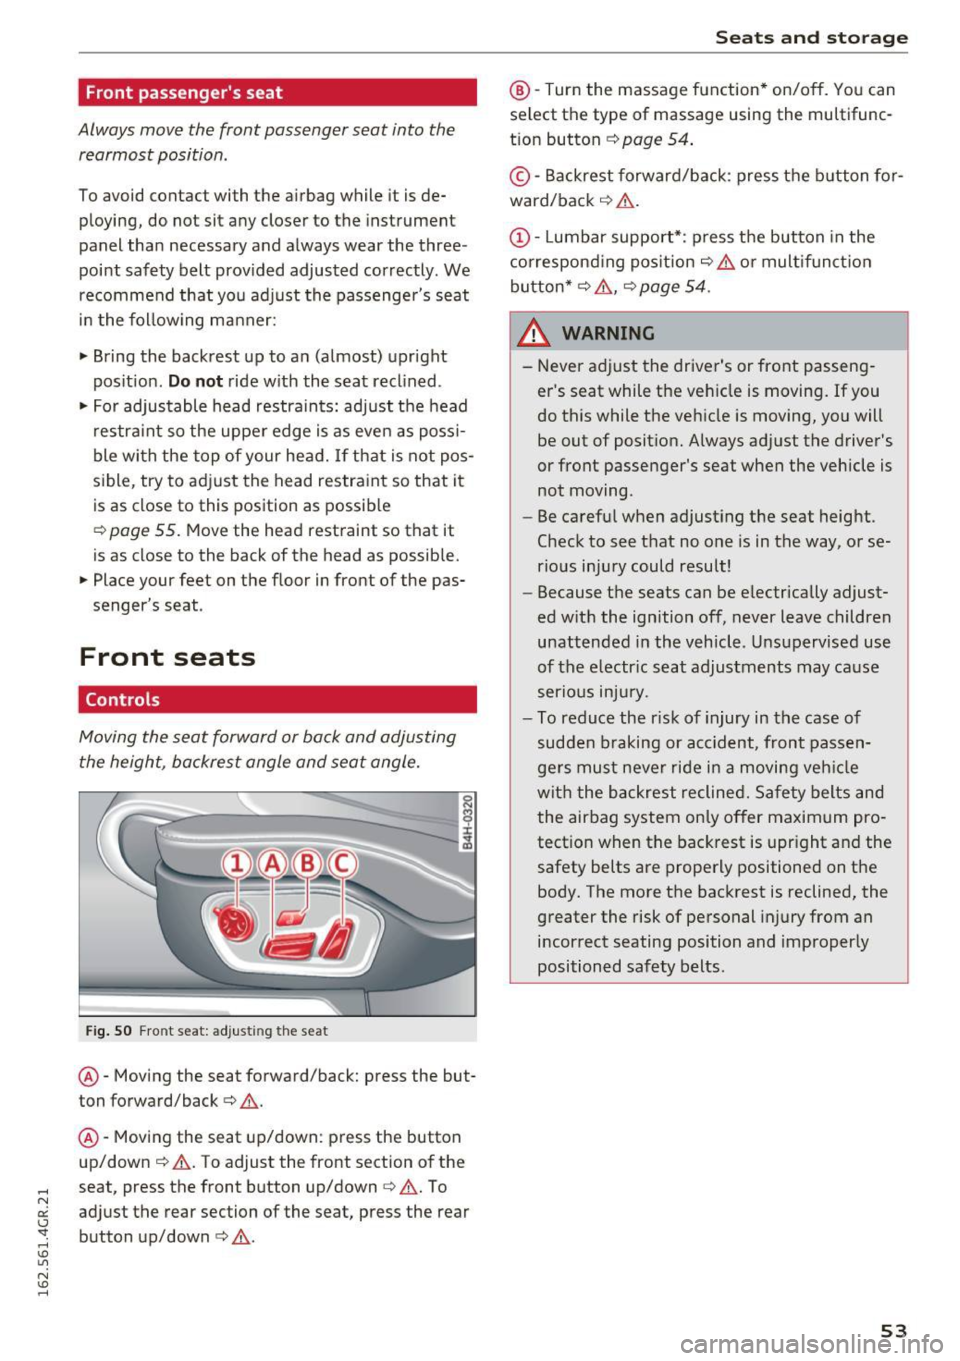
Moving the seat forward or back and adjusting
the height, backrest angle and seat angle.
Fig. SO Front seat: adjusting the seat
@ -Moving the seat forward/back: press the but
ton forward/back¢
A.
@ -Moving the seat up/down: press the button
up/down ¢
A. To adjust the front section of the
seat, press the front button up/down¢
A. To
adjust the rear section of the seat, press the rear
button up/down
c> A .
Seats and storage
@-Turn the massage function* on/off. You can
select the type of massage using the multifunc
tion button
¢ page 54 .
© -Backrest forward/back : press the button for
ward/back ¢
A.
(D -Lumbar support*: press the button in the
corresponding position¢
A or multifunction
button*¢
A , ¢ page 54 .
& WARNING
=
-Never adjust the driver's or front passeng-
er 's seat while the vehicle is moving. If you
do this while the vehicle is moving, you will
be out of position. Always adjust the driver's
or front passenger's seat when the vehicle is
not moving.
- Be careful when adjusting the seat height.
Check to see that no one is in the way, or se
rious injury could result!
- Because the seats can be electrically adjust
ed with the ignition off, never leave children
unattended in the vehicle . Unsupervised use
of the electric seat adjustments may cause
serious injury.
- To reduce the r isk of injury in the case of
sudden braking or accident, front passen
gers must never ride in a moving vehicle
with the backrest reclined. Safety belts and
the airbag system only offer maximum pro
tection when the backrest is upright and the
safety belts are properly positioned on the body. The more the backrest is reclined, the
greater the risk of personal injury from an
incorrect seating position and improperly
positioned safety belts.
-
53
Page 56 of 282

Sea ts and stor age
Multifunction button
Applies to: ve hicles w ith memory funct ion
You con adjust the massage function, lumbar
support, side bolsters and seating surface using
the multifunction button .
Fig . 5 1 MMI display: seat settings
Operating
.. The MMI displays the possible sea t settings @
when you turn the m ultif unct ion button
CD
¢ page 53, fig. 50 to the left or right¢ fig. 51,
¢ £ .
.. To select a seat setting, turn the multifunction
button
CD until the desired seat setting is high
lighted with a red border .
.. The arrows @ indicate the possible adjust
ments . For example, to
move the lumbar sup
port down, press the mult ifunct ion button
CD
down. The corresponding arrow © lights up.
The following seat sett ings @are possible:
Massage function* -Massage type Wave, Kno ck
ing, Stretch , Lumb ar, Shoulder or Off .
You can
set the massage strength level from 1 to S. You
can turn the selected massage on/off us ing the
button @¢
page 53, fig . 50 .
Lumbar support -Moving the lumbar support
up/down and making it firmer/softer¢&.
Side bolste rs* -Increasing/reducing the side
support in the seat using the side bo lsters on the
seating surface and backrest¢& .
Seating surfac e -Mak ing the seating surface lon
ger/shorter ¢& .
54
A WARNING
-Never adjust the driver's or front passeng
er's seat while the veh icle is moving. If you
do this while the veh icle is moving, you will
be out of posit ion . Always ad just the d river 's
or front passenger's seat when the vehicle is
no t moving.
- Be ca refu l when adjust ing the seat height .
Check to see t hat no one is in the way, or se
rio us inju ry could resu lt!
- Because the seats can be electrically adjust
ed w ith the ignition off,
never leave children
unattended in the vehicle . Unsupervised use
of the e lectric seat adjustments may cause
serious injury.
- To reduce the risk of injury in the case of
sudden braking or accident, front passen
ge rs must never ride in a moving veh icle
with the backrest reclined. Safety belts and
the airbag system only offer maximum pro
tect ion when the backrest is upr ight and the
safety bel ts are properly positioned on the
body. T he mo re the backrest is reclined, the
greater the risk of pe rsonal inju ry from an
incor rect seating posi tion and imprope rly
positioned safety belts .
(D Tips
- T he massage funct io n sw itches off auto
matically after approximate ly 10 m inutes.
- T he side bolsters* deflate when the driver's
door is opened . This allows you to enter and
ex it comfortab ly. The side bolste rs infla te
again once you begin driving.
Page 57 of 282

Armrest
There is a storage compartment under the arm
rest.
~ 0
CJ ..,. ID
Fi g. 52 Cockpit: center armrest
Adjusting the armrest
... To adjust the ang le, raise the armrest from the
starting position detent by deten t.
... To bring the armrest back into its original posi
tion, lift it above t he top position and then fold
it back down .
Opening the storage compartment
.,. Press t he b utton -arrow- upward.
P lease no te that the driver 's arm movements
may be res tric ted with t he a rm rest folded down.
F or this reason, the armrest should no t be folded
down when driving in city traffic .
Head restraints
Front head restraints
Applies to: veh icles with adjustable head restraints
Head restraints that are adjusted according to
body size, along with the seat belt, offer effec
tive protection.
F ig. 53 F ront seat: Adjust ing t he head restra int
g
0
CJ ..,. ID
Seats and storag e
Adjust the head restraint so the upper edge is as
even as possib le with the top of your head. If that
is not poss ib le, try to adjust the head restraint so
that it is as close to this position as possible .
Move the head restraint so that it is as close to
the back of the head as possible.
... To move the head restraint up or forward, slide
it unti l it locks into place .
... To move the head restraint down or back, press
the s ide button -a rrow-
r::;, fig . 53 and slide the
head restraint un til it locks into place .
Refer tor::;,
page 121, Proper adjustment of head
restraints
for gu idelines on how to adjust the
height of the front head restraints to s uit the oc
cupant's body s ize .
.&, WARNING
-Driving w ithou t head res tra ints or with head
rest raints that are not properly ad justed in
creases the risk of se rio us or f atal neck in
jury dramat ica lly.
- Re ad and heed all WAR NINGS
r::;,page 121,
Proper adjus tment of head restraints .
@ Tips
Correctly adjusted head restra ints and safety
belts are an ext reme ly effe ctive combi nat ion
of safety features.
55
Page 73 of 282

Driving
Steering
Manually adjustable steering wheel
A pplies to: ve hicles with man ually adjustable steering whee l
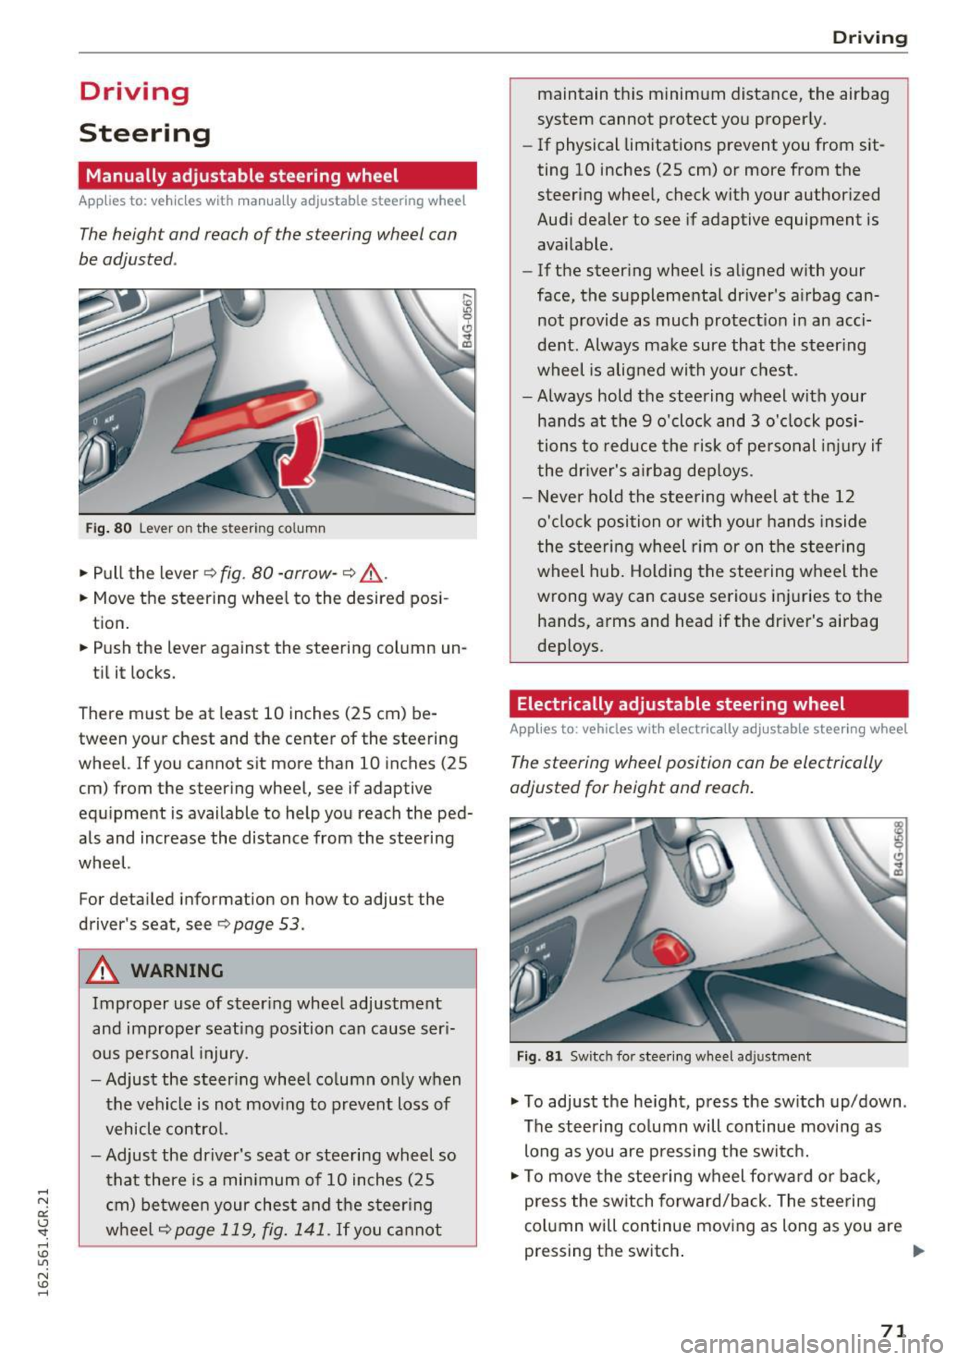
The height and reach of the steering wheel can
be adjusted .
Fig. 80 Lever on the steer ing co lumn
.,. Pull the lever 9 fig . 80 -arrow -9 ,&..
.. Move the steer ing wheel to the desired pos i
tion.
.. Push the lever against the steering column un -
ti l it locks.
There must be at least 10 inches (25 cm) be tween your chest and the center of the steering
wheel. If you cannot sit more than 10 inches (25
cm) from the steering wheel, see if adaptive
equ ipment is available to help you reach the ped
als and increase the distance from the steering
wheel.
For detailed information on how to adjust the
driver's seat, see
9page 53.
A WARNING
Improper use of steer ing whee l adjustment
and improper seating position can cause ser i
ous pe rsonal injury.
- Adjust the s teer ing whee l co lumn only when
the vehicle is not mov ing to prevent loss of
vehicle contro l.
- Adjust the driver's seat or steering wheel so
that there is a min imum of 10 inches (25
c m) be twee n your ches t and the steer ing
w heel
9page 119, fig. 141. If you ca nnot
D rivi ng
maintain this minimum distance, the airbag
system cannot protect yo u proper ly.
- If physical limitations prevent you from sit
ting 10 inches (25 cm) or more from the
steer ing whee l, check with your author ized
Audi dealer to see if adaptive equipment is
available.
- If the steer ing whee l is aligned w ith your
face, the supplementa l driver's a irbag can
not provide as much protect io n in an acci
dent. Always make sure that the steer ing
wheel is aligned with you r chest.
- Always hold the steering wheel with your
hands at the 9 o'clock and 3 o'clock posi
tions to reduce the risk of pe rsonal inju ry if
the dr iver's a irbag dep loys .
- Never ho ld the stee ring wheel at the 12
o'clock position or with you r hands inside
the stee rin g wheel rim or on t he steer ing
wheel hub. Holding the stee ring w heel the
wrong way can cause serious inj uries to the
hands, arms and head if the driver's airbag
deploys .
Electrically adjustable steering wheel
Applies to : vehicles wit h electrically adjustable stee ring wheel
The steering wheel position can be electrically
adjusted for height and reach .
Fig . 81 Sw itc h for stee ring wheel adju stment
.,. To adjust the he ight, press the sw itch up/down .
The steering co lumn will continue moving as
long as you are press ing the sw itch.
.,. To move the stee ring wheel fo rwa rd or back,
press the switch forward/back. The stee ring
column will continue mov ing as long as you are
pressing the switch . ""
71
Page 120 of 282

Driving sa fe ty
Driving safety
Basics
Safe driving habits
Please remember -safety first!
This chapter contains important information,
tips, instruct ions and warn ings that you need to
read and observe for your own safety, the safety
of your passengers and others. We have summar ized here what you need to know about safety
be lts, a irbags, child restra ints as well as child
safety. Your safety is for us
priority number 1 . Al
ways observe the i nfo rmation and wa rn ings in
this section - for your own safety as well as that
of your passengers.
The information i n this section applies to all
model versions of yo ur vehicle . Some of the fea
tures descr ibed in t his sections may be s tanda rd
equipment on some models, or may be optional
equipment on others . If you are not sure, ask
your authorized Audi dealer.
A WARNING
- Always make sure that you follow the in
structions and heed the WARNINGS in th is
Manual.
It is in your interest and in the in
te rest of your passengers.
- Always keep the comp lete Owner's Litera
ture in your A udi when you lend or sell your
vehicle so that this important information
will always be available to the d river and
passenge rs.
- Always keep the Owner 's literature handy so
that you can find it easily if you have ques
t ions.
Safety equipment
The safety features are part of the occupant re
straint system and work together to help reduce
the risk of injury in a wide variety of occident si t
uations.
Your safety and the safety of your passenge rs
should not be left to chance. Advan ces i n tech
nology have made a var iety of features avai lab le
to help reduce t he risk of injury in an accident .
118
The following is a list of just a few of the sa fety
features in your Audi :
- sophis tica ted safety be lts fo r dr ive r and all pas-
senge r seat ing pos itions,
- safety belt p retensioners,
- safety belt force lim ite rs fo r th e front seats,
- safety belt he ight adjustment systems for the
front seats,
- front airbags,
- knee airbags for the front seats*
- side airbags in the front seats and outer rear
seats*,
- side curtain airbags with ejection mitigation
features,
- special LATCH anchorages for child restraints,
- head rest raints fo r ea ch seating position,
- adj ustab le steering col umn.
These ind iv idual safety features, can work to
ge ther as a system to help protect you and your
passengers in a wide range of acc idents. These
features canno t wo rk as a sys tem if they are not
alw ays cor rec tly adj usted and cor rect ly used.
Safety is everybody' s re sponsibility!
Important things to do before driving
Safety is everybody's job! Vehicle and occupant
safety always depends on the informed and care
ful driver .
For your safety and the safety of your passen
gers,
before driving alway s:
.. Make sure that a ll lights and signals are operat
ing correctly.
.. Make sure that the tire pressure is correct.
.,. Make sure that all windows are clean and afford
good visibility to the outs ide .
.. Sec ure all luggage and othe r items carefully
~page 62, ~ page 60.
.. Ma ke sure that noth ing ca n interfere wi th the
peda ls .
.. Adjust front seat, head restraint and mirrors
correctly for yo ur height .
.. Instruct passengers to adjust the head re
straints according to their he ight.
Page 135 of 282

~ Push the loop-around fittings up qfig. 153 @,
or
~ squeeze together the(!) button, and push the
loop-around fittings
do wn@ .
~ Pull the belt to make sure that the upper at
tachment is properly engaged .
A WARNING
Always read and heed all WARNINGS and oth
er important informat ion
qpage 129.
With the front seats, the height adjustment
of the seat can also be used to adjust the po
sition of the safety belts.
Improperly worn safety belts
Incorrectly positioned safety belts can cause se
vere injuries.
Wearing safety belts improperly can cause seri
ous injury or death. Safety belts can only work
when they are correctly pos itioned on the body .
Improper seating positions reduce the effect ive
n ess of safety be lts and will
even i ncrease the
ris k of injury and death by mov ing the safety belt
to cr it ica l areas of the body. Imp roper seating
positions also increase the risk of serious inj ury
and death when an airbag deploys and strikes an
occ upant who is not in the correct seat ing posi
tion. A driver is respons ible for the safety of all
vehicle occupants and espec ia lly for children.
Therefore:
~ Never permit anyone to assume an incorrect
s itting position in the veh icle wh ile traveling
Q A .
A WARNING
Improperly worn safety belts increase the risk
of serious personal injury and death wheneve r
a vehicle is be ing used.
- Always make sure that al l vehicle occupants
are correctly restra ined and stay in a co rrect
seating pos it io n whenever the ve hicle is be
ing used.
S afet y be lts
- Always read and heed all WARNINGS and
other important in format ion
q page 129.
Belt tensioners
How safety belt pretensioners work
In front, side and rear-end collisions above a
particular severity and in a rollover, safety belts are tensioned automatically.
Rever sible safety belt tensioner s
The safety belts on the front seats are equipped
with power reversible tensioners. The following
funct ions are available when the dr iver's/front
passenger's safety belts are fastened:
- Automatic tens ioners: at the start of a drive,
the safety belts automatically adjust to the passenger after a certain time period or vehicle
speed. To switch the automatic tensioners off,
select the following in the MMI :
!CARI function
button
> (Car )* system s > Vehicle setting s >
Seats > Driver's seat or Passeng er' s s eat > Au
tom atic belt ten sioner
> Off .
- In certain driving situations, the safety bel ts
may tighten w it h a reve rsib le tensioning func
tion
q page 177.
-The safety be lts may also tigh ten with this re-
versible tension ing function in m inor collisions.
Pyrotechnic safety belt pretens ioners
The safety belts are equipped w it h safety belt
prete nsioners. The system is activated by sensors
in front, side and rear -end collisions of great se
verity and in a ro llover. This tightens the belt and
takes up belt slack
q .& in Service and disposal of
safety belt pretensioner on page 134.
Taking up
the slack he lps to reduce forward occupant
movement during a collision.
A WARNING
--
- It is poss ible for the pretensioners to dep loy
incorrectly.
- The pyrotechnic system can only provide
protection for one collision. If the pyrotech
n ic pretens ioners deploy, the pretensioning
system must be replaced.
133