Page 73 of 302

-When not in use, to reduce fuel consumption,
wind noise and to guard against th eft.
A WARNING
- Use of an unapproved roof rack or incorrect
mounting of an approved roof rack can
cause the roof rack or the items attached to
it to fall off the roof onto the road.
- Objects falling from the roof of a vehicle can
cause a crash and personal injury.
- Only mount the roof rack on the designated
locations on the roof
c::> fig . 77.
- The roof rack system must be installed ex
actly according to the instructions provided.
- When driving with a roof rack system,
changes to the center of gravity and wind
resistance can change the vehicle handling
and lead to a collision . Always adapt your
driving and your speed to the current condi
tions.
@ Note
- Your vehicle warranty does not cover any
damages to the vehicle caused by using roof
racks or mounting structures not approved
by Audi for your vehicle. The same applies to
damage resulting from incorrect roof rack installation .
-Always check the roof rack mountings and
hardware before each trip and during a trip
to make sure everything is securely tight
ened. If necessary, retighten the mountings
and check the entire system from time to
time.
- After mounting a roof rack system, or when
you transport objects on the roof of your ve hicle, the height of the vehicle is naturally
increased. Be careful when driving under
low bridges or in parking garages for exam
ple. This could cause damage to the load
and even the vehicle itself .
- Make sure the open rear lid and the sun
roof* do not come into contact with the roof
rack .
Seats and storage
Loading the roof rack
Always distribute loads evenly. Make sure any
thing on the roof rack is securely tied down .
.,. Always dist ribute the loads on the roof rack
evenly.
.,. Always attach items to the roof rack securely
before you drive off .
The maximum permissible roof weight is
220 lb
(100
kg) . The roof weight is the total of the
weight of the roof rack, the attachments and the
cargo you are carrying . You must also not exceed
the maximum load weight for the roof rack you
are using.
When using a roof rack system which has a lower
load carrying capacity, you must not use up the
total maximum permissible load carrying capaci
ty specified above. Instead, you should load the
roof rack system only to the maximum capacity
specified by the manufacturer of the roof rack
system.
.&_ WARNING
=
Weak, damaged or improper straps used to
secure items to the roof rack can fail during
hard braking or in a collision and cause seri
ous personal injury .
- Make sure the roof rack is installed exactly
as specified above
c::> page 70 .
-Always use suitable mounting straps for se
curing items to the roof rack to help prevent
items from shifting or flying forward.
- Items on the roof rack must always be se
curely mounted.
- The use of a roof rack can negatively affect
the way a vehicle handles . Cargo that is
large, heavy, bulky, long or flat will have a
greater negative influence on the vehicle's
aerodynamics, center of gravity and overall handling. Always drive slowly, avoid sudden
braking and maneuvers when transporting
cargo on the roof of your vehicle.
- Never exceed the maximum permissible
load carrying capacity of the roof of your ve
hicle, the permissible axle weights and the
permissible total weight of your vehicle
-
c::> page 277, Weights. ~
71
Page 74 of 302

Sea ts and stor age
@ For the sake of the environment
As a result of the increased wind resistance
created by a roof rack, your vehicle is using
fuel unnecessarily. So remove the roof rack
after using it .
12-volt sockets
Gilt fi.ir: Fahrzeuge 12-volt sockets
Electrical accessories can be connected to every
12-volt socket.
Fig. 78 Sectio n of the trim panel of the luggage compart
ment: 12-vo lt socket
Fig. 79 Rear center console: 12-volt socke t
• Open the socket cover~ fig. 78 or~ fig. 79 .
• Inser t the plug of the elec trical device into the
socket.
There is an additional 12 volt socke t in the front
center console~
page 73, fig . 80.
The 12 volt sockets can be used for electrical ac ·
cessories . T he power input must not exceed 120
watts .
Before you purchase any accessories, always read
and follow the informat ion in~
page 283, Addi·
tional accessories and parts replacement.
72
A WARNING
The sockets and the electrical accessories con·
nected to them operate only when the igni
tion is switched on . Incorrect usage can lead
to se rious injuries or burns . To reduce the risk
of injuries, never leave children unattended in
the vehicle with the vehicle key.
(D Note
To avoid damagi ng the socket, on ly use plugs
that fit p roperly.
- Never connect equipment that generates
electrical current, such as a solar panel or
battery charger, to the 12 vo lt socket. This
cou ld damage the vehicle's elec trical sys
tem.
- The 12 volt socket should o nly be used for a
short period of t ime as a powe r sour ce for
electrical equipment . Please use the electri
cal sockets in the vehicle when connect ing
equipment for longer per iods .
@ Tips
When the engine is off and accessories are
still p lugged in and are on, the veh icle battery
can still be drained .
Page 75 of 302

Storage
Cupholder
Fig. 80 Center console : fro nt c uphol der
F ig. 8 1 Sect io n of t he rear bench se at: r ear cupho lde r
Front cupholder
.,. To open the cupholder, tap the cover c:> fig. 80,
c:>& .
Rea r cupho lder
.,. To open the cupholder, tap the front strip
¢ fig. 81, c::> &.
In vehicles with a full-length center console in
the rear, the cupho lder is located at @
c:> page 66, fig. 68.
A WARNING
Spilled hot liquid can cause an accident and
personal in jury .
- Never carry any beverage containers with
hot liquids, such as hot coffee or hot tea, in
the vehicle while it is moving. In case of an
acc ident , sudden braking or other veh icle
movement, hot liquid could spill, causing
scald ing burns. Spilled hot liquid can also
cause an accident and perso nal i njury.
Seats and storag e
-Use on ly soft cups in the cupholder. Hard
cups and glasses can cause injury in an acc i
dent.
(D Note
Only drink containers with lids should be car
ried in the cupholder. Liq uid could spill out
and damage your vehicle's electronic equ ip
ment or stain the upholstery, etc .
Cooled glove compartment
The cooled glove compartment only functions
when the AIC system i s switched on.
Fig. 82 G love co mpart ment : swit ch ing coo ling mode o n/
off
.,. Turn the knob@ counterclockwise to switch
cooling on . The symbols on the knob indicate
the correct position
c:> fig. 82 .
"Turn the knob @ clockwise to switch cooling
off.
The glove compartment cooling mode only func
tions when the veh icle A/C system is switched o n.
If the heating is switched on, sw itchi ng the glove
compartment coo ling mode off is recommended .
A WARNING
-
Always leave the lid o n the glove compart
ment cover closed while dr iving to re duce the
r isk of injury .
(0 Tips
The glove compartment can be locked using
the mechanical key ¢
page 31.
73
Page 76 of 302

Seats and storage
Additional storage
There are a variety of storage compartments and
fasteners in various places in the vehicle.
- Storage compartments in the doors
- Net in the front passenger footwell
- Eyeglasses compartment in the headliner (near the rearview mirror)
- Storage compartments under the center armr
ests
- Compartments* on the back of the front seat
backrests
- Garment hooks over the rear doors
- Compartment in the center console with pass-
through)* (rear)
- Compartment behind the rear center armrest
(in vehicles without the pass-through* or cool
er*)
- Cell phone holder* in the right rear door
- Bag hooks in the luggage compartment
_& WARNING
-When driving, do not leave any hard objects
on the rear window shelf or allow your pet
to sit on the shelf. They could become a haz ard for vehicle occupants in the event of
sudden braking or a crash.
- Always remove objects from the instrument
panel. Any items not stored could slide
around inside the vehicle while driving or
when accelerating or when applying the
brakes or when driving around a corner.
- When you are driving make sure that any
thing you may have placed in the center con
sole or other storage locations cannot fall
out into the footwells. In case of sudden
braking you would not be able to brake or
accelerate.
- Any articles of clothing that you have hung
up must not interfere with the driver's view.
The coat hooks are designed only for light
weight clothing. Never hang any clothing
with hard, pointed or heavy objects in the
pockets on the coat hooks. During sudden
braking or in an accident -especially if the
airbag is deployed -these objects could in
jure any passengers inside the vehicle.
74
- To reduce the risk of personal injury in an
accident or sudden stop, always keep the
glove compartment closed while driving.
- Read and follow all WARNINGS
¢ page 164, Important safety instructions
on the side airbag system.
- Hang clothes in such a way that they do not
impair the driver's vision.
- The coat hooks must only be used for light
weight clothing. Do not leave any heavy or
sharp edged objects in the pockets which
may interfere with the side curtain airbag
deployment and can cause personal injury in
a crash.
- Do not use coat hangers for hanging cloth
ing on the coat hooks as this can interfere
with proper deployment of the side curtain
airbags in an accident.
- Do not hang heavy objects on the coat
hooks, as they could cause personal injury in
a sudden stop.
(D Note
Objects located on the rear shelf that rub
against the rear window could damage the
heating wires for the rear window defogger .
(D Tips
-A vent slot is located between the shelf and
the rear window. Do not block the vent with
any items you may place on the rear window
shelf .
'
-Do not place bulky items on the rear window
shelf as they could restrict or block the driv
er's vision in the rear view mirror.
Refrigerator
Introduction
Applies to: vehicles wit h cooler
Please clean the cooler before using it for the
first time ¢
table on page 208 .
You can only switch on the cooler if
- the temperature in the luggage compartment
is below 131 °F (5 5 °C). The cooler switches off
automatically if the temperature in the luggage .,._
Page 77 of 302
 . Once the
temperat ure falls below 131 °F (55 °C) again,
the cooler switches on again automatically.
- the battery is adequately charged . The")
compartment exceeds 131 °F (55 °C) . Once the
temperat ure falls below 131 °F (55 °C) again,
the cooler switches on again automatically.
- the battery is adequately charged . The cooler
switches off automatically if the vehicle battery
voltage falls below a minimum level. This pre
vents the battery from discharging. The cooler
switches back on again automatically when the
battery voltage increases again (e.g. after start
ing the engine) .
The cooler cools to 42.8 °F
(+ 6 °C) and the freez
er cools to 21.2 °F (- 6 °C) in optimum cooling
conditions . The cooling performance is affected
by the temperature in the luggage compartment .
The temperature inside the cooler will be higher
if the luggage compartment is hot .
& WARNING
To avoid putting the occupants at any risk,
please observe the following safety rules:
- The maximum capacity is 2.5 kg (5.5 lbs.).
- Never overload the cooler. This could cause
injury in the event of a collision or sudden
braking.
- The cooler lid must always be kept closed
while you are driving. Make sure the retain
ing catch is securely engaged. The contents
of the cooler could be thrown forward into
the passenger compartment in the event of
a collision or under sudden braking -risk of
injury!
- Inflammable liquids, gas canisters, etc.
must not be stored in the cooler -risk of ex-
-
plosion! This also includes any products that
might emit volatile or inflammable gases.
- liquids will freeze at temperatures at or be
low 32 °F (0 °C) and may cause glass bottles
to burst!
(D Note
- The ventilation openings for the cooler are
located on the back panel trim in the lug
gage compartment and
must be kept clear
at all times.
- If the cooler is not functioning properly,
switch it off to prevent further damage .
Have it checked by a qualified workshop.
Seats and storage
Operation
App lies to : vehicles wit h coo ler
Fig. 83 Rear center a rmrest
The cooler is located in the rear cabin behind the
center armrest or behind the sliding cover (de
pending on the equipment fitted in your vehicle) .
The cooler and freezer only work when the igni
tion is on.
Opening / closing the cooler
• To open the cooler, pull the re lease lever CD
c:::>fig . 83.
• To close the cooler, push the lid back into its
original position. You should hear the release
lever
CD engage if the lid is properly closed.
Switching on/off
• Press button @ c:::> fig. 83 to switch the cooler
on/off . The symbol in the button is lit when this
function is activated .
• Press button @ to switch the freezer on/off.
The symbol in the button is lit when this func
tion is activated .
(D Tips
-Always try to leave the lid open for as short
a time as possible to prevent condensation
buildup.
- Do not put hot food or drinks in the cooler.
75
Page 78 of 302

Warm and cold
Warm and cold
Climate control system
Description
The climate control system warms, cools and
adds humidity to the air in the veh icle inter ior. It
is the most effective when the windows and sun
roof* are closed . If the temperature inside the
parked vehicle becomes very warm, opening the
window briefly will speed up the cooling process.
I n all heating mode functions except
defrost, the
b lower only switches to a higher speed once the
engine coolant has reached a certain tempera
ture .
Condensat ion from the cooling system can drip
and form a puddle of water under the veh icle.
This is normal and does not mean there is a leak.
P ollutant filt er
The po llutant filte r removes pollutants such as
dust and pollen from the a ir.
The air pollutants filter must be changed at the intervals specif ied in your Warranty
& Mainte
nance booklet, so that the a ir cond it ione r can
properly work.
If you drive your vehicle in an area with high air pollut ion, the filter may need to be changed
more frequently than specified i n your Aud i Wa r
ranty
& Maintenance booklet. If in doubt, ask
your author ized Audi Service Advisor for advice.
Key cod ed setting s
The climate control settings are automatically
stored and assigned to the remote contro l key
that is in use .
.8, WARNING
Reduced visib ility is dangerous and can ca use
accidents.
- For safe dr iv ing it is very impo rtan t that a ll
windows be free of ice, snow and condensa
t ion .
76
- Complete ly familiarize yourself with the
proper use and function of the heating and
ventilation system and espec ially how to de
fog and defrost the wi ndows .
- Never use the windshield wiper/washer sys
tem in freezing weather until you have
warmed the windshield first, using the heat ing and vent ilation system. The washer solu
tion may freeze on the windshield and re
duce visibi lity.
(D Note
- If you suspect that the air conditioner has
been damaged, sw itch the system off to
avoid further damage and have it inspected
by a q ualified dealership.
- Repa irs to the Aud i air cond itioner requ ire
special techn ica l know ledge and spec ial
tools. Contact an a uthorized Audi dealer fo r
assistance.
@ For the sake of the environment
By reduc ing the amo unt of fuel you use, you
also red uce the amount of pollutants emitted
into the a ir.
(D Tips
- Keep t he a ir intake slots (in front of the
windshield) free from ice, snow and debr is
in orde r to maintain the prope r funct ion of
the climate control system .
- The energy management sys tem may sw itch
the seat heating* o r rea r window defroster
off temporarily. These systems are available
again as soon as the energy balance has
been restored.
- Air escapes through vents under the rear
window. When placing items of clothing on
the luggage compartment cover, ensure
that the openings are not covered.
Page 79 of 302
.
Fig. 84 Cockpit con trols
Fig. 85 four zone automatic climate contro")
Warm and cold
Operation
We recommend pressing the
! AUTO ! button and setting the temperature to 72 °F (22 °C).
Fig. 84 Cockpit con trols
Fig. 85 four zone automatic climate control: rear controls
Press the buttons to turn the functions on or off .
Use the dials to adjust the temperature, the
b lower speed and the air distr ibut ion. The LED in
a butto n will light up when the function is
switched on. The settings a re shown in the cli
mate con trol display and are also shown in the
MMI disp lay for a few seconds. The driver and
front passenger settings can be adj usting sepa
rately .
You can also adjus t the rear left and right sides in
the four zone automatic climate control*
¢fig. 85 .
IOFF I Switching the climate control system
on/off
~ The IOFFI button switches the climate control 0
~ system on or off. It also switches on when you
~ turn the dial or press any button. Airflow from U"I ,...., \!) ,....,
outside is blocked when the climate control sys
tem is switched off.
You can act ivate the residual heat function when
the ignit io n i s off by pressing and holding the~
button. The residual heat from the coolant is
u sed to heat the veh icle inter ior. The residua l
heat function switches off automatica lly after
about 30 minutes .
IA/Cl Switching cooling mode on/off
The air is not cooled and humidity is not removed
when cooling mode is switched off. This can
cause fog on the windows. Coo ling mode
switches off automatically at low outside tem
peratures.
1 .,.,,1 Switching recirculation mode on/off
In rec irculat ion mode, the air inside the vehicle is
circulated and filtered. This prevents the unfi l
tered air outside the vehicle from entering the
vehicle interior. We recommend switching recir
cu lation mode on when driving through a tunnel
or when sitting in traffic
c> &.
The !AUTO I button or I FRONT! button switches
recircu lation mode off. ..,.
77
Page 80 of 302

Warm and cold
IAUTO ! Switching auto matic mode on
Automatic mode ma intains a constant tempera
ture inside the vehicle. Air temperature, airflow
and air distribution are cont rolled automatically.
Adjusting th e tempe rature
Tempe ratures between 60 °F (+16 °C) and 84 °F
(+28 °C) can be set. Outside of this range,
l o or hi
will appear in the climate control system disp lay.
At both of these settings, the climate control sys
tem runs continuously at maximum cooling or
heating power . There is no temperature regula
tion .
~ Adjust ing th e airflo w
You can adjust the airf low manually to suit your
needs . To have the airflow regulated automati
cally, press the
IAU TO I button.
~ Adjusting the air distribution
You can manually se lect the vents where the a ir
will flow. To have the a ir dist ribution reg ulated
automatically, press the
IAU TO I button.
[ti /~ * Adjusting Seat h eating /v entil ation *
Pressing the button switches the seat heating/
venti lation on at the h ighest setting (level 3) . The
L EDs indicate the temperature level. To reduce
the tempera ture, press the button aga in. To
switch the seat heating/ventilation off, press the
button repeated ly until the LED turns off.
Afte r 10 minutes, the seat heating/ventilation
automatically switches from level 3 to level 2 .
In vehicles without the four zone automat ic cl i
mate control*, buttons in the rear center console
control the seat hea ting for both outer rear
seats*.
I @ FRONT I Switch th e defroster on /off
The windsh ield and s ide windows are defrosted
or cleared of condensation as qu ickly as possible .
The max imum amo unt of air flows ma inly from
the vents below the w indshield. Recircu lation
mode switches off. The temperature shou ld be
set to approximate ly 72 ° F (22 °C).
The
IAU TOI button switches the defroster off.
78
lliil REAR I Switch ing rear window he ater on /
off
The rear window heater only operates when the
engine is running . It switches off automatically
after 10 to 20 minutes, depending on the outside
temperature.
To prevent the rear window heater from switch
i ng off automatica lly, press and hold the
ICiJ REARI
button for more than 2 seconds. This rema ins
stored until the ignition is sw itched off.
I SYNC ! Synchroni zation *
When synchronization is switched on, the set
tings for the driver's side are applied to the front
passenger's side (except for seat heating/venti la
tion*). The rear seat is also synchroni zed in
vehicles with the 4-zone deluxe automatic cli mate control system*. Synchron izat ion sw itches
off if the sett ings a re adjusted on the front pas
senger's s ide or in the rear*.
You can synchronize the sett ings in a row by
pressing and holding a knob . For example, to ap
ply the settings for the front passenger's side to
the d river's s ide, press and hold the knob o n the
front passenger 's side.
Air vents
You can open or close the center and rear vents in
the cockpit and the vents in the rear center con
so le and doo r pillars us ing the ridged thumb
whee ls. The levers adj ust the direction of the air
flow from the vents.
_&. WARNING
- Do not use the rec irculat ion mode for ex
tended periods of time . The windows could
fog up since no fresh air can enter the vehi cle. If the windows fog up, press the air re
circulation button again immed iate ly to
sw itch off the a ir recircu lation function or
select defrost.
- Individuals w ith reduced sensit iv ity to pa in
or temperature could develop burns when
using the seat heating funct ion. To reduce
the risk of injury, these individuals should not use seat heating.
-
 1
1 2
2 3
3 4
4 5
5 6
6 7
7 8
8 9
9 10
10 11
11 12
12 13
13 14
14 15
15 16
16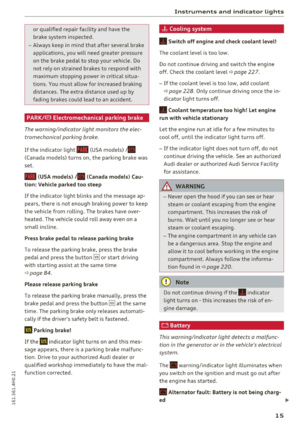 17
17 18
18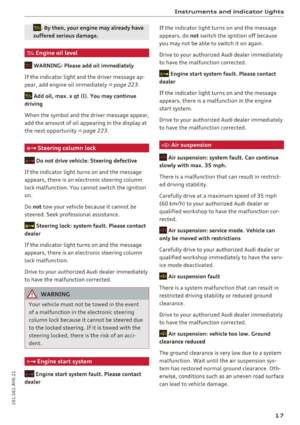 19
19 20
20 21
21 22
22 23
23 24
24 25
25 26
26 27
27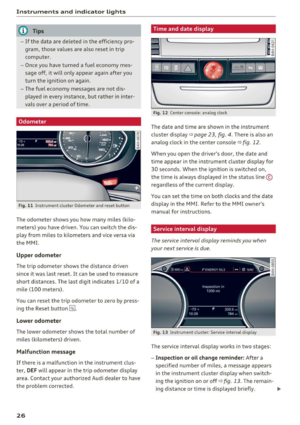 28
28 29
29 30
30 31
31 32
32 33
33 34
34 35
35 36
36 37
37 38
38 39
39 40
40 41
41 42
42 43
43 44
44 45
45 46
46 47
47 48
48 49
49 50
50 51
51 52
52 53
53 54
54 55
55 56
56 57
57 58
58 59
59 60
60 61
61 62
62 63
63 64
64 65
65 66
66 67
67 68
68 69
69 70
70 71
71 72
72 73
73 74
74 75
75 76
76 77
77 78
78 79
79 80
80 81
81 82
82 83
83 84
84 85
85 86
86 87
87 88
88 89
89 90
90 91
91 92
92 93
93 94
94 95
95 96
96 97
97 98
98 99
99 100
100 101
101 102
102 103
103 104
104 105
105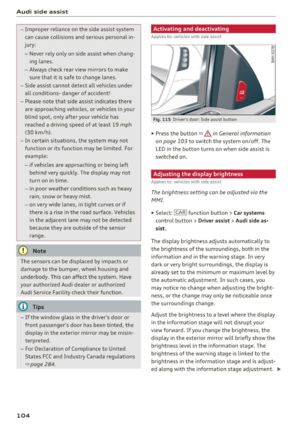 106
106 107
107 108
108 109
109 110
110 111
111 112
112 113
113 114
114 115
115 116
116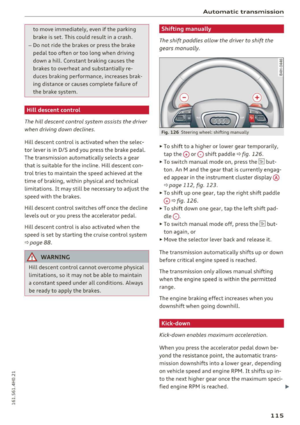 117
117 118
118 119
119 120
120 121
121 122
122 123
123 124
124 125
125 126
126 127
127 128
128 129
129 130
130 131
131 132
132 133
133 134
134 135
135 136
136 137
137 138
138 139
139 140
140 141
141 142
142 143
143 144
144 145
145 146
146 147
147 148
148 149
149 150
150 151
151 152
152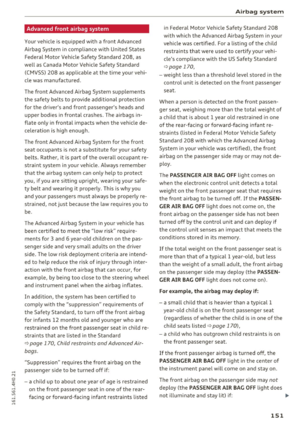 153
153 154
154 155
155 156
156 157
157 158
158 159
159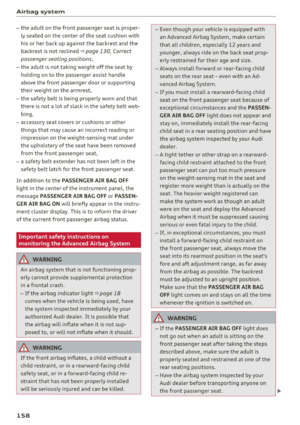 160
160 161
161 162
162 163
163 164
164 165
165 166
166 167
167 168
168 169
169 170
170 171
171 172
172 173
173 174
174 175
175 176
176 177
177 178
178 179
179 180
180 181
181 182
182 183
183 184
184 185
185 186
186 187
187 188
188 189
189 190
190 191
191 192
192 193
193 194
194 195
195 196
196 197
197 198
198 199
199 200
200 201
201 202
202 203
203 204
204 205
205 206
206 207
207 208
208 209
209 210
210 211
211 212
212 213
213 214
214 215
215 216
216 217
217 218
218 219
219 220
220 221
221 222
222 223
223 224
224 225
225 226
226 227
227 228
228 229
229 230
230 231
231 232
232 233
233 234
234 235
235 236
236 237
237 238
238 239
239 240
240 241
241 242
242 243
243 244
244 245
245 246
246 247
247 248
248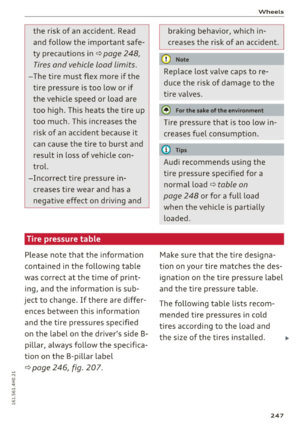 249
249 250
250 251
251 252
252 253
253 254
254 255
255 256
256 257
257 258
258 259
259 260
260 261
261 262
262 263
263 264
264 265
265 266
266 267
267 268
268 269
269 270
270 271
271 272
272 273
273 274
274 275
275 276
276 277
277 278
278 279
279 280
280 281
281 282
282 283
283 284
284 285
285 286
286 287
287 288
288 289
289 290
290 291
291 292
292 293
293 294
294 295
295 296
296 297
297 298
298 299
299 300
300 301
301