Page 25 of 204

REAR VIEW MIRRORS
INTERIOR MIRROR
Operate lever fig. 25 to adjust the mirror
into two different positions: normal or
anti-glare.
The mirror is fitted with a safety device
that causes its release in the event of a
violent impact with the passenger.
ELECTROCHROMIC INTERIOR MIRROR(where provided)
On some versions, an electrochromic
mirror is available, that can automatically
modify its reflecting action to prevent
dazzling the driver fig. 26.
The electrochromic mirror has an
ON/OFF button to activate/deactivate
the electrochromic anti-glaring function.When reverse gear is engaged, the mirror
is automatically set for daytime use.
DOOR MIRRORS
Electric adjustment
The mirrors can only be adjusted with the
ignition device at ON.
Select the desired mirror using device 1
fig. 27:
16)
device in position A: left mirror
selected;
device in position B: right mirror
selected.
To adjust the selected mirror, use device
1 in the four directions.
IMPORTANT Once adjustment is
complete, rotate device 1 to position D
to prevent accidental movements.
Manual folding
To fold the mirrors move them from the
open position to the closed position
fig. 28.
Electric folding
(where provided)
With device 1 in position D, move it to
position C fig. 27. Turn the device 1 again
to position C to return the mirrors to the
driving position.
If device 1 is turned again during door
2504106S0001EM
2604106S0002EM
2704106S0004EM
2804106S0005EM
23
Page 26 of 204
, their movement
direction is reversed.
Automatic activation
Activating the central door locking
system from outside the vehicle
automatical")
mirror folding (from closed to open
position and vice versa), their movement
direction is reversed.
Automatic activation
Activating the central door locking
system from outside the vehicle
automatically folds the mirrors, they
return to the driving position when the
ignition switch is turned to the ON
position.
If the door mirrors were folded in using
device 1, they can only be returned to the
driving position by means of a new
command on the same device.
IMPORTANT The mirrors must always be
open while driving and should never be
folded.
ELECTROCHROMIC EXTERIOR
MIRRORS
(where provided)
As well as an inside mirror, an
electrochromic mirror is also available on
some versions, which automatically
modifies its reflecting properties to
prevent dazzling the driver. The
dazzle-prevention electrochromic
enabling/disabling button fig. 26 is the
same for all rear view mirrors.
WARNING
16)As door mirrors are curved, and
therefore they may slightly alter the
perception of distance.
EXTERNAL LIGHTS
LIGHT SWITCH
The light switches fig. 29, located on the
left side (left hand drive versions) or on
the right side (right hand drive versions)
of the dashboard, controls operation of
headlights, side lights, daytime running
lights, dipped beam headlights, front and
rear fog lights.
The external lights can be activated only
when the ignition device is in position ON,
except for the parking lights. See the
"Parking lights" paragraph, in this chapter
for more information.
The instrument panel and the various
controls on the dashboard will be lit up
when the exterior lights are switched on.
2904126S0005EM
24
KNOWING YOUR CAR
Page 27 of 204

This is an infrared LED sensor that works
in conjunction with the rain sensor and is
located on the windscreen. It is able to
detect variations in outside lighting
based on")
AUTO FUNCTION (dusk sensor)
This is an infrared LED sensor that works
in conjunction with the rain sensor and is
located on the windscreen. It is able to
detect variations in outside lighting
based on the light sensitivity set via the
Connect system.
The higher the sensitivity, the lower the
amount of external light needed to
switch the lights on.
Function activation
Turn the light switch to AUTO.
IMPORTANT The function can only be
activated with the ignition device at ON.
Function deactivation
To deactivate the function, turn the light
switch to a position other than AUTO.
DIPPED HEADLIGHTS
Turn the light switch toto switch on
the side lights, the lights on the
instrument panel and the dipped beam
headlights.
The
warning light switches on in the
instrument panel.
DAYTIME RUNNING LIGHTS (DRL) AND
SIDE/TAIL LIGHTS
(where provided)
17) 18)
With the ignition device turned to ON and
the light switch turned to positionOthe
daytime running lights are automaticallyactivated; the other lights and interior
lighting remain off.
Where provided, if the direction
indicators are operated, the brightness
of the corresponding DRL will be
decreased as long as the direction
indicators are on.
Where provided, the DRL can be
activated/deactivated from Connect
system, by selecting the following
functions in sequence on the main Menu:
"Settings", "Lights" and "Daytime Lights".
IMPORTANT : on markets where DRL use
is not required, these lights work as side
lights and they are switched on and off
jointly with the main beam headlights.
FRONT FOG LIGHTS
(where provided)
The fog light switch is integrated with the
light switch.
Press the
button to turn on the fog
lights with side lights and dipped beam
headlights on.
To turn off the fog lights, press the
button again or turn the switch to the
Oposition.
The fog lights are switched on with the
dipped beam headlights or DRL on (the
latter work as side lights) and are
switched on when switching on the main
beam headlights but not when the main
beam headlights are flashed only.If the fog lights are not switched off
before stopping the engine, the next time
the engine is started they will switch on
again.
Cornering lights
(where provided)
The fog lights perform cornering
function. This function allows to
illuminate the road or a corner better by
lighting the corresponding fog light.
The cornering function can be
deactivated on the Connect system by
selecting the following functions in
sequence on the main menu: "Settings",
"Lights" and "Cornering Lights".
REAR FOG LIGHT
The rear fog light switch is integrated
with the light switch.
Press the
button to switch the light
on/off.
The rear fog light switches on only when
the dipped beam headlights or fog lights
are switched on. The light can be
switched off by pressing the
button
again or by switching off the dipped
beam headlights.
When the engine is stopped with the rear
fog lights on, the next time the engine is
started the lights will, however, be off.
25
Page 28 of 204

PARKING LIGHTS
They are switched on if, within a few
seconds from stopping the engine, the
light switch is taken first to theO
position and then to position
. All side
lights switch on, if you want to leave only
those on one side (right/left) switched on,
you need to move the direction indicators
control on the position on the side you
wish to leave on.
The
warning light switches on in the
instrument panel.
HEADLIGHTS OFF TIMER
The "Follow Me" function delays the
switching off of the headlights after the
vehicle has been stopped.
The function can be activated from the
Connect system by selecting the
following functions in sequence on the
main menu: "Settings", "Lights" and
"Follow me"; the side lights and the
dipped beam headlights stay on for a
time that can be set between 30, 60 and
90 seconds.
Function activation
With the headlights on, take the ignition
device to the STOP position: the timer
starts when the light switch is rotated to
positionO.
IMPORTANT To activate this function the
headlights must be deactivated within
2 minutes after the ignition device has
been taken to STOP.
Function deactivation
This function is deactivated by switching
on the headlights, the side lights or
bringing the ignition device to ON.
AFS (Adaptive Frontlight System)
FUNCTION
(where provided)
This is a system combined with Bi-Xenon
Headlamps (35W) which directs the main
light beam, horizontally and vertically,
and continuously and automatically
adapts it to the driving conditions round
bends/when cornering.
The system directs the light beam to light
up the road in the best way, taking into
account the speed of the car, the
bend/corner angle and the speed of
steering.
MAIN BEAM HEADLIGHTS
To activate the fixed main beam
headlights push the left lever towards
the instrument panel fig. 30. The light
switch must be turned toAUTOor
.
With main beam headlights on, the
warning light/icon on the instrument
panel will come on at the same time.The main beam headlights are switched
off by pushing the left stalk forward
again. Warning light/icon
switches off
in the instrument panel.
Flashing the headlights
The flashing of the main beam headlights
is activated by pulling the left stalk
towards the steering wheel, the lights
remain on while you are operating the
lever.
Automatic high beam headlights
(where provided)
In order not to dazzle other road users,
the lights are automatically deactivated
when approaching vehicles travelling in
the opposite direction or when following
a vehicle travelling in the same direction.
This function is enabled with the Connect
system and with the light switch turned
to AUTO.
3004126S0020EM
26
KNOWING YOUR CAR
Page 29 of 204
, the
function is activated (the warning light
or thesymbol comes on in the
instrument panel).
If the main beam headlights")
The first time the main beam headlights
are activated (pushing the left lever), the
function is activated (the warning light
or thesymbol comes on in the
instrument panel).
If the main beam headlights are actually
on, the blue icon/warning light
will
also come on in the instrument panel.
DIRECTION INDICATORS
Move the left lever fig. 30 as far as
possible (unstable position):
up: right direction signal activated, the
warning light
flashes on the
instrument panel;
down: left direction signal activated,
the warning light
flashes on the
instrument panel;
The direction indicators are switched off
automatically when the steering wheel is
straightened.
"Lane Change" function
When you want to signal the change of
the driving lane, move the lever until the
first impulse (about half stroke).
The direction indicator on the side
selected will flash five times and then
switch off automatically.
SBL FUNCTION (Static Bending Light)(where provided)
The SBL LEDs activate in order to better
illuminate the street and increase the
light angle while turning. This function isenabled by rotating the light switch to
position
orAUTO. The SBL LEDs
activate if the speed exceeds 12 mph
(20 km/h) and the steering radius is
below 1640 ft (500 m).
HEADLIGHT ALIGNMENT ADJUSTMENT
Headlight alignment corrector
(where provided)
This device is not available on vehicles
equipped with Xenon headlights
(Bi-Xenon 35 W headlamp version), as
they require an automatic alignment
correction system.
It only operates with the ignition device
at ON.
To adjust it, rotate the ring nut fig. 31.
Position 0: one or two people on the
front seats;
Position 1: 4 or 5 passengers;
Position 2: 4 or 5 passengers + load in
the luggage compartment
Position 3: driver + maximum
admissible load stowed only in the
luggage compartment
IMPORTANT Check the headlight
alignment each time the weight of the
load transported changes.
INSTRUMENT PANEL AND CONTROL
BUTTON GRAPHIC BRIGHTNESS
ADJUSTMENT
With side lights or headlights on, operate
on the ring nut fig. 32 upwards to
increase light brightness of the
instrument panel and of the control
button graphics, or turn the ring nut
downwards to decrease it. The control is
pulsed so that for every action the level
intensity increases/decreases, up to a
maximum of seven.
3104126S0015EM
3204126S0016EM
27
Page 30 of 204
The daytime running lights are an
alternative to the dipped headlights for
driving during the daytime in countries
where it is compulsory to have lights on
during the day; where it is not c")
WARNING
17)The daytime running lights are an
alternative to the dipped headlights for
driving during the daytime in countries
where it is compulsory to have lights on
during the day; where it is not compulsory,
the use of daytime running lights is
permitted.
18)Daytime running lights cannot replace
dipped beam headlights when driving at
night or through tunnels. The use of daytime
running lights is governed by the highway
code of the country in which you are driving.
Comply with legal requirements.
INTERIOR LIGHTS
FRONT CEILING LIGHT
Switch 1 fig. 33 switches on/off light
8.
Switch 2 is used to switch the rear
ceiling lights on/off.
Switch 3 switches on/off all lights
inside the ceiling lights (front and rear) in
the passenger's compartment.
Switch 4 activates or deactivates the
ceiling light 6, 7, 8 switching on/off upon
opening/closing the doors. Lights switch
on/off progressively.
Switch 5 switches on/off light 6.
Ceiling light timing
On certain versions, to facilitate getting
in/out of the vehicle at night or in
poorly-lit areas, two timed modes have
been provided.
WINDSCREEN WIPER
SCREEN WIPER/WASHER
7) 8)
This operates only with the ignition
device at ON.
Ring nut fig. 34 can be set to the
following positions:
windscreen wiper off.
rotating the ring nut to the first
position activates the first
sensitivity level of the rain sensor.
rotating the ring nut to the second
position activates the second
sensitivity level of the rain sensor.
rotating the ring nut to the third
position activates the first
continuous speed level of the
windscreen wipers in manual mode.
rotating the ring nut to the fourth
position activates the second
continuous speed level of the
windscreen wipers in manual mode.
3304136S0001EM
28
KNOWING YOUR CAR
Page 31 of 204
 to activate the MIST function:
operation is limited to the time for which
the stalk is held in this position. When
released, the stalk will return to its
def")
Move the stalk upwards (unstable
position) to activate the MIST function:
operation is limited to the time for which
the stalk is held in this position. When
released, the stalk will return to its
default position and the windscreen
wiper will be automatically stopped. This
function is useful to remove small
deposits of dust from the windscreen, or
morning dew.
IMPORTANT This function does not
activate the windscreen washer;
windscreen washer fluid will not
therefore be sprayed onto the
windscreen. To spray windscreen washer
fluid onto the windscreen, the washing
function must be used.
With ring nut in position
or, the
windscreen wiper will automatically
adapt its operating speed to the speed of
the vehicle.“Smart washing” function
Pull the stalk towards the steering wheel
(unstable position) to operate the
windscreen washer.
Keep the stalk pulled to activate both the
windscreen washer jet and the
windscreen wiper with a single
movement; the latter turns on
automatically.
The windscreen wiper stops working
three strokes after the stalk is released.
A further stroke after approx. 6 seconds
completes the wiping cycle.
RAIN SENSOR
This is located behind the interior rear
view mirror, in contact with the
windscreen and can detect the presence
of rain and, consequently, manage the
cleaning of the windscreen in accordance
with the amount of water on the screen.
Activation/deactivation
9) 10)
Rotating the ring nut fig. 34 to position
oractivates the rain sensor.
The activation of the sensor is signalled
by a flick of the wiper (indicating that the
command has been acquired).
To deactivate the system, use ring nut
fig. 34 or turn the ignition device to STOP.
If the ignition device is moved to STOP
position, leaving the ring nut fig. 34 in
or, when the vehicle is next
started (ignition device at ON), no wiping
cycle occurs even if it rains.
19)
WARNING
19)Make sure the device is switched off
whenever the windscreen must be cleaned.
IMPORTANT
7)Never use the windscreen wipers to
remove layers of snow or ice from the
windscreen. In such conditions, the
windscreen wiper may be subjected to
excessive stress and the motor cut-out
switch, which prevents operation for a few
seconds, may intervene. If operation is not
subsequently restored, even after restarting
the engine, contact an Alfa Romeo
Dealership.
8)Do not operate the windscreen wiper with
the blades lifted from the windscreen.
9)Do not activate the rain sensor when
washing the car in an automatic car wash.
10)Make sure the device is switched off if
there is ice on the windscreen.
3404146S0001EM
29
Page 32 of 204

Controls
1. Driver side temperature adjustment knob; 2. Driver side AUTO function activation button (automatic operation); 3. Driver's")
CLIMATE CONTROL
AUTOMATIC DUAL-ZONE CLIMATE CONTROLSYSTEM
2)
Controls
1. Driver side temperature adjustment knob; 2. Driver side AUTO function activation button (automatic operation); 3. Driver's
side air distribution selection button; 4. MAX-DEF function activation button (rapid defrosting/demisting); 5. Fan speed
adjustment knob; 6. Heated rear window on/off button; 7. Passenger side air distribution selection button; 8. Passenger side
AUTO function activation button (automatic operation); 9. Passenger side temperature adjustment knob; 10. MONO function
button (set temperature alignment) driver/passenger side; 11. Passenger side seat heater activation button; (where provided, see
chapter on seats); 12. Climate control compressor on/off button; 13. Steering wheel heater activation button; (where provided,
see chapter on steering wheel); 14. Driver side seat heater activation button; (where provided, see chapter on "Seats"); 15. On/
off button for internal air recirculation.
3504156S0005EM
30
KNOWING YOUR CAR
 1
1 2
2 3
3 4
4 5
5 6
6 7
7 8
8 9
9 10
10 11
11 12
12 13
13 14
14 15
15 16
16 17
17 18
18 19
19 20
20 21
21 22
22 23
23 24
24 25
25 26
26 27
27 28
28 29
29 30
30 31
31 32
32 33
33 34
34 35
35 36
36 37
37 38
38 39
39 40
40 41
41 42
42 43
43 44
44 45
45 46
46 47
47 48
48 49
49 50
50 51
51 52
52 53
53 54
54 55
55 56
56 57
57 58
58 59
59 60
60 61
61 62
62 63
63 64
64 65
65 66
66 67
67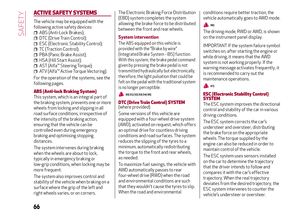 68
68 69
69 70
70 71
71 72
72 73
73 74
74 75
75 76
76 77
77 78
78 79
79 80
80 81
81 82
82 83
83 84
84 85
85 86
86 87
87 88
88 89
89 90
90 91
91 92
92 93
93 94
94 95
95 96
96 97
97 98
98 99
99 100
100 101
101 102
102 103
103 104
104 105
105 106
106 107
107 108
108 109
109 110
110 111
111 112
112 113
113 114
114 115
115 116
116 117
117 118
118 119
119 120
120 121
121 122
122 123
123 124
124 125
125 126
126 127
127 128
128 129
129 130
130 131
131 132
132 133
133 134
134 135
135 136
136 137
137 138
138 139
139 140
140 141
141 142
142 143
143 144
144 145
145 146
146 147
147 148
148 149
149 150
150 151
151 152
152 153
153 154
154 155
155 156
156 157
157 158
158 159
159 160
160 161
161 162
162 163
163 164
164 165
165 166
166 167
167 168
168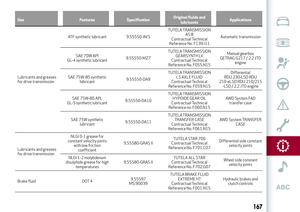 169
169 170
170 171
171 172
172 173
173 174
174 175
175 176
176 177
177 178
178 179
179 180
180 181
181 182
182 183
183 184
184 185
185 186
186 187
187 188
188 189
189 190
190 191
191 192
192 193
193 194
194 195
195 196
196 197
197 198
198 199
199 200
200 201
201 202
202 203
203