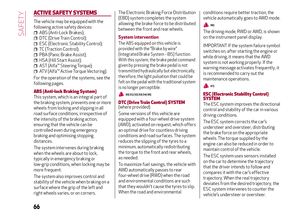
Page 129 of 204
pull out the bulb-bulb holder unit from
the headlight body by turning it
anticlockwise fig. 129;
remove the bulb by sliding it off the
bulb holder
install the new bulb, making sure it is
correctly inserted in the bulb holder;
then insert the bulb, bulb holder and
connector assembly in the housing on the
headlight body and turn it clockwise,
making sure that it is locked correctly;
refit the cover by tightening the two
fixing screws.
Front light cluster with main
beam/dipped beam Xenon gas
discharge headlights
To replace the bulbs of the main beam
headlights/dipped headlights contact an
Alfa Romeo Dealership
WARNING
119)Before replacing the bulb, wait for the
exhaust ducts to cool down: DANGER OF
SCALDING!
120)Modifications or repairs to the electric
system that are not carried out properly or
do not take the system technical
specifications into account can cause
malfunctions leading to the risk of fire.
121)Halogen bulbs contain pressurised gas,
in the case of breakage they may burst
causing glass fragments to be projected
outwards.
IMPORTANT
49)Halogen bulbs must be handled holding
the metallic part only. Touching the
transparent part of the bulb with your
fingers may reduce the intensity of the
emitted light and even reduce the lifespan of
the bulb. In the event of accidental contact,
wipe the bulb with a cloth moistened with
alcohol and let the bulb dry.
REPLACING FUSES
INTRODUCTION
122) 123) 124) 125) 126)
50) 51)
Fuses protect the electrical system: they
intervene (blow) in the event of a failure
or improper action on the system.
Fuse extracting pliers
To replace a fuse, use the pliers hooked
to the boot fusebox cover fig. 130.
Grab the pliers from the upper tabs,
press them and extract the pliers pulling
upwards.
The pliers fig. 131 have two different
ends, specifically designed to remove the
different types of fuses present in the
vehicle.
1: MINI fuse;
2: J-CASE fuse.
12808026S0021EM
12908026S0022EM
13008036S0053EM
127
Page 130 of 204
After use, refit the pliers in position,
proceeding as follows:
grasp the pliers from the upper tabs;
press the pliers in their housing,
pushing downwards, until they click into
place.
FUSE LOCATION
The fuses, which can be replaced by the
user, are grouped in two boxes below the
passenger side foot board and inside the
boot.
CONTROL UNIT UNDER PASSENGER
SIDE FOOTBOARD
To access the fuses, proceed as follows:
lift the upper end of the footboard 1
fig. 132 on the passenger side, pulling it
to release the 2 buttons;
remove the panel 2 fig. 133,
extracting it downward, after unscrewing
the two fixing hooks;
the fuses are freely accessible on the
control unit.
The number identifying the electrical
component corresponding to each fuse is
shown on the control unit cover.
LUGGAGE COMPARTMENT FUSE BOX
To access the fuses, proceed as follows:
lift the load carrying plane;
remove the control unit cover fig. 134;
The number identifying the electrical
component corresponding to each fuse is
shown on the cover.
After replacing a fuse, make sure that
you have closed cover correctly.
13108036S0005EM13208036S0010EM
13308036S0011EM
13408036S0014EM
128
IN AN EMERGENCY
Page 131 of 204
CONTROL UNIT UNDER PASSENGER SIDE FOOTBOARD
FUNCTIONFUSEAMPERE
Front electric window (driver side) F3325
Front electric window (passenger side) F3425
Supply
for Connect system, Climate Control system, Alarm,
Electric door mirror folding, EOBD system, USB port F36
ÖÚ
Safe
Lock device (driver side door unlock - where provided), Doors
unlock, Central lock F38
20
Windscreen washer pump F4320
13508036S0013EM
129
18-4-2016 12:11 Pagina 129
Page 132 of 204
FUNCTION FUSE AMPERE
Rear left electric window F47 25
Rear right electric
window F48 25
Heater rear window coil, cigar lighter F94 15
130
IN AN EMERGENCY
Page 133 of 204
LUGGAGE COMPARTMENT FUSE BOX
FUNCTION FUSE AMPERE
Tow hook module (TTM) F1 40
Hi-Fi system F8 30
KL15/a USB
Recharge (C070) F17 7.5
I-Drive / USB / AUX port F21 10
KL15/a 12V Power outlet (R053) F22 20
13608036S0015EM
131
Page 134 of 204
WARNING
122)Never replace a fuse with another with
a higher amp rating; DANGER OF FIRE.
123)Before replacing a fuse, make sure
that the ignition device is at STOP and that
all devices are switched off and/or
disconnected.
124)Contact an Alfa Romeo Dealership if a
safety system (airbags, brakes),
transmission system (engine, gearbox) or
steering system general protection fuse
blows.
125)If a fuse blows again, contact an Alfa
Romeo Dealership.
126)If a general protective fuse
(MAXI-FUSE, MEGA-FUSE, MIDI-FUSE)
blows, contact an Alfa Romeo Dealership.
IMPORTANT
50)Never replace a fuse with metal wires or
anything else.
51)If it is necessary to wash the engine
compartment, take care not to directly hit
the fuse box and the window wiper motors
with the water jet.
TIRE REPAIR KIT
DESCRIPTION
127) 128) 129) 130) 131) 132) 133) 134) 135)
52)
3)
The Tire Repair Kit is located in the boot,
inside a specific container.
To access the Tire Repair Kit, open the
boot, lift the load platform.
The Tire Repair Kit includes also:
one tank 1 fig. 137 containing the
sealing fluid, provided with: filler tube
2 and adhesive label 3 with the writing
"Max. 50 mph (80 km/h)”, to be attached
in a position easily visible to the driver
(eg. on the dashboard) after repairing the
tyre;
compressor 4 complete with pressure
gauge and connectors;
an instruction leaflet, to refer to for
prompt and correct use of the Tire Repair
Kit and that must be then given to the
personnel dealing with the tyre treated
with sealant;
a pair of protective gloves;
some adaptors, for inflating different
elements.
IMPORTANT The sealing fluid is effective
with external temperatures of between
-40°F (-40°C) and 122°F (+50°C). The
sealing fluid has an expiry date.
INFLATION PROCEDURE
127) 128) 130) 131) 132) 133) 134) 135)
Proceed as follows:
engage the electric parking brake.
Insert the tank 1 fig. 138 containing the
sealing liquid in the proper compressor
holder, pressing down hard. Unscrew the
tyre valve cap, take out the filler hose
2 and tighten the ring nut on the tyre
valve;
13708066S0002EM
132
IN AN EMERGENCY
Page 135 of 204
make sure that switch 5 fig. 139 of
the compressor is in position O (OFF);
insert the plug into the socket on the
central tunnel, start the engine;
start the compressor, placing the
switch 5 fig. 139 to position I (ON);
inflate the tyre to the pressure
indicated in the “Rims and Tyres”
paragraph (see “Technical data” chapter).
In order to obtain a more precise reading,check the pressure value on pressure
gauge 6 fig. 139 with the compressor off;
if after 15 minutes pressure is not at
least 1.8 bar (26 psi), disengage the
compressor from the valve and power
socket, then move the vehicle forwards
approx. five tyre turns in order to
distribute the sealing fluid inside the tyre
evenly, then repeat the inflation
operation;
if you still cannot obtain a pressure of
at least 1,8 bar (26 psi) within
15 minutes from the compressor
switching on, do not drive off and contact
an Alfa Romeo Dealership;
after having driven for about 5 mph
(8 km), stop, engage the electric parking
brake and recheck the tyre pressure;
if the pressure is less than 1.8 bar
(26 psi), do not go back into gear but see
an Alfa Romeo dealer;
if a pressure value of at least 1.8 bar
(26 psi) is detected, restore the correct
pressure (with engine running and
electric parking brake), resume driving
immediately and drive with great care to
an Alfa Romeo Dealership.
SEALANT BOTTLE REPLACEMENT
IMPORTANT Only use original cartridges,
which can be purchased at an Alfa Romeo
dealership.
Proceed as follows:
Remove the tank 1 fig. 140 pressingthe unhooking button 9;
insert the new tank pressing it
downwards hard.
WARNING
127)Punctures on the sides of the tire may
not be repaired. Do not use the Tire Repair
kit if the tyre was damaged as a result of
being used when underinflated.
128)Wear the protective gloves provided
with the Tire Repair kit.
129)Apply the adhesive label where it can
be easily seen by the driver as a reminder
that the tyre has been treated with the Tire
Repair Kit. Drive carefully, particularly on
bends. Do not exceed 80 km/h. Avoid sudden
acceleration or braking.
130)You must always indicate that the tyre
was repaired using the Tire Repair Kit. Give
the booklet to the technicians who will be
handling the tyre that was treated using the
Tire Repair Kit.
13808066S0004EM
13908066S0005EM
14008066S0009EM
133
Page 136 of 204
131)Repairs are not possible in the case of
damage to the wheel rim (bad groove
distortion causing air loss). Do not remove
foreign bodies (screws or nails) from the
tyre.
132)Never operate the compressor for
longer than 20 consecutive minutes. Risk of
overheating. The Tire Repair Kit is not
suitable for definitive repairs, so the
repaired tyres may only be used temporarily.
133)As required by current regulations, the
information on chemical substances for the
protection of human health and the
environment and on the safe use of the
sealing fluid are on the packaging label.
Compliance with the indications on the label
is an essential condition to ensure the safety
and the effectiveness of the product.
Remember to carefully read the label before
use; the user of the product is responsible
for any damages caused by improper use.
The sealing fluid has an expiry date. Replace
the bottle if the sealant has expired.
134)If the pressure falls below 1.8 bar, do
not drive any further: the Tire Repair Kit
cannot guarantee proper seal because the
tyre is too damaged. Contact an Alfa Romeo
Dealership.
135)The Tire Repair Kit provide a
temporary repair, therefore the tyre must be
examined and repaired by a specialist as
soon as possible. The sealant is suitable for
use at temperatures in the range from −40°C
to +50°C.IMPORTANT
52)In the event of a puncture caused by
foreign bodies, the kit may be used to repair
tyres showing damage on the tyre tread up
to max. 6mm diameter.
IMPORTANT
3)Dispose of the bottle and the sealant
liquid properly. Have them disposed of in
compliance with national and local
regulations.
EMERGENCY STARTING
If the battery is flat, a jump starting can
be performed using the battery and the
cables of another vehicle, or using an
auxiliary battery. In all cases, the battery
used must have a capacity equal to or a
little higher than the flat one.
Jump starting may be dangerous if
carried out incorrectly: carefully follow
the procedures described below.
53)
IMPORTANT NOTES
Do not use an auxiliary battery or any
other source of external supply with a
voltage above 12 V: the battery, the
starter, the alternator and the electrical
system of the vehicle could be damaged.
Do not attempt jump starting if the
battery is frozen. The battery could break
and explode!
REMOTE BATTERY CONNECTION
POLES
To facilitate the operation, the remote
poles of the battery for the jump starting
can be found in the engine compartment:
the battery, on the other hand, is placed
in the luggage compartment.
The negative terminal (-) fig. 141 fig. 8 is
positioned next to the right bonnet lock.
134
IN AN EMERGENCY