Page 25 of 81

42 || 43
VEHICLE CONTROLS
VEHICLE CONTROLS
TABLE OF
CONTENTS
INDEX
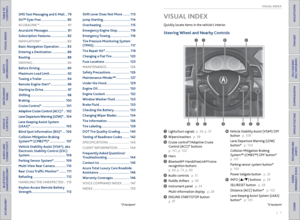
VISUAL INDEX
VOICE COMMAND INDEX
SAFETY
INFORMATION
CLIENT
INFORMATION
INSTRUMENT PANEL
SPECIFICATIONS
VEHICLE
CONTROLS
MAINTENANCE
AUDIO AND
CONNECTIVITY
HANDLING THE UNEXPECTED
BLUETOOTH®
HANDSFREELINK®
DRIVING
ACURALINK®
NAVIGATION
Failure to reinstall, or correctly reinstall, the head restraints can result in
severe injury during a crash.
Always replace the head restraints before driving.
WARNING
Pull
Lever
Unlock
Lock
Adjusting the Steering Wheel
The steering wheel height and distance from your body can be adjusted so that you
can comfortably grip the steering wheel in an appropriate driving posture.
1. Pull up the steering wheel adjustment lever.
2. Move the steering wheel up or down, and in or out.
3. Push down the steering wheel adjustment lever to
lock the steering wheel in position.
Adjusting the steering wheel position while driving may cause you to lose
control of the vehicle and be seriously injured in a crash.
Adjust the steering wheel only when the vehicle is stopped.
WARNING
To adjust
To lock Lever
Driving Position Memory System
You can store two driver’s seat and door mirror positions into memory when
the vehicle is on. When you unlock and open the driver’s door with a remote
transmitter, the seat and door mirrors adjust automatically to the corresponding
preset positions.
1. Adjust the seat and mirrors to your preferred
positions.
2. Press SET.
3. Press and hold memory button 1 or 2. You will
hear two beeps when the memory is set.
4. Press one of the memory buttons to recall
previously stored positions.
Lumbar positions cannot be stored.
Memory
button 1
Memory
button 2
SET button
Floor Mats Position the front and rear seat floor mats
properly and anchor them. If they are not properly
positioned, the floor mats can interfere with the
front seat functions.
Do not put additional floor mats on top of the
anchored mats.
Rear Seats
Separately fold down the left and right halves of the rear seat to make room for
cargo.
1. Store the center seat belt by inserting the latch
plate into the slot on the side of the anchor
buckle.
2. Retract the seat belt into the holder on the
ceiling.
3. Lower the center head restraint to its lowest
position. Put the armrest back into the seat-
back.
4. From the rear door side or cargo area side, pull
the release lever.
To return the seat to its original position, pull up
the seat-back to an upright position until it is
securely latched into place. Reposition the seat
belts as necessary.
Page 26 of 81

44 || 45
VEHICLE CONTROLS
VEHICLE CONTROLS
TABLE OF
CONTENTS
INDEX
VISUAL INDEX
VOICE COMMAND INDEX
SAFETY
INFORMATION
CLIENT
INFORMATION
INSTRUMENT PANEL
SPECIFICATIONS
VEHICLE
CONTROLS
MAINTENANCE
AUDIO AND
CONNECTIVITY
HANDLING THE UNEXPECTED
BLUETOOTH®
HANDSFREELINK®
DRIVING
ACURALINK®
NAVIGATION
Power Door Mirrors
Adjust the power door mirrors using the switches on the driver’s door when the
vehicle is on.
L/R selector switch: Select the left or right mirror.
After adjusting the mirror, return the switch to the
center position.
Mirror position adjustment switch: Press the
switch left, right, up, or down to move the mirror.
Folding door mirror button*: Press to fold the door
mirrors in or out.
Reverse Tilt Door Mirrors
Either side door mirror can tilt downward when you shift to Reverse (R) to
improve visibility on the selected side of the vehicle when reversing.
When in Reverse, slide the selector switch on the
driver’s door to the left or right side.
The mirror returns to its original position when you
shift out of Reverse.
Adjusting the Mirrors
Adjust the angle of the mirrors for the best visibility when you are sitting in the
correct driving position.
Automatic Dimming Rearview Mirror
When driving after dark, the automatic dimming
function reduces the glare in the rearview mirror
(and power door mirrors*) from headlights behind
you.
The function cancels when the shift lever is in
Reverse (R).
*if equipped
Selector
switch
Adjustment
switch
Folding button*
Selector switch
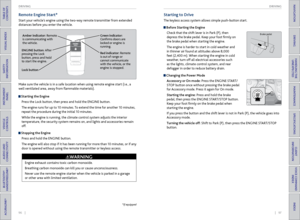
HomeLink®
Garage Opener
Program your vehicle to operate up to three remote-controlled devices around your
home—such as garage doors, lighting, or home security systems—using the buttons
on the ceiling.
Training a Button
Park near the system you want to program, and follow the instructions in the
flowchart below.
To retrain a button or erase codes, see the Owner’s Manual on the Owner
Information CD or visit owners.acura.com (U.S.) or www.myacura.ca (Canada). If
you need help, call (800) 355-3515 or visit www.homelink.com.
Press and hold the button on the r emote
and the HomeLink button at the same
time. Then, while continuing to hold the
HomeLink button, pr ess and release the
button on the r emote every 2 seconds.
Does the LED blink at a f ast er ra te within 20 seconds ?
Press and hold the
HomeLink button
again. T
raining
complete
YES
NO
HomeLink indicator
�ashes for 2 seconds,
then r emains on. HomeLink LED
r
emains on.YES
NO
YES
NO
P osition the remote transmitter
1–3 inches (3–8 cm) from the
HomeLink button you want to program.1
Press and hold the desir ed HomeLink
button and the button on the r emote
transmitter .
Does the HomeLink indicat or (LED) blink at a f ast er
rate after about 10 seconds ?
2
a
The remote has a r olling code. Pr ess
the “learn” button on the r emote-
contr olled device (e.g., garage door
opener).
Pr ess the pr ogrammed HomeLink
button again; the remote-contr olled
device should operate.
Within 30 seconds, pr
ess and hold the
pr ogrammed HomeLink button for 2
seconds.a
Pr ess and hold the programmed
HomeLink button for about a second.
Does the devic e (garage door opener) work?
3
b
4
5
Buttons
Indicator
Page 27 of 81

46 || 47
VEHICLE CONTROLS
VEHICLE CONTROLS
TABLE OF
CONTENTS
INDEX
VISUAL INDEX
VOICE COMMAND INDEX
SAFETY
INFORMATION
CLIENT
INFORMATION
INSTRUMENT PANEL
SPECIFICATIONS
VEHICLE
CONTROLS
MAINTENANCE
AUDIO AND
CONNECTIVITY
HANDLING THE UNEXPECTED
BLUETOOTH®
HANDSFREELINK®
DRIVING
ACURALINK®
NAVIGATION
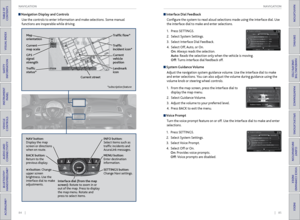
Climate Control System
The automatic climate control system can maintain your preferred interior
temperature by selecting the proper mix of heated or cooled air and fan speed.
AUTO button: Press,
then use the temperature
control dial to set your
preferred temperature. ON/OFF
button
Fan speed
buttons Windshield
defroster button
Passenger’s
temperature
control dial
SYNC button:
Set the
passenger’s
temperature to
the same as the
driver’s.
Rear window
defogger/
heated mirror
button
Recirculation
button: Choose
recirculation or
fresh air.
A/C button
Vent mode
button: Change
the vent source. Driver’s
temperature
control dial
On vehicles with ODMD, climate information is displayed on the screen, but cannot
be selected via touch. Adjust the climate settings using the dials and buttons.
Seat Heaters or Ventilation*
Quickly warm or ventilate the seats when the vehicle is on.
Front Seat Heaters*
Press the switch for the desired setting. An indicator in the switch appears for the
selected setting.
LO button: Press to slowly warm the seat, or to
maintain continuous heating.
HI button: Press to quickly warm the seat. If left in
HI, the heater cycles on and off.
Return the switch to the center to turn the seat
heaters off.
Front Seat Heaters and Ventilation*Press the seat heater or ventilation button. An indicator (red for heater, blue for
ventilation) appears for the selected setting.
Once: HI setting (three indicators)
Twice: MID setting (two indicators)
Three times: LO setting (one indicator)
Four times: OFF setting (no indicators)
Rear Seat Heaters*You can heat the two outer rear seats. An indicator in the button appears for the
selected setting.
LO button: Press to slowly warm the seat, or to
maintain continuous heating.
HI button: Press to quickly warm the seat. If left in
HI, the heater cycles on and off.
Press the button again to turn off.
Heat-induced burns are possible when using seat heaters.
Persons with a diminished ability to sense temperature (e.g., persons with
diabetes, lower-limb nerve damage, or paralysis) or with sensitive skin
should not use the seat heaters.
WARNING
*if equipped
Page 28 of 81

48 || 49
VEHICLE CONTROLS
VEHICLE CONTROLS
TABLE OF
CONTENTS
INDEX
VISUAL INDEX
VOICE COMMAND INDEX
SAFETY
INFORMATION
CLIENT
INFORMATION
INSTRUMENT PANEL
SPECIFICATIONS
VEHICLE
CONTROLS
MAINTENANCE
AUDIO AND
CONNECTIVITY
HANDLING THE UNEXPECTED
BLUETOOTH®
HANDSFREELINK®
DRIVING
ACURALINK®
NAVIGATION
Setting the Clock
Adjust the time in the clock display.
Models without navigation
Use the selector knob to make and enter selections.
1. Press the SETUP button.
2. Select Adjust Clock.
3. Select the item to change (12/24 hour mode, hour,
or minute).
4. Make the necessary changes for each item.
5. Select Set to set the time.
6. Press SETUP to return to the main display.
Models with navigation
Use the interface dial to make and enter selections.
1. Press the SETTINGS button.
2. Select System Settings.
3. Select Clock.
4. Select Clock Adjustment.
5. Rotate the interface dial to change the hour value.
Press the interface dial to select minutes, and
rotate to change the value. Press the interface dial
to exit the screen.
6. Press the BACK button to exit out of the menus.
Customized Settings*
You can easily customize many features of your vehicle. The customized settings
are recalled every time you unlock the driver’s door with the remote (Driver 1 or
Driver 2). Settings are unique to each remote.
How to Change a Setting
The vehicle must be in Park (P) to select Vehicle Settings. Use the interface dial to
make and enter selections.
1. Press the SETTINGS button.
2. Select an option (System, Vehicle, Camera, Audio, Phone, Info, or Navi).
3. Select a setting option, and make your preferred changes.
4. Press BACK to exit out of the menus.
*vehicles with navigation
Page 29 of 81

50 || 51
AUDIO AND CONNECTIVITY
AUDIO AND CONNECTIVITY
TABLE OF
CONTENTS
INDEX
VISUAL INDEX
VOICE COMMAND INDEX
SAFETY
INFORMATION
CLIENT
INFORMATION
INSTRUMENT PANEL
SPECIFICATIONS
VEHICLE
CONTROLS
MAINTENANCE
AUDIO AND
CONNECTIVITY
HANDLING THE UNEXPECTED
BLUETOOTH®
HANDSFREELINK®
DRIVING
ACURALINK®
NAVIGATION
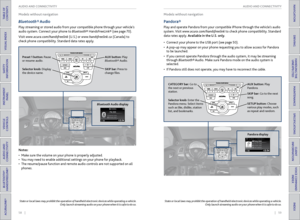
Basic Audio Operation
Connect audio devices in the front console, and operate buttons and displays for
the audio system.
USB Port
Connect a USB flash drive or other audio device, such as an iPod® or iPhone®.
1. Open the USB cover.
2. Install the iPod dock connector or the USB flash
drive into the USB port.
Auxiliary Input Jack
Connect standard audio devices with a 1/8-inch (3.5 mm) stereo miniplug.
1. Open the AUX cover.
2. Insert the miniplug attached to the audio device
into the jack. The audio system switches to AUX
mode. Use the device to control the audio.
iPod and iPhone are trademarks of Apple, Inc.
State or local laws may prohibit the operation of handheld electronic devices while operating a vehicle.
AUDIO AND CONNECTIVITY
Learn how to operate the vehicle’s audio system.
Accessory Power Socket
Located in the front and center consoles. Open the
socket cover to use power when the vehicle is on.
Do not insert an automotive type cigarette lighter element. This can overheat
the power socket.
NOTICE
Adjusting the Sound
Adjust various sound settings.
Models without navigation
Use the selector knob to make and enter selections.
1. Press the SETUP button.
2. Select Sound Settings.
3. Select the setting you want, and adjust it to the
desired level.
4. Press the BACK button to exit the menu.
Models with navigation
Use the interface dial to make and enter selections.
1. From the audio screen, press the MENU button.
2. Select Sound.
3. Select the setting you want, and adjust it to the
desired level.
4. Press the BACK button to exit the menu.
You can also adjust the sound using the ODMD touchscreen. Select More, select
Sound, and select the + or - icons to adjust settings. Select X to exit the screen.
Steering Wheel Controls
Operate certain functions of the audio system using the steering wheel controls.
MODE button: Cycle through available audio
modes.
VOL (p/q) buttons: Adjust audio volume.
CH (+/-) button: Change presets, tracks, albums,
or folders.
FM/AM/XM® Radio
Press (+) or (-) for the next or previous station.
Press and hold (+) or (-) for the next or previous strong station.
CD/HDD*/iPod®/USB/Bluetooth® Audio
Press (+) or (-) for the next or previous track.
Press and hold (+) or (-) for the next or previous folder (CD/USB).
Pandora®
Press (+) for the next song.
Press and hold (+) or (-) for the next or previous station.
*if equipped
Page 30 of 81

52 || 53
AUDIO AND CONNECTIVITY
AUDIO AND CONNECTIVITY
TABLE OF
CONTENTS
INDEX
VISUAL INDEX
VOICE COMMAND INDEX
SAFETY
INFORMATION
CLIENT
INFORMATION
INSTRUMENT PANEL
SPECIFICATIONS
VEHICLE
CONTROLS
MAINTENANCE
AUDIO AND
CONNECTIVITY
HANDLING THE UNEXPECTED
BLUETOOTH®
HANDSFREELINK®
DRIVING
ACURALINK®
NAVIGATION
Models without navigation
Color Information Display
Display audio information. Use the buttons to operate the system. Models without navigation
FM/AM Radio
Play FM or AM radio stations.
Selector knob: Rotate
to scroll through
options, and press to
enter a selection.
DISPLAY button:
Choose the audio,
wallpaper, or blank
display mode.
SETUP button:
Select various audio
mode options, sound
settings, and clock
adjustment.
BACK button: Go back
to the previous display.
button: Change screen
brightness. Use the selector
knob to make adjustments.
Color information display
FM/AM button:
Select a band. Preset
buttons (1-6):
Press and hold a preset
button to store the
current station.
Press a preset button
to select a previously
stored station.
SKIP bar: Search the
selected band for a
station with a strong
signal.
A.SEL (Auto Select)
button: Press to scan
bands and store the
strongest stations in
each preset.
Press again to turn off
scan and restore your
original presets.
CATEGORY bar:
Display and select
an RDS category.
SCAN button: Press to
hear a 10-second sample
of each strong station on
the selected band. Press
again to turn off scan.
Selector knob: Press
and rotate to tune
radio frequency.
SETUP button: Choose
RDS options to display
station text if available.
FM/AM radio display
Page 31 of 81

54 || 55
AUDIO AND CONNECTIVITY
AUDIO AND CONNECTIVITY
TABLE OF
CONTENTS
INDEX
VISUAL INDEX
VOICE COMMAND INDEX
SAFETY
INFORMATION
CLIENT
INFORMATION
INSTRUMENT PANEL
SPECIFICATIONS
VEHICLE
CONTROLS
MAINTENANCE
AUDIO AND
CONNECTIVITY
HANDLING THE UNEXPECTED
BLUETOOTH®
HANDSFREELINK®
DRIVING
ACURALINK®
NAVIGATION
Models without navigation
SiriusXM® Radio
Available on a subscription basis only. For more information or to subscribe, contact
your dealer, or visit www.siriusxm.com (U.S.) or www.siriusxm.ca (Canada).
Available in the U.S. and Canada, except Hawaii, Alaska, and Puerto Rico.
XM® is a registered trademark of Sirius XM Radio, Inc.
Models without navigation
Compact Disc (CD)
Insert a CD to begin playing. The audio system supports audio CDs, CD-Rs, and CD-
RWs in MP3, WMA, or AAC formats.
Do not use CDs with adhesive labels or insert a damaged CD. Inserting these types
of CDs may cause them to get stuck or damage the audio unit.
NOTICE
XM button: Select
XM1 or XM2. Preset
buttons (1-6):
Press and hold a preset
button to store the
current channel.
Press a preset button
to select a previously
stored station.
SKIP bar: Go to the
previous or next channel.
SETUP button: Choose
Channel Mode or
Category Mode.
CATEGORY bar:
Display and select
an XM category.
SCAN button: Press to
hear a 10-second sample
of each channel. Press
again to turn off scan.
Selector knob: Press and
rotate to change channels.
SiriusXM display
CD
eject button CD slot
CD button: Play a CD.
SKIP bar: Change
tracks, or rewind or fast
forward within a track.
SETUP button: Choose
various play modes,
such as repeat and
random.
CATEGORY bar:
Skip to the next
folder or the
beginning of the
previous folder.
SCAN button:
Press to
hear a 10-second sample
of each song.
Press again to turn off
scan.
Selector knob: Rotate to
change tracks. Press and
rotate to display folders.
CD display
Page 32 of 81

56 || 57
AUDIO AND CONNECTIVITY
AUDIO AND CONNECTIVITY
TABLE OF
CONTENTS
INDEX
VISUAL INDEX
VOICE COMMAND INDEX
SAFETY
INFORMATION
CLIENT
INFORMATION
INSTRUMENT PANEL
SPECIFICATIONS
VEHICLE
CONTROLS
MAINTENANCE
AUDIO AND
CONNECTIVITY
HANDLING THE UNEXPECTED
BLUETOOTH®
HANDSFREELINK®
DRIVING
ACURALINK®
NAVIGATION
Models without navigation
iPod®
Play and operate an iPod through the vehicle’s audio system. Connect your device
to the USB port (see page 50).
Searching for Music
Use the selector knob to search for tracks stored on the iPod using several
methods.
1. From the audio screen, press the selector knob
to enter the iPod menu.
2. Select a search type (artist, album, track, etc.).
3. Select the song you want to play.
iPod is a trademark of Apple, Inc.
Models without navigation
USB Flash Drive
Play and operate a USB flash drive through the vehicle’s audio system. Connect
your USB flash drive to the USB port (see page 50).
Searching for Music
Use the selector knob to search for tracks stored on the USB drive using several
methods.
1. Press the selector knob to enter the USB menu.
2. Select a folder or file.
3. Select the song you want to play.
State or local laws may prohibit the operation of handheld electronic devices while operating a vehicle.
Only launch streaming audio on your phone when it is safe to do so.
SKIP bar: Change
tracks, or rewind or fast
forward within a track.
SETUP button:
Choose various play
modes, such as repeat,
random, and shuffle. AUX button: Play a
connected iPod.
Selector knob: Rotate to
change tracks. Press to
display the iPod search
menu, and rotate and
press to select items.
iPod display
CATEGORY bar: Skip
to the next folder or
the beginning of the
previous folder. SKIP bar: Change files,
or rewind or fast forward
within a file.
SETUP button:
Choose various play
modes, such as repeat
and random. AUX button: Play a
connected USB drive.
Selector knob: Rotate to
change files. Press to display
the folder list, and rotate
and press to select items. SCAN button: Press to
hear a 10-second sample
of each file on the folder.
Press again to turn off
scan.
USB display