2016 Acura RDX center console
[x] Cancel search: center consolePage 29 of 81

50 || 51
AUDIO AND CONNECTIVITY
AUDIO AND CONNECTIVITY
TABLE OF
CONTENTS
INDEX
VISUAL INDEX
VOICE COMMAND INDEX
SAFETY
INFORMATION
CLIENT
INFORMATION
INSTRUMENT PANEL
SPECIFICATIONS
VEHICLE
CONTROLS
MAINTENANCE
AUDIO AND
CONNECTIVITY
HANDLING THE UNEXPECTED
BLUETOOTH®
HANDSFREELINK®
DRIVING
ACURALINK®
NAVIGATION
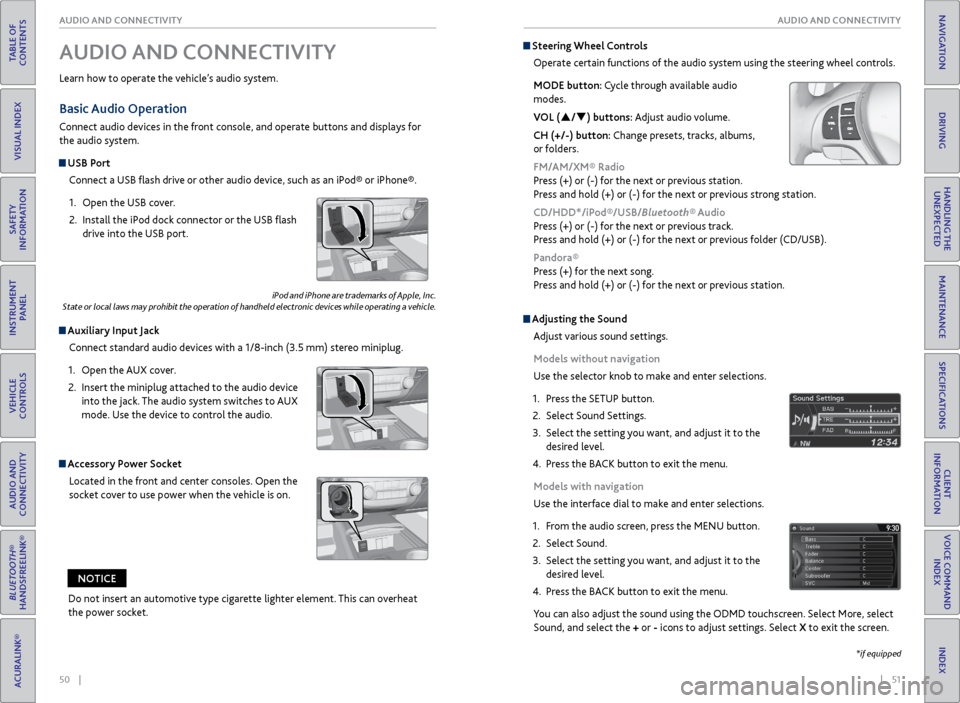
Basic Audio Operation
Connect audio devices in the front console, and operate buttons and displays for
the audio system.
USB Port
Connect a USB flash drive or other audio device, such as an iPod® or iPhone®.
1. Open the USB cover.
2. Install the iPod dock connector or the USB flash
drive into the USB port.
Auxiliary Input Jack
Connect standard audio devices with a 1/8-inch (3.5 mm) stereo miniplug.
1. Open the AUX cover.
2. Insert the miniplug attached to the audio device
into the jack. The audio system switches to AUX
mode. Use the device to control the audio.
iPod and iPhone are trademarks of Apple, Inc.
State or local laws may prohibit the operation of handheld electronic devices while operating a vehicle.
AUDIO AND CONNECTIVITY
Learn how to operate the vehicle’s audio system.
Accessory Power Socket
Located in the front and center consoles. Open the
socket cover to use power when the vehicle is on.
Do not insert an automotive type cigarette lighter element. This can overheat
the power socket.
NOTICE
Adjusting the Sound
Adjust various sound settings.
Models without navigation
Use the selector knob to make and enter selections.
1. Press the SETUP button.
2. Select Sound Settings.
3. Select the setting you want, and adjust it to the
desired level.
4. Press the BACK button to exit the menu.
Models with navigation
Use the interface dial to make and enter selections.
1. From the audio screen, press the MENU button.
2. Select Sound.
3. Select the setting you want, and adjust it to the
desired level.
4. Press the BACK button to exit the menu.
You can also adjust the sound using the ODMD touchscreen. Select More, select
Sound, and select the + or - icons to adjust settings. Select X to exit the screen.
Steering Wheel Controls
Operate certain functions of the audio system using the steering wheel controls.
MODE button: Cycle through available audio
modes.
VOL (p/q) buttons: Adjust audio volume.
CH (+/-) button: Change presets, tracks, albums,
or folders.
FM/AM/XM® Radio
Press (+) or (-) for the next or previous station.
Press and hold (+) or (-) for the next or previous strong station.
CD/HDD*/iPod®/USB/Bluetooth® Audio
Press (+) or (-) for the next or previous track.
Press and hold (+) or (-) for the next or previous folder (CD/USB).
Pandora®
Press (+) for the next song.
Press and hold (+) or (-) for the next or previous station.
*if equipped
Page 66 of 81

124 || 125
HANDLING THE UNEXPECTED
HANDLING THE UNEXPECTED
TABLE OF
CONTENTS
INDEX
VISUAL INDEX
VOICE COMMAND INDEX
SAFETY
INFORMATION
CLIENT
INFORMATION
INSTRUMENT PANEL
SPECIFICATIONS
VEHICLE
CONTROLS
MAINTENANCE
AUDIO AND
CONNECTIVITY
HANDLING THE UNEXPECTED
BLUETOOTH®
HANDSFREELINK®
DRIVING
ACURALINK®
NAVIGATION
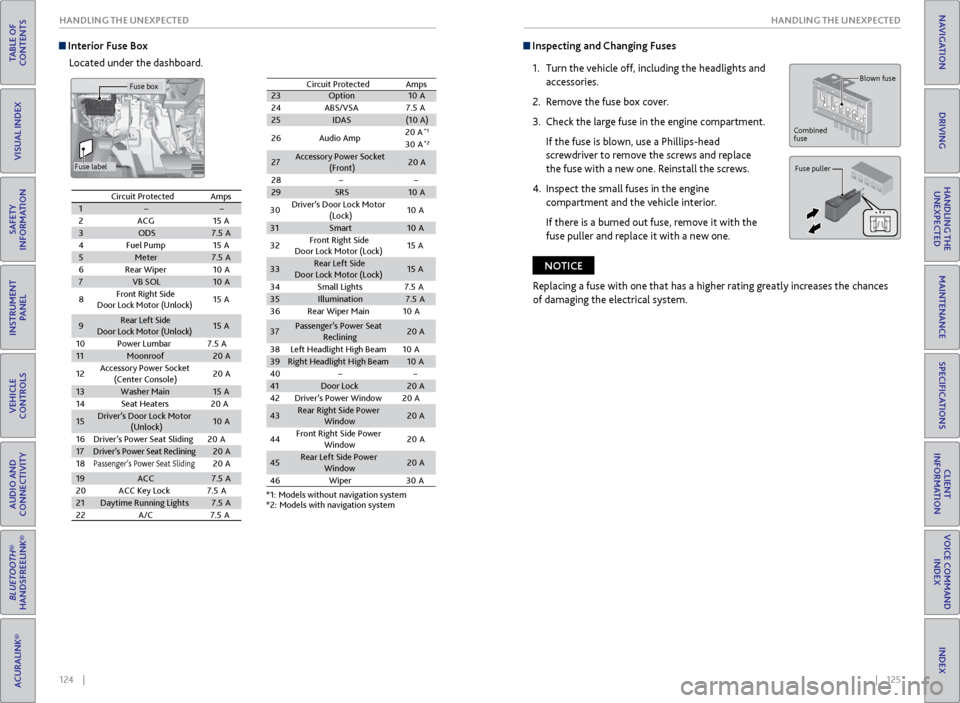
Interior Fuse Box
Located under the dashboard. Inspecting and Changing Fuses
1. Turn the vehicle off, including the headlights and
accessories.
2. Remove the fuse box cover.
3. Check the large fuse in the engine compartment.
If the fuse is blown, use a Phillips-head
screwdriver to remove the screws and replace
the fuse with a new one. Reinstall the screws.
4. Inspect the small fuses in the engine
compartment and the vehicle interior.
If there is a burned out fuse, remove it with the
fuse puller and replace it with a new one.
Blown fuse
Combined
fuse
Fuse puller
Replacing a fuse with one that has a higher rating greatly increases the chances
of damaging the electrical system.
NOTICE
Circuit ProtectedAmps1��2ACG15 A3ODS7.5A4Fuel Pump15A5Meter7.5A6Rear Wiper10 A7VB SOL10A
8Front Right Side
Door Lock Motor (Unlock)15 A
9Rear Left Side
Door Lock Motor (Unlock )15A
10 Power Lumbar 7.5A
11Moonroof20A
12 Accessory Power Socket
(Center Console )20
A
13Washer Main15A
14 Seat Heaters 20A
15Driver’s Door Lock Motor
(Unlock)10A
16 Driver’s Power Seat Sliding2 0A
17Driver’s Power Seat Reclinin g20A
18Passenger’s Power Seat Slidin g20A
19ACC7.5A
20 ACC Key Lock 7.5A
21Daytime Running Lights7.5A
22 A/C 7.5A
23 Option 10A
24 ABS/VSA7 .5A
25 IDAS (10A )
26 Audio Amp 20
A
*1
30 A*2
27 Accessory Power Socket
(Front) 20
A
28 ��
29 SRS 10A
Circuit Protected
Amps
*1: Models without navigation system
*2: Models with navigation system
30
Driver’s Door Lock Motor
(Lock) 10
A
31 Smart 10A
32 Front Right Side
Door Lock Motor (Lock) 15
A
33 Rear Left Sid
e
Door Lock Motor (Lock) 15
A
34 Small Lights 7.5A
35 Illumination 7.5A
36 Rear Wiper Main 10A
37 Passenger’s Power Seat
Reclining 20
A
38 Left Headlight High Beam 10A
39 Right Headlight High Beam 10A
40 ��
41 Door Lock 20A
42 Driver’s Power Window 20A
43 Rear Right Side Power
Window 20
A
44 Front Right Side Power
Window 20
A
45 Rear Left Side Power
Window 20
A
46 Wiper3 0A
Circuit Protected Amps
1 � �
2 ACG 15A
3 ODS 7.5A
4 Fuel Pump 15A
5 Meter 7.5A
6 Rear Wiper 10A
7 VB SOL 10A
8 Front Right Side
Door Lock Motor (Unlock) 15
A
9 Rear Left Side
Door Lock Motor (Unlock )15
A
10 Power Lumbar 7.5A
11 Moonroof 20A
12 Accessory Power Socket
(Center Console )20
A
13 Washer Main 15A
14 Seat Heaters 20A
15 Driver’s Door Lock Motor
(Unlock) 10
A
16 Driver’s Power Seat Sliding2 0A
17
Driver’s Power Seat Reclinin g20A
18Passenger’s Power Seat Slidin g20A
19 ACC 7.5A
20 ACC Key Lock 7.5A
21 Daytime Running Light s7.5A
22 A/C 7.5A
23Option10 A
24 ABS/VSA7.5A25IDAS(10A )
26 Audio Amp 20
A*1
30 A*2
27Accessory Power Socket
(Front)20 A
28
��29SRS10 A
Circuit ProtectedAmps
*1: Models without navigation system*2: Models with navigation system
30
Driver’s Door Lock Motor
(Lock) 10
A
31Smar t10A
32 Front Right Side
Door Lock Motor (Lock) 15
A
33Rear Left Sid e
Door Lock Motor (Lock)15 A
34 Small Lights 7.5A
35Illumination7.5A
36 Rear Wiper Main 10A
37Passenger’s Power Seat
Reclining20 A
38 Left Headlight High Beam 10A
39Right Headlight High Beam10A
40��41Door Lock20 A
42 Driver’s Power Window 20A
43Rear Right Side Power
Window20A
44 Front Right Side Power
Window 20
A
45Rear Left Side Power
Window20A
46 Wipe
r30A
Fuse box
Fuse label
Page 75 of 81

142 || 143
SPECIFICATIONS
MAINTENANCE
TABLE OF
CONTENTS
INDEX
VISUAL INDEX
VOICE COMMAND INDEX
SAFETY
INFORMATION
CLIENT
INFORMATION
INSTRUMENT PANEL
SPECIFICATIONS
VEHICLE
CONTROLS
MAINTENANCE
AUDIO AND
CONNECTIVITY
HANDLING THE UNEXPECTED
BLUETOOTH®
HANDSFREELINK®
DRIVING
ACURALINK®
NAVIGATION
Testing of Readiness Codes
Your vehicle has “Readiness Codes” as part of the onboard self-diagnostic system.
Some states refer to these codes as a test to see if your vehicle’s emissions
components are working properly. The codes may not be read if you go through the
testing just after the battery has gone dead or been disconnected.
To check if they are set, turn the vehicle on without starting the engine. The
malfunction indicator lamp will come on for several seconds. If it goes off, the
readiness codes are set. If it blinks five times, the readiness codes are not set.
If you are required to have your vehicle tested before the readiness codes are set,
prepare the vehicle for retesting by doing the following:
1. Fill the gas tank to approximately 3/4 full.
2. Park the vehicle and leave the engine off for 6 hours or more.
3. Make sure the ambient temperature is between 40°F and 95°F (4°C and 35°C).
4. Start the engine without touching the accelerator pedal, and let it idle for 20
seconds.
5. Keep the vehicle in Park (P). Increase the engine speed to 2,000 rpm, and hold it
there for about 3 minutes.
6. Let the engine idle with your foot off the accelerator for 20 seconds.
7. Select a nearby, lightly traveled major highway where you can maintain a speed
of 50 to 60 mph (80 to 97 km/h) for at least 20 minutes. Drive on the highway
with the vehicle in Drive. Do not use cruise control. When traffic allows, drive
for 90 seconds without using the accelerator pedal. (Vehicle speed may vary
slightly; this is OK.) If you cannot do this for a continuous 90 seconds because of
traffic conditions, drive for at least 30 seconds, then repeat two more times (for
a total of 90 seconds).
8. Drive in city/suburban traffic for at least 10 minutes. When traffic conditions
allow, let the vehicle coast for several seconds without using the accelerator
pedal or the brake pedal.
9. Park the vehicle and leave the engine off for 30 minutes.
The readiness codes are erased when the battery is disconnected, and set again
only after several days of driving under a variety of conditions.
If a testing facility determines that the readiness codes are not set, you may be
requested to return at a later date to complete the test, or see your dealer.=
Vehicle
SPECIFICATIONS
Tires
*1:2WD models*2: AWD models
ModelAcura RD X
No. of Passengers:
Front 2
Rear 3
Tota l5
Weights:Gross Vehicle
Weight RatingU.S.:4,850 lbs (2,200 kg )*14,982 lbs (2,260 kg )*2Canada:2,260 kgGross Axle Weight
Rating (Front)U.S.:2,557 lbs (1,160 kg )*12,623 lbs (1,190 kg )*2Canada:1,190 kgGross Axle Weight
Rating (Rear)U.S.:2,293 lbs (1,040 kg )*12,381 lbs (1,080 kg )*2Canada:1,080 kg
Gross Combined
Weight Rating U.S.:
6,349 lbs (2,880 kg )*16,482 lbs (2,940 kg )*2Canada:2,940 kgAir Conditioning:Refrigerant Type HFC-134a (R-134a )Charge Quantity15.2 – 16.9 oz (430 – 480 g)Lubricant TypeND-OIL8
Headlights (High Beams)LED
Headlights (L ow Beams) LED
Fog Lights*55W (H11 )
Side Turn Signal Lights
(on Door Mirrors )LED
Front Side Marker Lights 3CP
Rear Side Marker/Brake/Taillight sLED
Back-Up Lights 16W
Rear Turn Signal Lights21W (Amber)
High-M ount Brake Ligh tLED
Rear License Plate Ligh t5W
Cargo Area Lights 5W
Vanity Mirror Lights1.4W
In teri or Lights
Map LightsLED
Ceiling Ligh t8 W
Door Courtesy Lights2CP
Console Compartment Light 1.4W
Glove Box Light1.4W
Center Pocket Ligh tLED
Front turn signal/Parking lights/
Daytime running lights LE
D
Light Bulbs
Engine and Fuel Fluids
Engine Speci�cation s
FuelDisplacemen t211.8 cu-in (3,471 cm3)
Spark Plugs NG
KI LZKR7B11
DENSO SXU22HCR11
TypeUnleaded premium gasoline, Pump octane number of 91 or higher
Fuel Tank Capacity 16 US gal (60.5 �)
RegularSizeP235/60R18 102VPressure
psi (kPa[kgf/cm2])Fron t35 (240 [2.4])Rear33 (230 [2.3])
Compact
Spar e
*Size T165/90R17 105M
Pressure
psi (kPa[kgf/cm
2]) 60 (420 [4.2])
Wheel SizeRegula
r18 x 7.5JCompact Spar e*17 x 4T
Automatic Transmission Fluid
Rear Differential Fluid*
Transfer Assembly Fluid*
Speci�edAcura Automatic Transmission Fluid ATF DW-1
Capacity Change 3.3 US qt (3.1 �)
Speci�ed Acura DPSF-I I
Capacity Change1.32 US qt (1.25 �)
Speci�edAcura Hypoid Gear Oil HGO-1 1
Capacity Change0.43 US qt (0.41 �)
Engine Oil
Engine Coolan
t
Recommended·Genuine Acura Motor Oil 0W-2 0
·API Premium-grade 0W-20 detergent oi l
Capacity Change
4.23 US qt (4.0 �)
Change
including
�lter 4.55 US qt (4.3 �)
Speci�e
dAcura Long Life Antifreeze/Coolant Type 2
Ratio 50/50 with distilled wate r
Capacity1.96 US gal (7.4 �)
(change including the remaining 0.193 US gal (0.73 �) in the reserve tank )
Washer Fluid
Tank CapacityU.S.: 2.6 US qt (2.5 �)
Canada: 5.1 US qt (4.85 �)
Brake FluidSpeci�edAcura Heavy Duty Brake Fluid DOT 3
*if equipped