Page 134 of 223

132Driving and operating
transmission will automatically shift toa lower gear, even in manual mode,
to prevent the engine from stalling.
If a higher gear is selected when
vehicle speed is too low, or a lower
gear when vehicle speed is too high,
the shift is not executed.
In manual mode, no automatic
shifting to a higher gear takes place
at high engine revolutions.
Gears can be skipped by moving the
selector lever repeatedly at short
intervals.
After stopping, 1st gear is
automatically selected. When starting
on slippery surfaces, tip selector lever forwards to engage 2nd gear.
To move back to position D, move
selector lever back to the right.
Electronic driving
programmes ■ Following a cold start, the operating
temperature programme increasesengine speed to quickly bring the
catalytic converter to the required
temperature.Kickdown
In both automatic and manual modes, if the accelerator pedal is pressed
down completely the transmission
shifts to a lower gear depending on
engine speed. Full engine power is
available for acceleration.
Fuel economy mode
Activate fuel economy mode to allow
the transmission to adapt gearshift
patterns, improving the vehicle's fuel
economy.
Activation
In automatic mode, press button
s ; control indicator s
illuminates in the instrument cluster 3 90.
The settings of certain electronic
systems are adapted to reduce fuel
consumption:
■ The engine reacts less quickly to the accelerator pedal.
■ Automatic upshift points occur sooner and downshift points occur
later.
■ The transmission locks itself to the engine at cruising speeds, to
improve efficiency and increase
power and torque.
■ The fuel supply is automatically cut-
off more quickly during vehicle
deceleration. Overrun cut-off
3 125.
Do not use fuel economy mode whilst towing, e.g. a trailer.
Page 167 of 223

Vehicle care165
1. Remove 2 screws from panel onunderside of vehicle below front
fog lights and remove panel.
2. Disconnect harness connector from bulb holder and rotate bulb
holder anticlockwise.
3. Remove bulb holder from lamp assembly, rotate bulb
anticlockwise and remove from
bulb holder.
4. Insert new bulb into bulb holder and rotate it clockwise.
5. Reinstall bulb holder in lamp assembly and reconnect harnessconnector.
6. Reinstall panel to underside of vehicle using 2 screws removed
earlier.Tail lights
Rear brake, tail, turn signal,
reverse and fog tail light
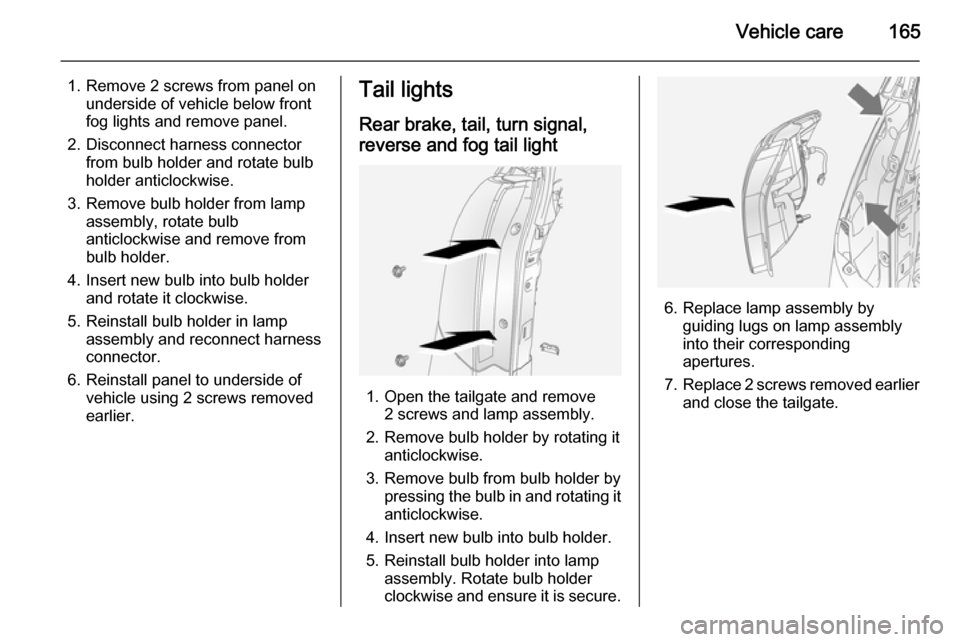
1. Open the tailgate and remove 2 screws and lamp assembly.
2. Remove bulb holder by rotating it anticlockwise.
3. Remove bulb from bulb holder by pressing the bulb in and rotating it
anticlockwise.
4. Insert new bulb into bulb holder.
5. Reinstall bulb holder into lamp assembly. Rotate bulb holder
clockwise and ensure it is secure.
6. Replace lamp assembly by guiding lugs on lamp assembly
into their corresponding
apertures.
7. Replace 2 screws removed earlier
and close the tailgate.
Page 168 of 223
166Vehicle careSide turn signal lights
1. Using a suitable screwdriver, prylamp assembly away from wing.
2. Rotate bulb holder anticlockwise.
3. Remove bulb from lamp assembly
by pulling bulb straight out of bulb holder.
4. Insert new bulb into bulb holder by
pressing it in and rotating the bulb holder clockwise.
5. Push lamp assembly back into aperture.
Centre high-mounted
brake light Have bulbs replaced by a workshop.
Number plate light
1. Remove 4 screws (arrowed) and remove lamp covers.
2. Remove bulb holder from lamp assembly by rotating it
anticlockwise.
3. Pull bulb straight out of bulb holder.
4. Insert new bulb.
5. Reinstall bulb holder into lamp assembly, rotate bulb holder
clockwise and ensure it is secure.
6. Replace lamp covers using the 4 screws removed earlier.
Interior lights
Front reading lights
1. Using a suitable screwdriver, pry lamp lens away from roof lining.
2. Remove bulb.
3. Insert new bulb.
4. Reinstall lamp lens in roof lining.
Page 189 of 223

Vehicle care187
■ Do not raise the vehicle more thanis necessary to change a wheel.
■ No people or animals may be in the
vehicle when it is jacked-up.
■ Never crawl under a jacked-up vehicle.
■ Do not start the engine when it is raised on the jack.
■ Clean wheel nuts and thread before
mounting the wheel.9 Warning
Do not grease wheel bolt, wheel
nut and wheel nut cone.
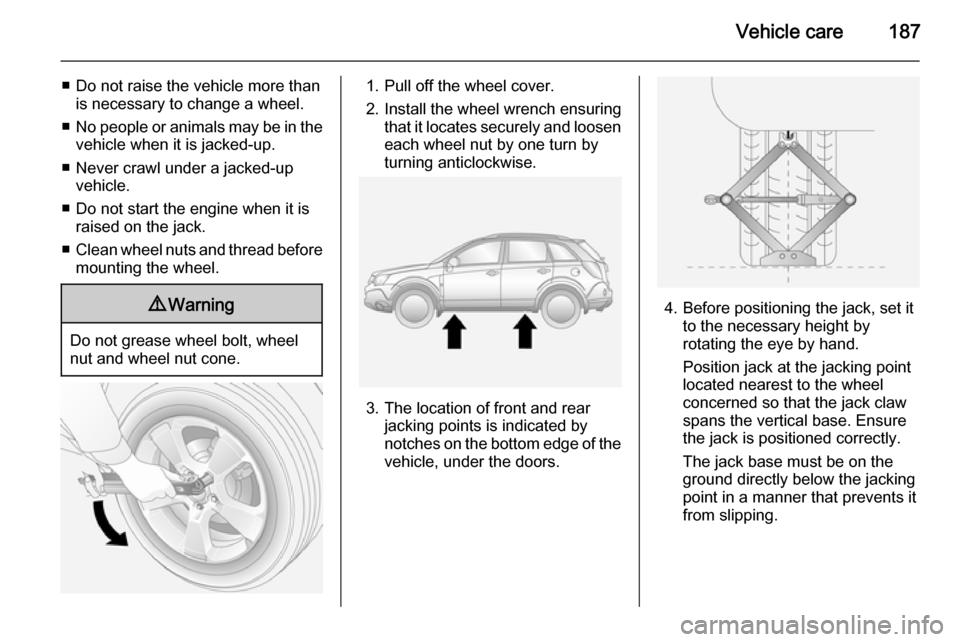
1. Pull off the wheel cover.
2. Install the wheel wrench ensuring that it locates securely and loosen
each wheel nut by one turn by
turning anticlockwise.
3. The location of front and rear jacking points is indicated by
notches on the bottom edge of the
vehicle, under the doors.
4. Before positioning the jack, set it to the necessary height by
rotating the eye by hand.
Position jack at the jacking point
located nearest to the wheel
concerned so that the jack claw
spans the vertical base. Ensure
the jack is positioned correctly.
The jack base must be on the
ground directly below the jacking
point in a manner that prevents it
from slipping.
Page 190 of 223

188Vehicle care
5. Attach wheel wrench to eye ofthreaded rod and rotate wrench
clockwise to raise vehicle.
If this is not the case, carefully
lower the vehicle immediately and
reposition the jack. Raise the
vehicle until the wheel is just clear of the ground.
6. Unscrew wheel nuts completely and wipe clean with a cloth.
Do not grease the threads. Put
wheel nuts somewhere where the threads will not be soiled.
7. Change the wheel. Notes on spare wheel 3 189.
8. Screw on the wheel nuts and
tighten slightly by hand by turning
clockwise until wheel is held
against the hub.
9. Rotate wrench anticlockwise and lower vehicle to the ground.
10. Install the wheel wrench ensuring that it locates securely and tighten
each wheel nut in a crosswise
sequence. Tightening torque is
140 Nm.
11. Stow the replaced wheel 3 189
and the vehicle tools 3 175.
12. Check the tyre pressure of the installed tyre as soon as possible.
Have the defective tyre renewed and
replace temporary spare wheel with a
full specification wheel without delay.
Jacking position for lifting platform
Rear arm position of the lifting
platform centrically under the recess
of the sill.
Page 191 of 223

Vehicle care189
Front arm position of the lifting
platform centrically under the recess
of the sill.
Spare wheel
Temporary spare wheel
Some vehicles are equipped with a
tyre repair kit instead of a spare
wheel.
The temporary spare wheel is
designed for use on your vehicle only.
If mounting a spare wheel which is
different from the other wheels, this
wheel might be classified as a
temporary spare wheel and the
corresponding speed limits apply,
even though no label indicates this.
Seek the assistance of a workshop to
check the applicable speed limit.
Use of the temporary spare wheel
could affect driveability, particularly if
using winter tyres. Have the defective
tyre renewed as soon as possible and
have the wheel balanced and fitted to the vehicle.Caution
The use of a spare wheel that issmaller than the other wheels or in
combination with winter tyres
could affect driveability. Have the defective tyre replaced as soon as
possible.The temporary spare wheel is located in the load compartment below the
floor cover and is secured with a
screw-in retainer.
Push both levers on the floor cover
towards the handle and pull up the
cover by the handle. Hang the hook
to the upper part of the tailgate
opening.
Vehicle tools 3 175.
Remove the retainer by rotating it
anticlockwise and remove temporary
spare wheel from the spare wheel
well.
Page 192 of 223

190Vehicle care
Only mount one temporary spare
wheel. Do not drive faster than
50 mph. Take curves slowly. Do not
use for a long period of time.
When the temporary spare wheel is
fitted, do not take the vehicle through an automatic vehicle wash with guide rails. The temporary spare wheel may
get caught on the rails, causing
damage to the tyre, wheel and other
vehicle parts.
The use of tyre chains is not permitted on the temporary spare wheel.
Tyre chains 3 183.
Directional tyres Fit directional tyres such that they rollin the direction of travel. The rolling
direction is indicated by a symbol
(e.g. an arrow) on the sidewall.
The following applies to tyres fitted
opposing the rolling direction:
■ Driveability may be affected. Have the defective tyre renewed as soon
as possible and have the wheel
balanced and fitted to the vehicle.■ Do not drive faster than 50 mph.
■ Drive particularly carefully on wet and snow-covered road surfaces.9 Warning
Storing a jack, a wheel or other
equipment in the load
compartment could cause injury if they are not fixed in place
properly. During a sudden stop or
a collision, loose equipment could
cause personal injury or damage
to the vehicle.
Always store the jack and vehicle
tools in their respective storage
compartments and secure them properly.
Always place the damaged wheel
in the load compartment, secured
in the spare wheel well with the
screw-in retainer.
Jump starting
Do not start with quick charger.
A vehicle with a discharged battery can be started using jump leads and
the battery of another vehicle.9 Warning
Be extremely careful when starting
with jump leads. Any deviation
from the following instructions can
lead to injuries or damage caused
by battery explosion or damage to the electrical systems of both
vehicles.
9 Warning
Avoid contact of the battery with
eyes, skin, fabrics and painted
surfaces. The fluid contains
sulphuric acid which can cause
injuries and damage in the event
of direct contact.
■ Never expose the battery to naked flames or sparks.
Page 195 of 223

Vehicle care193
Turn key to ignition switch position
ACC and release the electrical
parking brake before towing the
vehicle.Caution
Drive slowly. Do not drive jerkily.
Excessive tractive force can
damage the vehicle.
When the engine is not running,
considerably more force is needed to
brake and steer.
Keep tow rope clear of front bumper, and ensure it is securely fixed to the
towing eye at both ends. Pull on the tow rope to check.
To prevent the entry of exhaust gases from the towing vehicle, switch on the
air recirculation system 3 116 and
close the windows.
Vehicles with manual transmission:
The vehicle must be towed facing
forwards. The maximum speed is
55 mph. In all other cases, and when
the transmission is defective, the front axle must be raised off the ground.
Vehicles with automatic transmission:
Do not tow the vehicle using the
towing eye. Towing with a tow rope
could cause severe damage to the
transmission. When towing a vehicle
with automatic transmission, use flat
bed or wheel lift equipment.
Seek the assistance of a workshop.
After towing, unscrew the towing eye
and replace the spoiler lip. Store
towing eye in the storage
compartment below the floor cover in the load compartment.
Vehicle tools 3 175.Towing another vehicle
Remove the cover located on the rear
bumper by pressing the lower part of
the cover.
The rear towing eye attachment is
stored below the floor cover in the
load compartment.
Screw the rear towing eye attachment
anticlockwise using a suitable
screwdriver, until it is firmly in place
and stops in a horizontal position.
Attach a tow rope – or better still a tow
rod – to the rear towing eye.