Page 86 of 223

84Instruments and controlsTurn signal
O illuminates or flashes green.
The relevant control indicator flashes
when the turn signal is switched on
3 109.
Rapid flashing: failure of a turn signal bulb or the associated fuse or failure
of a turn signal light on trailer.
Both control indicators flash when the
hazard warning flashers are active
3 108.
Bulb replacement 3 161, Fuses
3 167.
Turn signals 3 109.
Seat belt reminder Seat belt reminder for front
seats X for driver's seat illuminates or
flashes red.
k for front passenger's seat
illuminates or flashes red, when the
seat is occupied.When the engine is running, if seat
belt is not engaged, the control
indicator will flash for 100 seconds
then illuminate until seat belt is
fastened.
If vehicle speed exceeds 14 mph, the
control indicator will flash for
100 seconds along with a warning
chime and remains illuminated until seat belt is fastened.
Fastening the seat belt 3 41.
Front passenger seat belt reminder k
3 42.
Airbag and belt tensioners v illuminates red.
When the ignition is switched on, v
flashes briefly. If it does not flash,
stays lit or flashes during driving,
there is a fault in the airbag system.
Seek the assistance of a workshop.
The airbags and belt pretensioners
may fail to trigger in the event of an
accident.
Deployment of the belt pretensioners
or airbags is indicated by continuous
illumination of v.9
Warning
Have the cause of the fault
remedied immediately by a
workshop.
Belt pretensioners, airbag system
3 41, 3 44.
Charging system
p illuminates red.
Illuminates when the ignition is
switched on and extinguishes shortly
after the engine starts. If it does not
illuminate, seek the assistance of a
workshop.
Illuminates when the engine is running
Stop vehicle and switch off engine.
Battery is not charging. Engine
cooling may be interrupted. The
brake servo unit may cease to be
effective.
Page 165 of 223
Vehicle care163
5. Engage bulb retaining spring andreplace headlamp cap.
6. Reinstall headlamp assembly.
Front turn signal
1. Remove headlamp assembly 3 161.
2. Rotate bulb holder anticlockwise and withdraw bulb holder from
lamp assembly.
3. Press and rotate bulb anticlockwise to remove it from
bulb holder.
4. Insert new bulb into bulb holder by
pressing and rotating it clockwise.
5. Reinstall bulb holder in lamp assembly by rotating it clockwise.
6. Reinstall headlamp assembly.
Sidelights
1. Remove headlamp assembly 3 161.
2. Remove headlamp cap and withdraw bulb holder (located
next to high beam bulb) from lamp
assembly.
3. Remove bulb from bulb holder by pulling it straight out.
4. Insert new bulb, using a lint-free cloth to hold bulb.
5. Reinstall bulb holder in lampassembly and replace headlamp
cap.
6. Reinstall headlamp assembly.
Xenon headlights
Xenon headlights B can be identified
from Halogen headlights A by the
different lens layout.
Page 166 of 223
164Vehicle care
Low and high beam9Danger
Xenon headlights work under
extremely high electrical voltage.
Do not touch. Have bulbs replaced by a workshop.
Front turn signal
1. Remove headlamp assembly 3 161.
2. Rotate bulb holder anticlockwise and withdraw bulb holder from
lamp assembly.
3. Press and rotate bulb anticlockwise to remove it from
bulb holder.
4. Insert new bulb into bulb holder by
pressing and rotating it clockwise.
5. Reinstall bulb holder in lamp assembly by rotating it clockwise.
6. Reinstall headlamp assembly.
Sidelights
1. Remove headlamp assembly 3 161.
2. Rotate bulb holder anticlockwise and withdraw bulb holder from
lamp assembly.
3. Remove bulb from bulb holder by pulling it straight out.
4. Insert new bulb, using a lint-free cloth to hold bulb.
5. Reinstall bulb holder in lamp assembly by rotating it clockwise.
6. Reinstall headlamp assembly.
Fog lights
Page 167 of 223

Vehicle care165
1. Remove 2 screws from panel onunderside of vehicle below front
fog lights and remove panel.
2. Disconnect harness connector from bulb holder and rotate bulb
holder anticlockwise.
3. Remove bulb holder from lamp assembly, rotate bulb
anticlockwise and remove from
bulb holder.
4. Insert new bulb into bulb holder and rotate it clockwise.
5. Reinstall bulb holder in lamp assembly and reconnect harnessconnector.
6. Reinstall panel to underside of vehicle using 2 screws removed
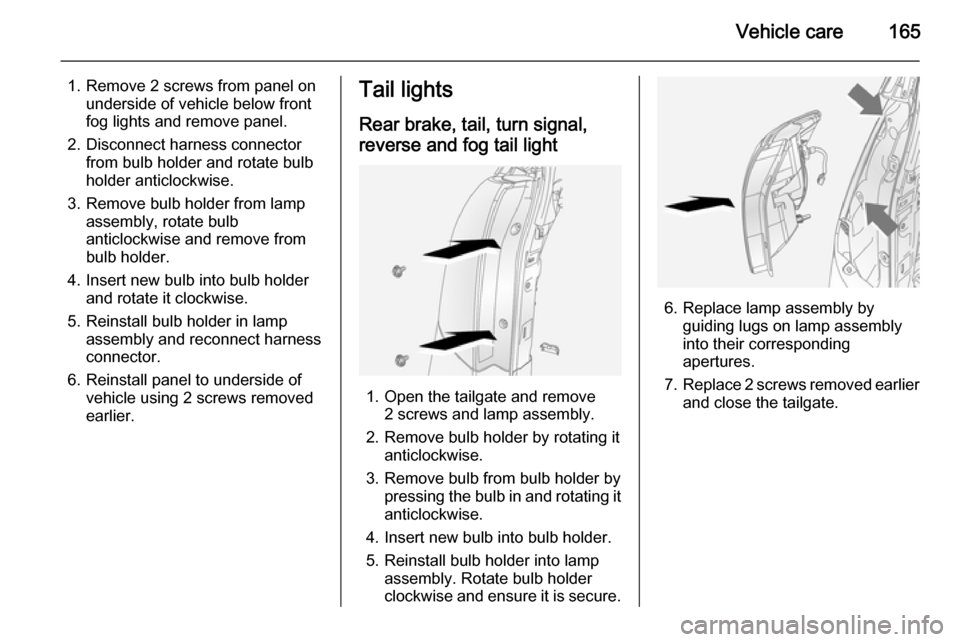
earlier.Tail lights
Rear brake, tail, turn signal,
reverse and fog tail light
1. Open the tailgate and remove 2 screws and lamp assembly.
2. Remove bulb holder by rotating it anticlockwise.
3. Remove bulb from bulb holder by pressing the bulb in and rotating it
anticlockwise.
4. Insert new bulb into bulb holder.
5. Reinstall bulb holder into lamp assembly. Rotate bulb holder
clockwise and ensure it is secure.
6. Replace lamp assembly by guiding lugs on lamp assembly
into their corresponding
apertures.
7. Replace 2 screws removed earlier
and close the tailgate.
Page 168 of 223
166Vehicle careSide turn signal lights
1. Using a suitable screwdriver, prylamp assembly away from wing.
2. Rotate bulb holder anticlockwise.
3. Remove bulb from lamp assembly
by pulling bulb straight out of bulb holder.
4. Insert new bulb into bulb holder by
pressing it in and rotating the bulb holder clockwise.
5. Push lamp assembly back into aperture.
Centre high-mounted
brake light Have bulbs replaced by a workshop.
Number plate light
1. Remove 4 screws (arrowed) and remove lamp covers.
2. Remove bulb holder from lamp assembly by rotating it
anticlockwise.
3. Pull bulb straight out of bulb holder.
4. Insert new bulb.
5. Reinstall bulb holder into lamp assembly, rotate bulb holder
clockwise and ensure it is secure.
6. Replace lamp covers using the 4 screws removed earlier.
Interior lights
Front reading lights
1. Using a suitable screwdriver, pry lamp lens away from roof lining.
2. Remove bulb.
3. Insert new bulb.
4. Reinstall lamp lens in roof lining.