Page 580 of 728

580 4-3. Do-it-yourself maintenance
LC200_OM_OM60L83U_(U)
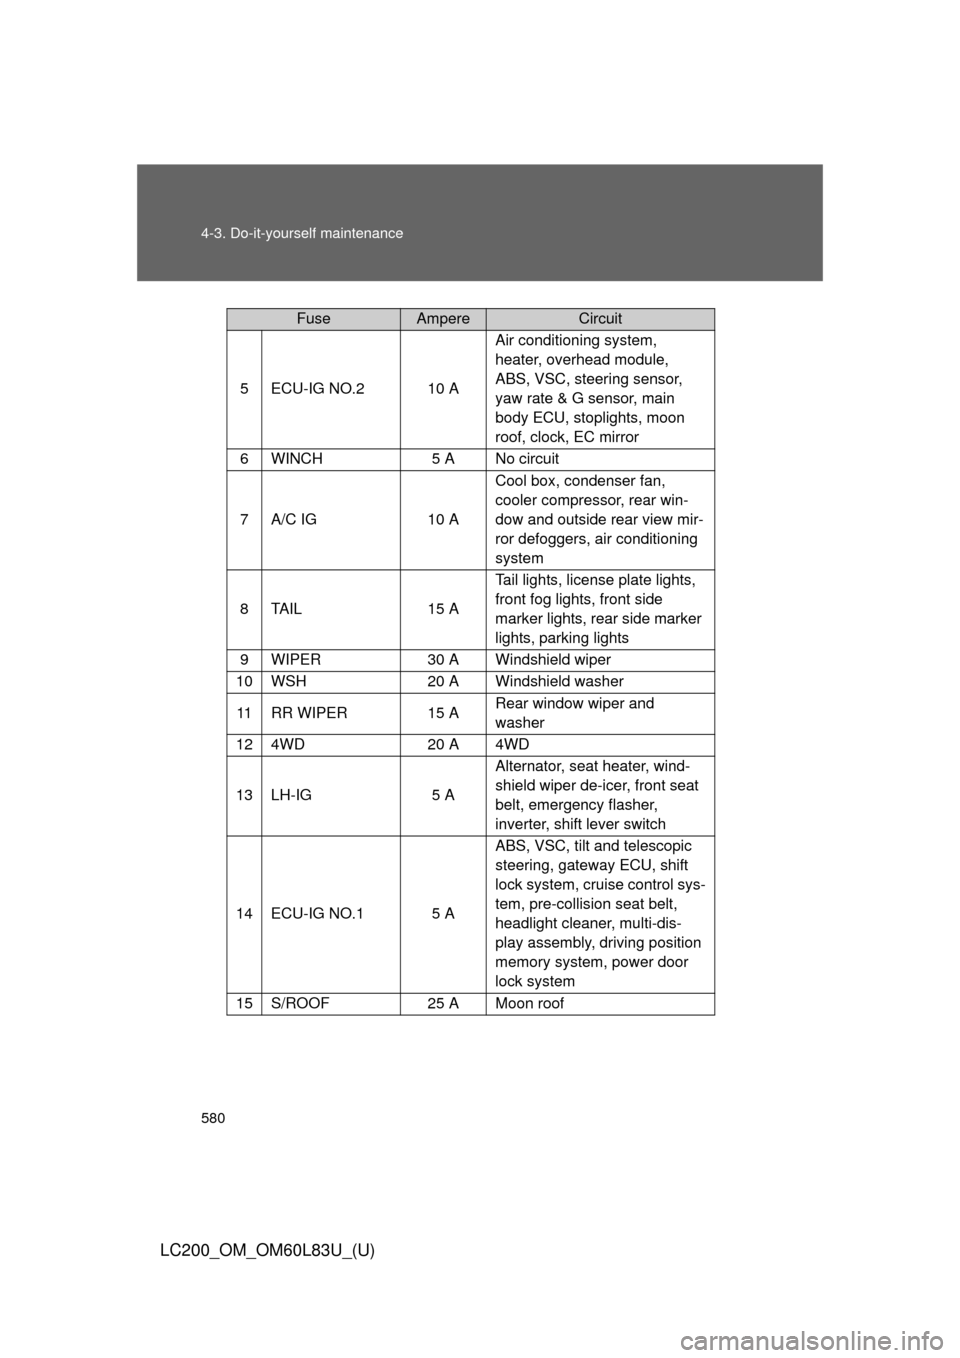
5ECU-IG NO.210 AAir conditioning system,
heater, overhead module,
ABS, VSC, steering sensor,
yaw rate & G sensor, main
body ECU, stoplights, moon
roof, clock, EC mirror
6WINCH5 A No circuit
7A/C IG10 A
Cool box, condenser fan,
cooler compressor, rear win-
dow and outside rear view mir-
ror defoggers, air conditioning
system
8TA I L15 A
Tail lights, license plate lights,
front fog lights, front side
marker lights, rear side marker
lights, parking lights
9WIPER30 A Windshield wiper
10WSH20 A Windshield washer
11RR WIPER15 A
Rear window wiper and
washer
124WD20 A 4WD
13LH-IG5 AAlternator, seat heater, wind-
shield wiper de-icer, front seat
belt, emergency flasher,
inverter, shift lever switch
14ECU-IG NO.15 AABS, VSC, tilt and telescopic
steering, gateway ECU, shift
lock system, cruise control sys-
tem, pre-collision seat belt,
headlight cleaner, multi-dis-
play assembly, driving position
memory system, power door
lock system
15S/ROOF25 A Moon roof
FuseAmpereCircuit
Page 581 of 728
581
4-3. Do-it-yourself maintenance
4
Maintenance and care
LC200_OM_OM60L83U_(U)
16RR DOOR RH20 A Power windows
17MIR15 A
Mirror ECU, outside rear view
mirror defoggers
18RR DOOR LH20 A Power windows
19FR DOOR LH20 A Power windows
20FR DOOR RH20 A Power windows
21RR FOG7.5 A No circuit
22A/C7.5 A Air conditioning system
23AM15 A No circuit
24TI & TE15 A Tilt and telescopic steering
25FR P/SEAT RH30 A Power seat
26PWR OUTLET15 A Power outlet
27OBD7.5 A On-Board diagnosis
28PSB30 A Pre-collision seat belt
29DR/LCK25 A Main body ECU
30FR P/SEAT LH30 A Power seat
31INVERTER15 A Inverter
FuseAmpereCircuit
Page 582 of 728
582 4-3. Do-it-yourself maintenance
LC200_OM_OM60L83U_(U)■
Passenger’s side instrument panel
FuseAmpereCircuit
1RSF LH30 A No circuit
2B/DR CLSR RH30 A No circuit
3B/DR CLSR LH30 A No circuit
4RSF RH30 A No circuit
5DOOR DL15 A No circuit
6AHC-B20 A No circuit
7TEL5 A Multimedia
8TOW BK/UP7.5 A Towing
9AHC-B NO.210 A No circuit
10ECU-IG NO.45 A Tire pressure warning system
11SEAT-A/C FAN10 A Ventilators
12SEAT-HTR20 A Seat heater
13AFS5 A No circuit
14ECU-IG NO.35 A Cruise control system
15STRG HTR10 A Heated steering system
16TV10 A Multi-display assembly
Page 589 of 728
589
4-3. Do-it-yourself maintenance
4
Maintenance and care
LC200_OM_OM60L83U_(U)
Replace the light bulb, and install
the bulb base.
Align the 3 tabs on the light bulb
with the mounting, and insert.
Turn and secure the bulb base.
Shake the bulb base gently to
check that it is not loose, turn the
headlights on once and visually
confirm that no light is leaking
through the mounting.
STEP3
STEP4
Page 591 of 728
591
4-3. Do-it-yourself maintenance
4
Maintenance and care
LC200_OM_OM60L83U_(U)
Replace the light bulb.
Align the 3 tabs on the light bulb
with the mounting, and insert.
Turn and secure the light bulb.
Install the bulb base.
Shake the bulb base gently to
check that it is not loose, turn the
fog lights on once and visually
confirm that no light is leaking
through the mounting.
When installing the fender liner, conduct in reverse.
STEP4
STEP5
STEP6
STEP7STEP1
Page 592 of 728
592 4-3. Do-it-yourself maintenance
LC200_OM_OM60L83U_(U)■
Front turn signal light
For the left side only: Remove
the securing bolt and move the
washer fluid filler opening.
Turn the bulb base counterclock-
wise.
Remove the light bulb.
When installing, reverse the steps listed.
ITY43C012
STEP1
STEP2
STEP3
STEP4
Page 593 of 728
593
4-3. Do-it-yourself maintenance
4
Maintenance and care
LC200_OM_OM60L83U_(U)
■
Front side marker light
For the left side only: Remove
the securing bolt and move the
washer fluid filler opening.
Turn the bulb base counterclock-
wise.
Remove the light bulb.
When installing, reverse the steps listed.
ITY43C012
STEP1
ITY43C050
STEP2
ITY43C051
STEP3
STEP4
Page 600 of 728

600 4-3. Do-it-yourself maintenance
LC200_OM_OM60L83U_(U)
CAUTION
■Replacing light bulbs
●Turn off the headlights. Do not attempt to replace the bulb immediately
after turning off the headlights.
The bulbs become very hot and may cause burns.
● Do not touch the glass portion of the light bulb with bare hands. When i\
t is
unavoidable to hold the glass portion, use and hold with a clean dry cloth
to avoid getting moisture and oils on the bulb.
Also, if the bulb is scratched or dropped, it may blow out or crack.
● Fully install light bulbs and any parts used to secure them. Failing to do so
may result in heat damage, fire, or water entering the headlight unit. This
may damage the headlights or cause condensation to build up on the lens.
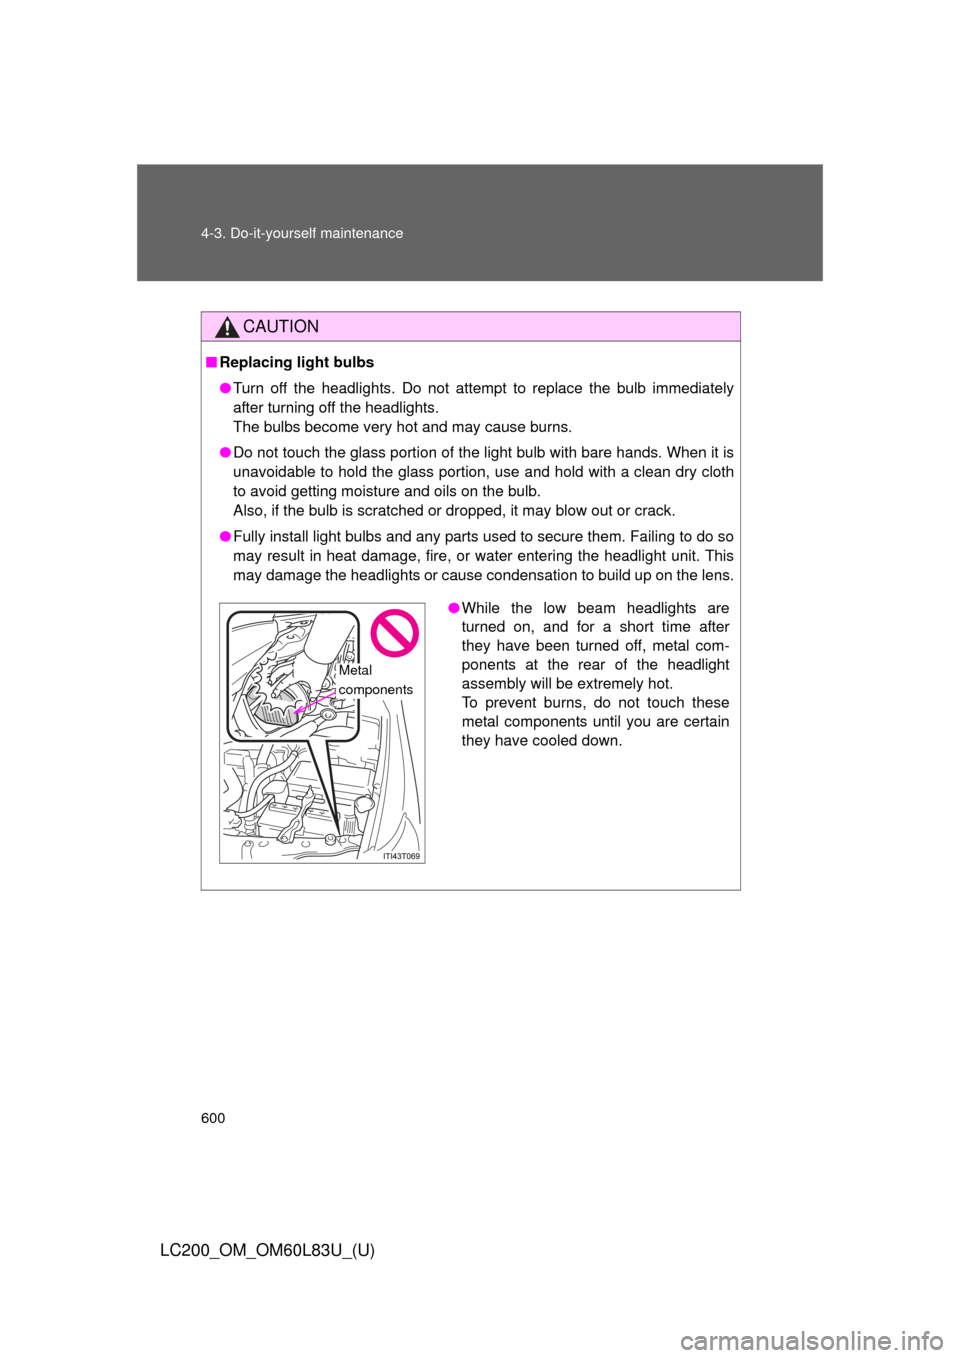
●While the low beam headlights are
turned on, and for a short time after
they have been turned off, metal com-
ponents at the rear of the headlight
assembly will be extremely hot.
To prevent burns, do not touch these
metal components until you are certain
they have cooled down.
Metal
components